


3 Unit installation
Installation manual
8
EGSAH/X06+10DA9W(G)
Daikin Altherma 3 GEO
4P569811-1 – 2019.02
X22Y
X11YB
X803YA
X1YA
7
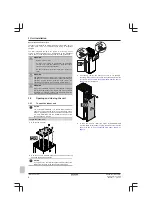
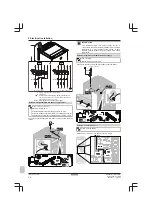
Remove the upper hydro module cover. You can lift up the
uncoupled piping to access the screws more easily, and to take
off the cover itself.
5×
T25
8
Remove the screw that fixes the hydro module to the bottom
plate.
1×
T25
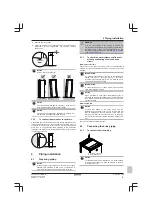
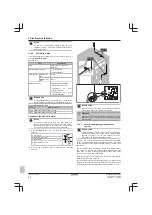
9
Lift up the uncoupled piping and use the handle on the front of
the module to carefully slide the module out of the unit. Make
sure the module remains level and does not tilt forward.
CAUTION
The hydro module is heavy. It requires at least two persons
to carry it.
NOTICE
Make sure not to damage any insulation during the
removal process.
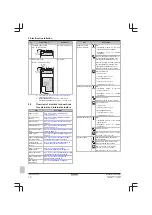
Removal after first installation
If the water and brine circuits have been filled before, the procedure
for removing the hydro module involves steps in addition to those
described above:
1
Close the shut-off valves by turning the lever handles before
uncoupling the piping.
4×
2
Before sliding out the module, drain remaining water and brine
from the hydro module. Open the water and brine air purge
valves at the top of the module to speed up the draining
process.
d
c
a
b
a
Water drain valve
b
Brine drain valve
c
Brine air purge valve
d
Water air purge valve
3.2.3
To close the indoor unit
1
If applicable, reinstall the left side panel.
2
If applicable, reinsert the hydro module.
3
If applicable, close the cover of the main switch box and
reinstall the front panel.
4
Close the cover of the installer switch box.
5
Reconnect the cables to the user interface panel.
6
Reinstall the user interface panel.
7
Reinstall the top panel.
NOTICE
When closing the indoor unit cover, make sure that the
tightening torque does NOT exceed 4.1 N•m.
3.3
Mounting the indoor unit
3.3.1
To install the indoor unit
1
Lift the indoor unit from the pallet and place it on the floor. See
"2.1.2 To handle the indoor unit" on page 5
.
2
Connect the drain hose to the drain. See
Summary of Contents for Altherma 3 GEO
Page 38: ......
Page 39: ......
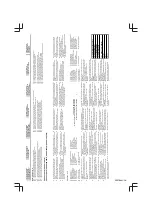
Page 40: ...4P569811 1 2019 02 Copyright 2019 Daikin 4P569811 1 0000000S ...


