background image

13

Installation

12

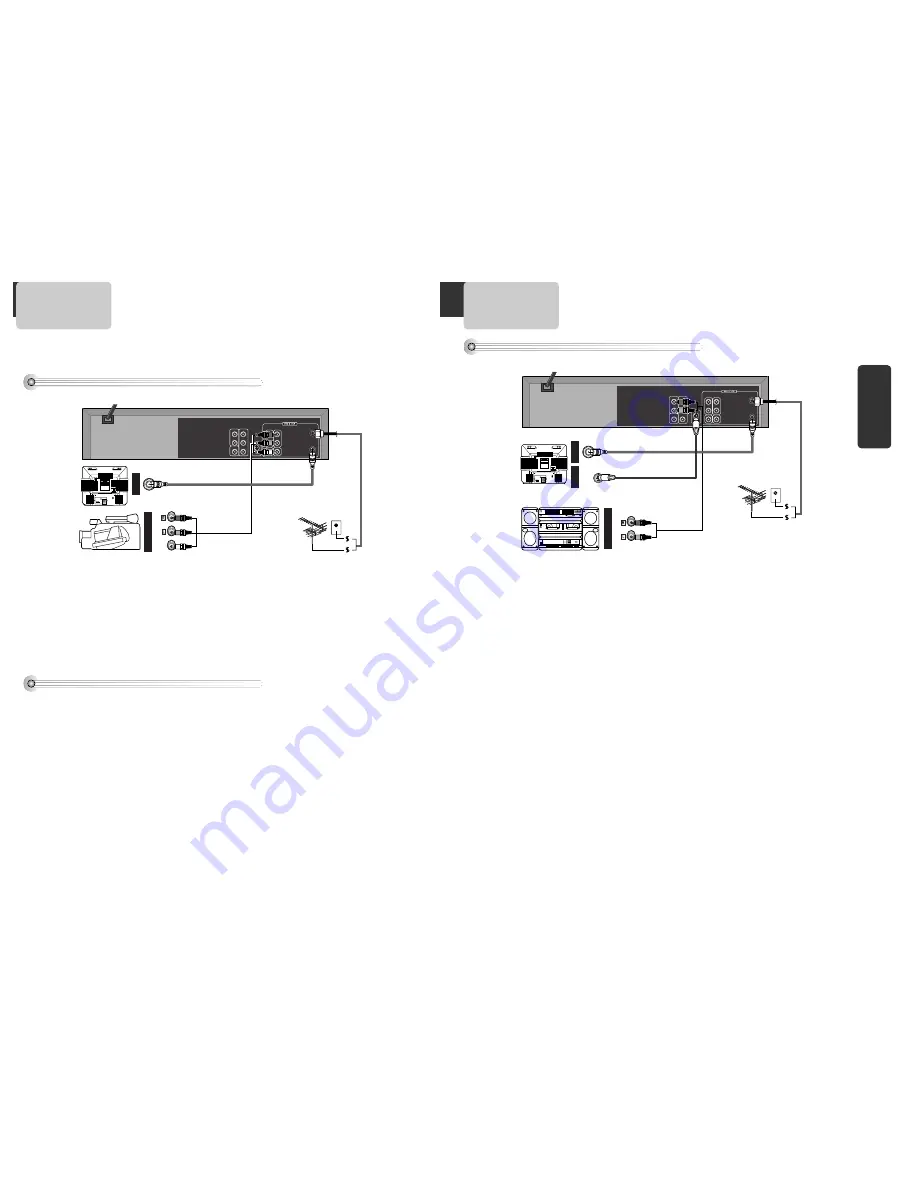
Connecting with Other Video Equipment

How to Connect

 AUDIO

VIDEO

ANT INPUT

A/V OUTPUT

CAUTION

CAUTION: TO REDUCE THE RISK OF ELECTRIC SHOCK.

DO NOT REMOVE COVER (OR BACK).

NO USER SERVICEABLE PARTS INSIDE.

REFER SERVICING TO QUALIFIED SERVICE PRESONNEL.

RISK OF ELECTRIC SHOCK

DO NOT OPEN

20

18

16

14

12

10

8

6

4

3

21

19

17

15

13

11

9

7

5

3

1

R

ANT.IN

RF OUT

L

OUT

IN

AUDIO

VIDEO

R

COAXIAL

S-VIDEO OUT

L

Y

Pr

Pb

DIGITAL AUDIO OUT

COMPONENT OUT

AUDIO OUT

How to Copy(Edit) Tape with Other Video Equipment

1

1

Connect 

Audio/Video Out

jack in other video equipment to 

Audio/Video In

jack in rear panel (or front

panel) of DVD-Video with connecting cable. 

2

2

Connect “

ANT. IN

” jack in TV to “

RF.OUT

” jack in DVD-Video with RF cable. 

3

3

To record contents of other video equipment with DVD-Video, insert recording tape attached recording tab
in DVD-Video. 

1

1

Turn on DVD-Video. 

2

2

Press [OUTPUT] button of remote control and adjust DVD-Video to display “External Input 1” or  “External
Input 2” in TV screen. 

3

3

Press [PLAY] button in other video equipment. 

4

4

Press [REC] button in DVD-Video if you want to record contents of other video equipment. 

5

5

Press [Pause] button in DVD-Video when unnecessary or undesired scene is displayed in recording. 

(Caution) Recording is released automatically after 5 minutes since pressing [PAUSE] button.

Press [REC] button if you want to record again. 

Playback VCR,

Camcorder,

Satellite

Receiver ...

.

.

.

.

.

.

RF Cable

AUDIO/VIDEO Cable

You can connect a wide variety of audio/video equipment to your DVD-Video, including : an additional VCR,
Laser Disc Player, DVD Player, Camcorder, Satellite Receiver, Video Game. Since all of these devices use
essentially the same connections, they will be described together.

How to Connect

Connecting with an Analog Audio

 AUDIO

ANT INPUT

AUDIO INPUT

CAUTION

CAUTION: TO REDUCE THE RISK OF ELECTRIC SHOCK.

DO NOT REMOVE COVER (OR BACK).

NO USER SERVICEABLE PARTS INSIDE.

REFER SERVICING TO QUALIFIED SERVICE PRESONNEL.

RISK OF ELECTRIC SHOCK

DO NOT OPEN

20

18

16

14

12

10

8

6

4

3

21

19

17

15

13

11

9

7

5

3

1

S-VIDEO

S-VIDEO INPUT

R

ANT.IN

RF OUT

L

OUT

IN

AUDIO

VIDEO

R

COAXIAL

S-VIDEO OUT

L

Y

Pr

Pb

DIGITAL AUDIO OUT

COMPONENT OUT

AUDIO OUT

1

1

Connect Audio jack. Connect 

AUDIO OUT

in rear panel of DVD-Video to 

In 

jack of stereo sound unit. 

2

2

For Input Select in stereo unit, Select “External Input” connected with DVD-Video. 

3

3

Playback DVD disc or Hi-Fi videotape, you can hear sound in speaker of stereo unit.

Summary of Contents for DV6T512N

Page 1: ...ion code it does not operate Please only use a disc with region code 1 or ALL is a Prohibition mark If this mark is displayed in operating the product please wait for a while then use it If Prohibitio...

Page 2: ...ailed or defeated Avoid direct exposure to beam CAUTION Do not open the top cover There are no user serviceable parts inside the Unit leave all servicing to qualified service personnel CLASS 1 LASER P...

Page 3: ...entry as practical 13 Outdoor Antenna Grounding If an outside antenna or cable system is connected to the product be sure the antenna or cable system is grounded so as to provide some protection again...

Page 4: ...described below Please read carefully before using a DVD Video player Installation place and handling When you place this player near other devices they may affect poorly together When you place DVD V...

Page 5: ...ment 12 Connecting with an Analog Audio 13 Connecting with a dolby digital decoder or DTS decoder 14 Output Select 15 Clock Set 15 DVD Playback 16 VCR Playback 17 VCR Operation Memorizing TV Channels...

Page 6: ...move into a previous chapter or track REVERSE SEARCH button 1 VCR TIMER RECORDING button 2 DVD VCR CLOCK COUNTER button 3 DVD VCR TV VCR button 4 VCR Record button 5 DVD VCR NUMBER button VCR TRACKIN...

Page 7: ...cable Plug this cable into a splitter available at your local electronics store You should install a distributor additionally How to watch general broadcasting with recording CATV 1 1 Set Channel Sel...

Page 8: ...deo equipment 5 5 Press Pause button in DVD Video when unnecessary or undesired scene is displayed in recording Caution Recording is released automatically after 5 minutes since pressing PAUSE button...

Page 9: ...S LANGUAGE SELECT Move Select End SETUP ENTER CLOCK SET Time and Date Set Auto DST ON TIME AND DATE SET TIME AND DATE SET Move Select End SETUP ENTER Move Input End SETUP Move Input End SETUP Time hh...

Page 10: ...he operational status is flickering or poor adjust it with TRACKING button 1 1 2 2 3 3 To stop it press button For pause press PLAY PAUSE button in playback mode If you press this button once more it...

Page 11: ...emorized channels is displayed Please check the memorized channels To check the memorized channels press PR button on remote control 1 1 2 2 3 3 To Memorize Automatically Channels SETUP CLOCK SET TIME...

Page 12: ...hat is protected by method claims of certain U S patents and other intellectual property rights owned by Macrovision Corporation and other rights owners Use of this copyright protection technology mus...

Page 13: ...mer Program Setting Press T REC button You can set the Timer Program Before timer program setting clock should be set correctly and video mode should be selected Timer Recordings TIMER RECORDINGS Pres...

Page 14: ...lists the recording time hours minutes for each tape type according to recording speed Tape Type SP Mode Standard Play SLP Mode Extended Play T 60 1 00 3 00 T 90 1 30 4 30 T 120 2 00 6 00 T 160 2 40...

Page 15: ...rst index mark on the tape when you start at the beginning of the tape Searching with the tape counter go to search Using advanced features Using advanced features Play the tape automatically This fea...

Page 16: ...Consult a television guide for program broadcast information 28 Changing the on screen menu language Press SETUP button and select LANGUAGE SELECT 1 1 Select the language among English Spanish or Fren...

Page 17: ...k or first scene of current chapter or track Directly moving to a desired title DVD Press the TITLE PBC or MENU button A list of the titles on the disc is displayed For the case of VCD disc menu scree...

Page 18: ...R OFF VCD 00 45 1 2 T Playing a desired scene Confirming the current MP3 disc mode Display screen appears automatically in Playback mode It shows the MP3 File information in disc the directory MP3 Fil...

Page 19: ...the user presses AUDIO button English ENG French FRE Spanish SPA and others appear one by one Selecting a subtitle language Keep pressing SUBTITLE button till the user s preferred language appears If...

Page 20: ...l as CD audio To stop playback Press the STOP button To skip to the next or previous file Press the NEXT button of the remote control briefly while playing to skip ahead to the beginning of the next f...

Page 21: ...of a user s password please move to Change Password and enter new password 7 7 The initial password is 3308 In case you forget newly input password you can use 3308 as a password Video Audio Others OS...

Page 22: ...2 0 S VCD and Audio CD Disc type Playable Restriction DVD Possible Region number 1 or Region number All Video CD Possible Version 1 0 1 1 2 0 SVCD CVD CD Possible PCM CD G Possible Only Audio playback...

Page 23: ...t appear or poor screen appears Sound is irregular Remote control does not work Dolby Digital sound does not work AUDIO or SUBTITLE button does not work ANGLE button does not work while a DVD is playi...

Page 24: ...pe the tape is re ejected A videotape is not ejected A channel on video and a play screen does not appear Noise screen noise appears on screen Noise appears on screen after recording While in playing...

Page 25: ...Vp p Pr 0 7Vp p AUDIO output common use of DVD and VCR Audio output terminal 2 kinds 8 8dBm VCR 2 0Vrms DVD RCA JACK AUDIO output DVD only Analogue AUDIO output 2 CH 2 0Vrms Digital audio output COAXI...

Reviews: