background image

DSA-6100 User Guide 

20   


y


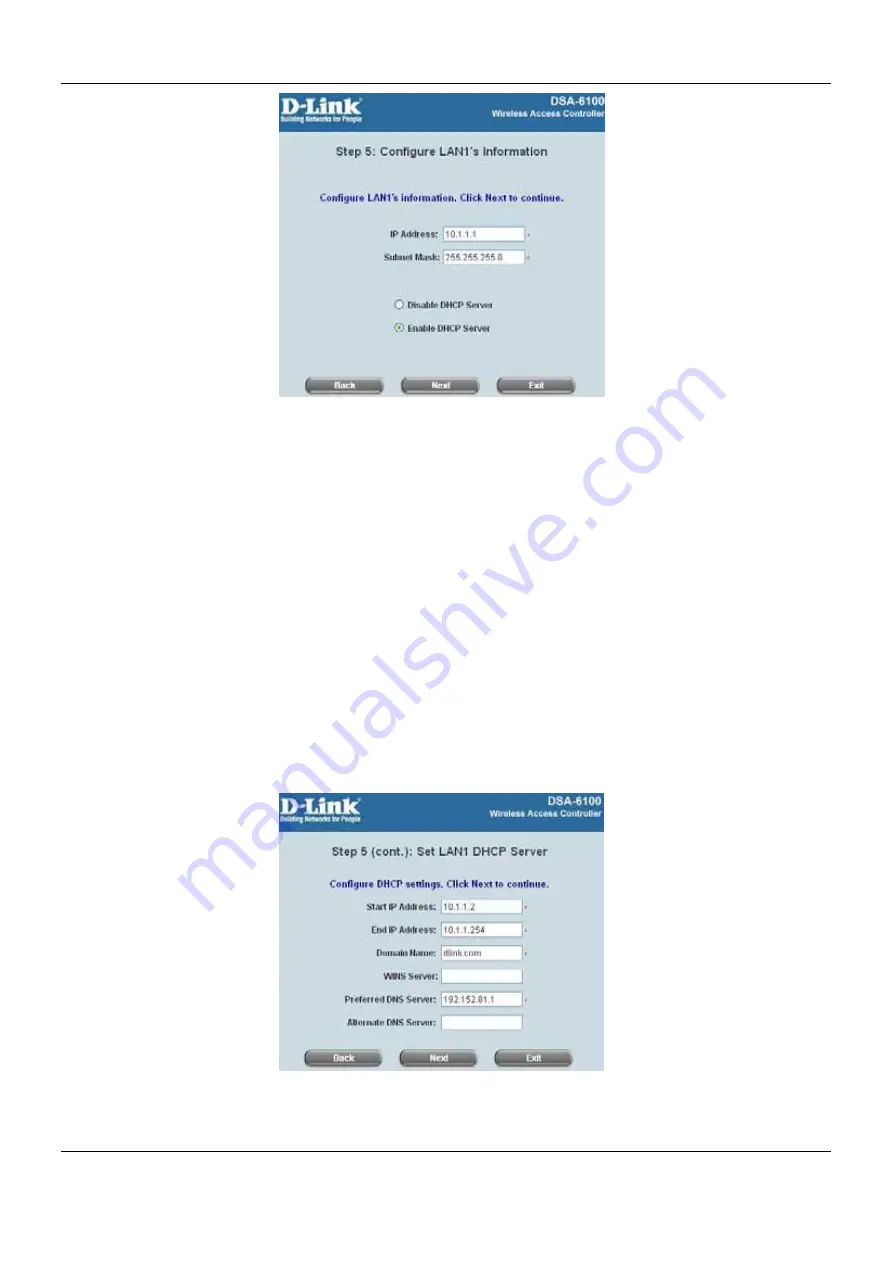
Step 5 (cont.): Set LAN1 DHCP Server   

If the 

Enable DHCP Server

 option is selected, more information about the LAN1 DHCP server will be needed. 

Fields marked with red asterisks must be filled in. 

Start IP Address:

 The start IP address of the DHCP scope of LAN1. 

End IP Address:

 The end IP address of the DHCP scope of LAN1. 

These IP address will be assigned to the LAN1 clients. 

(Note: Be sure that IP address assigned in this 

range is NOT used in other setting of DSA-6100.) 

Domain Name:

 Enter a domain name provided by your ISP (e.g. dlink.com). 

WINS Server:

 Enter the IP address of the WINS server.(Windows Internet Naming Service Server) This field 

is optional. 

Preferred DNS Server:

 The DNS Server settings are provided by your ISP. Only the Preferred DNS Server 

field is mandatory. Contact your ISP if you are unsure of the DNS Server settings. 

Alternate DNS Server:

 The DNS Server settings are provided by your ISP. The field is optional. Click 

Next

 to 

continue. 


Summary of Contents for DSA-6100

Page 1: ...DSA 6100 User Guide Version DSA 6100 2 10 July 2009 ...

Page 2: ......

Page 3: ...ademarks of D Link Corporation All other brand and product names are registered trademarks or trademarks of their respective holders Statement of Conditions In the interest of improving internal design operational function and or reliability D Link Corporation reserves the right to make any changes to products described in this document without notice D Link Corporation shall be indemnified agains...

Page 4: ......

Page 5: ...onfiguration Wizard Also served as Quick Installation Guide 15 4 1 2 System Information 26 4 1 3 WAN1 Configuration 27 4 1 4 WAN2 Failover 30 4 1 5 LAN1 Configuration 31 4 1 6 LAN2 Configuration 35 4 2 Network Configuration 36 4 2 1 Network Address Translation 37 4 2 2 Privilege List 40 4 2 3 Monitor IP List 43 4 2 4 Walled Garden List 45 4 2 5 Proxy Server Properties 46 4 2 6 Dynamic DNS 47 4 2 7...

Page 6: ...5 Status 134 4 5 1 System Status 135 4 5 2 Interface Status 137 4 5 3 Current Users 139 4 5 4 Traffic History 140 4 5 5 Notification Configuration 145 4 5 6 Online Report 147 4 6 Tool 149 4 6 1 Change Password 150 4 6 2 Backup Restore Setting 154 4 6 3 Firmware Upgrade 155 4 6 4 Ping Utility 156 4 6 5 Restart 157 4 7 Help 158 Appendix A External Network Access 159 Appendix B Console Interface Conf...

Page 7: ...ns used in this manual For cautionary statements or warning requiring special attention by readers a text box with italic font will be used Warning For security purposes you should immediately change the administrator s password When any of the button symbol shown below is selected the following action will be executed accordingly Return to the homepage of this section Return to the previous page ...

Page 8: ...e or in other specified external authentication databases The process of authenticating the user s identity is executed via the SSL encrypted webpage The use of web interface ensures the system is compatible to most desktop systems and palm computers When a user authentication is requested the DSA 6100 server software checks the authentication database at the rear end to confirm the user s access ...

Page 9: ...er such as the Internet Explorer must be opened and a connection to any website must be performed When the browser attempts to connect to a website the DSA 6100 will force the browser to redirect to the user login webpage The user must enter the username and password for authentication After the identity is authenticated successfully the user will be granted proper access right as defined in the D...

Page 10: ...4 Another setup example is shown in the following diagram where the administrator is able to increase the uplink bandwidth capacity beyond the capacity of any single WAN port This is done by the DSA 6100 s Bonding feature ...

Page 11: ...or Internet access where an external connection can be established for sharing accounting authentication and users management This solution can be applied for environments such as hotels campus hot spots and others An example of the network topology is as follows ...

Page 12: ... DSA 6100 is able to use a Local Database or authentication servers NT Domain POP3 LDAP and Radius to authenticate users This type of solution is suitable for environments such as hotels campus hot spots enterprises and others ...

Page 13: ...tion in menu Arrow Up Navigate upward to select required function in menu Arrow Down Navigate downward to select required function in menu 3 LED Power ON indicates that power is on and OFF indicates that power is off Status OFF indicates BIOS is running BLINKING indicates the OS is running and ON indicates system is ready Hard Disk Reserved for future usage Port Speed Upper left indicator OFF indi...

Page 14: ...Password you can connect a PC to this port as a Console Serial Port via a terminal connection program the terminal s configuration must be 9600bps 8 N 1 flow control none to change the Administrator s Password 7 LAN1 LAN2 Ports The two LAN ports can be independently configured and set to disallow users to access Internet before authentication Administrators can therefore choose to force authentica...

Page 15: ...andard package of the DSA 6100 includes y DSA 6100 x 1 y Console Cable x 1 y Crossover Ethernet Cable x 1 y Straight through Ethernet Cable x 1 y Power Cord x 1 y CD ROM x 1 y Quick Installation Guide x 1 y Screw Set x 1 y Rack Mount Bracket x 1 3 3 System Requirement y Standard 10 100BaseT including network cables with RJ 45 connectors y All PCs need to install the TCP IP network protocol ...

Page 16: ... Ethernet cable to LAN2 Port with the user authentication function disabled on the front panel The LAN2 port without authentication function is referred to as Private LAN and the administrator can enter the administrative user interface to perform configurations via Private LAN Connect the other end of the Ethernet cable to a client s PC The LED of this LAN2 should light up to indicate a proper co...

Page 17: ...ategories System Configuration Network Configuration AP Management User Authentication Status and Tool OPTION FUNCTION Configuration Wizard System Information WAN1 Configuration WAN2 Failover LAN1 Configuration System Configuration LAN 2 Configuration Network Address Translation Privilege List Monitor IP List Walled Garden List Proxy Server Properties Dynamic DNS Network Configuration IP Mobility ...

Page 18: ...tallation the administrator can configure the DSA 6100 via web browsers with JavaScript enabled such as Internet Explorer version 6 0 After the basic installation has been completed according to the instructions of the previous chapter the DSA 6100 can further be configured with the following steps 1 Use the network cable of the 10 100BaseT to connect a PC to the Private LAN LAN2 and then start a ...

Page 19: ...static IP in TCP IP setting set a static IP address such as 192 168 1 x for your network interface and then open a new browser again 2 After successfully logging into the DSA 6100 the Administration System page of the web management interface will appear To log out of the system when completed select the Logout icon on the upper right corner of the interface to return to the Administrator Login Pa...

Page 20: ... Guide 14 4 1 System Configuration This section relates to system configuration and provides the information on the following functions Configuration Wizard System Information WAN Configuration and LAN Configuration ...

Page 21: ...llation Guide The 7 steps are listed below 1 Change the Admin Password 2 Choose the System s Time Zone 3 Set the System Information 4 Select the Connection Type for WAN1 Port 5 Configure LAN1 6 Select Authentication Method 7 Restart Click System Configuration to go to the System Configuration page Click the System Configuration from the left menu and the System Configuration page will appear Next ...

Page 22: ...oper time zone via the pull down menu Click Next to continue y Step 3 Set System Information Home Page Enter the URL to where the clients should be directed when they are properly authenticated NTP Server Enter the URL of the external time server for the DSA 6100 time synchronization or use the default DNS Server Enter a DNS Server provided by the ISP Internet Service Provider Contact the ISP if t...

Page 23: ...PPPoE Client Select a proper Internet connection type and click Next to continue Dynamic IP Address If this option is selected an appropriate IP address and related information will be assigned automatically Click Next to continue Static IP Address Set WAN1 Port s Static IP Address Enter the IP Address Subnet Mask and Default Gateway provided by the ISP Click Next to continue ...

Page 24: ...DSA 6100 User Guide 18 PPPoE Client Set PPPoE Client s Information Enter the Username and Password provided by the ISP Click Next to continue ...

Page 25: ... Subnet Mask Enter the Public port Subnet Mask or use the default Disable DHCP Server If the DHCP server is disabled the Public LAN clients must be configured with an IP address manually Enable DHCP Server When the option is selected the DSA 6100 will automatically provide the necessary IP address to all Public LAN clients Click Next to continue ...

Page 26: ...AN1 clients Note Be sure that IP address assigned in this range is NOT used in other setting of DSA 6100 Domain Name Enter a domain name provided by your ISP e g dlink com WINS Server Enter the IP address of the WINS server Windows Internet Naming Service Server This field is optional Preferred DNS Server The DNS Server settings are provided by your ISP Only the Preferred DNS Server field is manda...

Page 27: ...has to be selected from one of the five options appeared in this window Local User is selected for this setup example Click Next to continue Local User Add User A new user can be added to the local user data base To add a user enter the Username e g test Password e g test MAC optional and assign it a policy or use the default Upon completing a user adding more users can be added to this authentica...

Page 28: ...rovided by the ISP and then choose enable SSL or not Click Next to continue User Authentication Method RADIUS Enter RADIUS server IP Domain Name authentication port accounting port and secret key then choose whether to enable accounting service Next choose the desired authentication method Click Next to continue ...

Page 29: ...ver Port and Base DN and select one kind of Binding Type and Account Attribute to access the LDAP server If the User Account binding type is selected the system will use the Base DN to be the user account to access the LDAP server If Anonymous binding type is selected the system will access the LDAP servers without requiring authentication ...

Page 30: ...s the LDAP server If Windows AD binding type is selected please enter the domain name of Windows AD to access the LDAP server Click Next to continue User Authentication Method NT Domain When NT Domain User is selected enter the information for Server IP Address and enable disable Transparent Login After this setup is completed click Next to continue ...

Page 31: ...arting now Please wait for a moment message will appear on the screen Please do not interrupt the DSA 6100 until the Configuration Wizard has disappeared This indicates that the restart process has been completed Back and Exit During every step of the wizard if you wish to go back to modify the settings please click the Back button to go back to the previous step Click Exit to leave the Wizard ...

Page 32: ...onnect to the web management interface via the authenticated port For example 10 2 3 0 24 means that as long as an administrator is within the IP address range of 10 2 3 0 24 he or she can reach the administration page of the DSA 6100 If the administrator configures a single IP such as 10 2 3 5 only this IP address can reach the administration page y SNMP Configure IP address and Community ID of e...

Page 33: ...dress and PPPoE Client y Static IP Address Manually specifying the IP address of the WAN1 Port regarding your ISP network information which is applicable for the network environment where IP address cannot be obtained automatically Note The option of Bonding for WAN2 is only available when WAN1 is set to static IP address The fields with red asterisks are required Please fill in these fields ...

Page 34: ...es will be in the same network segment When the WAN1 is set to use a static IP address and Enable Bridge Mode is checked the DSA 6100 will act as a switch and WAN2 LAN1 and LAN2 ports will share the same static IP address from WAN1 The pictures below are the results on the WAN2 and LAN2 when Bridge Mode is enabled on the WAN1 interface y Dynamic IP address Configure WAN port settings automatically...

Page 35: ...t the idle timer before the system is disconnected from the Internet When selecting PPPoE to connect to the network please set the User Name and Password from your ISP to access the network There is a Dial on demand function under PPPoE and if this function is enabled you can set a Maximum Idle Time When the idle time is reached the system will automatically disconnect itself ...

Page 36: ...ted in a specific round robin order Note The option of Bonding is only available when WAN1 is set to Static IP Address Connection Detection WAN Failover Probe Target To verify the connection to the Internet the system keeps up to three target URLs These URLs are used for the system as the detect targets of WAN Failover and Warning of Internet Disconnection At least one URL is required for the syst...

Page 37: ... user authentication under LAN1 port is required y Operation Mode The system supports NAT mode and Route Mode NAT All IP addresses of internal hosts connected to the LAN1 port where the internal hosts belong to the same network as the LAN1 interface will be converted into the IP address of the WAN1 interface by the DSA 6100 and onward to outside the network ROUTER All IP addresses of internal host...

Page 38: ...ate DNS Server Domain Name WINS Server Lease Time and Reserved IP Address List If you want to use the reserved IP address function click on the Reserved IP Address List The setup menu of the Reserved IP Address List will appear as shown in the following picture Enter the related Reserved IP Address the MAC Address of the client and some Description optional When finished click Apply to complete th...

Page 39: ... separated into several virtual LAN interfaces It allows switches to assign end stations to different virtual LANs y Activate VLAN and Edit VLAN List Select the check box to activate the VLAN Thereafter on the VLAN List 32 VLANs can be configured accordingly Select the desired Item and click Edit to configure the VLAN VLAN Interface Configuration for LAN1 ...

Page 40: ...ment y Mode o NAT All IP addresses of hosts on the VLAN interface will be converted into the IP address of the WAN1 interface and onward to outside the network o ROUTER All IP addresses of hosts on the VLAN interface will remain the same while the IP packets travel through WAN1 interface thus making the DSA 6100 act like a router y IP address IP address of each network interface y Subnet Mask Subn...

Page 41: ...loyment requirements Please refer to the previous section LAN1 Configuration for details about the similar configuration of LAN2 port LAN2 These are the basic global configuration options for LAN2 port DHCP Server Configuration DHCP options for LAN2 port include Disable DHCP and Relay VLAN To activate the VLAN interfaces for LAN2 port please check Activate VLAN and Edit VLAN List Thereafter on the...

Page 42: ...ion This section is used to set all the internet settings The section provides information on the following functions Network Address Translation Privilege List Monitor IP List Walled Garden List Proxy Server Properties Dynamic DNS and IP Mobility ...

Page 43: ...ses A computer within a DMZ is unprotected by firewall and typically all port accesses are routed through that computer A router will forward all traffic to the computer specified in the DMZ if it does not otherwise have a rule for how to forward traffic on a given port There are 40 sets of static Internal IP Address and External IP Address available These settings will become effective immediatel...

Page 44: ...Enter the External Service Port Local Server IP Address and Local Server Port accordingly Depending on the different services provided the network service will be able to use the TCP protocol or the UDP protocol In the Enable column check the desired server to enable These settings will become effective immediately after clicking the Apply button Virtual Servers will transfer External port to Loca...

Page 45: ...ss When the user attempts to connect to a destination IP address Port the connection packet will be converted and redirected to the corresponding destination This function allows the administrator to set up to 40 IP addresses for redirection purpose Enter the IP Address and Port of Original Destination and the IP Address and Port of Redirect to According to the different services provided choose t...

Page 46: ...some workstations belonging to the managed server that need to access the network without authentication enter the IP addresses to this list The Remark field is not necessary but is useful to keep track The DSA 6100 allows up to 100 privilege IP addresses These settings will become effective immediately after clicking Apply Warning Permitting specific IP addresses to have network access rights wit...

Page 47: ...twork without authentication can also be set in this list The DSA 6100 allows up to 100 privilege MAC addresses The list can be created by entering data in the table or by import from a file The list can be exported as well Be sure to enter the MAC address the format is xx xx xx xx xx xx as well as the remark optional if manually creating the list is desired and select a policy for the individual ...

Page 48: ...ld be a text file and the format of each line is MAC Policy Remark without the quotes There must be no spaces between the fields and commas The remark field can be omitted but the trailing comma must be retained When adding user accounts by uploading a file the existing accounts in the embedded database will not be replaced by new ones Export List Click Export List to export or create the Mac List...

Page 49: ...f the monitored IP address does not respond the system will send an e mail to notify the administrator that such destination is not reachable After entering the related information click Apply and these settings will become effective immediately Click Monitor to check the current status of all the monitored IP The system provides up to 40 IP addresses for the Monitor IP List ...

Page 50: ...il y Interval The time interval to send the e mail report y SMTP Server The IP address of the SMTP server y Auth Method The system provides four authentication methods Plain Login CRAM MD5 and NTLMv1 or None to use none of the above Depending on which authentication method selected enter the Account Name Password and Domain y Send Test Email Click Send to send out a test e mail of the IP monitorin...

Page 51: ...efore login and authentication Up to 20 addresses or domain names of the websites can be defined in this list Users without the network access right in the list can make use of the actual network service free of charge Please enter IP Address or Domain Name of the website in the list The settings will be effective immediately after clicking Apply The Walled Garden supported by the system provides ...

Page 52: ...led the end users will be forced to treat the DSA 6100 as the proxy server regardless of the end users original proxy settings y External Proxy Server Under the DSA 6100 security management the system will match the External Proxy Server list to the end users proxy setting If a match is not available the end users will not be able to reach the login page and thus unable to access the network If a ...

Page 53: ... regularly to the DNS server if the WAN1 interface is set to Dynamic These settings will become effective immediately after clicking Apply y DDNS Dynamic DNS choose to enable or disable of this function y Provider Select the dynamic DNS service provider y Host name The IP address domain name of the WAN port y Username E mail The register ID username or e mail for the dynamic DNS service provider y...

Page 54: ...ain When Mobil IP is enabled wireless clients roaming from two subnets behind the DSA 6100 with the same SSID will be able to stay connected with the system and disconnection will not occur For example when downloading data transmission will not be interrupted even while clients are roaming y Enable Cross Subnet Login If connecting a router between the LAN ports and the end computer users access p...

Page 55: ...Chapter 4 Web Interface Configuration 49 4 3 AP Management This section includes the following functions AP List AP Discovery Manual Configuration Template Settings Firmware Management and AP Upgrade ...

Page 56: ...r configurations including General Settings LAN Interface Setting Wireless Interface Setting and Access Control Setting y Status Current status of the AP including Configuring Online Offline Upgrading and Lost Unknown 1 Configuring It is displayed as Configuring when the newly discovered AP is being added to the list and being configured or new setting is being applied to the AP 2 Online The hyper...

Page 57: ...Settings interface Revise the AP Name Admin Password SNTP NTP SMTP Syslog and Remark here if desired Firmware information can also be viewed here LAN Interface Settings Click LAN to enter the LAN Settings interface Input the data of LAN including IP Address Subnet Mask and Default Gateway of AP ...

Page 58: ...bled y Internal Station Connection Select either Enabled or Disabled The connection allows clients to communicate with each other when enabled Performance Settings y Data Rate The default is Auto Available range is from 1 to 54Mbps The rate of data transmission should be set depending on the speed of the wireless network Select from a range of transmission speed or keep the default setting Auto to...

Page 59: ...ecting Multi SSID with VLAN Multi SSID settings could configure up to multiple SSID Click Configure button to setup SSID Configuration the information of SSID Broadcast SSID WMM and Security SSID Configuration Page SSID Service Set Identifier Broadcast SSID Select this option to enable the SSID to broadcast in your network When configuring the network it is suggested to enable this function but di...

Page 60: ... a different non overlapping channel User Limit Enter the number of the limit of load balancing users from 0 64 y Link Integrate Enable or disable the feature y Antenna Diversity Choose from Diversity Left Antenna or Right Antenna Radio is connected to each antenna and supports auto diversity mode by default The access point will auto switch to the antenna with better RSSI value ...

Page 61: ...s of information shown AP Status Summary and AP Status Details AP Status Summary includes AP Name AP Type LAN interface MAC address Wireless interface MAC address Report Time Number of Associated Clients and Remark AP Status Details include System Status LAN Status Wireless LAN Status Access Control Status and Associated Client Status y AP Name Mnemonic name of the specified AP y AP Type This is t...

Page 62: ...s the information about IP Address Subnet Mask and Gateway Wireless LAN Status The table shows all of the related wireless information Access Control Status The table shows the lists of MAC of clients under the control of the AP Associated Client Status The table shows the clients connecting to the AP and the related information of the client ...

Page 63: ...fill in the required data Note The APs and the firmware version as well as the hardware number that are supported include 1 DWL 2100 FW v2 20 2 30eu and v2 20 2 30na HW A4 2 DWL 3200 v2 3 FW v2 30 HW B1 3 DWL 8200 FW v1 20 HW A2 y To discover AP manually please select fill in the required data AP Type List the current AP types to choose from Interface Select between LAN ports where the APs are con...

Page 64: ...terface configuration in Background Auto Discovery page are the same as in the Discovery Settings Click Configure and then select Enable to set the configuration When Auto Adding AP to the list is enabled the system will add the discovered APs into the List table automatically and apply the selected template in the Template Applied option to the AP When the configurations are set as requirement th...

Page 65: ...e desired AP input the desired name and password select one template to apply select the check box and click Add to add the AP to the AP List About the template please see 4 3 4 Template Settings When the matched AP is discovered it will be shown in the AP List below and be given a new IP address as set previously ex 192 168 2 2 Check the Add box to add the AP and it will be listed in the AP List ...

Page 66: ...onfiguring in the AP List initially The system will attempt to configure the AP with the value specified A couple of minutes later the AP s status will become online or offline on the AP List y AP Type The type of supported AP y AP Name The mnemonic name of the specific AP y Admin Password The password of the AP for the system to access it y IP Address The IP address of the AP y MAC Address The Me...

Page 67: ...e of the three available Template Name and then click Edit to have the Template Editing page Except configuring all the template setting manually copy the configuration of an AP to the template by selecting a Copy Settings From and revise some settings is also acceptable Please select None if configuring the whole template from the draft is desired Enter the Name and Remark optional and click Conf...

Page 68: ...rds General Subnet Mask The default is 255 255 255 0 All devices in the network must share the same subnet mask Default Gateway The default is 192 168 1 1 Enter the gateway IP address for the network typically a router SNMP Public Community When enabled change the Public Community Name here Private Community When enabled change the Private Community Name here User Status Notification Enable or Dis...

Page 69: ...s clients to communicate with each other when enabled If this is disabled wireless stations of the selected band are not allowed to exchange data through the access point Performance Settings Data Rate The default is Auto Available range is from 1 to 54Mbps The rate of data transmission should be set depending on the speed of the wireless network Select from a range of transmission speed or keep t...

Page 70: ...access point a different non overlapping channel o User Limit Enter the number of the limit of load balancing users from 0 64 Link Integrate Enable or disable the feature Multi SSID Settings Select Disabled Multi SSID with VLAN or Multi SSID without VLAN While Multi SSID enabled Super G Mode will be disabled automatically While selecting Multi SSID with VLAN Multi SSID settings could configure up ...

Page 71: ...function provides to control the clients devices that are allowed to associate with the APs applied with the desired template setting Choose Disabled or Enabled in the Status column and enter the desired clients MAC addresses in the MAC Address List When this function is enabled please make sure the MAC Address List is not empty ...

Page 72: ...d by the system General Subnet Mask The default is 255 255 255 0 All devices in the network must share the same subnet mask Default Gateway The default is 192 168 1 1 Enter the gateway IP address for the network typically a router SNTP NTP The time server IP address time zone and the local time will be displayed Time Zone Select your time zone from the drop down menu Server IP Enter the IP address...

Page 73: ...ata Rate The default is Auto Available range is from 1 to 54Mbps The rate of data transmission should be set depending on the speed of the wireless network Select from a range of transmission speed or keep the default setting Auto to make the Access Point automatically use the fastest rate possible Beacon Interval ms Enter a value between 20 and 1000 msec The default value is 100 milliseconds The ...

Page 74: ...mit of load balancing users from 0 64 Link Integrate Disable or Enable this feature Antenna Diversity Radio is connected to each antenna and supports auto diversity mode by default The access point will auto switch to the antenna with better RSSI value o Diversity The AP will auto switch to the antenna with better RSSI value o Left Antenna The AP will not switch antenna and the radio will use the ...

Page 75: ... this enabled someone could easily obtain the SSID information with the site survey software and get unauthorized access to a private network With this disabled network security is enhanced and can prevent the SSID from being seen on networked WMM WMM stands for Wi Fi Multimedia by enabling this feature It will improve the user experience for audio and video applications over a Wi Fi network Secur...

Page 76: ...provides to control the clients devices that are allowed to associate with the APs applied with the desired template setting Choose Disabled or Enabled in the Status column and enter the desired clients MAC addresses in the MAC Address List When this function is enabled please make sure the MAC Address List is not empty ...

Page 77: ...de settings The connection could be select to enable 802 11a 802 11b g or disable Compatible with 802 11a 802 11b and 802 11g Devices that is fully compatible with the IEEE 802 11a 802 11b and 802 11g standards the DWL 8200AP can connect with existing 802 11b 802 11g or 802 11a compliant wireless network adapter cards It is compatible with the 802 11b standard to provide a wireless data rate of up...

Page 78: ... to allow the logging of any wireless clients that connect to the AP Notice Select Enable to allow all other information to be logged Remote Syslog Server If you require more space to hold your logs please provide the IP address of the Server The embedded memory can only have up to 300 logs SMTP SMTP Server IP IP address of SMTP Server SMTP Sender The sender s Email address SMTP Recipient The rece...

Page 79: ...an RTS and waits for reply Transmit Power Select either Full Half 3dB Quarter 6dB Eighth 9dB or Minimum minimum power This tool can be helpful for security purpose if you wish to limit the transmission range Wireless B G mode Choose between Mixed 11b only or 11g only The function allows you to configure the wireless network with IEEE 802 11g only IEEE 802 11b only or IEEE 802 11g with backward int...

Page 80: ...VLAN 802 11b mode only Multi SSID without VLAN for both modes or Multi SSID with VLAN While Multi SSID enabled Super G A Mode will be disabled automatically While selecting Multi SSID with VLAN Multi SSID settings could configure up to multiple SSID Click Configure button to setup SSID Configuration the information of SSID Broadcast SSID WMM and Security Click button of Configure to further setup ...

Page 81: ... SSID from being seen on networked WMM WMM stands for Wi Fi Multimedia by enabling this feature It will improve the user experience for audio and video applications over a Wi Fi network Security Choose one of security types from SSID Configuration also selecting whether WEP included or not Access Control by MAC Address MAC address based control for access the network AP This function provides to c...

Page 82: ...version must be one that has been integrated y File Name The name of the AP firmware to be uploaded y Upload Click Upload button to upload the file from a local disk to the system y List All uploaded firmware will be listed here y Checksum The automatically detected security identification of the firmware y AP Type The AP type of the firmware y Version The version of the firmware y Size The file s...

Page 83: ...e APs in Selection column Note that both the version before upgrade and the next version must be ones that have been integrated with the system Check the APs which need to be upgraded and select the upgrade version of firmware and click Apply to upgrade firmware y Last Upgrading Time The time when the AP was last upgraded y New Version The firmware version to be upgrade to the AP ...

Page 84: ...de 78 4 4 User Authentication This section provides information on the following functions Authentication Configuration Policy Configuration Black List Configuration Guest User Configuration and Additional Configuration ...

Page 85: ...ter completing and clicking Apply to save the settings go back to the previous screen to choose a server to be the default server and enable or disable any server on the list y Server Name There are several kinds of authentication options supported by DSA 6100 Local Server POP3 Server RADIUS Server LDAP Server NT Domain On demand User and PMS User Click the hyperlink of the respective Authenticati...

Page 86: ...h a maximum of 40 characters all other letters are not allowed Warning The Postfix Name cannot contain these words MAC and IP y Blacklist There are five sets of the black lists Select one of them or choose None Please refer to 4 4 3 Black List Configuration y Local User Account Click the Local User Setting hyperlink to set the further configuration y Policy Name There are ten policies to choose fr...

Page 87: ...er interface Fill in the necessary information such as Username Password MAC and Remark Select a desired Maximum Bandwidth Request Bandwidth and Policy Username and Password are required information the rest are optional For the Policy configuration please check section of Policy Configuration ...

Page 88: ...oad process The uploading file should be a text file and the format of each line is ID Password MAC Policy Remark or ID Password MAC Max bandwidth Request bandwidth Policy Remark without the quotes There must be no spaces between the fields and commas The MAC field can be omitted but the trailing comma must be retained When adding user accounts by uploading a file the existing accounts in the embe...

Page 89: ...Chapter 4 Web Interface Configuration 83 y Export List Click this to create a txt file and then save it on disk ...

Page 90: ...on this button to delete all the users at once and click on Delete to delete the user individually y Edit User If editing the content of individual user account is needed click the username of the desired user account to enter the Edit User Interface for that particular user and then modify or add any desired information such as Username Password MAC Maximum Bandwidth Request Bandwidth Policy and ...

Page 91: ...n any of the listed RADIUS clients as long as the RADIUS clients are configured accordingly Click the hyperlink RADIUS Client List to enter the RADIUS Client Configuration interface Choose the desired type Disable Roaming Out or 802 1x and key in the related data and then click Apply to complete the settings y 802 1x Authentication 802 1x is a security standard for wired and wireless LANs It encap...

Page 92: ...t one POP3 server is needed Choose POP3 in the Server Name field the hyperlink beside the pull down menu will become POP3 Setting Click the hyperlink POP3 Setting for further configuration Enter the related information for the primary server and or the secondary server the secondary server is not required The blanks with red star are necessary information These settings will become effective immed...

Page 93: ...cate users using external RADIUS server including both primary and secondary RADIUS server Choose RADIUS Server in the Server Name field the hyperlink beside the pull down menu will become RADIUS Setting Click the hyperlink RADIUS Setting for further configuration The RADIUS server sets the external authentication for user accounts Enter the related information for the primary server and or the se...

Page 94: ...ill be transferred to the RADIUS server for authentication When disabled only the username will be transferred to RADIUS server for authentication y Class Mapping Class Attribute can be specified to map to internal Policy y Server IP Enter the IP address domain name of the RADIUS server y Authentication Port Enter the authentication port of the RADIUS server and the default value is 1812 y Account...

Page 95: ...the default policy For a RADIUS server if a class mapping is enabled a configuration page allows the mapping of RADIUS class attributes to a policy on DSA 6100 If there is no policy chosen for a RADIUS Class attribute the total bandwidth for that RADIUS Class is bounded by the total bandwidth of the default policy of the authentication server If there is a specific policy selected for that RADIUS ...

Page 96: ...on Enter the related information for the primary server and or the secondary server the secondary server is not required The blanks with red asterisk are necessary information These settings will become effective immediately after clicking the Apply button y Server IP Enter the IP address domain name of the LDAP server y Port Enter the Port of the LDAP server and the default value is 389 y Base DN...

Page 97: ...nly select one Account Attribute UID CN or Account Name Specified DN Entering the specific DN username and password in the Bind RDN and Bind Password fields and then select one Account Attribute UID CN or Account Name to access the LDAP server Window AD Enter the domain name of Windows AD to access the LDAP server ...

Page 98: ... down menu will become NT Domain Setting Click the hyperlink NT Domain Setting for further configuration Enter the server IP address and enable disable the transparent login function These settings will become effective immediately after clicking the Apply button y Server IP Address Domain Server IP address Enter the server IP address of the domain controller y Transparent Login Enable this option...

Page 99: ...nderline _ and dot with a maximum of 40 characters All other letters are not allowed Receipt Header 1 2 There are two fields Receipt Header 1 and Receipt Header 2 for the receipt s header Enter receipt header message or use the default Receipt Footer Enter receipt footer message here or use the default Monetary Unit Select the desired monetary unit for a region or input the needed monetary unit if...

Page 100: ...rnames matching the keyword will be listed y Username The login name of the on demand user y Password The login password of the on demand user y Remain Time Volume The total Time Volume that the user can use currently y Status The status of the account Normal indicates that the account is not in use and not overdue Online indicates that the account is in use and not overdue Expire indicates that t...

Page 101: ...lowed is 9 999 999 MByte or Time the maximum days allowed are 999 days y Expired Info This is the time that the system will store this account information after the account generation if the account is not activated during this time the account will self expire the maximum time allowed is 999 days Valid Duration This is the time that the end user can use the account after the account is activated ...

Page 102: ... to enter the On Demand User Generate screen Pressing the Create button for the desired plan an On demand user will be created then click Printout to print a receipt which will contain this on demand user s information Notice Printout is related to a local printer connected or configured at the Administrator s computer ...

Page 103: ...bled or disabled PMS Server IP Enter the IP address of the PMS server PMS Server Port Enter the Port of the PMS server Postfix Set a postfix that is easy to distinguish e g Local for the server using numbers 0 9 alphabets a z or A Z dash underline _ and dot with a maximum of 40 characters All other letters are not allowed Policy Name There are five policies to select from Receipt Header 1 2 There ...

Page 104: ...rdue Online indicates that the account is in use and not overdue Expire indicates that the account is overdue and cannot be used Expire Valid Time The Valid Time indicates the duration of time that the end user can use the account after the activation of the account After the time the account will self expire the maximum time allowed is 999 days Expire Time This is the time that system will store ...

Page 105: ...on the account will self expires 1 999 hours can be entered Valid Period This is the duration of time that the user needs to activate the account after the generation of the account If the account is not activated during this duration the account will self expires 1 999 hours can be entered Assign to Policy Assign a policy for this billing plan Price The price charged for this billing plan Note Th...

Page 106: ...fault the PMS user database is empty After entering the Room Number and Maximum User select the desired plan and press the Create button A PMS user will be created Click Printout to print a receipt which will contain this PMS user s information Maximum User The maximum number of accounts in one room Notice Printout is related to a local printer or configured at the computer of the hotel counter ...

Page 107: ...rver Two authentication servers may share the same policy Select Policy Select Global for setting up Global policy configuration Firewall Profile Global firewall rules can be defined and applied to all users Specific Route Profile Static routing rules can be specified to route IP traffic from the system to the destination in a controlled fashion VLAN Isolation Profile Default isolation rule can be...

Page 108: ...m passing and Pass is to permit packets passing Protocol There are three protocols to select TCP UDP and ICMP or choose ALL to use all three protocols Source MAC Address The MAC address of the source IP address This is for specific MAC address filter Source Destination Interface There are four interfaces to choose WAN1 WAN2 LAN1 and LAN2 Source Destination IP Enter the source and destination IP ad...

Page 109: ...t 255 255 255 255 32 if the destination is a single host IP Address Destination The destination IP address of the host or the network View System Route Table Click the hyperlink View System Route Table to see the routing information for the entire system VLAN Isolation Profile Click the hyperlink of Setting for VLAN Isolation Profile the VLAN Isolation Profile list will appear The isolation rules ...

Page 110: ...r Block All If traffic between any particular interfaces has to be blocked or passed administrators will need to create the custom exceptional rules to block or to pass the traffic that are traveling between the selected interfaces o Active Select the check box to activate the exception rule o Interface Use the drop down list to select the interfaces where the traffic will be blocked or passed acc...

Page 111: ...Bandwidth Define maximum bandwidth allowed Maximum Concurrent Sessions The maximum number of concurrent sessions which is allowed to be established by each user Select Policy Policy Name Select a desired policy and rename it in the Policy Name field if desired Select Policy1 Policy10 for setting up 10 policies configuration Firewall Profile Click the hyperlink of Setting for Firewall Profile the F...

Page 112: ...is is for specific MAC address filter Source Destination Interface There are five interfaces to choose ALL WAN1 WAN2 LAN1 and LAN2 Source Destination IP Enter the source and destination IP addresses Domain Host filtering is supported but Domain name filtering is not Source Destination Subnet Mask Enter the source and destination subnet masks which Specific Route Profile Click the hyperlink of Sett...

Page 113: ... routing rule as the default route Schedule Profile Click the hyperlink of Setting for Schedule Profile to enter the Schedule Profile list Select Enable to show the list This function is used to restrict the time the users can log in Please enable disable the desired time slot and click Apply to save the settings on the screen below is shown only for 0 to 10 but the system can be configured based ...

Page 114: ... concurrent sessions which is allowed to be established by each user Use the drop down list to select the maximum number of concurrent sessions which is allowed to be established by each user Note For more information please refer to Appendix F Session Limit and Session Log ...

Page 115: ...0 users A user account listed in the black list is not allowed to log into the system the client s access will be denied The administrator may select one black list from the drop down menu and the black list can be applied to this specific authentication option y Select Black List There are 5 lists supported by DSA 6100 for selections y Name Set the name of the black list and it will show in the p...

Page 116: ...DSA 6100 User Guide 110 After entering the usernames in the Username blanks and the related information in the Remark blank not required Click Apply to add the users ...

Page 117: ...st Configuration screen the added black list usernames will be shown on the list If the administrator wants to remove a user from the black list just select the user s Delete check box and then click the Delete button to remove that user from the black list ...

Page 118: ...omplete the upload process The uploading file should be a text file and the format of each line should be ID Remark without the quotes There must be no spaces between the fields and commas When adding user accounts by uploading a file existing accounts in the embedded database that are also defined in the data file will not be replaced by new ones y Export Black List Click Export List to create a ...

Page 119: ...List The DSA 6100 offers ten guest users for log in To activate a guest user just enter the password in the corresponding Password text field for that guest account Guest accounts with blank password will not be activated Session Length This restricts the connection time of the guest users The default session length is 6 hours and the available session time ranges from 1 to 12 hours or unlimited C...

Page 120: ... accounting Friendly Logout When a user logs into the network with wireless connection a small window will appear to show the user s information and there is a logout button for the logout If enabled When the users try to close the small window there will be a new popup window to confirm the logout in case the users click the logout button by accident B Roaming Out Timer This function refers to RA...

Page 121: ...ck the first Browse button to select the Private Key Click the second Browse button to select the file for the certificate upload Next click Apply to complete the upload process Click Set To Default and then click restart to use the default certificate and key 2 Login Page The administrator can use the default login page or get the customized login page by setting the template page uploading the p...

Page 122: ...DSA 6100 User Guide 116 b Choose Template Page to make a customized login page Click Select to pick up a color and then fill in all of the blanks Click Preview to see the result first ...

Page 123: ...d a login page Note The user defined login page must include the following HTML codes to provide the necessary fields for username and password And if the user defined login page includes an image file the image file path in the HTML code must be the image file to be uploaded ...

Page 124: ... will show the used space and the maximum size of the image file of 512K If the administrator wishes to restore the factory default of the login page click the Use Default Page button to restore it to default After the image file is uploaded the file name will show on the Existing Image Files field Check the file and click Delete to delete the file After the upload process is completed and applied...

Page 125: ...ver After the agreement shown on the page is read users are asked whether they agree or disagree with the disclaimer By clicking I agree users are able to log in If users choose to decline they will get a popup window saying they are unable to log in The basic design is to have the disclaimer and login function in the same page but with the login function hidden until users agree with the disclaim...

Page 126: ...ext a window will pop up to tell user that he she cannot log in d Choose the External Page selection and get the login page from the specific website In the External Page Setting enter URL of the external login page on the external web server and then click Apply ...

Page 127: ... at the bottom of this page The user defined logout page must include the following HTML codes to provide the necessary fields for username and password 3 Logout Page The users can apply their own logout page in the menu As the process is similar to that of the Login Page please refer to the Login Page instructions for more details ...

Page 128: ...ng Preview at the bottom of this page If restore to factory default setting is needed for the logout interface click the Use Default Page button 4 Login Success Page The administrator can use the default login success page or get the customized login success page by setting the template page uploading the page or downloading from the specific website After finishing the setting click Preview to se...

Page 129: ...ter 4 Web Interface Configuration 123 b Choose Template Page to make a customized login success page Click Select to pick up a color and then fill in all of the blanks Click Preview to see the result first ...

Page 130: ... an image file the image file path in the HTML code must be the image file to be uploaded Next enter or browse the filename of the images to upload in the Upload Images field on the Upload Images Files page and then click Submit The system will show the used space and the maximum size of the image file of 512K If the administrator wishes to restore the factory default of the login success page cli...

Page 131: ...gin success page from the specific website In the External Page Setting enter URL of the external login page on the external web server and then click Apply After applying the setting the new login success page for On Demand can be previewed by clicking Preview button at the bottom of this page ...

Page 132: ...for On Demand or get the customized login success page for On Demand by setting the template page uploading the page or downloading from the specific website After finishing the setting click Preview to see the login success page for On Demand a Choose Default Page to use the default login success page for On Demand ...

Page 133: ...eb Interface Configuration 127 b Choose Template Page to make a customized login success page for On Demand Click Select to pick up a color and then fill in all of the blanks Click Preview to see the result first ...

Page 134: ...ge for On Demand upload Then click Submit to complete the upload process After the upload process is completed and applied the new l login success page for On Demand can be previewed by clicking Preview button at the bottom If the user defined login success page for On Demand includes an image file the image file path in the HTML code must be the image file to be uploaded ...

Page 135: ...ccess page for On Demand click the Use Default Page button to restore it to default After the image file is uploaded the file name will show on the Existing Image Files field Check the file and click Delete to delete the file d Choose the External Page selection and get the login success page from the specific website Enter the website address in the External Page Setting field and then click Appl...

Page 136: ...e page uploading the page or downloading from the specific website After finishing the setting click Preview to see the logout success page a Choose Default Page to use the default logout success page b Choose Template Page to make a customized logout success page Click Select to pick up a color and then fill in all of the blanks Click Preview to see the result first ...

Page 137: ...ge includes an image file the image file path in the HTML code must be the image file to be uploaded Next enter or browse the filename of the images to upload in the Upload Images field on the Upload Images Files page and then click Submit The system will show the used space and the maximum size of the image file of 512K If the administrator wishes to restore the factory default of the login succe...

Page 138: ...ew button at the bottom of this page D Credit Reminder The administrator can enable this function to remind the on demand users before their credit run out There are two kinds of reminder Volume and Time The default reminding trigger level for Volume is 1Mbyte and the level for Time is 5 minutes E POP3 Message If a user tries to retrieve mail from POP3 mail server before login the users will recei...

Page 139: ... this list can log into the DSA 6100 There will only be 40 users allowed in this MAC address list User authentication is still required for these users Please enter the MAC Address Control to fill in these MAC addresses select Enable and then click Apply Caution The format of the MAC address is xx xx xx xx xx xx or xx xx xx xx xx xx ...

Page 140: ...DSA 6100 User Guide 134 4 5 Status This section is to display information on System Status Interface Status Current Users Traffic History Notification Configuration and Online Report ...

Page 141: ...em network user configurations and the system time The following is a description of the information available in System Status Item Description Current Firmware Version The present firmware version of the DSA 6100 System Name The system name The default is the DSA 6100 Home Page The page the users are directed to after initial login success ...

Page 142: ...c information History Traffic log Email To The email address that the traffic history information will be sent to NTP Server The network time server that the system is set to align Time Date Time The system time is shown as the local time Idle Timer The number of minutes allowed for the users to be inactive Multiple Login Enabled Disabled indicates whether the current setting allow disallow multip...

Page 143: ...ce Status The Interface Status function provides an overview of the interfaces on the network including WAN1 LAN1 and LAN2 interfaces Click on VLAN hyperlink to enter VLAN Interface Status including status of LAN DHCP Server LAN Tag and LAN Tag DHCP Server ...

Page 144: ...tion Status The status of connection in active or inactive Status Enabled Disabled indicates the status of the DHCP server on the LAN Preferred DNS Server The primary DNS server of the LAN Alternate DNS Server The secondary DNS server of the LAN WINS IP Address The WINS server IP on DHCP server N A means that it is not configured Start IP Address The start IP address of the DHCP IP range End IP Ad...

Page 145: ...sername IP Address MAC Address Pkts In Bytes In Pkts Out Bytes Out Idle and Kick Out can be obtained Administrator can use this function to force a specific online user to log out Just click the hyperlink of Logout next to the online user s name to logout that particular user Click Refresh to renew the current users list ...

Page 146: ...or up to 3 days All records are sorted by date and listed accordingly Please note that these records are stored on the volatile memory and will be lost if the system is turnoff Caution Since the history is saved in the DRAM if you need to restart the system and keep the history you will have to manually copy and save the information before restarting ...

Page 147: ...dress MAC address In bound Packet Count Out bound Packet Count In bound Byte Count and Out bound Byte Count As shown in the following picture each line is a traffic history record consisting of 9 fields Date Type Name IP MAC Pkts In Bytes In Pkts Out and Bytes Out of user activities y On demand User Log This page includes the on demand user account status changes and the traffic history As shown i...

Page 148: ...ic history record of user activities consisting 14 fields Date Type Name NSID NASIP NASPort UserMAC SessionID SessionTime Bytes in Bytes Out Pkts In Pkts Out and Message y Roaming In Traffic History This page includes all traffic history of the users who have roamed into this system The following picture shows each line of the roaming in traffic history record of user activities consisting of 15 f...

Page 149: ...lds for network service status DHCP Server Syslog Server SNMP Server HTTP Server Agent SSH Server RADIUS Server Proxy Server and Redirector Server y System Performance This page shows the history records of the CPU and memory usage As shown in the following picture the history record consists of 5 fields of the DSA 6100 status CPU Usage Memory Usage Total Memory KB Memory Used KB and Memory Free K...

Page 150: ...DSA 6100 User Guide 144 y Monthly Report Monthly traffic statistics As shown in the following picture the monthly report consists of 5 fields Local Roaming in Roaming out On Demand Users PMS Users ...

Page 151: ...ation y Traffic History Email The system will send Traffic History and On demand User Log automatically to any valid email account and external Syslog Server Administrator can configure the sending interval of each notification email SMTP Server and a valid email account are required to send notification email Sender s Address The e mail address of the administrator in charge of the monitoring Thi...

Page 152: ...sion Log for the Entire System When enabled the system can record connection details of each user accessing the Internet In addition the log data can be sent out to specified Syslog Server Email Box or FTP Server Note For more information please refer to Appendix F Session Limit and Session Log y Syslog Server IP Address The IP address of the external Syslog server Port The port number of the Sysl...

Page 153: ...us The page shows the current CPU and memory usage This online report of DSA 6100 status consists of 5 fields CPU Usage Memory Usage Total Memory Memory Used and Memory Free y Service Status This page shows the current status of the internal daemon service The online report for network service status consists of 6 fields DHCP Server Syslog Server SNMP Server HTTP Server Agent SSH Server RADIUS Ser...

Page 154: ...ists of 5 fields Interface Speed IN bps Speed OUT bps Packet IN pps and Packet OUT pps y Network Session Status This report tells how many connections TCP and UDP each IP address is using now The online session information report consists of 3 fields IP TCP session count and UDP session count This report tells how many connections each IP address uses currently ...

Page 155: ...ace Configuration 149 4 6 Tool This section provides information on four utilities used for customizing and maintaining the system including Change Password Backup Restore Setting Firmware Upgrade Ping Utility and Restart ...

Page 156: ...the picture below Please enter the current password and then enter the new password twice to verify Click Apply to activate the new passwords The DSA 6100 supports three types of account interface admin manager operator or frontdesk These account interfaces are authenticated to access only certain configuration pages The default usernames and passwords are as follow ...

Page 157: ...es of the DSA 6100 User Name admin Password admin Manager The manager can only access the configuration pages under User Authentication to manage the user accounts but has no permission to change the settings of the profiles for Firewall Specific Route and Schedule User Name manager Password manager ...

Page 158: ... demand User to create and print out the new on demand user accounts User Name operator Password operator Frontdesk The frontdesk can only access the configuration page of PMS Frontdesk Tools to view the PMS users list or create and print out the new PMS users User Name frontdesk Password frontdesk ...

Page 159: ...terface Configuration 153 PMS User List PMS User Creation Caution If the administrator s password is lost the administrator s password can still be changed through the text mode management interface on the console port ...

Page 160: ...p file keeps the current system settings as well as the local user accounts information y Restore System Setting Click Browse to search for a db database backup file created by the DSA 6100 and click Restore System Setting to restore to the same settings at the time the backup file is created y Reset to the Factory Default Setting Click Yes to load the factory default settings of the DSA 6100 Caut...

Page 161: ...upgrade process completes Upon completion the system will need to be restarted for the firmware to take effect Warning 1 Firmware upgrade may sometime result in loss of some data Please ensure you read the release notes to understand the limitations before upgrading the firmware 2 Please restart the system after upgrading the firmware Do not interrupt upgrade process such as power on off the syste...

Page 162: ... utility is for administrator s convenience to easily test the network connection on the DSA 6100 administration interface Enter IP address or domain name in Host field and press Ping button The results will show whether the connection is successful ...

Page 163: ...system click NO to go back to the previous screen Please wait for countdown timer to finish before accessing the system management webpage again If turning off the power is necessary restart the DSA 6100 and wait for it to complete the restart process before turning off Caution The connection of all online users on the system will be disconnected when the system is in the process of restarting ...

Page 164: ...100 User Guide 158 4 7 Help The Help button is at the upper right corner of the DSA 6100 display screen Click Help for the Online Help window and then click the hyperlink of the relevant information required ...

Page 165: ...The device will get an IP address automatically via DHCP Next open a web browser and access any URL The default User Login Page will appear Enter the User Name and Password created in the local user account database by the Configuration Wizard then click Submit e g test Local for the username and test for the password 2 If the Login page appears it means the DSA 6100 has been installed and configu...

Page 166: ...ta of the account 5 When an on demand user logs in successfully the successful Login screen will appear which differs from the usual user s login successfully screen as it contains an extra line showing Remaining usage and a Redeem button y Remaining usage Shows the remainder usage time that the on demand user can surf the Internet y Redeem When the remaining time or data size is insufficient the ...

Page 167: ...wo accounts to add up the available usage time and data size by the system The total available usage time and data size after adding credit will then be shown Caution The maximum session time data transfer is 24305 days 2003 Mbyte If the redeem amount exceeds this number the system will automatically reject the redeem process ...

Page 168: ... text interface with dialog boxes Please use arrow keys on the keyboard to browse the menu and press the Enter key to make selection or confirm what you enter 3 Once the console port of the DSA 6100 is connected properly the console main screen will appear automatically If the screen does not appear in the terminal simulation program automatically please try to press the arrow keys so that the ter...

Page 169: ... of the system is displayed which may help to confirm the Static Route settings Display ARP table The internal ARP table of the system is displayed Display system live time The system live time time for system being turn on is displayed Check service status Check and display the status of the system Set device into safe mode Used when the administrator is unable to access the Web Management Interf...

Page 170: ...ement interface The administrator s password can be changed Even if the password is forgotten and the management interface cannot be accessed from the web or the remote end of the SSH the null modem can still be used to connect the console management interface where the administrator s password can then be reset Caution Although it does not require a username and password for the connection via th...

Page 171: ...A hotspot is usually implemented without sophisticated network architecture via proxy servers from Internet Service Providers In a hotspot environment users usually enable their proxy setting at their browsers such as IE and Firefox Likewise the DSA 6100 also needs to set some proxy configuration in the Gateway Follow these steps to complete the proxy configuration 1 Login Gateway by using admin 2...

Page 172: ...6100 User Guide 166 3 Click the Proxy Server Properties from left menu and the homepage of the Proxy Server Properties will appear 4 Add the ISP s proxy Server IP and Port into External Proxy Server Setting ...

Page 173: ...Appendix C Proxy Configuration 167 5 Enable Built in Proxy Server in Internal Proxy Server Setting 6 Click Apply to save the settings ...

Page 174: ... Firefox to reduce the internet access loading Therefore some proxy configurations in the Gateway need to be set Caution Some enterprises will automatically redirect packets to proxy server by using core switch or Layer 7 devices By the way the clients don t need to enable their browsers proxy settings and administrators don t need to set any proxy configuration in the Gateway Please follow the st...

Page 175: ...ck the Proxy Server Properties from left menu and the homepage of the Proxy Server Properties will appear 4 Add your proxy Server IP and Port into External Proxy Server Setting 5 Disable Built in Proxy Server in Internal Proxy Server Setting ...

Page 176: ...n the browser the login page will not appear because the proxy server is down Please make sure your proxy server is always available Client setting Adding a default gateway IP address into proxy exception information is a necessity for clients so that the user login successful page can show up normally 1 Use the command ipconfig to obtain the Default Gateway IP Address ...

Page 177: ...Proxy Configuration 171 2 Open the browser to add the default gateway IP address e g 192 168 1 254 and logout page IP address 1 1 1 1 into the proxy exception information For Internet Explorer For Mozilla Firefox ...

Page 178: ...en deploying the DSA 6100 Secure Certificate setting for both IE6 and IE7 For the company with its own Certificate Authority CA the certificate of the company should be trusted by all his employees computers and the certificate should be delivered through a trusted media For example the MIS staff should install the CA certificate in each computer The company CA will issue a certificate for the DSA...

Page 179: ...her not trusted by IE7 the following steps may be taken to provide a workaround or to bypass the issue a Open the IE7 browser and you will be redirected to the default login page If the certificate is not trusted the following page will appear Click Continue to this website b The default User Login Page will appear and the users can then login normally ...

Page 180: ...For installing a trusted certificate to solve the IE7 certificate issue please follow instructions below a When the User Login page appears click Certificate Error at the top b Click View Certificate c Click Certification path ...

Page 181: ...Appendix D Certificate Setting for IE6 and IE7 175 d Select root certification then click View Certificate e Click Install Certificate f Click Next ...

Page 182: ...DSA 6100 User Guide 176 g Select Automatically select the certificate store based on the type of certificate then click Next h Click Finish i Click Yes ...

Page 183: ...Appendix D Certificate Setting for IE6 and IE7 177 j Click OK k Launch a new IE7 browser The certificate is now trusted via IE7 according to the key symbol shown at top next to the address field ...

Page 184: ...te error the following information provides the step to proceed when the certificate publisher is not trusted by IE6 1 Open an IE6 browser the Security Alert message will be appeared if the certificate is not trusted Click Yes to proceed 2 The User Login Page will appear 3 The user can now login normally ...

Page 185: ...e traffic between VLAN1and VLAN2 will travel through the DSA 6100 When the specific VLAN isolation rule which is applicable to VALN1 and VLAN2 is activated in DSA 6100 the traffic will be blocked by DSA 6100 and therefore the users on two VLANs are isolated from each other For more information about the VLAN isolation here are the details 1 The VLAN isolation rules are configured in Global Policy ...

Page 186: ...2 Tag 3333 LAN1 Tag 1111 4 An Example The Default Isolation Rule specifies Block All Traffic and an exception rule says Pass the pair LAN1 Untagged ALL In this example the system will block all traffic between all VLAN interfaces except for the traffic between VLAN1 and other VLANs 5 The priority of basic system security rules a When the Default Isolation Rule is Pass All Traffic the priority of e...

Page 187: ...tect the network in daily operation Session Log The system can record connection details of each user accessing the Internet In addition the log data can be sent out to a specified Syslog Server Email Box or FTP Server based on pre defined interval time The following table shows the fields of a session log record Field Description Date and Time The date and time that the session is established Ses...

Page 188: ...1 local TCP MAC 00 09 6b cd 83 8c SIP 10 1 1 37 SPort 1628 DIP 203 125 164 142 DPort 80 Jul 20 12 35 06 2007 New user1 local TCP MAC 00 09 6b cd 83 8c SIP 10 1 1 37 SPort 1629 DIP 203 125 164 142 DPort 80 Jul 20 12 35 07 2007 New user1 local TCP MAC 00 09 6b cd 83 8c SIP 10 1 1 37 SPort 1630 DIP 67 18 163 154 DPort 80 Jul 20 12 35 09 2007 New user1 local TCP MAC 00 09 6b cd 83 8c SIP 10 1 1 37 SPo...

Reviews: