background image

CONTROLLED COPY CREATED: 3/21/2014 4:59:41 PM


31 


There are three tabs at the top of the screen that provide useful information when troubleshooting:  


Connectivity 


Sensor 


Hub 


11.5.1.


Connectivity Tab 

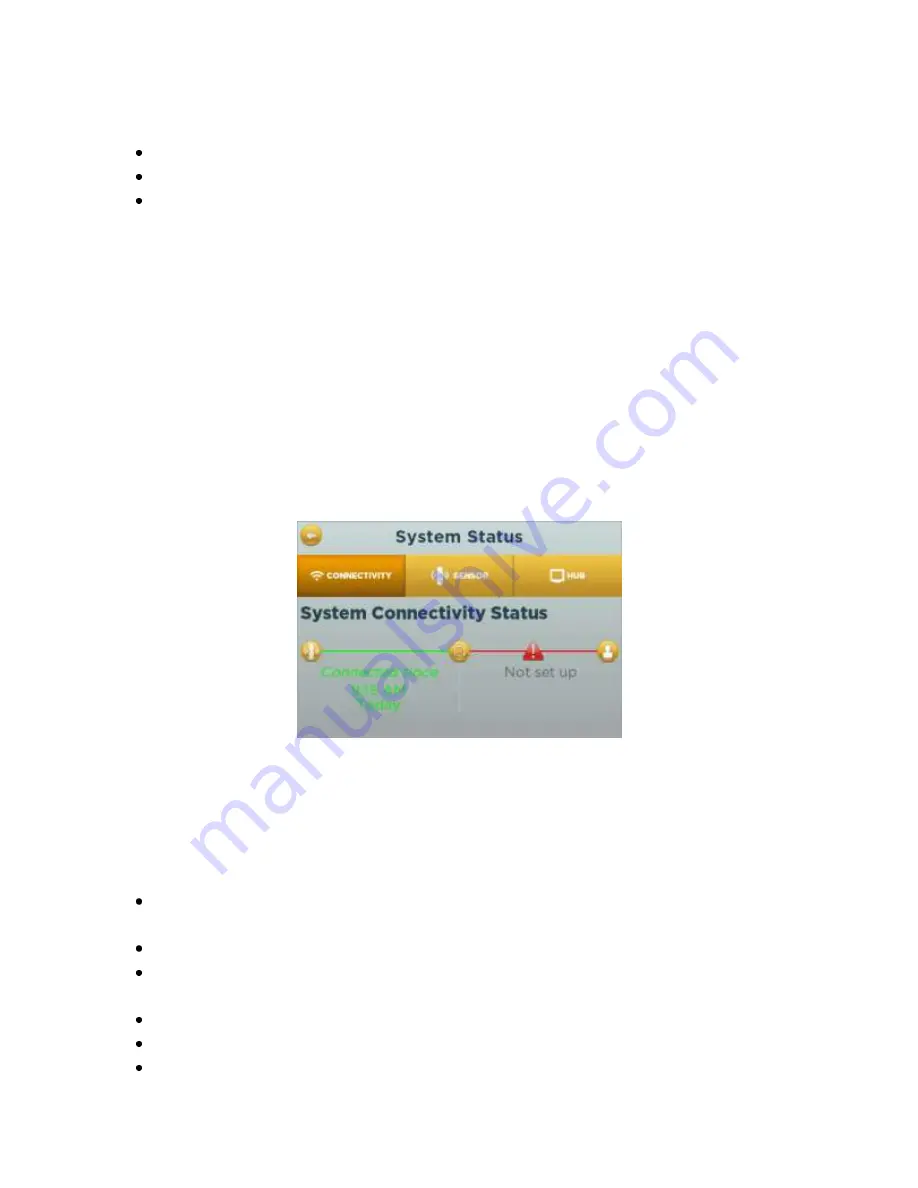
The Connectivity tab screen (Figure 32) displays the connection status between the Hub and Sensor 
(needed for seizure detection), and the Hub with the ProGuardian App (needed to send notifications to 
a mobile device).The time and date of connections are shown to help you verify that System was 
working throughout the night time use period. 

Green bars indicate active connections thatare working. Red bars indicate a disconnection.  Refer to on-
screen troubleshooting provided by the Hub, or the “Troubleshooting” section of the manual to fix a 
disconnection.   

Figure 32: System Status – Connectivity Tab 


11.5.2.


Sensor Tab 

The sensor tab screen (Figure 33) indicates if the System is appropriately detecting heart rate (“ECG 
Status”) and other software details thatmaybe needed for troubleshooting. These details include: 


ECG Status

: Displays “Ok” during normal operation and “No Signal” when troubleshooting is 

required. 


Software Version

: Shows the current software version loaded on the Sensor 


Firmware Version

: Provides additional software information which may be requested during 

troubleshooting. 


Hardware Version

: Provides details related to manufactured components inside the Sensor 


Serial Number:

  A unique number used to identify your Sensor 


Model Number:

Product type identifier 

Summary of Contents for ProGuardianREST

Page 1: ...CONTROLLED COPY CREATED 3 21 2014 4 59 41 PM 1 Caution Investigational device Limited by Federal law to investigational use March 2014 ...

Page 2: ... to Enter Information on the Hub 13 7 2 2Starting the Setup Wizard 13 7 3Begin Seizure Monitoring 14 7 3 1Preparation 15 7 3 2Sensor Patch Setup 16 7 3 3Patch and Sensor Application 18 8 Responding to Seizure Notifications 20 8 1Confirmingor Denying a Seizure Notification 21 8 2Adjusting Seizure Notification Sensitivity 21 9 Pausing or Stopping Monitoring 22 9 1Pausing and Resuming Seizure Monitor...

Page 3: ...nformation 38 11 7Help Menu 39 11 7 1ProGuardian App Setup Wizard 39 11 7 2About 40 11 7 3Contact Us 40 11 7 4Administrator Access 40 12 The ProGuardian App 40 12 1ProGuardian App Setup Wizard 41 12 2Wi Fi Network Changes and Registering New Devices 45 12 3Receiving Notifications on Your Mobile Device 46 12 4Adjusting Your Mobile Device Sound Settings 47 12 5Configuring App Sound Settings 48 12 6D...

Page 4: ...egiver supervision or prescribed healthcare The ProGuardian System is an informational tool that may help you enhance your efforts in managing your loved one s epilepsy 2 Understanding Your ProGuardian System Your ProGuardian System comes with the components listed below If anything is missing or damaged contact your Customer Care Service Center refer to Contact Us section of this manual 2 1 Syste...

Page 5: ...natural rubber latex For additional information about the System please see Section 14 System Specifications 3 Intended Use The ProGuardian System is a monitoring device for people with epilepsy five years of age and over The system aids in detecting notifying and recording potential seizures during periods of sleep It is capable of detecting seizures that are accompanied by changes in heart rate ...

Page 6: ...oing so may damage the ProGuardian System Only use the power cord supplied with the Hub Failing to do so can damage the System and present a fire hazard Only use ProGuardian Patches Other types of Patches will not work with your System Do not expose the Patch to fire or heat sources as it contains a battery that could explode Do not expose the Hub Sensor and Patch to water or any other liquid Doin...

Page 7: ...ed to sense changes in heartrate or movement and to notifyyouof potential seizure activity The system is not intended to replace supervisionand should not be expected to detect all types of seizures 6 1 Explanation of Symbols The symbols below are used in the manual in other package labeling or on the product components forthe ProGuardian System Symbol Description Notice for reader to pay special ...

Page 8: ...em operates most effectively Follow the guidelines listed below When handling the ProGuardian System make sureyou have dry clean hands Do not exposethe Hub Sensor and Patchto water or any other liquid Operate the System in temperatures ranging 5 40 C 41 104 F and 15 93 relative humidity When not in use the System can be stored in temperatures ranging 25 70 C 13 158 F and 15 93 relative humidity Ea...

Page 9: ...ter time see Section 12 The ProGuardian App for more details To begin using your ProGuardian System set up the following parts of the system Hub Hub Software Sensor and Patch 7 1 Hub Setup The Hub is where you enter and receive information When set up with an active Sensor it provides anotification when a potential seizure is detected Confirmed seizures are stored in the seizurelog Follow the step...

Page 10: ...time the System is paused Not lit When the neither the sensor nor the Caregiver App are registered or connected B Notification LED Provides a visual indicator for notifications Flashing amber Indicates pending seizure or system notifications Solid amber A system notification has not been resolved after warning message has been dismissed C Power Button Press and hold to turn Hub ON or OFF Blue when...

Page 11: ...re notifications You must tap Confirm or Deny on the touchscreen to dismiss the notification displayed on the Hub B Power Alert Off The Hub provides an alert if the wall outlet is disconnected or if it loses power for any reason while turned ON This button silences the alert Figure 4 Hub Bottom Figure 4 A Power Alert Battery B Hub Reset C AC Plug D USB 2 Port E USB 1 Port F LAN Not active A B A E ...

Page 12: ...opriate plug tip seeFigure 6 Figure 6 Assemble AC Adaptor 4 Connect the power cordinto the back of the Hub and then plug into a wall outlet 5 The Hub will automatically turn on display the Cyberonics logo and start the ProGuardian software 7 2 Setup Wizard for Hub Software The Setup Wizard guidesyou through the registration and initial setup of the Hub software Follow the on screen instructions an...

Page 13: ...ld and using the Pop up menu Press the Continue button after making your selections You may select the order in which day month and year is displayed and recorded by the System You may choose either 12 or 24 hour clock format 4 Enter the correct local date and time These settings must be accurate so that when seizure detections are added to the log the date and time information is correct a To set...

Page 14: ...pp at this time or you can later access the ProGuardian App Setup Wizard from the Home Screen Help menu a The ProGuardian App is an optional mobile applicationthat can be loaded on anAndroid smart phone b The application allows receipt of seizure notifications from the Hub on your mobile device when in range of your home Wi FiNetwork c Refer to the The ProGuardian Mobile Application section for mo...

Page 15: ...otated by any degree however ensure center of Patch indicated by is placed as shown on diagram Caution For people with the implantable VNS Therapy System the ProGuardian Sensor should only be placed on the lower rib cage or on the back To ensure the sensor has fullcontact with the body prepare the skin by following the steps below 1 Trim any excess hair from the chosen location using scissors or e...

Page 16: ...playing the Home Screen Figure 8 The Sensor icon on the Home Screen will begray disabled until the System is ready to detect seizures Caution If the Sensor icon is yellow enabled then the system was not turned off from the Hub Home Screen at the end of the last use period To prevent connection problems press the Sensor icon then select Off before proceeding to Step 2 see Pausing or Stopping Monito...

Page 17: ...cted when properlyaligned The triangle notch on the Sensor and triangle on the Patch must face the same direction Caution If moisture is present on or near the back of the Sensor or the contacts of the Patch do not assemble Doing so can permanently damage the System Dry the parts using a soft cloth paper towel or cotton swab before proceeding 4 Apply firm pressure to the top and bottom of the Sens...

Page 18: ...ection Patch and Sensor Application If the Sensor LED is red refer to the Troubleshooting section 7 3 3 Patch and Sensor Application 1 Remove the protective liner from the Patch and place on the bodywithin 5 minutesafter connecting the Patch and Sensor Figure 12 Figure 12 Remove Patch Liner 2 Apply the assembled Sensor and Patch The assembled Sensor and Patch should be worn in one of the following...

Page 19: ...gree however ensure center of Patch indicated by is placed as shown on diagram Caution For people with the implantable VNS Therapy System the ProGuardian Sensor should only be placed on the lower rib cage or on the back 3 You will see a Starting message on the Hub Home Screen as the Sensor is establishing communication with the Hub Figure 14 Once the Sensor has made a connection with the Hub the S...

Page 20: ...mplete b The Hub will provide a system notification to alert the user if any problems occur thatcould prevent seizure detection Follow on screen troubleshooting steps or consult Section 13 2 of this manual if this occurs Congratulations Your System is now monitoring for seizures 8 Responding to Seizure Notifications Based on changes in the heart rate or motion the system provides a notification to...

Page 21: ... to Using the Hub Software section If NO is selected the software returns to the previously displayed screen Note The timestamp of the seizure that gets logged in the Seizure Log is the time of your confirmation not the initial notification time Seizure monitoringwill resume as soon as either YESor NOis selected If a response is not provided after 10 minutes the System resumes monitoring and the n...

Page 22: ...ption is selected the System will only resume seizure monitoring after a new Patch is assembled to the Sensor 9 1 Pausing and Resuming Seizure Monitoring After you have attached the Sensor and Patch you may want to pause the seizure monitoring This may be because the sensor wearer is not ready to go to sleep wants or needs to get up from bed for a short time is awake and needs comforting To pause ...

Page 23: ... ready to resume seizure monitoring press Resume The software will then return to the Home Screen Figure 18 Congratulations The system is once again monitoring for seizures 9 2 Turning Seizure Monitoring Off There are two reasons to turn off the seizure monitoring and remove the Sensor and Patch The sensor wearer is at the end of the sleep period You are instructed by the Hub to turn off the seizu...

Page 24: ... 4 Lower the latches on both sides of the Sensor to expose the Sensor release button Figure 21 Figure 21 Lower Latches 5 Useyour thumb and index finger to squeeze thetwo release buttons located on opposite sides of the Sensor Figure 22 This releases the Sensor from the Patch Figure 22 Release Sensor 6 Store the Sensor for future use Caution Do not store or temporarily place the Sensor on any surfa...

Page 25: ...4 Hold the battery between the thumb and finger of one hand and the rest of the Patch between the thumb and finger of the other and pull in opposite directions Figure 25 The battery and two metal tabs that connect the battery to the Patch will release from the Patch The Patch can then be disposed Figure 23 Cut Patch Figure 24 Tear Opening Figure 25 Remove Battery Caution Do not expose the Patches ...

Page 26: ...tware The following sections provide further detail about the Hub software and related System features 11 1 Home Screen Once you complete the Setup Wizard the software will display the Home screen There are six navigation options on the Home screen Sensor Seizure Log Reports System Status Settings Help The features and options for each menu item are detailed in subsequent sections of the User Manu...

Page 27: ... discontinue stop seizure monitoring See Pausing or Stopping Monitoring for more details 11 3 SeizureLog The system detects and notifies you of potential seizure activity based on changesin heart rate ormovement Once confirmed these seizures are maintained in an electronic log which you can review at any time Figure 26 The log is intended to help you track the frequency and trendsin seizure activi...

Page 28: ...e list 11 3 2 Adding Seizures to the Log The ProGuardian System is capable of detecting many but not all seizures For example if a seizure is not associated with a heart rate change or a detectable change in motion it will not automatically be detected by the ProGuardian System An additional feature is the ability to expand the use of the ProGuardianseizure log bymanually recording seizures experi...

Page 29: ...nually entered seizure event The dialog screen options for seizures detected by the System Figure 28 or those manually entered Figure 29 are shown below Note Selecting Denied or Delete permanently removes the seizure from the log Figure 28 Modify System Detected Seizures Figure 29 Manually Entered Seizures 11 4 Reports Menu Select the Reports option from the Home Screen to display the seizure coun...

Page 30: ... Hub USB 1 Port see Figure 4 3 Press the export button Export Icon located in the upper right The systemcreates a pdf file on the USB flash drive with a title containing ProG Report and the date and time when the report was created The USB flash drivecan be removed from the Hub as soon as the Export Complete message is displayed Figure 31 Figure 31 Export Complete The reportcan be viewed on any co...

Page 31: ...r to on screen troubleshooting provided by the Hub or the Troubleshooting section of the manual to fix a disconnection Figure 32 System Status Connectivity Tab 11 5 2 Sensor Tab The sensor tab screen Figure 33 indicates if the System is appropriately detecting heart rate ECG Status and other software details thatmaybe needed for troubleshooting These details include ECG Status Displays Ok during n...

Page 32: ...tup the ProGuardian App accessthe Help menu from the HubHome Screen or refer to Section 12 The ProGuardian App for more information Power Alert Battery Status The Hub contains a backup battery CR2032 lithium coin cell which sounds an audible notification if the Hub loses power while powered on and in use The audio alertis meant to notify the user when seizure detection is not possible Good indicat...

Page 33: ... following submenu Touch the Hub screen and scroll to view all options Figure 35 Settings Menu 11 6 1 Seizure Detection Settings It is recommended that you configure the seizure detection settings to give the best results for the sensor wearer The System identifies changes in heart rate or motion as potential seizures events Note Changes can only be made during system use while the Sensor is activ...

Page 34: ...f a seizure notification Lower numbers 1 2 or 3 make the system less sensitive and decrease the chance of a seizure notification Note To help you determine the best setting both sensitivity controls display the number of associated Denied detections since the last sensitivity setting change Figure 36 3 Press Save Figure 36 Configuring Seizure Detection Settings What if I feel seizures are being un...

Page 35: ...m the Sensor 3 Use the ProGuardian System for a few nights and then repeat these steps as needed Note Cyberonics recommends trying the new setting until additional seizures or notifications not associated to a seizureoccur and then repeating the process as needed Note Changes can only be made during system use while the Sensor is in range of the Hub 11 6 2 Sound Settings 1 To adjust the Hub volume...

Page 36: ...en brightness touch the displayed value adjustable between 10 and 100 percent and touch and drag the slide control A hundredpercent is the maximum screen brightness If you want the screen dark with system active simply tap the power button on the front of Hub The screen will automatically dim after 10 minutes of inactivity default setting This time period can be adjusted by tapping the Screen Off ...

Page 37: ...alog appears 2 Adjust the values as needed using the or buttons 3 Press Ok Set the Time 1 Tap the currently displayed setting and a popup dialog appears 2 Adjust the values as needed using the or buttons If 12 hour format was selected AM and PM can be selectedby tapping the field 3 Press Ok Note The system will not automatically update for daylight saving time 11 6 4 2 Date and Time Formats 1 The ...

Page 38: ...on screen keyboard or popup menus Figure 40 Note that the information included in this profile is printed on each exported ProGuardian report for the convenience of the healthcare provider Note If the Sensor will be used on a new person contact your Customer Care Service Center for assistance resetting the seizure log and System Figure 40 Patient Profile 11 6 6 Account Information The account info...

Page 39: ...creen keyboard 3 Press Save to set the information in the system Note Passwords are case sensitive upper and lower case letters are checked They must be at least 5 characters long and can contain numbers letters or symbols no spaces allowed The security answer is not case sensitive the software will not differentiate between upper and lower case letters 11 7 Help Menu The Help Menu allows you to s...

Page 40: ...s an optionalfeature of the System that is not needed for standard seizure monitoring The ProGuardian App is free software that connects the ProGuardian System with an Androidmobile device This extends the operating range of the ProGuardian System by allowing a user to remotely receiveseizure and system notifications from the Hub while connected to a home Wi Fi Network To use this optional feature...

Page 41: ...lowing situations ProGuardian App for the first time setup Anytime changes are made to the home Wi Fi network or if the Hub is being used in a new location with a different network To register a new mobile device to receive Hub notifications Note You can only have one mobile device at a time registered with the System To unregister an existing mobile device and stop delivery of Hub notifications F...

Page 42: ... the first time you are setting up the app the system status bar indicates that the Hub and mobile device are not yet connected shown by a red bar Text on the screen states Mobile Device Not Ready Figure 44 ProGuardian App Screen Mobile Device Not Set Up 2 Next continueProGuardian App Setupby completing the ProGuardian App Setup Wizard on the Hub Connect the Hub to the home Wi Fi network by select...

Page 43: ...ect the mobile device that you would like to receive Hub notifications by tapping the name from the displayed list Figure 46 If you don t see your device at first you may select the refresh button to search again It may take several minutes to find available devices Figure 46 Connect to Mobile Device Hub a The list includes all devices that have an open ProGuardian App on the same Wi Fi network as...

Page 44: ...w complete The App displays the text Mobile device ready to receive notifications 5 Press Send test notification to device to check function and verify that your mobile device sound is turned on Figure 47 If your mobile device is muted or set to vibrate the ProGuardian App will not produce audio for notifications Figure 47 ProGuardian App Registration Complete Hub 6 Press Exit to Home Screen to cl...

Page 45: ... Wizard Remember to connect your mobile device to the same Wi Fi network as the Hub To register a new mobile device to receive Hub notifications complete steps 1 2 of ProGuardian App Setup Wizard When you reach step 3 tap the name of the new mobile device The list includes all devices that have an open ProGuardian App on the same Wi Fi network as the Hub If you do not know your device name refer t...

Page 46: ...ion Mobile Device in Range When the ProGuardian App is open and the mobile device is in range of the home Wi Fi and connected to the Hub the ProGuardian App receives seizure and system notifications from the Hub Figure 50 and Figure 51 Please note the following Notifications are displayed on both the Hub and the ProGuardian App Pressing Okon the ProGuardian App only dismisses the notification on t...

Page 47: ...cation and display a message that it is not in range If the Hub volume is muted the audio will be restored until the mobile device reconnects with the home Wi Fi The connection status between the Hub and Sensor will be displayed as unknown gray bar on the mobile device 12 4 Adjusting Your Mobile Device Sound Settings Cyberonics recommends that your mobile device sound is ALWAYS enabled turned on w...

Page 48: ... by tapping on either end of the sound control The setting menu also lists the mobile device model and MAC address which are needed when completing the app setup wizard Figure 52 ProGuardian App Settings Menu 12 6 Discontinuing Use of the ProGuardianApp To disconnect or unregister an existing mobile device and stop delivery of Hub notifications 1 Press Help on the Hub Home Screen 2 PressGoto launc...

Page 49: ...ny devices 6 Press Exit to return to the Hub Home Screen 13 Troubleshooting Please refer to this section if you encounter any issues while using your ProGuardian System 13 1 Sensor Reset A sensor reset may be performed if you feel that the Sensor is not operating correctly You should always turn off the Sensor from the Hub before attempting a sensor reset To perform the reset press and hold the re...

Page 50: ...ensor wearer closer to the Hub Wait 30 seconds and re check connectivity 2 Press Off on the Sensor icon and wait 30 seconds If Sensor icon remains grayed out perform Sensor reset and wait another 30 seconds to check connectivity 3 Press Off on the Sensor icon replace the Patch and retry setup Hub displays ProGuardian App Communication Try the following in the suggested order until resolved 1 Retur...

Page 51: ...automatically start the ProGuardian software and you can resume use of the System Hub displays ECG check fail Try the following in the suggested order until resolved 1 Press Off on the Sensor icon Verify that the Sensor Patch assembly is fully secured and perform a reset on the Sensor 2 Press Off on the Sensor icon Replace the Patch and retry at same body location 3 Press Off on the Sensor icon Re...

Page 52: ...led and in use on a mobile device and The registered mobile device is within range and connected to the Home Wi Fi Network To setup the ProGuardian App run the ProGuardian App setup wizard under the Help menuon the Hub Other audio issues Go to the Sound submenu and make sure that the test audio sound is not playing press the stop icon if it is playing Make sure that you ve entered and saved the de...

Page 53: ...status bar to determine source of the connection issue To resolve an issue with Sensor to Hub connectivity refer to troubleshooting for Sensor Communication listed above To resolve an issue with Hub to ProGuardian App connectivity refer to troubleshooting for ProGuardian App Communication listed above The Hub Connectivity LED is flashing Amber This indicates that System setup has not been complete...

Page 54: ...bleshooting section with the same name in the earlier section The Hub notification LED is flashing Amber A seizure or system notification is currently in progress Attend to the sensor wearer to assess potential seizure activity Follow on screen troubleshooting for system notifications LED doesn t light up when it should or lights up when it shouldn t Wait 5 minutes and see if the problem resolves ...

Page 55: ...software and no action is needed Always refer to the Hub for the correct notification time Any other problems with the ProGuardian App Setup Wizard Exit the ProGuardian App Setup Wizard and restart If still having problems restart the Hub and retry the ProGuardian App Setup Wizard If problem persists contact the Customer Care Service Center 13 3 Replacing a Lost or Damaged Sensor or Hub If a Senso...

Page 56: ...y interference received including interference that may cause undesired operation This equipment has been tested and found to comply with the limits for a Class B digital device pursuant to part 15 of the FCC Rules These limits are designed to provide reasonable protection against harmful interference in a residential installation This equipment generates uses and can radiate radio frequency energ...

Page 57: ...ansmitter except in accordance with FCC multi transmitter product procedures Changes or modifications not expressly approved by the party responsible for compliance could void the user s authority to operate the equipment 16 Contact Us Cyberonics Europe Airport Plaza Kyoto Building Leonardo Da Vincilaan 19 B 1831 Diegem Belgium Cyberonics USA 100 Cyberonics Blvd Houston Texas 77058 Toll Free Custo...

Page 58: ...CONTROLLED COPY CREATED 3 21 2014 4 59 41 PM 58 ...

Reviews: