NOTE:
Intel LGA 2011/2011-3/2066 do not require
backplate installation. Proceed to step 2.
REMARQUE:
LGA 2011/2011-3/2066 ne
nécessitent pas l'installation d'une plaque arrière.
Passez à l’étape 2.
HINWEIS:
Der Intel LGA 2011/2011-3/2066
erfordern keine Rückwandinstallation. Fahren Sie
mit Schritt 2 fort.
LET OP:
Voor de Intel LGA 2011/2011-3/2066
hoeft geen achterplaat te worden geïnstalleerd.
Ga door naar stap 2.
NOTA:
I modelli Intel LGA 2011/2011-3/2066 non
richiedono l’installazione della piastra posteriore.
Andare al passaggio 2.
NOTA:
Intel LGA 2011/2011-3/2066 no requieren
la instalación de una placa de respaldo.
Continúe con el paso 2.
OBSERVAÇÃO:
Intel LGA 2011/2011-3/2066 não
exigem instalação de placa traseira.
Prossiga para a etapa 2.
UWAGA:
W przypadku gniazd procesora Intel
LGA 2011/2011-3/2066 nie jest konieczne
montowanie podstawki. Przejdź do kroku 2.
ПРИМЕЧАНИЕ.
Для
Intel LGA 2011/2011-3/2066
установка
опорной
пластины
не
требуется
.
Перейдите
к
шагу
2.
لىإ
Intel
نم
LGA 2011/2011-3/2066
جاتحي لا
:ةظحلام
.
2
ةوطخلا لىإ عبات .ةيفلخلا ةحوللا بيكرت
注意:
Intel LGA 2011/2011-3/2066
不需要安裝
背板。繼續執行步驟
2
。
注意:
Intel LGA 2011/2011-3/2066
不需要背面板
安装。继续执行步骤
2
。
EN
FR
DE
NL
IT
ES
PT
PL
RU
TC
SC
AR
J
1. INSTALLING THE INTEL BACKPLATE
Installation de la plaque arrière Intel / Installation der Intel-Rückwand / Installatie van de Intel-achterplaat
Installazione della piastra posteriore Intel / Instalación de la placa de soporte para Intel / Como instalar
a placa traseira Intel / Montowanie podstawki montażowej Intel /
Установка опорной пластины
Intel
/
安裝
Intel
背板
/
安装
Intel
隔架螺丝
Intel
نم ةيفلخلا ةحوللا بيكرت
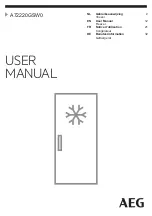
2. INSTALLING THE INTEL STANDOFF SCREWS
Installation des vis d'entretoise Intel / Installation der Intel-Abstandhalter / Installatie van de
Intel-afstandschroeven / Installazione delle viti del supporto Intel / Instalación de los tornillos del
separador para Intel / Como instalar os parafusos de suporte Intel / Montowanie śrub dystansowych Intel
Установка опорных винтов
Intel /
/
安裝
Intel
支柱螺絲
/
安装
Intel
隔架螺丝
Intel
نم دعابلما يغارب بيكرت
3
2
EN
> Attach the provided Intel standoffs.
> Use B for LGA 1150/1151/1155/1156/1366
and attach to mounting posts in backplate.
> Use C for LGA 2011/2011-3/2066 and attach to
mounting posts in processor socket.
> Tighten all four screws until firmly secured.
> Attachez les entretoises Intel fournies.
> Utilisez B pour LGA 1150/1151/1155/1156/1366
et attachez sur les tiges de montage de la
plaque arrière.
> Utilisez C pour LGA 2011/2011-3/2066 et
attachez sur les tiges de montage sur le socket
de processeur.
> Serrez les quatre vis jusqu’à ce qu’elle soient
solidement fixées.
> Bringen Sie die mitgelieferten Intel-
Abstandsbolzen an.
> Verwenden Sie B für LGA 1150/1151/1155/1156/
1366 und bringen Sie sie an den
Befestigungsstiften an der Rückwand an.
> Verwenden Sie C für LGA 2011/2011-3/2066 und
bringen Sie sie an den Befestigungsstiften am
prozessorsockel an.
> Ziehen Sie alle vier Schrauben fest.
> Bevestig de meegeleverde Intel-
afstandschroeven.
> Gebruik B voor LGA 1150/1151/1155/1156/1366
en bevestig deze in de montagevoeten op
de achterplaat.
> Gebruik C voor LGA 2011/2011-3/2066 en
bevestig deze in de montagevoeten op de
processorsocket.
> Draai alle vier de schroeven stevig aan tot ze
goed vastzitten.
> Fissare i supporti Intel forniti.
> Usare B per LGA 1150/1151/1155/1156/1366 e
collegare ai montanti della piastra posteriore.
> Usare C per LGA 2011/2011-3/2066 e collegare
ai montanti del socket del processore.
> Stringere saldamente tutte e quattro le viti.
> Coloque los tornillos de separación
Intel incluidos.
> Utilice la opción B para los modelos LGA
1150/1151/1155/1156/1366 y sujételos
a los postes de montaje en la parte posterior
de la placa.
> Utilice la opción C para los modelos LGA
2011/2011-3/2066 y sujételos a los postes de
montaje en el socket del procesador.
> Apriete firmemente los tornillos.
NL
IT
ES
FR
DE
INTEL
INTEL
LGA 2011
2011-3 /2066
LGA 1150/1151
1155/1156/1366
C
B