


Artiglio Master
operator’s manual
67
EN
vements of the tread in the footprint, on the carcass
and underneath the tread an annular reinforcing
structure generally known as a belt is used. The
tread and the sidewall work with different rigidities
and independently, so as the wheel turns flexural
movements of the sidewall are not transmitted to
the tread.
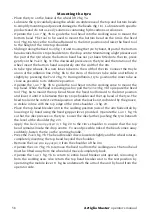
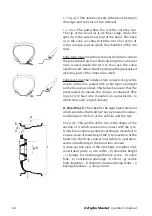
4 - Loop.
This is a loop of metal consisting of several
steel wires. The carcass plies are anchored to the
loop.
5 - Belt.
This is a non-extensible circumferential struc-
ture consisting of plies criss-crossed at very narrow
angles, located underneath the tread, in order to
stabilise the carcass in the footprint area.
6 - Centring ridge.
This is a small ridge running around
the circumference of the top of the bead groove,
which serves as reference to ensure that the tyre is
centred exactly on the rim after mounting.
7 - Guard ridge.
This is a ridge running around the
circumference of the part of the sidewall most at risk
of accidental rubbing.
8 - Sidewall.
This is the zone between the shoulder
and the centring ridge. It consists of a layer of rubber
of varying thickness, intended to protect the carcass
plies against knocks from the side.
9 - Liner.
This is a sheet of airtight rubber blend, vul-
canised onto the inside of tubeless tyres.
10 - Filling.
A rubber profile, generally triangular in
cross-section, above the loop; it ensures the rigidity of
the bead and provides a gradual compensation of the
sudden change in thickness caused by the loop.
11 - Turn-up.
This is the edge of the carcass ply which
is wrapped around the loop and placed against the
carcass in order to fix the ply in place and prevent
it from fraying.
12 - Sole or foot.
This is the innermost layer of the tread,
in contact with the belt or, where there is no belt (bias
ply tyres), with the last ply of the carcass.
7
14
6
11
2
10
4
a
c
d
e
b
Summary of Contents for Artiglio Master 26 MI
Page 38: ...38 Manuale d uso Artiglio Master Note...
Page 183: ...Artiglio Master 183 Fig 2 Fig 1 1 2 3 4 5 B A C D 1 2...
Page 184: ...184 Artiglio Master Fig 3 Fig 4 B A 200 400 1 B A Fig 5b Fig 5 Fig 5a...
Page 185: ...Artiglio Master 185 Fig 7 B H A A A Fig 6...
Page 186: ...186 Artiglio Master 23 Fig 8a 1 15 2 3 4 5 7 6 8 9 10 11 12 13 14...
Page 187: ...Artiglio Master 187 Fig 9a Fig 8b 20 19 16 21 17 22 18 4 1 2 3 5...
Page 188: ...188 Artiglio Master Fig 9b 4 5 7 6 B 8 9 C 10 A B C 3 1 2 A 3 1 2 Fig 9c...
Page 189: ...Artiglio Master 189 A Fig 10 Fig 10a Fig 10c A B C Fig 10b A B C A B C 1 Fig 9d...
Page 190: ...190 Artiglio Master Fig 11...
Page 191: ...Artiglio Master 191 Fig 13 Fig 14 1 Fig 12 Fig 12a...
Page 192: ...192 Artiglio Master Fig 15 1 2 a b c d e f...
Page 193: ...Artiglio Master 193 Fig 16 Fig 17 Fig 18 A...
Page 194: ...194 Artiglio Master Fig 19 Fig 21 HUMP H double HUMP H2 Fig 20 1 A...
Page 195: ...Artiglio Master 195 Fig 22 Y 1 K Z X...
Page 196: ...196 Artiglio Master Fig 23...
Page 197: ...Artiglio Master 197...
Page 198: ...198 Artiglio Master Fig 24...
Page 199: ...Artiglio Master 199 Fig 25...
Page 200: ...200 Artiglio Master Fig 26...
Page 201: ...Artiglio Master 201 Note...
Page 202: ...202 Artiglio Master Fig 29 115 200 230V...
Page 203: ...Artiglio Master 203...
Page 206: ...206 Artiglio Master Cod 463529 Fig 31...
Page 207: ...Artiglio Master 207 Cod 463529...
Page 208: ...208 Artiglio Master Cod 4 104715 Fig 32...
Page 209: ...Artiglio Master 209 Cod 4 104715...
Page 210: ...210 Artiglio Master Cod 463533 Fig 33...
Page 211: ...Artiglio Master 211 Note...


