Continental Refrigerator PC1000i Operator'S Manual Download Page 8

8

PC1000i Crimper – Operator Manual 

PC1000i Crimper with CrimpIQ™ Controller
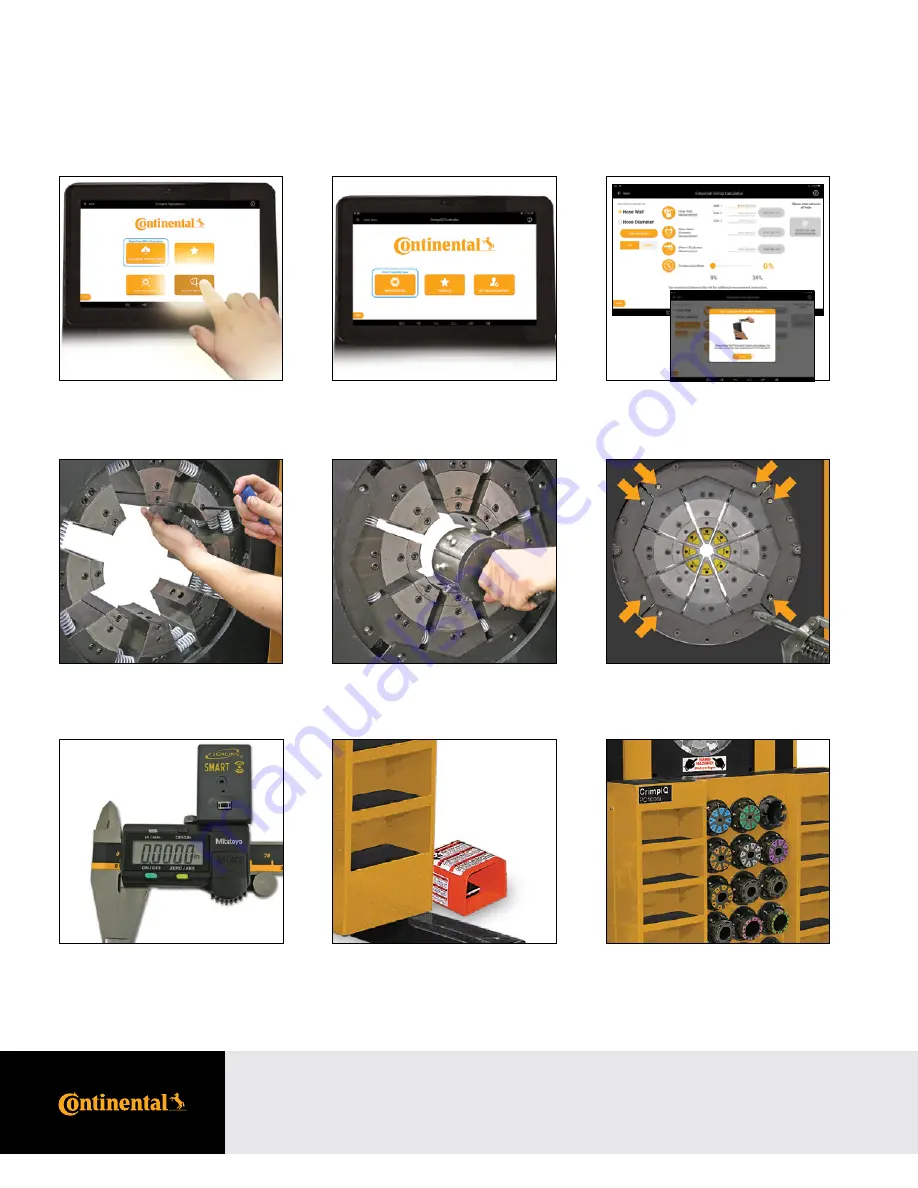
PC1000i Features

Quickly Interchangeable Adapter Dies.

Continental CrimpIQ™ controller, the 
future of crimping at your fingertips.

10-inch color capacitive touchscreen 
and user- friendly navigation.

Intuitive screens lead the operator 
through the setup and crimping process.

Quick change tool makes die changes
a quick and simple process.

Easy grease maintenance through the 
lubrication fittings.

Built-in die shelves and storage pockets 
keeps frequently used die sets readily 
available.

Foot pedal for use in semi and full 
automatic mode.

PC1000i Features

Continental CrimpIQ™ controller
supports bluetooth calipers to input 
crimp diameter measurements.
Saving time and entering accurate
measurements. 

Summary of Contents for PC1000i

Page 1: ...Group or Division Here www contitech us Industrial Fluid Solutions PC1000i Crimper with CrimpIQ Controller Operator Manual www contitech us ...

Page 2: ... Crimper Operations Screen 14 Load Crimp Specifications 14 MyCrimp Search Screen 15 Key Functions of MyCrimp 15 MyCrimp Results Screen 16 MyCrimp Crimp This Specification 17 Managing Crimp Specifications 17 Crimp Specifications with Special Handling Requirements 18 Favoriting Crimp Specifications 19 Editing a Favorite 20 Favorite Special Handling 20 Crimp to Diameter 21 MyCrimp Industrial 22 Enter...

Page 3: ... Solutions 47 Training Manuals 47 Machine Information 47 Other Topics 48 Integrated Caliper Measurements 48 Configuring CrimpIQ Calipers Bluetooth 48 Configuring CrimpIQ Calipers USB 48 Setting Up USB Calipers 48 Using CrimpIQ Calipers 49 Connecting Bluetooth Calipers 50 Initial Setup 50 Access the device s Bluetooth Settings 51 Find the Bluetooth Accessory in the list of all available devices 52 ...

Page 4: ... and identify all component parts before using the crimper PC1000i crimper can produce 485 tons of crimping force Keep both hands away from pinch points Consult the Continental Crimp Specifications Manual for correct crimper setting and crimp measurements Always wear eye protection i PC1000i Safety Precautions ...

Page 5: ...at it matches the crimper s requirements shown on the voltage tag attached to the crimper cord Notes Plug the PC1000i crimper directly into the appropriate electrical circuit wall outlet Electrical Requirements 7 5HP 230V 3Phase 20 Amp 7 5HP 440V 480V 3Phase 20 Amp 5HP 230V 1Phase 30 Amp Caution Do not run the crimper on an extension cord as low voltage can damage the motor and or electrical compo...

Page 6: ...ial Crimp Calculator computes appropriate crimp diameter based on hose and fitting measurements Support for foot pedal and electronic backstop Customizable User account specific settings such as choice of millimeters or inches as first choice for data entry Create individual user logins 4 digit pins to track usage and restrict machine configuration Connected Wi Fi or Ethernet connections for easy ...

Page 7: ...Stop Audio and USB Ports 10 inch Color Touch Screen PC1000i Specifications Crimping force 485 Ton Hose capacity Max 1 2 wire 3 4SP 3 6SP 3 Industrial 10 Crimper size L 54 x W 62 x H 86 Power unit size L 28 x W 33 x H 45 Crimper weight 6 185 lbs Power 7 5HP 230V 3Phase Standard 7 5HP 440V 480V 3Phase Optional 5HP 230V 1Phase Optional Hydraulic die series 99P Adapter die series 145MM to 99MM 230MM t...

Page 8: ...eens lead the operator through the setup and crimping process Quick change tool makes die changes a quick and simple process Easy grease maintenance through the lubrication fittings Built in die shelves and storage pockets keeps frequently used die sets readily available Foot pedal for use in semi and full automatic mode PC1000i Features Continental CrimpIQ controller supports bluetooth calipers t...

Page 9: ...ief setup process must be completed This process sets some initial parameters identifies this machine to the CrimpCloud system and allows the user to confirm the Terms and Conditions for use of this machine This process only needs to be completed once when the machine is installed After that the machine will power up and be ready for use Initial Crimper Setup ...

Page 10: ...intenance Machine This account is an admin level account intended for the local administration Owner It has full access to all settings and functions Default pin code is 9876 User This account has the permissions and capabilities to perform crimping operations but has limited access to settings and diagnostics setup functions Default pin code is 1234 Note The system will automatically log users ou...

Page 11: ... and functions related to this screen directly linked to the screen title Left Menu Provides access to information and functions that need to be available from everywhere within the application Access this with the menu button or by swiping left to right from the left side of the screen Back Menu This allows you to return one screen back when you reach the main menu it brings out the left slide ou...

Page 12: ...meter target currently loaded into the machine This is the diameter the crimper will close to given the size of the dies loaded into the machine Previous Max Max pressure on the last successful crimp Pressure Last Activity Sync The last time that the machine has synced with CrimpCloud Left Slide Out Menu Functions The left slide out menu provides functions that can be executed from anywhere at any...

Page 13: ... Controller Main Menu Screen Options Begin Crimping This button brings up the functions to perform hydraulic and industrial hose crimping Favorites The Favorites button provides users with direct access to favorited crimp specifications Setting and This button brings up all of the support information training manuals and configuration options Support available for this machine ...

Page 14: ...etrieve and load a crimp specification from MyCrimp Favorites This function contains all of the crimp specifications that have been previously favorited Crimp to Diameter This function allows the user to directly enter a crimp diameter Once entered the system will recommend a die and allow the user to proceed to Crimp Operations MyCrimp Industrial This brings up an Industrial Crimp Calculator This...

Page 15: ...imper This is preset to the current crimper type and cannot be changed Favorite Allows the user to favorite selections and view them at the top of the list Clear The clear button and trash can icon clear previous selections and let the user begin a new search Total Crimp Specs Lists the total number of crimp specifications found that match the search criteria View Crimp Allows the user to view a l...

Page 16: ... Once you find the desired crimp specification View Crimp Specifications will allow users to review the matching crimp specifications MyCrimp Results Screen This view provides a review of the hose and fitting selected Select Begin Crimping to begin crimping Crimper Operations ...

Page 17: ...s also found below the specification details MyCrimp Crimp This Specification Selecting Crimp This Specification will allow the user to confirm the crimp specification details Managing Crimp Specifications Begin Crimping Select this option to have the controller configure the crimper and allow the operation to load confirm the correct die is loaded Die Options In special situations the user may wi...

Page 18: ...l Handling Requirements There are cases where the user has to perform additional steps in order to select the correct crimp specification for the hose and fitting combination In these cases MyCrimp will prompt the user with additional information Users can then take the appropriate actions Crimper Operations ...

Page 19: ...p Specifications Favoriting Crimp Specifications The user can save frequently crimped specifications for easy access and repeated crimping This brings up a list of all the favorites saved on this machine This scrollable list can be sorted by date added Recent Favorite name Name or hose size ...

Page 20: ...nger needed Favorite Special Handling There are a subset of crimp specifications that require special handling For these favorites users must make an additional check to verify that the correct crimp specification has been selected The system will automatically bring up a User Action Required dialog and ask the user for an additional confirmation or cancel Note For these specifications the edit fu...

Page 21: ...mply choose the Crimp to Diameter option from the Crimper Operations page Enter the appropriate crimp diameter target in inches or mm As you enter a target diameter the crimp automatically calculates the equivalent measurement in the other unit of measure The system will recommend a die and you can proceed to crimping Note If the keyboard is not visible tap the Diameter data entry area and the key...

Page 22: ...with a compression ratio The calculator will then calculate the appropriate crimp diameter The calculator provides additional details on each required value Press on the measurement icon and a more detailed description pops up Entering Industrial Measurements Hose Wall Allows users to perform the calculation based on 3 measurements averaged of the hose wall thickness Hose Diameter A single hose di...

Page 23: ...ssion ratios are available from hose and fitting manufacturers Ratios must be between 10 and 35 As data is entered the calculator will determine the final crimp diameter users cannot proceed to crimping until all fields have information entered Once the data is entered and the calculation complete you can proceed to crimping MyCrimp Industrial ...

Page 24: ...d for this crimper the user is prompted to install the recommended die Notes Continental dies use color coding to help the user select the correct die set The crimper will always prompt the user to Install Confirm that the die is loaded Therefore even if the recommended die is already loaded the user will always be prompted to confirm that the correct die is installed in the crimper While on the C...

Page 25: ...luded because they are not capable of reaching the crimp diameter This list is scrollable You can slide the list up and down but in general the list will be centered on the dies that can be used for this crimp This list is limited to the dies configured when the initial machine setup was completed either in the factory or during the initial machine setup If you have a die appropriate for this crim...

Page 26: ...nge Die Mode When you select the die the pump will start and the Open Close buttons will work to allow you to load the die in the crimper Once the die has been loaded press the OK to continue Note If the desired die is already loaded simply press OK to continue Beginning a Crimp ...

Page 27: ...crimp always needs to be measured to ensure the crimp is within tolerance of the crimp diameter Note Once the calibration crimp has been completed and an initial crimp diameter entered manually entered or entered via USB CrimpIQ calipers the crimper will automatically adjust to accurately crimp subsequent crimps Crimp Operations ...

Page 28: ...eter measurement matches the current crimp target the user can press the Crimped to Target button to automatically enter the measurement with a single button press If a value is incorrectly entered simply press the clear button Once the measurement has been entered the Save button is enabled and saves the measured crimp diameter for quality assurance reporting A keyboard will pop up on the bottom ...

Page 29: ...e on this screen the pump is running and the Open Close buttons are enabled limited by Crimp Mode Crimp Operations Screen Sections The operations screen is divided into 5 sections Operations Information Crimp Detail Panel Crimp Mode Crimp Settings and Crimp Management Operations Information Crimp Mode Crimp Settings Crimp Management Crimp Detail Panel Crimp Operations ...

Page 30: ...ssures The last 10 maximum crimping pressures measured in PSI Note Users may not be required to measure every crimp Combined View This view combines the measurement and the max pressure view into one Crimp Detail Panel This area of the screen provides the user with additional information about the crimping processes The data in this area rotates through a series of screens with different informati...

Page 31: ...and hose size information when loading a MyCrimp specification Hose Image If a hose image is available this image will be displayed Spec Notes This view shows the crimp specifications notes Industrial Crimp This view summarizes the values entered into the Industrial Crimp Calculator Crimp Operations ...

Page 32: ...ce the crimper Mode reaches the target position the crimper will automatically open back to the retraction point Full Automatic This mode allows the crimper to complete a complete cycle close then open with just a single Mode push of the close button Once the hose and fitting are correctly positioned press the close button once and the crimper will close to the target position and then automatical...

Page 33: ...ss the favorite icon on the left PSI Monitoring The CrimpIQ controller has the option to monitor the crimping pressure and alert the user if the Max PSI PSI is out of range Press the PSI icon to configure the target PSI and tolerance Crimp Count The CrimpIQ controller keeps track of the crimps completed By default this count goes up but you can also set it to count down This is configured using th...

Page 34: ...p diameter When activated the user can enter a crimp diameter measurement Change Die Mode This mode allows the user to change die Suspend Crimp Suspend Crimp is intended to put the crimper in a safe mode when the user needs to step away from the machine for a short time While suspended the pump is turned off and the Open Close buttons are disabled Done This button should be used when the user has ...

Page 35: ...ce See Machine Configuration below Support Support page allows users to request support directly from the machine See the Support below Manufacturer Website Access to all of the information on the Continental corporate website See the Manufacturer Website below Training Manuals Direct access to setup guides and training manuals for the machine and controller See Training Manuals below Machine Info...

Page 36: ...r will attempt to back these changes up to CrimpCloud This backup requires an Internet connection to complete Machine Configuration Options Manage Preset Dies Setup the dies that are available for crimping on this machine See Manage Preset Dies above Manage Users Edit and setup machine users See Manage Users above Self Calibration Check the crimper calibration See Self Calibration Mode above Maint...

Page 37: ...sed Purchased to allow the CrimpIQ controller to filter the list of dies the user sees to only dies that are available with this machine Each die has a name type size in inches and size in mm If there is also a color code associated with the die that is displayed Administrators also have the option to create additional dies Select the Create New Preset Die button and setup additional dies Settings...

Page 38: ... configured This user type can change all machine settings access all support information and perform all crimp operations Machine Tech This type has privileges to maintain the machine but cannot perform crimping tasks Supervisor This type has privileges to monitor machine operations but cannot perform maintenance tasks Machine User This type has privileges to use the machine perform all crimping ...

Page 39: ...e either triggered by the number of crimps or the number of days since the last maintenance based on the requirements of the task Users can come to this Maintenance Mode screen and perform maintenance tasks or wait for the popup alert Recording a maintenance task provides the user with an opportunity to add notes The logged in user and date time are recorded along with the maintenance task A compl...

Page 40: ...he appropriate Wi Fi Network enter in any required credentials and connect Connecting to a Captive Portal Some customer locations have restrictions on which machines can connect to the company s internal network If this is the case see the additional connection options section below Verifying Connection Status When the Internet connection has been successfully established the connection status wil...

Page 41: ...e setup process only takes a few minutes after which the Wi Fi connection is not needed b Some facilities Wi Fi connection use a web page to request user Wi Fi login credentials The controller supports this After selecting the appropriate network return to the CrimpIQ controller setup screen Use the verify connection option to bring up the ContiFluidSolutions home page The local network will then ...

Page 42: ...p configuration Simply press Backup to CrimpCloud and the backup is performed General Configuration The following is a collection of other settings available to Administrators to configure the CrimpIQ crimper to meet their specific needs User Settings Preferred Units Each user can have own settings for default units Default units determine which data entry field the cursor is placed in Update Mach...

Page 43: ...full power crimping mode Note The default value generally does not need to be changed User Timeout Length Length of time idle in minutes before the machine automatically locks and requires a pin to login Note This feature has an option to turn off disables user timeout Die Selection Tolerance This setting helps the crimper recommend the best die for each crimp This tolerance value ensures that the...

Page 44: ...he latest version of the application Note Internet connection is required Check for Update to MyCrimp Trigger the CrimpIQ controller to connect to CrimpCloud and check for MyCrimp application updates If found the controller will download and install the latest version of the MyCrimp application Note Internet connection is required Force CrimpCloud Operation Trigger the CrimpIQ controller to upload...

Page 45: ...ntal support staff Note The system must be connected to the Internet for this function to work The user should create a ticket to get support Create a Ticket This option allows the user to enter text to describe their issue They can attach an image using the camera button on the bottom menu bar to capture the screen where the error is encountered Once submitted this information is sent to CMS tech...

Page 46: ... the bottom row of icons Images can be attached by pressing the paperclip icon in the upper right corner of the screen 4 Add images and text You can attach multiple images to the ticket and add text to explain your issue 5 Complete the process To complete the process and send the support ticket press the arrow icon in the upper right section of the screen What Happens Next Once you submit the tick...

Page 47: ... services Training Manuals The controller provides access to a number of different training manuals The page lists a number of support resources available to machine users These files are downloaded as requested from the Internet Internet connection required Machine Information The Machine Information screen provides operations and administrators with access to a range of operational and machine i...

Page 48: ... list of Bluetooth devices as Bluetooth Keyboard in the list of AVAILABLE DEVICES Select Bluetooth Keyboard from the list of devices to pair If you don t see this turn Bluetooth off and then on The Bluetooth Keyboard should say Pairing while it is pairing with the tablet and moved to list of PAIRED DEVICES once it is paired The iGaging dongle will also beep when pairing is complete Select the appr...

Page 49: ...into the text box Simply place the cursor in the correct field and press the DATA button on the calipers Whatever value is displayed on the caliper display will automatically be transferred into the controller If calipers are connected to the controller number entry keypads do not always appear Simply press in the data entry field and a keypad will appear For example if changing users with the USB...

Page 50: ...etooth dongle Note To replace batteries when needed use a SR44SW 1 55V battery for the calipers and CR2032 3V battery for the Bluetooth dongle Step 2 If necessary remove the standard port cover from the top of the calipers above the Mitotoyo logo with a paperclip Insert dongle into port facing same direction as caliper screen Note There may be a cover installed over caliper accessory port Remove w...

Page 51: ...en should show 0 00 inches millimeters when at the zero position Step 5 Tap gray area in pull down menu and tap the Gear icon to show full settings menu Step 4 Access the device s Bluetooth Settings Swipe down from the upper right of the device screen to reveal an options panel Tap the Bluetooth button to open the Bluetooth management page Android 5 1 Above Connecting Bluetooth Calipers ...

Page 52: ...ooth feature switch is in the On position When Bluetooth is enabled and the blue light on the adaptor is flashing the device should appear on the list with the name Bluetooth Keyboard and you should see other devices available as well for nearby phones or computers It is possible that the device will appear with no name or a name such as 0F 5E 12 9A B4 or any other group of letters and numbers If ...

Page 53: ...he battery and hold the send button on the module until it beeps and the blue light blinks This should reconnect the module to the tablet If the device does not connect automatically follow the steps above to reconnect the accessory Connecting Bluetooth Calipers Troubleshooting Number Pad Not Showing If you find testing the calipers that the number pad isn t displaying on screen to manually enter ...

Page 54: ... mm O D to 145 mm I D Adapter Die each finger individually as shown in photo 3 Notes Use the T Handle Wrench provided with the crimper to tighten the 2 master die locking studs to secure the adapter die finger Repeat the same step for the remaining 7 adapter die fingers The die size stamped on the face of the adapter dies should face toward the operator Next install the 145 mm O D to 99 mm I D Ada...

Page 55: ... size stamped on the face of the hydraulic die set should face toward the operator Align the studs of the Hydraulic Die set with the holes in the Adapter Die and with the crimper in manual mode SLOWLY close the crimper head on the hydraulic die set as shown in photo 2 Next bring the crimper head to the fully closed position as shown in photo 3 Remove the quick change tool as shown in photo 4 Notes...

Page 56: ...gin first bring the master dies to the fully closed position as shown in photo 2 Next lubricate the master dies through the 8 lubrication fittings in the protective plates as shown in photo 3 With the dies still in the fully closed position lubricate the 2 lubrication fittings visible through the two bottom lubrication fittings in the face of the crimper as shown in photo 4 Notes Parking the crimp...

Page 57: ...n the controller screen Resetting the PLC to Its Original Settings Open the back electrical enclosure Power up the crimper from the main power switch The crimper must be powered on during the PLC reset procedure Move the three position toggle switch on front of the PLC right to the STOP position and then left to the RUN position Return the toggle switch to the center TERM position Cycle the main p...

Page 58: ...w voltage or inadequate electrical service Check motor rotation and be certain that the motor rotates in the direction of the arrow on the motor housing Note For three phase units rotation can be reversed by switching any two wires in the plug PROBLEM THE CRIMPER WILL CLOSE ON THE FITTING BUT DOES NOT DEVELOP POWER TO COMPLETE THE CRIMP Position the master dies to the fully opened position and che...

Page 59: ...M 1 CC1000 FRONT PANEL 103204 1 1 2 CC1000 PROTECTIVE SLIDE PLATE 103209 2 1 CC1000 BACK PANEL 103214 3 2 CC1000 PROTECTIVE PLATE WRAP 103236 4 1 CC1000 TOP FRAME WRAP 103219 5 24 M6 X 12 BHCS 91239A318 6 2 M6 X 16 BHCS 91239A321 7 15 99S DIE HOLDER 101242 8 60 1 4 20 x 3 4 SHCS 91251A540 9 2 CC1000 BASE LEG 103208 10 8 M12 X 50 SHCS 91290A626 11 5 4 2 3 6 7 1 8 9 6 2 10 6 PC1000i SHEET METAL ASSE...

Page 60: ...IDING V PLATE 103150 2 4 CC 1000 MASTER DIE WEAR PLATE 103157 3 8 M10 X 20 FHCS 91294A328 4 2 CC 1000 STATIONARY WEAR PLATE 103163 5 8 M6 X 25 FHCS 91294A242 6 1 CC 1000 CYLINDER ASSEMBLY 103158 7 1 M16 X 70 SHCS 91290A837 8 2 CC1000 LEFT SUPPORT LEG ASMB 103206 L 9 2 CC1000 RIGHT SUPPORT LEG ASMB 103206 R 10 8 M12 X 50 SHCS 91290A626 11 8 M12 WASHER 91166A290 12 1 2 3 5 6 4 8 7 11 12 9 10 TORQUE ...

Page 61: ...284 6 1 CC1000 POTENTIOMETER BRACKET 103248 7 2 M12 X 50 SHCS 91290A626 8 1 M16 X 50 SHCS 91290A820 9 4 CC1000 PROTECTIVE PLATE ALIGNMENT TABS 103230 10 1 CC600 1000 ROLLER LIMIT SWITCH 103473 11 1 CC600 1000 ADJUSTABLE BRACKET 103349 12 4 CC1000 PROTECTIVE PLATE KEY 103448 13 1 CC600 CC1000 LINEAR POTENTIOMETER 103472 14 2 10 24 x 5 8 SHCS 91251A244 15 2 10 24 X 3 4 SHCS 91251A345 16 2 10 24 ROUN...

Page 62: ...reakdown CC1000 MASTER DIE ASSEMBLY QTY DESCRIPTION PART NUMBER ITEM 4 CC1000 MASTER DIE CARRIER 103147 1 40 CC1000 MASTER DIE ALIGNMENT NUT 103249 2 40 M4 X 10 SHCS 91290A144 3 8 M8 X 45 SHCS 91290A446 4 8 CC1000 MASTER DIE SHOE 103156 5 24 DIE SPRING 103470 6 2 M10 X 100 SHCS 91290A548 7 4 1 5 3 2 6 7 3 2 PC1000i MASTER DIE ASSEMBLY ...

Page 63: ...LY 103161 3 QTY DESCRIPTION PART NUMBER ITEM 1 CC1000 SHEET METAL WRAP 103219 1 4 CC600 1000 MIRROR BRACKET SUPPORT ARMS 103307 2 1 CC600 1000 MIRROR ATTACHMENT BRACKET 103345 3 1 12 X 12 MIRROR 103471 4 2 M12 X 40 BHCS 91239A620 5 2 3 8 16 X 1 BHCS 91255A624 6 2 3 8 16 HEX NUT 94846A031 7 2 3 8 16 X 1 1 4 BHCS 91255A626 8 2 3 4 5 1 7 6 8 PC1000i MIRROR BRACKET ASSEMBLY ...

Page 64: ...ate of invoice This warranty ends when the product becomes unusable for reasons other than defects in workmanship or material If any product or part manufactured by CustomCrimp is found to be defective by CustomCrimp at its option CustomCrimp will either repair or replace the defective part or product and return via ground transportation freight prepaid This warranty does not cover any product or ...

Page 65: ...ve influence on the industrial infrastructure We see digitalization and current trends as an opportunity to work with our customers to add sustainable value for both sides and for good The content of this publication is not legally binding and is provided as information only The trademarks displayed in this publication are the property of Continental AG and or its affiliates Copyright 2018 ContiTe...

Reviews: