background image


EPIQ 5 & 7 Training Manual 

© 2016 Conquest Imaging 

35 

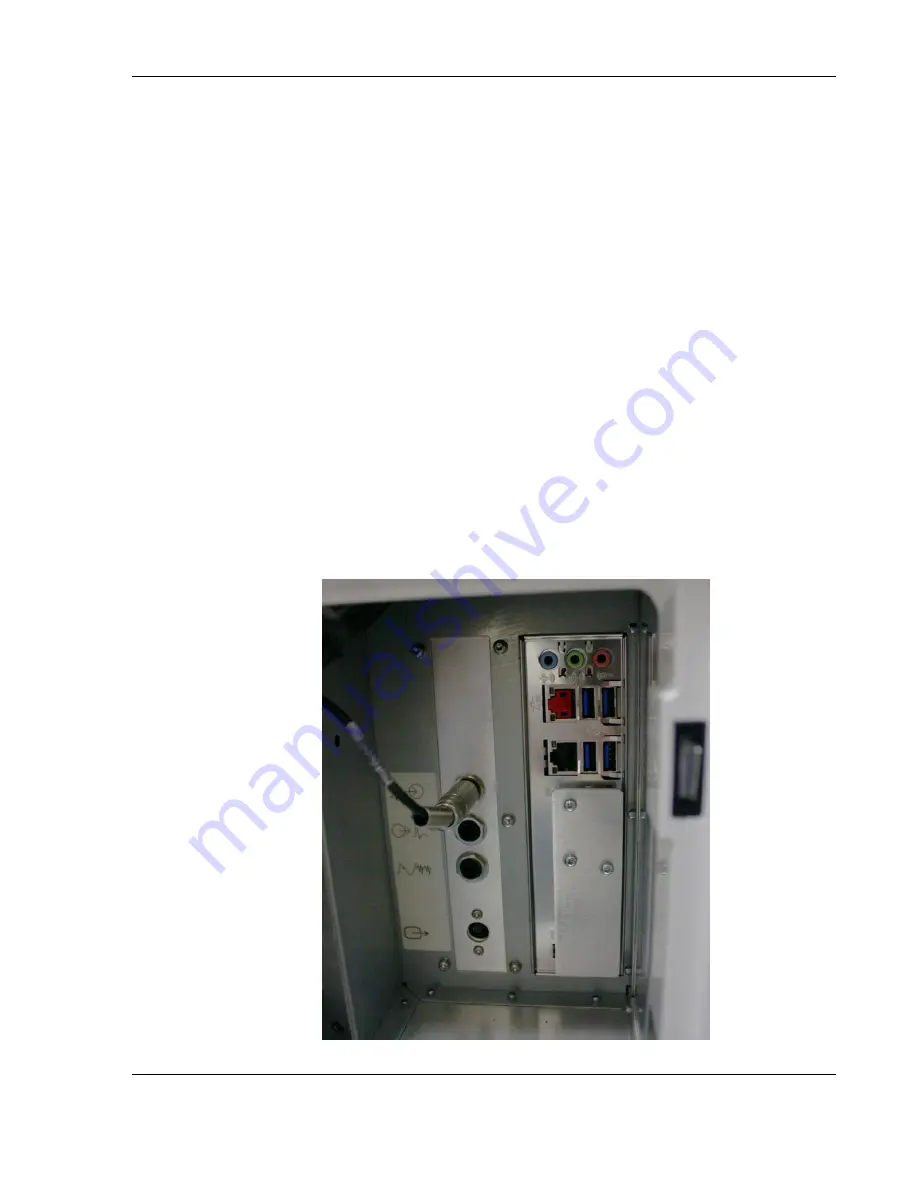
Install Wireless Network Adapter BCM Motherboard 

The following procedure tells you how to install the wireless network 
adapter on systems using the BCM motherboards (version 1.2 
systems and later: 

1. Verify that the customer intends to use wireless networking. 

2. Remove the adapter, extension cable, cable-tie mount, and cable 
tie from the accessories box. 

3. Remove the right side enclosure. 

4. Remove the paper from the adhesive backing of the cable-tie 
mount, orient the opening on the mount horizontally, and attach the 
mount to the right of the USB connectors. 

5. Connect the extension cable to the network adapter and the lower 
right USB port. 

6. Secure the adapter with the cable tie and trim the end of the tie. 


All manuals and user guides at all-guides.com

Summary of Contents for Philips EPIQ 5/7

Page 1: ...All manuals and user guides at all guides com a l l g u i d e s c o m...

Page 2: ...All manuals and user guides at all guides com...

Page 3: ...5 only 10 User Interface Components 10 Control Panel Controls 11 Audio I O Module 12 Video Configurations for Different Models 12 VIO Module and Graphics Card 12 SVIO Module 12 EPIQ S Video Option 13...

Page 4: ...6 Set Type of Connection Ethernet or Wireless 36 Manually Set Network Connection Type 36 Configure Ultrasound System for a Network Connection 37 Configure DNS Settings 37 DICOM Device Server Configura...

Page 5: ...on and body marker functions 57 Measurement and Analysis Test 57 To Perform a 2D Distance Measurement 58 Query Retrieval Test 58 To Query a PACS Device for Exams 58 Peripherals Tests 59 To Test DVD Re...

Page 6: ...attery Replacement 82 Replacement Procedure 82 Resetting the BIOS 83 To change the BIOS settings 83 Post VIO or Graphics Card Replacement 84 Display Assignment 84 To set the monitor and touch screen f...

Page 7: ...EPIQ 5 7 Training Manual 2016 Conquest Imaging v DICOM Devices to Connect to System 100 Other Needed Information 101 All manuals and user guides at all guides com...

Page 8: ...All manuals and user guides at all guides com...

Page 9: ...ules Understand the role of each component in the system Be able to perform standard maintenance procedures Have the knowledge to troubleshoot common problems Be able to safely access and replace boar...

Page 10: ...tive Maintenance Probe Care and Handling NFPA 99 Electrical Safety Crash Course OEM Platforms To see the full descriptions and the scheduling of these courses please visit our training department webs...

Page 11: ...a power regulator providing both AC and DC voltages needed by the components on the board System Front End Components This section covers system frontend topics for the EPIQ 5 and EPIQ 7 Front end is...

Page 12: ...t end are the Acquisition Control Board ACB along with the Channel Board CB and the Transducer Select Board TSB Front End Block Diagram The front end manages the input from the transducers performs An...

Page 13: ...ve data It uses the PCIe bus to pass information between the ACB and the motherboard The Argon FPGA controls the transmission sequence by sending the Xmit Start signal to the CB Argon also provides th...

Page 14: ...agram Channel Board Neon0 FPGA Neon1 FPGA Power Regulator Filter 160 MHz OSC Clock Distribution ADC Chipper 16Ch Analog ASIC Chipper 16Ch Analog ASIC Chipper 16Ch Analog ASIC Chipper 16Ch Analog ASIC...

Page 15: ...F signal sent to all channels for test purposes using the I2C bus Transducer Select Board The Transducer Select Board TSB switches input and output signals from the four transducer connectors and one...

Page 16: ...ctions such as master controller signal processing image memory video layout peripherals and user interface PC Module Motherboard EPIQ systems use different motherboards depending on the version of th...

Page 17: ...et Supported by no battery and two battery power supply configuration BCM Motherboard customized BC77Q This motherboard contains a single quad core processor from the Intel Core i7 i5 i3 product famil...

Page 18: ...eo for the touch screen Supports up to three graphics heads on one graphics board including monitor 1920 x 1080 Aux Video region of interest or full screen user selectable and control panel touch scre...

Page 19: ...Q 5 7 Training Manual 2016 Conquest Imaging 11 LED status indicators Keyboard illumination LEDs Spare USB connector TGC slide controls Control Panel Controls All manuals and user guides at all guides...

Page 20: ...2 Audio Codec and two amplifiers that output to the system monitor s two high frequency speakers 3 Audio Codec and amp to subwoofer mounted above VPPM Video Configurations for Different Models Dependi...

Page 21: ...connector on the user connector panel No other configuration is required For theory of operation see the SVIO Slim Board section of this manual EPIQ Non S Video Option The EPIQ Non S Video option repl...

Page 22: ...tion SVIO Module or SVIO Slim board installed the embedded graphics chip also processes S Video for systems requiring SVHS VCRs DVRs or other analog peripherals Video processing on the motherboard clo...

Page 23: ...s for audio output and a microphone for user annotation of DVDs Video I O Module The Video Input Output Module VIO handles video signal input and out functions The VIO is located in a PCI E slot of th...

Page 24: ...VI format Systems with VIO and Graphics Card Video Configuration iButton It is important to note that for software version 1 3x and earlier the iButton which contains the system chip ID number for the...

Page 25: ...t for additional Aux video format at 1920 x 1080 or 1024 x 768 resolution The 1024 x 768 signal is a subset of the image called the region of interest ROI The DisplayPort output supports the following...

Page 26: ...d analog Aux video signals The S Video output is 1024 x 768 ROI and is always enabled The user can configure S Video inputs to NTSC or PAL video information It also generates the supply power 12 Vdc t...

Page 27: ...Video Configuration below The remaining S Video connector is on the bottom of the board That connector supplies the S Video signal to the user connector panel only on systems with the EPIQ S Video Opt...

Page 28: ...tivation of the three solenoids that lock control panel position The solenoids are located on the gas strut the upper swivel and the lower swivel of the control panel articulation arm The board is nor...

Page 29: ...Status AC Status Power Indicator Sleep Indicator Power Off Disconnected Unlighted Unlighted Power Off Connected Lighted white Unlighted Sleep Mode on Connected Lighted green Lighted white Sleep Mode...

Page 30: ...stem monitor is powered by VDC_SYS voltage 24 Vdc It is not powered by the battery to reduce battery load When activating the control panel articulation solenoids the Power Supply Module AC in PC Modu...

Page 31: ...rrent demand Low AC input 65 85 VAC Non essential voltages are shut down so scanning can continue Essential voltages remain on Insufficient AC input 65 VAC and below VPPM shuts down all output voltage...

Page 32: ...upports the video monitor 12 VDC Yes Provides power to the disk drives and cooling fans Provides power to other lower voltage power supplies on the motherboard 5 VDC Yes Provides logic power for the d...

Page 33: ...the charge on the batteries 120 VAC Inverter Voltages No Produces isolated AC power for the peripherals Connections are on the side of the VPPM which is accessible from the rear of the system Optional...

Page 34: ...not in range of 21 6Vdc to 30 Vdc the 24VDC from VPPM to power regulator board is disabled When the Power Regulator on signal PWR_REG_ON from the VPPM indicates that the voltage from the VPPM is stab...

Page 35: ...ges from the backplane to the Channel Board PRB Fan Temp Control PIC HV Supply Fan Channel Board BACK PLANE Power Module ACB Motor FAN_CTRL 24V PWR_REG_ON MOTOR_PHASE 3 MOTOR_PHASE 3 5 5AS 3 17A 3 8AS...

Page 36: ...ircuitry or components although it does have a power switch PWR_SW and a reset switch RESET_SW that connect to the power pins on the motherboard Reset starts a reboot of the system The backplane is pa...

Page 37: ...d PC ATX connections Backplane power connector Backplane signal connector Power Distribution Board Connectors Temperature Control System temperature is monitored and controlled by the I2C bus and seve...

Page 38: ...on ACB provides master clock for the I2C diagnostic bus Monitored Temperature Locations Factory Set Threshold Temperatures It is possible to alter the factory set temperature threshold settings if ne...

Page 39: ...DICOM The Digital Imaging and Communications in Medicine DICOM is a standard that specifies a consistent file structure for biomedical images and important associated information that must remain ass...

Page 40: ...lick Use the Following DNS Server IP Addresses in order and add one or more DNS addresses If the network administrator specified DNS suffixes click Append Given Name with One of the Following DNS Suff...

Page 41: ...system System Ethernet Jack Ethernet Connection Diagram 1 Ultrasound system connected directly to an Ethernet connection through a jack on the wall shown in blue 2 Ultrasound system connection to the...

Page 42: ...less Network Adapter SuperMicro Motherboard To install the wireless network adapter on systems using the SuperMicro motherboards version 1 0 and 1 1 systems Make sure you have the adapter cable tie mo...

Page 43: ...working 2 Remove the adapter extension cable cable tie mount and cable tie from the accessories box 3 Remove the right side enclosure 4 Remove the paper from the adhesive backing of the cable tie moun...

Page 44: ...Utilities On the System tab touch Setups Click Setup Wizard Getting Started and click Next three times In Export and Storing Data click Store to PACS DICOM Data Image CineLoops Click Yes I want to set...

Page 45: ...DNS settings for your system Press Support Click the Network DICOM tab Click DNS Settings If the network administrator specifies domain name server DNS IP addresses click Use the Following DNS Server...

Page 46: ...can be assigned different servers default or backup different printers that are connected to the network or other media devices such as DVD recorders DICOM Printer Configuration To add and verify a D...

Page 47: ...name If you want to change the number of copies film display format or film orientation click Edit and enter the new settings If available click Advanced and if necessary edit those settings Click OK...

Page 48: ...the server automatically you can choose Automatically Perform DICOM Verification After Saving Note The query retrieval device must verify Study Root Query Retrieve Find and Study Root Query Retrieve M...

Page 49: ...b touch Setups and click on Setup Wizard Click Getting Started and click Next three times In Export and Storing Data click Store to PACS DICOM Data Image CineLoops Then click Yes I want to setup netwo...

Page 50: ...COM parameters can help the performance until the network is updated In general only someone who is well versed in DICOM parameters would alter these To access these settings Press Support and Click t...

Page 51: ...onfigure the parameters under which the system automatically resends exam content and storage commit requests Setting Auto Retry for DICOM Storage Commit The auto retry is set with factory default opt...

Page 52: ...sion select one of the following Uncompressed RLE Lossless Compression JPG Lossy Compression For MonoChrome select one of the following Monochrome Off Send BW as Monochrome Color as RGB Send all as Mo...

Page 53: ...e Structured Reports To a DICOM Structured Report Server sends the structured report to a separate storage server from the images Enabling Export of Native Data Native data files are files that contai...

Page 54: ...ional images can still be saved and additional patient exams can be created for Almost full messages Full messages do not allow additional patients to be created or images to be saved If the maximum n...

Page 55: ...g Manual 2016 Conquest Imaging 47 Do one of the following Click Manual Click Automatically Delete Archived Exams and choose the time interval to keep the exams Click Save All manuals and user guides a...

Page 56: ...stem backup is very important Backup the system anytime you are in front of it Your backup is not complete without printouts To create backup on EPIQ systems Support System Management Backup Restore S...

Page 57: ...firmware System performance must be verified after installation after every repair involving PCB or module replacement and during every preventive maintenance inspection If measurements are inaccurat...

Page 58: ...bled you are able to start a regular exam If patient data security is enabled you can only start an exam as an emergency study using a temporary patient ID Successful execution of the exam start tests...

Page 59: ...d Exam to ensure the previous exam was ended 3 Enter the patient data and click Done 4 Select a transducer from the touch screen 5 Touch an application preset Now you can continue to exercise the syst...

Page 60: ...ult size 12 Turn 2D Opt and verify the setting changes on the touch screen Verify that the MI and TI values change on the imaging display 13 Turn Loop Length Verify that the setting changes on the tou...

Page 61: ...hanges to an orange color 9 Turn CPA Verify that the color in the color box changes to the orange colors Testing PW Doppler CW Doppler and M mode Successful execution of this test indicates PW CW M mo...

Page 62: ...udio 6 Touch Mute Verify that there is no sound from the speakers Touch Mute again to turn the volume on again 7 Touch the center dot in the volume control slider and slide both directions Verify that...

Page 63: ...uisition touch Full Volume 8 Press Rotation Style and do one of the following a Select Absolute to allow rotating the image relative to the acquisition axes of the image b Select Relative to allow rot...

Page 64: ...ck Done 7 To display the Patient Directory touch Review 8 Insert a new DVD into the DVD drive 9 Select the patient exam that was most recently ended and click Send To 10 In the Send To dialog box clic...

Page 65: ...ant to appear on the display 5 To display predefined labels touch a label control to display its text 6 To display an arrow press the Arrow quick key position the arrow with the trackball and then cli...

Page 66: ...report 9 Press 2D to return to 2D imaging 10 Press Pointer a couple of times Verify that an arrow appears and disappears from the display Query Retrieval Test You must be able to complete a query bef...

Page 67: ...a PW Doppler image 4 Touch Utilities 5 Touch DVR DVD recorder 6 To format the disc touch Format Status 7 Touch and record several seconds of video 8 Touch to pause the video 9 Touch to stop the recor...

Page 68: ...preset 2 Acquire a 2D image 3 Press Freeze 4 Determine which print controls are associated with the printer a Touch Utilities b On the System tab touch Setups c Click Acquisition Capture d Click the A...

Page 69: ...es all the remaining subtests System Test is available to all users and displays a pass fail result on the system monitor The subtest results are annotated in the system logs If an error message is di...

Page 70: ...ful export and click OK Filter Cleaning Philips recommends once yearly cleaning at minimum and more often in dusty environment Also you should think of this as one of these very first Is it plugged in...

Page 71: ...ended interval for caster maintenance is also every 12 months You will need to use the system cart lift tool and Molygraph SL3144 bearing grease as recommended by Philips if maintence or replacement i...

Page 72: ...the lift tool to avoid damage to the system Read the assembly and usage documentation before attempting to use the lift Monitor and External Surface Cleaning The monitor and touch screen are generally...

Page 73: ...terior plastic covers Touch Screen Calibration Touch screen calibration should be performed during preventive maintenance procedures or after touch screen replacement To calibrate the touch screen Pre...

Page 74: ...aned as a part of normal preventive maintaince Before cleaning you should check the trackball for smooth operation To Clean the Trackball To remove the trackball use your thumb and index finger press...

Page 75: ...al 2016 Conquest Imaging 67 Use a cotton swab moistened with alcohol to remove dust and debris from the trackball reservoir Then use a second alcohol swab to clean the rollers All manuals and user gui...

Page 76: ...t Imaging 68 Replace the trackball in the reservoir and carefully align the ring to prevent damage to the threads while turning clockwise until it is securely in place All manuals and user guides at a...

Page 77: ...s shock hazards The chassis is grounded with a three wire plug and cable which must be plugged into a grounded outlet Never connect the system using a power strip or extension cord The ultrasound syst...

Page 78: ...e environment Because ultrasound imaging frequencies are in the RF range ultrasound transducer circuits are also susceptible to RF interference For example the noise generated by an ESU in use can eas...

Page 79: ...ires use only extingushers that are specified for this use Using water or other liquids is very dangerous and can lead to injury General Cautions Batteries must be handled as hazardous waste Check tha...

Page 80: ...sues If you have power but the system will not start up with the power button you can try checking the following on the motherboard Click on off switch at the LED if it is white 5V_STBY is present Nex...

Page 81: ...e Number Status 1 AC Power Present 2 Battery status see table 3 24V and VDC_SYS is ready 4 ATX and PC voltages are ready Rear Panel of VPPM Channel Board LED Indicators The Channel Board LED Indicator...

Page 82: ...6 Conquest Imaging 74 Power Regulator Board LED Indicators The following photos show the LEDs in a system that is functioning normally Immediately After Power Up Normal Steady State All manuals and us...

Page 83: ...7 Training Manual 2016 Conquest Imaging 75 Acquisition Board Power Status LED Indicators The following LED indicators are found on the aquistion control board All manuals and user guides at all guide...

Page 84: ...non booting systems Normally you use MTE when the operating system boots but the system application does not boot You may enter MTE by pressing Ctrl Alt R during the bootup process If an error messag...

Page 85: ...fidence test Software Maintenance Allows to install or repair software by reinstalling the application or the operating system and application Disk Utilities Enables users to perform hard drive mainte...

Page 86: ...e to follow proper power down procedures and be mindful of proper ESD procedures during any maintenance Some important points to remember when you power down to perform maintenance or repairs Make sur...

Page 87: ...he active circuitry of the system To open the E Module Locate the peripheral bay release mechanisms on each side of system Slide release mechanism towards back of system Lift the peripheral bay up and...

Page 88: ...you with the locations of boards and modules The two black boxes are large heat sinks containing the processors note that some newer EPIQ models have only a single processor A C B P R B HDD2 HDD1 HDD...

Page 89: ...l baywhere the Rear I O panel is installed Using a T20 TORX screwdriver remove the screw that secures the Rear I O panel to the peripheral bay Using a wide blade slot screwdriver insert the screwdrive...

Page 90: ...settings you may want to check the motherboard battery The battery is a standard CR2032 CMOS lithium 3V coin cell Expected battery life is about 5 years The BIOS may need to be reset after battery rep...

Page 91: ...the BIOS display enter your password Verify the settings against those in Appendix 1 BIOS Settings Locate the type of setting and use the keyboard to select the settings To highlight the setting type...

Page 92: ...Test Utilities Hardware Utilities In the dialog box that reminds you to reboot the system when you exit SupportConnect click Yes On the Interactive Utilities display click Display Assignment Run Test...

Page 93: ...e and earlier VIO Module 1 4 software SVIO Module Main Board 1 4 1 software AIO8 module If you are unsure of which software version you can reboot the system You can see it on the display when the sys...

Page 94: ...e the upper release lever just under the control panel surround 2 Press down and hold it while rotating to the next position When you release the lever it locks into the next detent 3 Repeat if needed...

Page 95: ...to adjust the monitor articulation arm buoyancy and or the swivel knuckle tension Adjust Monitor Articulation Arm Buoyancy 1 Check monitor buoyancy to determine sensitivity 2 Remove left right articu...

Page 96: ...g Monitor Swivel Knuckle Tension 1 Rotate monitor left right to determine ease of rotation 2 Tighten or loosen the screw at the bottom of the knuckle 3 Readjust as needed Adjustment Screw All manuals...

Page 97: ...rface standard administered by the Video Electronics Standards Association VESA Doppler effect Change in the frequency of a periodic event such as sound waves due to a change in distance between the s...

Page 98: ...ted at different angles to obtain image Physio Refers to ECG inputs Protocol Data Units Message formats exchanged between peer entities within a layer A PDU consists of protocol control information an...

Page 99: ...in Name Server EIO Extended Input Output board EMC ElectroMagnetic Compatibility EMI ElectroMagnetic Interference ESD ElectoStatic Discharge ESU Electo Surgical Unit FRU Field Programmable Gate Array...

Page 100: ...System SCP Service Class Provider SIP Signal Image Processing SVHS Super Video Home System TFT Thin Film Transistor TGC Time Gain Control or Time Gain Compensation VCR Video Cassette recorder VIO Vide...

Page 101: ...raphic Adapter Priority Slot 6 Bootup Num Lock On Wait for F1 If Error Enabled Hit DEL Message Display Enabled Interrupt19 Capture Enabled Power Button Function Instant Off Restore on AC Power Loss Po...

Page 102: ...oop Enabled IDE SATA Configuration Configure SATA 1 as RAID Intel Hot Plug Disabled IDE Detect Time Out Sec 35 PCI PnP Configuration Clear NVRAM No Plug Play O S Yes PCI Latency Timer 64 PCI IDE BusMa...

Page 103: ...rom S3 S4 Disabled High Precision Event Timer Enabled PCI E Native Support Disabled Event Log Configuration PCI E Error Log Yes Security Supervisor Password Installed User Password Installed Change Su...

Page 104: ...voking BIOS default sets these to Not Installed However these settings may be reset to the appropriate settings after the system boots 1st Drive Not Installed2 CD DVD Drives 1st Drive Not Installed2 U...

Page 105: ...irtualization Technology Disabled Performance Tuning CPU Configuration Non Turbo Ratio Override 34 Host Clock Override 0 CPU Voltage 0 IA Core Current Max 896 IGFX Core Current Max 400 Enhanced Intel...

Page 106: ...Chassis Opening Warning Disabled H W Monitor Smart Fan Function Enabled System Smart Fan Target Disabled CPU Smart Fan Target Disabled Chassis Smart Fan Target Disabled Option ROM Policy Launch Storag...

Page 107: ...lti Monitor Enabled DVMT Pre Allocated Mem 512m DVMT Total Graphic Mem MAX Primary IGD boot Display VBIOS Default PEGO Gen X Auto PEGO ASPM Auto Enabled PEG Auto DIMM Profile Default DIMM Provided BOO...

Page 108: ...configured to recognize the ultrasound system You should also determine what the desired behaviors of Aquire1 and Aquire2 are DICOM Devices to Connect to System DICOM network printer Yes No DICOM stor...

Page 109: ...turer and model number of the printer Only needed if a printer will be connected Minimum network connection information The system supports DHCP on originally released systems Application Entity AE ti...

Reviews: