background image

2

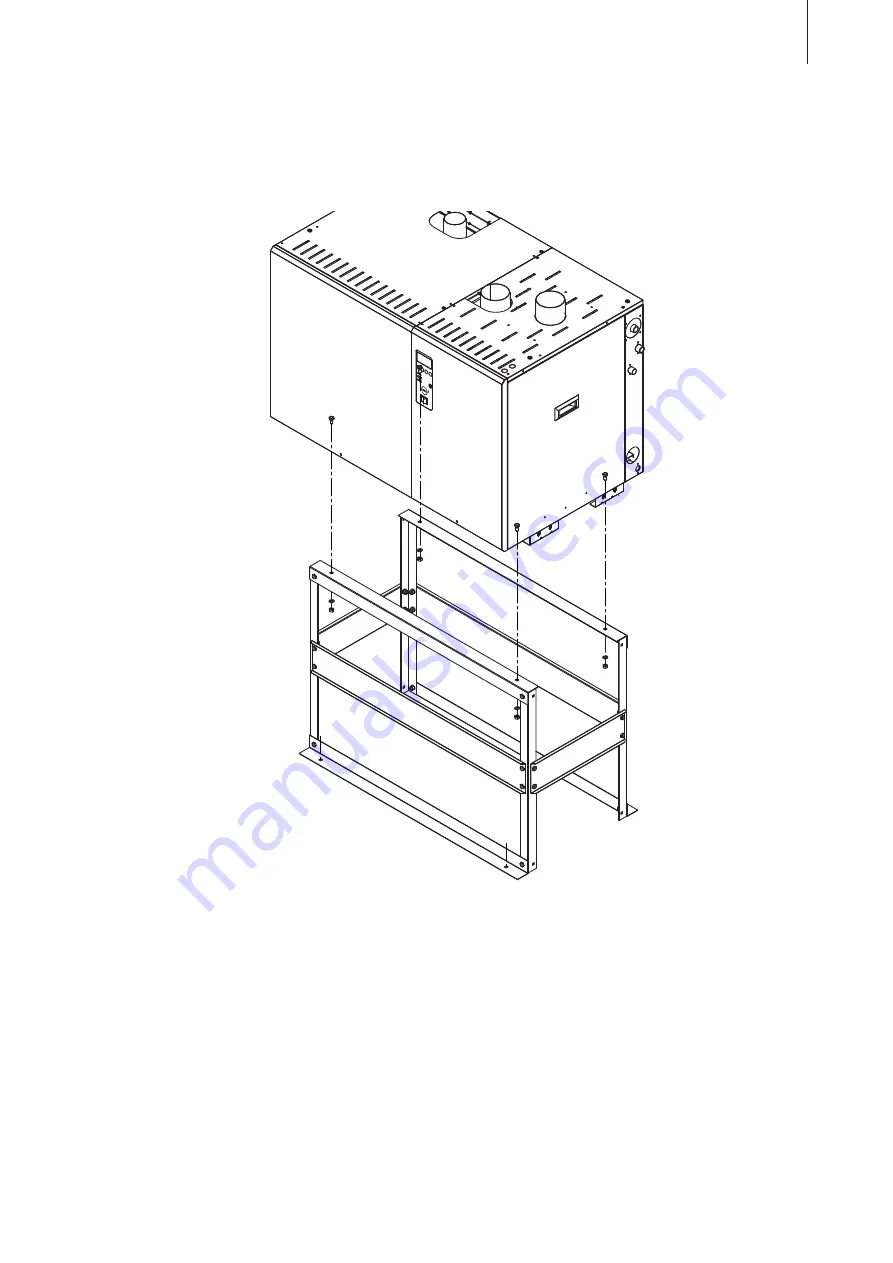
The Condair GS  humidifiers must be mounted on the unit stand

 supplied with the unit

. If mounting 

on the unit stand supplied is not possible in your particular case, select a method of mounting that 

is of similar stability. In case of doubt, please contact your Condair supplier.

5.2.2  Mounting the humidifier

Mounting instructions

1.  Assemble the unit stand as shown in the separate installation instructions. Hand tighten all bolts 

only.

2.  Lift up humidifier with a lifting device approx. 900 mm above the floor.
.  Position unit stand below the humidifier. 
4.  Lower the humidifier and align with the holes of the unit stand.
5.  Fasten the humidifier to the unit stand using the bolts, cup washers and nuts provided. 
6.  Tighten all nut and bolt pairs to 22.6 Nm (200 lb-in) or until secure.
7.  Position the entire assembly to the desired location. Make sure the humidifier is stable, shimming 

of the floor below the support legs of the unit stand may be necessary.

8.  Fix the unit stand to the floor (mandatory) via the four holes in the support plates of the unit stand.

Summary of Contents for GS 40 Series

Page 1: ...Installation commissioning and service instructions Gasfired steam humidifier 1119123 EN 0906 Condair GS C series ...

Page 2: ......

Page 3: ... gas installation 37 5 7 Installation of the air inlet line for room air independent units RS units 42 5 8 Installation of control and monitoring devices 44 5 9 Electrical Installation 45 6 Inspecting the installations Check list 47 7 Operation 49 7 1 Important notes on operation 49 7 2 Function of the display and operating elements 50 7 3 Commissioning 51 7 4 Notes on operation 53 7 5 Taking the ...

Page 4: ... will be glad to assist you 1 2 Notes on the installation commissioning and service instructions Limitation The subject of these installation commissioning and service instructions is the Condair GS C series GasfiredSteamHumidifierinitsdifferentversions Thevariousaccessoriesareonlydescribed insofar as this is necessary for proper operation of the equipment Further information on accessories can be...

Page 5: ...accessed If the equipment changes hands the installation commissioning and service instructions should be passed on to the new operator If the installation commissioning and service instructions get mislaid please contact your Condair supplier Language versions These installation commissioning and service instructions are available in various languages Please contact your Condair supplier for info...

Page 6: ...t only by qualified personnel authorised by the Conair representative It is assumed that all persons working with the Condair GS are familiar and comply with the appropri ate regulations on work safety and the prevention of accidents Intended use The gas fired steam humidifier Condair GS is intended exclusively for humidification in ventila tion systems within the specified operating conditions An...

Page 7: ...ng these components during or shortly after opera tion Prevention Do not touch the water tank the steam line and the exhaust system during operation Before carrying out any work set the Condair GS out of operation as described in chapter 6 3 then wait until the components has cooled down sufficiently thus preventing danger of burnin Behaviour in case of danger If it is suspected that safe operatio...

Page 8: ... G25 Natural gas HS G25 1 Natural gas Lw G27 Natural gas Ls GZ350 Propane gas P G31 Room air independent unit with separate air intake The humidifiers are equipped with an operating and display unit as standard by means of which the current operating parameters can be interrogated and the equipment can be configured for op eration The humidifiers are controlled via the internal PID controller or a...

Page 9: ... building side 10 Drain water connection 11 Drain water line 12 Funnel with trap 13 Auxiliary drain connection 14 Shut off valve auxiliary drain building side 15 Flue gas pipe 16 Flue gas adapter with condensate drain accessory FA 17 Air intake pipe RS units only 18 Main steam pipe building side 19 Steam hose adapter accessory SA 20 Steam hose accessory DS80 21 Steam distribution pipe accessory 81...

Page 10: ...ormer 11 Control board 12 Driver board 13 Remote operating and fault indication board 3 4 Construction of the gasfired steam humidifier 14 Ignition modules 15 Burner electronic 16 Combustion air blower 1 to 6 17 Flame sensor 18 Igniter 19 Drain pump 20 Air pressure switch 21 Gas pressure control valve 1 to 6 22 Auxiliary drain line 23 Drain connection 24 Double inlet valve filling water 25 Connect...

Page 11: ...pane independent of blower speed or external conditions This air and fuel is thoroughly mixed in the blower and then forced through the burner ports where ignition occurs Hot products of combustion are forced through a baffle inside the heat exchanger and then vented outside The heat exchanger has large vertical surfaces to minimize scale build up and promote scale shedding to the bottom of the ta...

Page 12: ... internal PID controller or an external continuous controller Flushing The concentration of minerals in the water in the tank increases due to the evaporation process In order that this concentration does not exceed a specified value an appropriate quantity of water is pumped off from the tank at a fixed time interval and replaced by fresh water These flushing cycles are based on steam production ...

Page 13: ...g kg The values for ρ ε x2 and x1 can be gathered from the h x diagram or the Carrier Diagram for moist air respectively For a rough estimate of the calculated steam capacity the following table can be used The values listed in the table are based on a desired room air temperature of 20 C and a desired relative room air humidity of 45 rh Note To roughly estimate the calculated maximum steam capaci...

Page 14: ...t your Condair supplier 4 1 2 Combustion gas The Condair GS can be operated with natural gas or propane The equipment is configured ex works for the respective combustion gas that is to be employed If required the equipment can be converted at a later date to work with one of the other combustion gas Combustion gas Designation Natural gas H E E S G20 Natural gas L ELL G25 Natural gas HS G25 1 Natu...

Page 15: ...roller Y input signal from A1 System 2 Room humidity control with continuous limitation of the supply air humidity System 2 is suited for air conditioning systems with a large portion of supply air low supply air temperature post humidification or variable airflow volume If the supply air hum idity exceeds the preset value the continuous limitation is effected prior to the room hum idity control T...

Page 16: ...umidistat PIE external PI controller PIDI internal continuous controller PID controller Y input signal from A1 Z input signal from A2 Which humidity control system for which application Application Location of the humidity sensor Room or exhaust air duct supply air duct Air conditioning systems with Supply air portion up to 33 System 1 System 1 Supply air portion up to 66 System 1 or 2 System 2 or...

Page 17: ... hose meter KS10 number 1 2 3 4 5 6 Filter valve Z261 1 pc per system Flue gas adapter with condensate drain FA40 FA80 FA120 160 FA200 240 number 1 1 1 1 Control input signals The Condair GS is regulated via the internal PID controller or an external continuous controller e g PI controller Important For the control systems 2 and 3 the external controller must be equipped with two control signal in...

Page 18: ...00 1600 50 81 1500 1500 1600 2000 50 81 1800 1800 2000 2400 50 81 2000 2000 2200 2600 50 81 2300 2300 2500 2900 50 81 2500 2500 2700 3100 50 1 Material CrNi steel 2 Special length on request 3 To fully exploit the overall capacity of your GS humidifier the output of each steam outlet may be fed to more than one distribution pipe If more than one steam distribution pipe is fed per steam outlet the ...

Page 19: ...difiers must be unconditionally observed and complied with All local regulations relating to the execution of gas flue gas water steam and electrical installations must be observed and complied with Safety The connection of the Condair GS to the mains electrical supply must not be made until all installa tion work has been completed Incorrectly executed installations can result in personal injury ...

Page 20: ...he case of room air dependent units care must be taken to provide an adequate intake of air in accordance with local building regulations For UK only Please refer to BS 5440 Part II or BS 6644 when installing units We draw your at tention especially to combustion an ventilation air supply requirements for plant rooms Permanent low and high level openings communicating directly with the outside air...

Page 21: ... not mount the humidifier on a base that is subject to vibration If necessary please contact your Condair representative The Condair GS must be installed only in locations equipped with a water drain or with sensors that safely interrupt water supply in case of leak age Do not cover the air openings in the top and bottom covers of the humidifier housing otherwise the air flow may be insufficient F...

Page 22: ... NPT 1 2 140 211 GS 80 4 1 x 3 BSP 3 4 BSP 3 4 3 4 NPT 1 2 162 273 GS 120 5 1 x 3 BSP 3 4 BSP 1 3 4 NPT 1 2 238 459 GS 160 5 1 x 4 BSP 3 4 BSP 1 3 4 NPT 1 2 261 471 GS 200 6 1 x 4 BSP 3 4 BSP 1 1 4 3 4 NPT 1 2 290 610 GS 240 6 1 x 4 BSP 3 4 BSP 1 1 4 3 4 NPT 1 2 314 623 Steam outlet Flue gas outlet Air intake RS units only Control signal Gas supply Water supply Water drain Auxiliary water drain Po...

Page 23: ... bolts only 2 Lift up humidifier with a lifting device approx 900 mm above the floor 3 Position unit stand below the humidifier 4 Lower the humidifier and align with the holes of the unit stand 5 Fasten the humidifier to the unit stand using the bolts cup washers and nuts provided 6 Tighten all nut and bolt pairs to 22 6 Nm 200 lb in or until secure 7 Position the entire assembly to the desired lo...

Page 24: ...system Input humidity φ1 in rh Length of humidification distance BN in m Output humidity φ2 in rh 40 50 60 70 80 90 5 0 9 0 22 1 1 0 28 1 4 0 36 1 8 0 48 2 3 0 66 3 5 1 08 10 0 8 0 20 1 0 0 26 1 3 0 34 1 7 0 45 2 2 0 64 3 4 1 04 20 0 7 0 16 0 9 0 22 1 2 0 30 1 5 0 41 2 1 0 58 3 2 0 96 30 0 5 0 10 0 8 0 17 1 0 0 25 1 4 0 36 1 9 0 52 2 9 0 88 40 0 5 0 11 0 8 0 20 1 2 0 30 1 7 0 45 2 7 0 79 50 0 5 0 ...

Page 25: ...m distribution pipes are designed for either horizontal installation on the duct wall or with accessories for vertical installation in the duct floor The outlet orifices should always point upwards and at right angles to the airflow If possible the steam distribution pipes should be installed on the pressure side of the duct max duct pressure 1700 Pa If the steam distribution pipes are installed o...

Page 26: ... gmin gmin gmin gmin gmin gmin gmin gmin gmin gmin gmin gmin g min 100 mm h min 85 mm H min 250 mm H 400 mm H min 200 mm H min 400 mm H min 350 mm H min 300 mm H min 600 mm H min 500 mm H min 400 mm H min 720 mm H min 600 mm H min 500 mm H min 840 mm H min 700 mm H min 600 mm H min 960 mm H min 800 mm H min 700 mm ...

Page 27: ...ucts passing through cold rooms should be insulated to prevent the humidified air from con densing along the duct wall Poor airflow conditions within the air duct e g caused by obstacles tight bends etc can lead to condensation of the humidified air Steam distribution pipes must not be mounted to round ducts Exercise extreme caution when installing in fiberglass or internally lined ducts If necess...

Page 28: ...e used e g produced using a pipe bending machine or constructed from a pair of 45 bends This reduces the performance loss due to the formation of condensate and in addition the static pressure in the steam line Use Cu pipe for operation with untreated drinking water only or stainless steel pipe min DIN 1 4301 exclusively To minimize the condensate formation loss the steam pipes must be insulated o...

Page 29: ...ould be avoided throughout the entire length of the hose The installation of a stop cock in the steam hose is not permissible Steam hoses must be prevented from sagging condensate pockets if necessary support with pipe clamps rails or wall brackets If sagging can not be prevented e g when passing by obsta cles a condensate drain with siphon min hose bend Ø200 mm must be mounted at the lowest point...

Page 30: ...sed e g produced using a tube bending machine or constructed from a pair of 45 bends This reduces the performance loss due to the formation of condensate and in addition the static pressure in the steam line Important Allowance must be made for a pressure loss of 10 mm water column approx 100 Pa per meter length or per 90 bend Connection of the steam pipes to the steam distribution pipe and steam ...

Page 31: ...ded building side 5 Pressure reducing valve compulsory for water pressures 8 bar building side 6 Water drain connection 3 4 Ø19 mm 7 Drain line building side min inner Ø 45 mm min 50 cm directed vertically downwards 8 Funnel building side min height 15 cm 9 Siphon min inner Ø 45 mm building side 10 Auxiliary water drain connection NPT 1 2 inside thread 11 Shut off valve installation recommended bu...

Page 32: ... supply temperature 1 30 C Notes on water quality For the water supply of the Condair GS use exclusively untreated drinking water or fully demineralized water Note The use of fully demineralized water reduces the maintenance and the cleaning of the water tank to a minimum The use of additives such as corrosion inhibitors disinfectants etc is not allowed since these additives may endanger health an...

Page 33: ...ccessible for the purpose of inspection and cleaning The following connection data should be observed Connection on unit hose connection 3 4 Ø19 mm CAUTION Use only temperature resistant installation materials When using fully demineralized water only stainless steel min DIN 1 4301 or chemically re sistant plastic e g Polypropylene connection components must be used Drainage capacity approx 20 l m...

Page 34: ...5 16 Propane gas P G31 37 or 50 25 57 5 The connection material used must be pressure tested and approved for gas installations Do not use teflon tape on gas line pipe threads A flexible sealant suitable for use with Natural Gas and Propane Gas is recommended Plan gas supply piping so it will not interfere with removal of gas valves or blower assemblies and front or side service doors All installa...

Page 35: ... the following page Important The conversion shall be carried out by a manufacturer s authorized representative or person trained and licenced for such activities in accordance with the requirements of the manufacturer or local authorities having jurisdiction in the area of installation 1 Disconnect the humidifier from the electrical power supply and take precautions against inadvert ent switching...

Page 36: ...ct the hose from the air pressure switch and if present from the air inlet manifold on RS units only to the inlet elbow 16 Reconnect the electrical cables to the gas pressure regulating valve and the air pressure switch 17 On multiple burner units repeat steps 4 to 16 for each gas valve assembly 18 Carry out a leakage test Refer to instructions in 5 5 2 19 Turn power to unit back on and initiate a...

Page 37: ...lue pipe installation must be performed only by adequately qualified person nel Ascertaining the qualifications is the customers responsibility 5 6 1 Performing flue gas installation Overview 1 Flue gas connection on the unit GS 40 ø76 mm 3 GS 80 ø101 mm 4 GS 120 GS 160 ø127 mm 5 GS 200 GS 240 ø152 mm 6 2 Flue gas adapter with condensate drain accessory FA GS 40 FA40 DA 80 mm GS 80 FA80 DA 100 mm ...

Page 38: ... country codes for flue gas systems min 1 5m 1m 1m min 1m 2 5m 2 5m Rain cap by client max flue length for type B23 flue systems 30 m see installation notes flue gas terminal according local regulations Applicable flue systems for room air independent units RS units Type C33 min 1 5m Rain cap by client min 1 m Reference part number for flue terminal adapter from Muelink Grol GS 40 82420 GS 80 8242...

Page 39: ...e installation notes Note Wherelocalregulationspermit theRSunitscanbeinstalledasC63x appliances As a C63x appliance the Condair GS can be connected to a separately approved and maketed system for the supply of combustion air and discharge of flue gases For such applications refer to the applicable local regulations and the separate Installation Instructions Installation as a C6 appliance available...

Page 40: ...ire proof screen or barrier at a minimum distance of 50 mm to flue gas pipe to prevent personal injury in areas where inadvertent personnel contact with flue pipe can occur or where heat sensitive products are stored Secure the flue pipe e g by means of beading the pipe see overview to prevent it from slipping into the flue connector of the unit A condensate discharge point should be installed at ...

Page 41: ...of the flue terminal at least 45 cm above grade or ground or normally expected snow accumulation level The snow level may be higher on walls exposed to prevailing winds Avoid areas where local experience indicates that condensate drippage may cause problems such as above planters patios or over public walk ways or over an area where condensate or vapor could create a nuisance or hazard or could be...

Page 42: ...ed to without reservation In any case please consult your Condair representative Installation of the air supply line must only be carried out by adequately qualified personnel Overview 5 7 1 Performing air supply installation 1 Air supply connection on RS units GS 40 ø76 mm 3 GS 80 ø101 mm 4 GS 120 GS 160 ø127 mm 5 GS 200 GS 240 ø152 mm 6 2 Connection hose building side 3 Hose clamps building side...

Page 43: ...supported at least every 1 5 m of its length and additionally supported at every pipe bend The air supply line can be provided either as a fixed tube or as a hose The minimum internal diameter must be observed over the entire length GS 40 ø76 mm 3 GS 80 ø101 mm 4 GS 120 GS 160 ø127 mm 5 GS 200 GS 240 ø152 mm 6 All connections on the air supply line must be positively sealed with a silicone sealant...

Page 44: ...the saturation limit Install the flow monitor such that reliably detects the existence of an airflow and the absence of an airflow Connect it in such a way that the circuit is closed when airflow is present and opens when there is no airflow Before starting the humidifier check all control and monitoring devices for correct function Calibration of the control and monitoring devices On Off and cont...

Page 45: ... K1 External safety loop 24 Vac Q External service switch or plug type connector RJ45 Communication interface for detailed informations refer to the separate documentation S1 Full tank blow down 24 Vac Wiring diagram 1 2 3 4 5 6 7 8 J1 A2 Z A1 Y K1 B1 B2 B3 F2 0 10 mADC 2 20 mADC 0 20 mADC 4 20 mADC 0 10 VDC 2 10 VDC 0 5 VDC 1 5 VDC 24VAC Hot 24VAC COM F1 100mA Unit ON Steam Service Error 1 2 3 4 ...

Page 46: ...ipped with 4 relays for remote operation and fault indication On this relay closes after the humidifier has been powered up Steam this relay closes as soon as steam is produced Service this relay closes when the set maintenance interval has expired Error this relay closes when an error occurs External safety circuit K1 To guarantee the safety of the humidification system monitoring the operation b...

Page 47: ... radius of 4 5 x internal diameter of solid steam pipe Is the pipe properly insulated Is the correct installation material used Is the minimum internal diameter maintained over the entire pipe length Steam hose between steam hose adapter and steam distributor Maximum length of 4 m Minimum bend radius of 300 mm 4 5 x internal diameter with fixed piping Have the instructions for hose positioning bee...

Page 48: ...ed sealing material been used Have all heat sensitive and easily flammable materials been removed from the vicinity of the flue gas pipe Is the flue gas pipe insulated at all the necessary positions Is the flue gas outlet terminal outside the building correctly located Have the permitted sealing materials been used Air supply system for room air independent units RS units Does the air supply syste...

Page 49: ...l gas valve to the appliance before shutting off the electrical supply Do not operate this appliance if any part has been exposed to excess humidity Immediately call a qualified service technician to inspect the appliance and to replace any part of the control system and any gas control which has been under water An open unit must not be operated Before putting the Condair GS humidifier into opera...

Page 50: ...n ventilation interlock has triggered is open As soon as the safety chain is closed again the indica tion disappears yellow LED Maintenance Function The LED lights if the maintenance is due green LED Humidification Function The LED lights if the unit produces steam The LED flashes alternately with the red LED if the external safety chain ventilation interlock has triggered is open As soon as the s...

Page 51: ...ime is shorter At the end of the filling cycle the control unit checks the function of the water level unit If the control unit has verified the proper function of the water level unit the ignition sequence starts After three attempts at ignition the auto ignition switches off The red LED lights and a corresponding error message is shown in the display Now switch the humidifier Off 4 Check ignitio...

Page 52: ...f the indication level Note The contents of the standard operating display depends on the actual operating status and on the configuration of the Condair GS and can differ from the opposite display As soon as the humidity controller demands humidity the auto ignition activates the igniter This heats up and after approx four seconds the gas pressure regulating valve opens The burner ignites and ste...

Page 53: ... and steam installation for any leakage the humidifier and the other system components for correct fixing and any damage the electric installation for any damage If the inspection reveals any irregularities e g leakage error indication or any damaged compo nents take the Condair GS out of operation as described in chapter 7 5 Then contact your Condair representative 7 5 Taking the unit out of oper...

Page 54: ...nce III Important Depending on the hardness of the water and the average steam output under certain circumstances it may be necessary to reduce the service interval for the minor maintenance work If the lime residues deposited on the floor of the tank exceed a height of 5 cm the interval must be reduced If the height is less than 5 cm the interval can be extended Important Every service action mus...

Page 55: ...eck screen in air intake terminal clean if necessary Flue gas temperature sensor X X Visual check that sensor is intact wired and attached to the exhaust Flue gas system X X Check flue gas system for sealing and remove all traces of condensate Check screen in flue gas terminal clean if necessary Ifspecified havethefluegassysteminspected by an appropriate specialist Igniter and flame sensor X Every...

Page 56: ...difier to cool before commencing cleaning work The combustion chamber walls are usually self cleaning Due to the expansion and contraction dur ing the humidification process lime deposits peel from the walls and sink to the floor of the tank An accumulation of lime on the floor of the tank up to a maximum height of 50 mm is permissible and does not affect the operation of the humidifier Remove the...

Page 57: ...e and disconnect the gas pipe 6 Undothetwoscrewsoftheventurimanifoldandliftupthemanifoldtogetherwiththegas pressure re gulat ing valve 7 Undo the two screws of the electronic board if present and remove electronic board 8 Undo the nuts on the outlet side of the blower and remove the blower unit Reinstallation is achieved by following the reverse sequence Replace defective seals with new ones Make ...

Page 58: ...e of the burner Re installation is achieved by following the reverse sequence Renew the flange seal and replace igniter and flame sensor if necessary Tight the nuts of the burner flange with a torque wrench torque 10 Nm Make sure all cables are connected correctly DANGER Danger of explosion Following maintenance work on the gas system a leakage test must always be undertaken in accordance with cha...

Page 59: ...ththegas pressure re gulat ing valve 7 Undo the four screws and remove the gas pipe connection of the gas pressure regulating valve 8 Pull off the hose connected to the pressure switch note the connection layout Then undo the three screws of the pressure switch support and remove pressure switch assembly from the gas regulating valve 9 Undo the three screws fixing the gas pressure regulating valve...

Page 60: ...he screw s phillips screwdriver and remove the right side panel s 3 Disconnect the wiring connection to the igniter and to the flame sensor 4 Unscrew the fixing nuts for the igniter and the flame sensor Now carefully remove the igniter and flame sensor CAUTION The silicon carbide igniter is breakable Therefore handle it with great care to avoid damage Reinstallation is achieved by following the re...

Page 61: ...tion follows in the reverse sequence Make sure the cables and the hose are connected correctly 1 Take the humidifier out of operation as described in chapter 7 5 2 Undo the screw phillips screwdriver and remove the right front panel 3 Note the cable assignment then remove all connection cables to the ignition module 4 Unscrew the two fixing screws securing the ignition module and then remove ignit...

Page 62: ...ected cor rectly Replacing the drain pump 1 Take the humidifier out of operation as described in chapter 7 5 Important If drain pump is defective drain tank manually via the auxiliary drain 2 Undo the screw phillips screwdriver and remove the right side panel 3 Remove the connection cables to the drain pump note assignment before removal 4 Remove hose clamps on the drain pump connections and pull ...

Page 63: ...s are correctly secured with the hose clamps and the cables are connected correctly Replacing the water level unit 1 Take the humidifier out of operation as described in chapter 7 5 2 Undo the screw phillips screwdriver and remove the left front panel 3 Remove the connection cable to the level unit 4 Remove hose clamps on the level unit connections and pull off the hoses 5 Squeeze both sides of th...

Page 64: ...ver and remove the right side panel 3 Remove hose clamps on the filling chamber connections and pull off the hoses 4 Undo the two nuts securing the filling chamber to the face of the tank then remove the filling chamber Re installation is carried out in the reverse sequence Make sure the hose are correctly secured with the hose clamps ...

Page 65: ...nections to the components combustion blower ignition module air pressure switch etc of the respective heat exchanger Important Note the connector assignment 8 Undo the coupling of the respective flexible gas pipe and remove the flexible gas pipe 9 Dismount the burner with the air blower and the gas pressure regulating valve of the respective heat exchanger 10 Unscrew the nuts and remove the flue ...

Page 66: ...nts that have been cleaned in this way are to be rinsed with water CAUTION Do not use solvents for cleaning purposes nor aromatized or halogenized hydrocarbons or other aggressive substances Follow local environmental protection regulations without reservation 8 4 Notes on cleaning agents 8 5 Resetting the maintenance reminder After completing maintenance work the maintenance reminder message must...

Page 67: ...dair GS must be taken out of operation as described in chapter 7 5 and prevented from further inadvertent operation Make sure the power supply to the unit is cut off test with voltage tester and that the stop valves in the water and gas supply line are closed General note Most operational malfunctions are not caused by faulty equipment but rather by improper installa tion or disregarding of planni...

Page 68: ...3 76 mm 4 101 mm 4 101 mm 4 101 mm Flue pipe connection Inches 3 76 mm 4 101 mm 5 127 mm 5 127 mm 6 152 mm 6 152 mm Humidity control Possible control signals 0 5VDC 1 5VDC 0 10VDC 0 20mA 4 20mA Dimensions Height cm 81 158 unit on stand Width cm 114 Depth cm 53 69 109 109 149 149 Shipping weight kg 174 210 295 319 358 382 Operating weight filled kg 211 273 459 471 610 623 empty kg 140 162 238 261 2...

Page 69: ...9 8 7 2 9 flue gas pressure Pa 80 5 80 5 exhaust diameter mm 127 127 Condair GS 160 energy consumption kW 146 10 5 146 10 5 gas consumption kg h 9 44 0 68 12 16 0 87 m3 h 13 9121 0 8695 16 1773 1 0111 exhaust temperature C 180 49 180 49 exhaust mass flow kg s 0 06 0 0131 0 068 0 0224 CO2 content 8 9 2 2 8 7 2 2 flue gas pressure Pa 80 5 80 5 exhaust diameter mm 127 127 Condair GS 200 energy consum...

Page 70: ...re version Location Responsible Internal no Date Time First Maintenance I Small Maintenance II Annual Maintenance III Working hours h Water hardness in d or ppm or mg l CaCO 3 Remarks e g height of the lime residues in the water tank replaced parts measures etc Signature Side ...

Page 71: ... Walter Meier Climate International Ltd 2009 Printed in Switzerland Technical modifications reserved ...

Page 72: ...ier Climate International Ltd Talstr 35 37 P O Box CH 8808 Pfäffikon Switzerland Phone 41 55 416 61 11 Fax 41 55 416 62 62 www waltermeier com international climate waltermeier com Solutions for Indoor Climate Consulting Sales and Service ...

Reviews: