


57
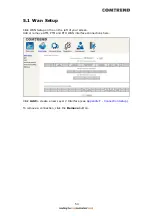
5.2 NAT
For NAT features under this section to work, NAT must be enabled in at least one
PVC.
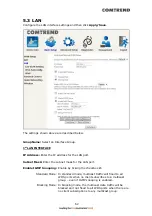
5.2.1 Virtual
Servers
Virtual Servers allow you to direct incoming traffic from the WAN side (identified by
Protocol and External port) to the internal server with private IP addresses on the
LAN side. The Internal port is required only if the external port needs to be
converted to a different port number used by the server on the LAN side.
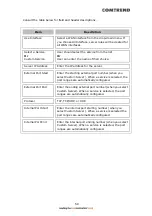
A maximum of 32 entries can be configured.
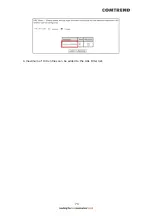
To add a Virtual Server, click Add. The following will be displayed.
Click Apply/Save to apply and save the settings.
Summary of Contents for VR-3071 Series
Page 1: ...261099 055 VR 3071 Series Home Gateway User Manual Version A1 0 January 10 2020...
Page 24: ...23 This screen shows hardware software IP settings and other related information...
Page 31: ...30 ADSL2 Click the Reset Statistics button to refresh this screen...
Page 46: ...45 5GHz...
Page 52: ...51 List the associated station to the wireless interface...
Page 57: ...56 NOTE Up to 16 PVC profiles can be configured and saved in flash memory...
Page 68: ...67 5 3 3 UPnP Select the checkbox provided and click Apply Save to enable UPnP protocol...
Page 71: ...70 A maximum of 100 entries can be added to the URL Filter list...
Page 86: ...85...
Page 106: ...105...
Page 130: ...129 2 Both devices need to have the same fixed channel See section 6 12 6 Advanced for details...
Page 134: ...133 6 12 6 Advanced This page allows you to configure the Physical Wireless interfaces 2 4GHz...
Page 136: ...135...
Page 168: ...167 STEP 2 Click the Windows start button Then select Control Panel...
Page 169: ...168 STEP 3 Select Devices and Printers STEP 4 Select Add a printer...
Page 197: ...196 F2 4 PPP over ATM PPPoA IPv4 STEP 1 Click Next to continue...
Page 200: ...199 Click Next to continue or click Back to return to the previous step...
Page 213: ...212 After clicking Apply Save the new service should appear on the main screen...


