


181
NOTE:
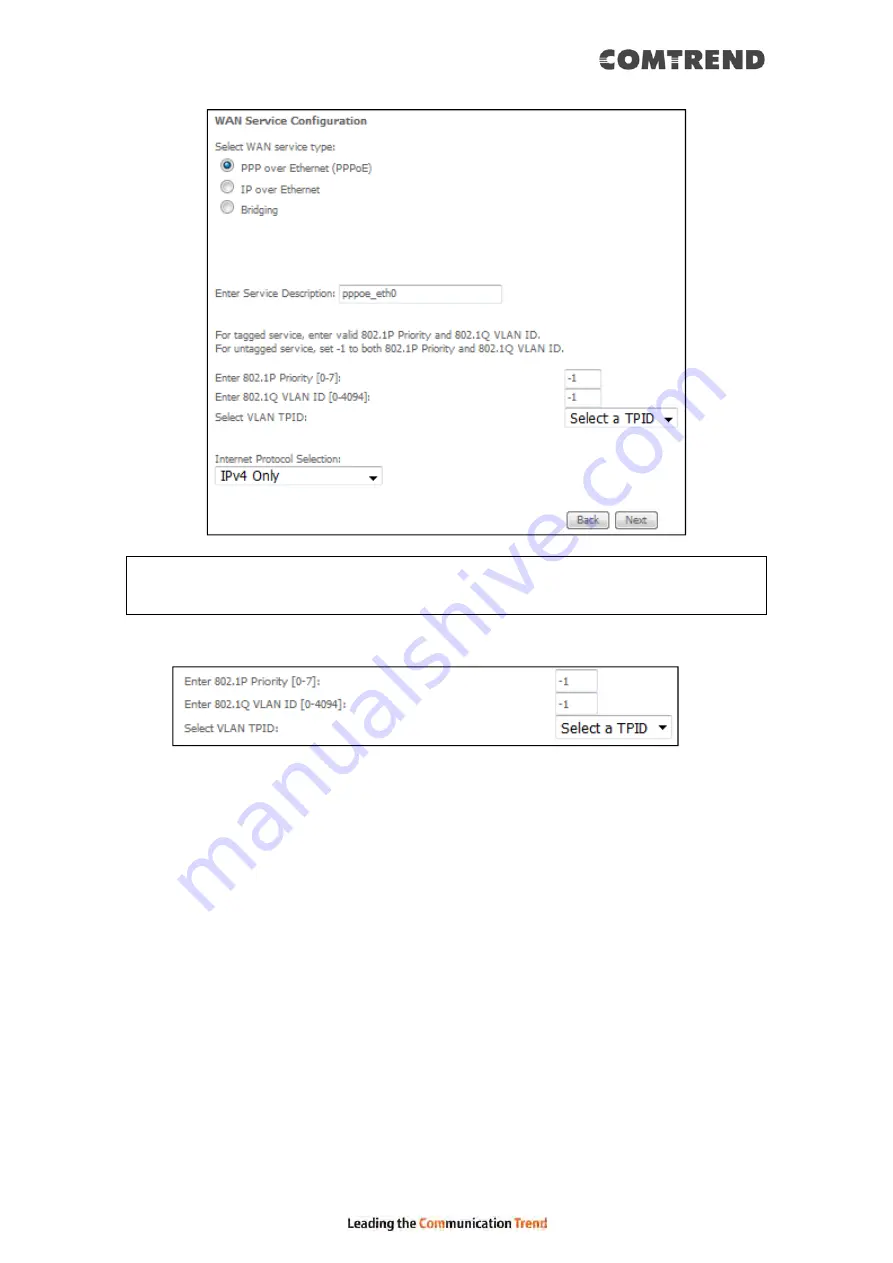
The WAN services shown here are those supported by the layer 2
interface you selected in the previous step. If you wish to change your
selection click the Back button and select a different layer 2 interface.
STEP 4: For VLAN Mux Connections only, you must enter Priority & VLAN ID tags.
Select a TPID if VLAN tag Q-in-Q is used.
STEP 5: You will now follow the instructions specific to the WAN service type you
wish to establish. This list should help you locate the correct procedure:
(1) For
PPP over ETHERNET (PPPoE) – IPv4
(2) For
IP over ETHERNET (IPoE) – IPv4
(3) For
Bridging – IPv4
(4) For
PPP over ATM (PPPoA) – IPv4
(5) For
IP over ATM (IPoA) – IPv4
(6) For
PPP over ETHERNET (PPPoE) – IPv6
(7) For
IP over ETHERNET (IPoE) – IPv6
(8) Bridging – IPv6 (Not Supported)
(9) For
PPP over ATM (PPPoA) – IPv6
(10) IPoA – IPv6 (Not Supported)
The subsections that follow continue the WAN service setup procedure.
Summary of Contents for VR-3071 Series
Page 1: ...261099 055 VR 3071 Series Home Gateway User Manual Version A1 0 January 10 2020...
Page 24: ...23 This screen shows hardware software IP settings and other related information...
Page 31: ...30 ADSL2 Click the Reset Statistics button to refresh this screen...
Page 46: ...45 5GHz...
Page 52: ...51 List the associated station to the wireless interface...
Page 57: ...56 NOTE Up to 16 PVC profiles can be configured and saved in flash memory...
Page 68: ...67 5 3 3 UPnP Select the checkbox provided and click Apply Save to enable UPnP protocol...
Page 71: ...70 A maximum of 100 entries can be added to the URL Filter list...
Page 86: ...85...
Page 106: ...105...
Page 130: ...129 2 Both devices need to have the same fixed channel See section 6 12 6 Advanced for details...
Page 134: ...133 6 12 6 Advanced This page allows you to configure the Physical Wireless interfaces 2 4GHz...
Page 136: ...135...
Page 168: ...167 STEP 2 Click the Windows start button Then select Control Panel...
Page 169: ...168 STEP 3 Select Devices and Printers STEP 4 Select Add a printer...
Page 197: ...196 F2 4 PPP over ATM PPPoA IPv4 STEP 1 Click Next to continue...
Page 200: ...199 Click Next to continue or click Back to return to the previous step...
Page 213: ...212 After clicking Apply Save the new service should appear on the main screen...


