


41
5.1.1 WAN Service Setup
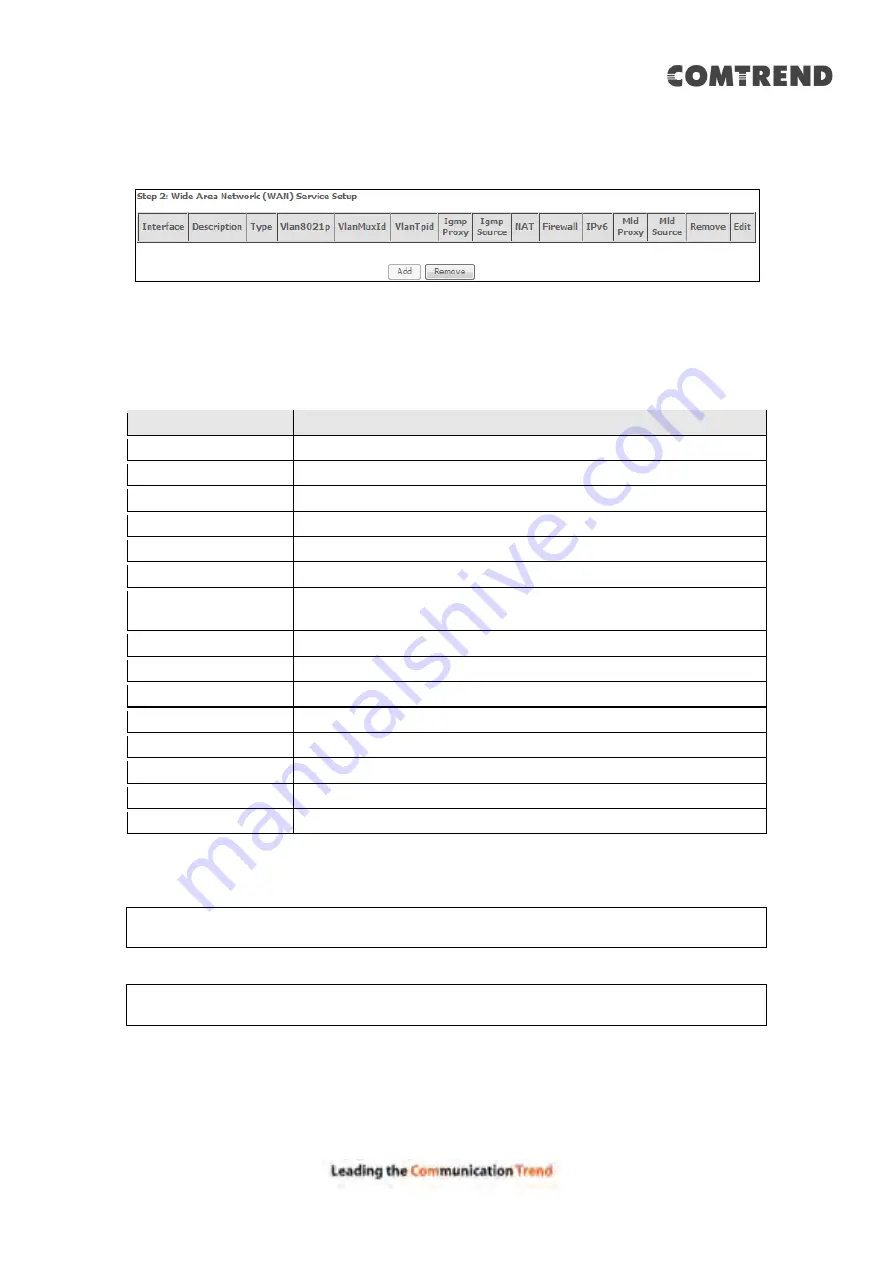
This screen allows for the configuration of WAN interfaces.
Click the
Add
button to create a new connection. For connections on ATM or ETH
To
remove a connection, select its Remove
column
radio button and click
Remove.
Heading
Description
Interface
Name of the interface for WAN
Description
Name of the WAN connection
Type
Shows the connection type
Vlan8021p
VLAN ID is used for VLAN Tagging (IEEE 802.1Q)
VlanMuxId
Shows 802.1Q VLAN ID
VlanTpid
VLAN Tag Protocol Identifier
IGMP Proxy
Shows Internet Group Management Protocol (IGMP) Proxy
status
IGMP Source
Shows the status of WAN interface used as IGMP source
NAT
Shows Network Address Translation (NAT) status
Firewall
Shows the Security status
IPv6
Shows the WAN IPv6 address
MLD Proxy
Shows Multicast Listener Discovery (MLD) Proxy status
Mld Source
Shows the status of WAN interface used as MLD source
Remove
Select interfaces to remove
Edit
Click the Edit button to make changes to the WAN interface.
To
remove a connection, select its Remove
column
radio button and click
Remove.
NOTE
:
In Default Mode, up to 8 WAN connections can be configured; while VLAN
Mux Connection Mode supports up to 16 WAN connections.
NOTE:
Up to 16 PVC profiles can be configured and saved in flash memory.
Also, ETH and PTM/ATM service connections cannot coexist.
Summary of Contents for AR-5319
Page 1: ...AR 5319 ADSL2 WLAN Router User Manual 261056 079 Version A1 1 March 6 2017...
Page 40: ...39 4 11 2 Site Survey The graph displays wireless APs found in your neighborhood by channel...
Page 56: ...55 5 3 3 UPnP Select the checkbox provided and click Apply Save to enable UPnP protocol...
Page 67: ...66 Enter the PPP username password given by your service provider for PPP service detection...
Page 111: ...110 Enter the MAC address in the box provided and click Apply Save...
Page 149: ...148 To add a WAN connection go to E2 WAN Connections...
Page 185: ...184 Click Next to continue or click Back to return to the previous step...
Page 203: ...202 STEP 2 Click the Windows start button Then select Control Panel...
Page 204: ...203 STEP 3 Select Devices and Printers STEP 4 Select Add a printer...


