background image


KinetiC-NC 

User Manual 


CNC-STEP GmbH & Co. KG ▪ Siemensstrasse 13-15 ▪ 47608 Geldern ▪ Germany


Page 22 

Support: +49 (0)2831/91021-50 

10.11.2018 


4


Initial Sta rt-up 

The first time you start the software, you will be asked for the language first .  


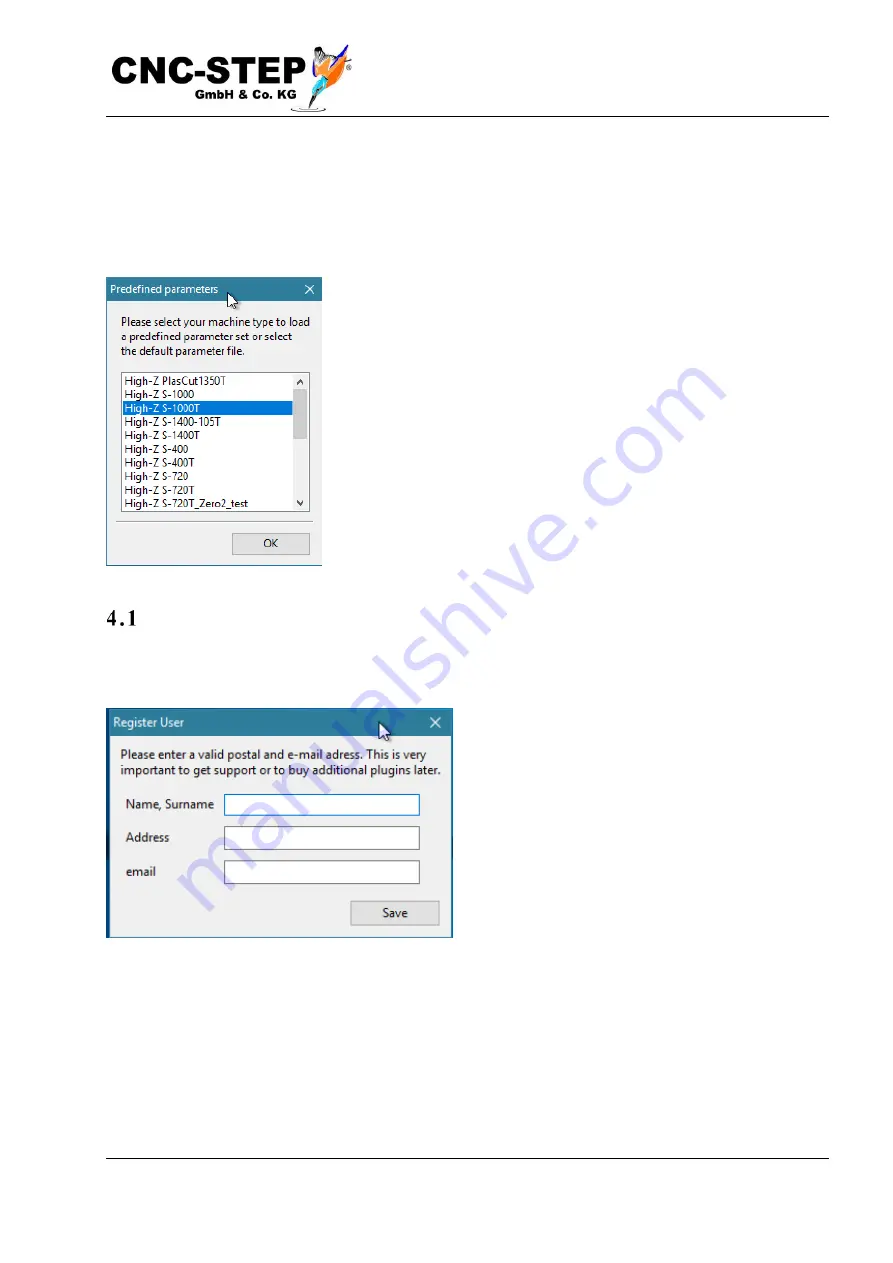
Then a list of known machines is displayed, for which there are already predefined parameter. 


U s e r   i n f o r ma t i o n  

During the first start of the software its necessary to enter the user details. This can be important if 

you need support or you want to add additional options. 


Summary of Contents for KinetiC-NC

Page 1: ...From 10 11 2018 KinetiC NC User Manual Software KinetiC NC with CncPOD and 2 LPT Interfaces Version 1 74 https www cnc step com ...

Page 2: ... own a working milling machine or engraving machine that you have purchased together with the CNC control In this case the setting of the machine parameters is very easy and is limited to the selection of a pre set parameters The control can also be individually adapted to a large number of different machines However this requires the exact knowledge of the drive mechanism and the electrical wirin...

Page 3: ...ation of CncPOD 16 Power supply 16 LPT Ports 16 Network connection 17 3 Installation Software 19 Installation WinPCAP 19 License conditions 19 Installation main program KinetiC NC 20 Install Updates 21 4 Initial Start up 22 User information 22 Machine Selection Plug Play 23 Establish connection 24 Demo mode 25 User login 25 No access 26 Parameter settings 26 Individual adaptation 27 Function contr...

Page 4: ...ution of the screen 37 The coordinates display 38 Load file 38 Errors 39 The 3D display 39 6 The operation 40 Set zero point 40 Where to put the zero point 40 The start up 40 Reference movement 41 Speed setting 41 The zero point symbol 42 Zero point and material 42 Slow feed 42 Presentation of the path 42 7 The user interface 43 The program screen 43 Graphic display 44 Mouse operation 44 The NC pr...

Page 5: ...ncy stop and alarm 49 Message window 50 The setup screen 51 The jog buttons 51 Rounding 52 Zeroing display 52 The MDI 52 Softlimits 53 The diagnostic screen 54 Inputs and outputs 55 Lookahead display 55 Hour meter 55 Part counter 55 The special screen 56 Application examples 56 8 The file menu 57 Opening NC file 57 File extensions 57 Error while opening 58 Recently used files 58 Create NC file 59 ...

Page 6: ...reate backup 62 Select file 62 Create individual configurations 63 Exit 63 9 The configuration menu 64 Machine 64 Offsets 65 Copy Offset 65 Tools 66 Do I need a tool list 66 Radius compensation and length compensation 66 Add new tools 67 Assign names 67 Hardware 68 Hotkeys 68 Assign keys 68 Jog keys 69 Macros 69 Macro directory 69 User 70 Which password 70 Forgot Password 70 Language 70 Calibratio...

Page 7: ...enu 74 Login 74 Automatic login 74 No access 74 Lock the operation 75 Logout 75 11 The Support Menu 76 User Registration data 76 Why a registration 76 Updates 76 Send request 79 No Internet 80 Check if everything has been sent 81 Logfile Options 81 Support 81 Important Reset the log options 81 12 The help menu 82 User manual 82 Reference manual 82 Environment 82 Help 83 Search 83 Information about...

Page 8: ...terial 89 Homing 89 Zero adjustment 89 Starting the program 90 Adjust feed 90 Problems How to stop 91 Continue again 91 Start program at any point 92 Additional tip 92 Execution time 92 Statistical functions 93 Running time meter 93 Parts counter 93 Tool path settings 93 Other material 94 Position of the workpiece 94 Probe 94 3D probe 94 Camera centering 95 Working with height probe 95 What is a h...

Page 9: ...h tool length sensor 100 G40 G43 Mode 101 Manual change with tool holders 101 Advantage 101 How is measured 101 Simple entry in the list 102 Automatic tool change direct 102 Magazine types 102 The M6 and G79 macro 102 Automatic change with tool holders 103 Rotary axis and cylindrical engraving 103 Cylindrical engraving 104 Simply without CAM 104 Where is the rotary axis mounted 104 Insert workpiec...

Page 10: ...g 109 Functions locked 109 Connection interrupted 110 Error messages 111 The machine does not react as expected 111 Security door 111 Maintenance mode 112 15 Import filter 113 DXF Import filter 113 What is imported 113 The milling direction 113 The import process 114 Tab Layer defaults 114 Tab Global Settings 115 Settings for milling 116 Settings for drilling 116 Tab Settings 117 Z values of mater...

Page 11: ...he file 121 Special features when importing from DXF files 121 Note for experienced users 121 No existing import data or message Error while parsing the DXF file wrong version 122 HPGL Import filter 123 Short description 123 Language supported 123 The import process 123 Output file 124 Customizing the import process 124 Z depth 125 Tools 125 Feed 125 Zero Offset 125 General settings 126 16 Custome...

Page 12: ...C control software is a component that can only be used in conjunction with a suitable personal computer and suitable hardware It is by no means an independent controller Since mistakes despite all efforts can never be completely avoided we are grateful for any note The user guides Since not all users need all the information about the control hardware and software the documentation has been divid...

Page 13: ...Safety instructions CNC machining always carries a certain risk of injury because it works with fast rotating tools with sharp edges Due to the computer controlled movement of the drives machine parts can unexpectedly start to move for the operator Although the control software has been carefully tested malfunctions can occur at any time Therefore follow the instructions of the machine manufacture...

Page 14: ...apter with mini USB cable A CNC milling machine or engraving machine with stepper motor drives or servos with step direction signals and associated control electronics e g Zero 3 A network cable Cat 5 or 6 with RJ45 connectors for connecting the CncPOD to the PC One SUBD 25 cable male to female to connect the CncPOD to the stepper motor controller Real time requirements In order for the PC to be u...

Page 15: ...etwork load or changes to the operating system While surfing the Internet or transferring files on the corporate network itself does not interfere with CNC operation the background actions of an anti virus program that it causes can cause problems It is therefore recommended to disable problematic programs such as virus scanners expensive screen savers and the like and to refrain from surfing the ...

Page 16: ...or is used Please always use an extra power adapter and do not connect the CncPOD to the PC with a USB cable Although this also works for test purposes the galvanic isolation of the network connection would be ineffective making the controller unnecessarily susceptible to electromagnetic interference The USB port is for power only A data transfer with USB is not provided LPT Ports A 25 pin SUB D c...

Page 17: ...o the PC should always have the fastest transmission rate in the network So if the PC has a GBit interface and the DSL router only 100MBit then the switch should also 1GBit and the CncPOD be connected directly to this switch This ensures that there is no bottleneck and data transfer between other PCs does not slow down communication with the CncPod Only unmanaged switches may be used Routers with ...

Page 18: ...ffic and become a bottleneck As already described in the chapter System requirements Real time requirements it is very important for the control computer that sufficient computing power is available at all times and the PC is not slowed down by background programs Therefore you should make sure to remove all unnecessary programs to disable automatic updates If it is a laptop expressly not recommen...

Page 19: ...be in a different language Installation WinPCAP You will first be prompted to install WinPCAP This is a kind of universal driver software for network controllers and is required for communication of the KinetiC NC software with the CncPod Start the installation of WinPcap by pressing the Next button License conditions You must agree to the license terms of the WinPcap software by pressing the I Ag...

Page 20: ... the further development of the program and speak a native language that is not yet supported you may also like to install the language support This allows you to create your own translations of the software and share it with other users The KinetiC NC software is installed in the suggested folder If you would like to rename the entry you can do so now By ticking the box you can install an icon on...

Page 21: ...ing settings or Yes if you want to reset all parameters to the factory settings Although normally no settings unsolicited are overwritten when installing an update it is strongly advised to back up the machine parameters before each update This ensures that you can return to the old state in the event that something does not work as expected After completing the installation wizard there will be a...

Page 22: ...up The first time you start the software you will be asked for the language first Then a list of known machines is displayed for which there are already predefined parameter User information During the first start of the software its necessary to enter the user details This can be important if you need support or you want to add additional options ...

Page 23: ... detailed description of all setting options would go beyond the scope of this manual In the following only the most important features are explained After selecting the machine model the main window of the software opens It is usually recommended to always turn on the machine before starting the software If this has not already been done or there are problems with the connection the following dia...

Page 24: ...o the PC and is powered by the USB power supply At least the right green LED on the network connection of the CncPOD should light up connection status With Search net you can redisplay the list If several CncPODs are listed which can be found on several existing machines in a larger network you can use Identification to find out which one is the right one The currently selected CncPOD is to be rec...

Page 25: ...he hardware This means that the software which is stored in the processor of the hardware module must be adapted to the state of the PC software If you are asked to do so please follow the instructions in chapter Updating the machine firmware The installation is now complete and you can log in for the first time User login Not all functions of the software are allowed at any time It may happen tha...

Page 26: ...ram starts without the dialog opening The default user may not change any settings and machine parameters The user Client Admin has the beginning password 1234 This administrator has the right to change machine settings On request users can be assigned passwords to protect the machine against misuse see chapter User management If you leave the workplace without switching off the machine you can al...

Page 27: ...lly comfortable with it follow the instructions in the Controller Reference Manual Function control In the main window switch to the Diagnostics page First you should test the function of the emergency stop button When the switch is pressed the symbol with the red yellow button labelled Emergency Stop must appear on the right in the Status field After unlocking the switch it must disappear and an ...

Page 28: ...abels indicate a problem with the safety door the frequency converter or other external equipment For information about how to resolve the issues in these cases refer to the instructions in the appropriate extension If the Emergency Stop symbol does not disappear check whether all emergency stop switches are actually unlocked and whether all connections to the controller and machine are plugged in...

Page 29: ... piece of metal in front of the switch for reed switches a magnet Now it must be checked whether the directions of rotation of the drive motors are correct Go to the page Setup When pressing the arrow buttons the associated axis must move in the right direction Depending on the position of the machine and the line of sight of the operator the actual direction front rear right left may differ from ...

Page 30: ...the directions of all drives are correct you can start a homing run with the All Ref button on the diagnostics page If you have to cancel the homing because there is still something wrong you can either do this by pressing the button again or pressing the ESC key Test outputs Finally you can test the function of the spindle and coolant outlets or dust extraction To do this click on the correspondi...

Page 31: ...ngs Details can be found in the chapter The File Menu Installation of additional options If in addition to the basic equipment you have purchased additional options for your machine it may be that the machine parameters deviate from the standard settings and must be supplemented Please refer to the instructions in the option to see if this is required In this case a file is attached or a link spec...

Page 32: ...ct the hardware This means that the software which is stored in the processor of the hardware module must be adapted to the state of the PC software This happens automatically First open the hardware dialog via menu configuration hardware The following dialog opens The module to be updated must be in the upper part of the list If this is not the case but the module is in the lower part as in the p...

Page 33: ...In particular never carry out updates with laptops notebooks or other battery powered devices as these could unintentionally turn off the network connection power saving mode During the update do not turn off the machine or disconnect the network cable This could irreparably damage the module Reconnect All you have to do is follow the instructions on the screen After transferring the firmware file...

Page 34: ...face of the software may differ from the design of the illustrations in this manual It deliberately chose a classic design with few colors to optimize the contrast and readability of the manual Starting the Software It is best to turn on the machine before starting the software Otherwise you will receive an error message because it will automatically attempt to connect to the controller at startup...

Page 35: ...ts the ability to restrict access to functions depending on the logged in user At the bottom of the screen in the middle of the status line you can see which user you are currently logged in with As a logged off user you are not authorized to move the machine or start programs The possibilities are very limited which is also visible through the gray buttons and menus ...

Page 36: ...ignals from external devices this may also lock machine functions This is indicated by a different symbol instead of Emergency Stop Only with OK all functions are enabled No user is logged in or the current user is not authorized for certain functions If User logged out is displayed in the status bar or if you need to access functions that require special authorization you must log in as the user ...

Page 37: ...Distribution of the screen To keep the screen as clear as possible the main window is divided into four pages The tabs at the top of the title and menu bar Program Setup Diagnostics and Special allow you to switch between the pages The exact meaning of all individual elements is explained in detail in the chapter The user interface ...

Page 38: ...the start first the company logo appears After loading the program the tool path is displayed here Underneath is the window for the program text which is empty after the program starts Load file At the top of the title bar is the menu bar Select File Open NC file to open the file dialog Select the sample file Sample din or another G code file of your choice Depending on the Windows version you wil...

Page 39: ...t fits into the editing room If not or if other errors have been detected an error message appears in the message window at the bottom right For example it may indicate that number out of range is displayed because the zero point is not yet in the correct location and parts of the tool path are outside of the processing space It is important to recognize this already before the machine would hit a...

Page 40: ... done by setting the zero point Where the zero point is on the workpiece depends on the drawing The Sample din file contains the zero point in the lower left corner and at the level of the drawing For round or symmetrical parts it may also be that the zero point is in the center In the Z direction the zero point is usually placed on the upper edge of the workpiece so that positive Z values are abo...

Page 41: ...ece of paper on the workpiece Continue to drive slowly down until the paper stops moving and is clamped under the tool Now press the 0 button next to the Z coordinate display The coordinate jumps to zero Speed setting Set the speed back to 1000mm min and drive Z up a few millimeters Now you can use X and Y to move the tool over the left X lower Y corner and also set these two axes to zero Now the ...

Page 42: ...ough time to react if the machine does not run as intended and a collision threatens Slow feed Set the slider Feed 10 and then press Start Program on the far left The machine starts moving and moves to the first letter C During the first pass the contour is driven 4mm above the material If everything is correct you can set the slider back to 100 or press the Reset button to the right of the slider...

Page 43: ...as deliberately chosen to be simple and to handle all functions while working on the machine A consciously overcrowded and artistically playful surface has been deliberately omitted in order to offer the user a clear clean structure in order to exclude the risk of operating errors due to confusion The program screen On the first page is the graphic display of the tool path the text display of the ...

Page 44: ...wn the button Use the mouse wheel to move closer or farther away from the subject zoom Dragging while holding down the right mouse button turns the viewing angle Double click with the left mouse button to center the object in the window and set the center of rotation in the workpiece double click sets the zoom so that the complete machine room is displayed which is represented by a cuboid of thin ...

Page 45: ...rt from here will activate and you can continue a program from this point The control elements Below the other controls are briefly explained If one of the icons should later be unclear you can leave a short help text Tooltip by leaving the mouse pointer over the button First the display of the symbols is explained by the Edit button Normal active button that can be pressed Normal active button th...

Page 46: ...ton you are right back at the beginning of the first line of the program Load program This button is identical to Menu File Open NC File Edit program This button opens an editor in which the current NC program can be edited Sets the coordinate to the right to zero 0 The coordinate refers to the selected current offset G53 G59 Sets all coordinates to zero 0 The coordinates refer to the selected cur...

Page 47: ...u can change the current feed With the ESC key you can immediately zero the feed override to temporarily stop program execution This has the same effect as zeroing the feed slider The button Reset resumes execution at normal speed 100 To indicate the cause for the standstill more conspicuously the field is colored red at 0 feed These buttons can be used to change the spindle speed These buttons de...

Page 48: ... can be selected with the selection button below Offsets For G53 the coordinates are absolute machine zero and are shown in white on green all other choices are workpiece related offsets and are displayed in white on blue All workpiece offsets G54 to G59 are permanently stored on the hard disk of the computer and are retained even after the software has been exited and restarted Set the coordinate...

Page 49: ...hardware is not plugged in or powered down or another fault condition is present the Emergency Stop or other warning icon will appear If the DEMO symbol appears there is no connection to the hardware The triangular warning labels indicate a problem with the safety door the frequency converter or other external equipment For information about how to resolve the issues in these cases refer to the in...

Page 50: ...rasse 13 15 47608 Geldern Germany Page 50 Support 49 0 2831 91021 50 10 11 2018 Message window The Messages window at the bottom right shows information about the program flow or error messages The messages can be deleted by right clicking on the window ...

Page 51: ...start directly a drive of the associated axis in the appropriate direction The speed and step size can be selected using the selection buttons below Continuous means the axis is moving as long as the arrow button is pressed and stops when released For finite step sizes and when Position rounding is active the axis travels a maximum until the next position value rounded to the step size with increm...

Page 52: ...row buttons the machine moves directly to the zero point or the parking position If you want the Z height to remain constant you can also choose only X Y instead of all axes Attention use this function only if you are sure that the way to it is free If a collision threatens you can stop the movement by pressing the button again or of course with the emergency stop button The MDI The MDI button at ...

Page 53: ... axes travel It is therefore automatically always stopped before the hitting the stopping point If the tick is removed before Soft Limits this check is switched off which is normally only required when testing the machine if the reference switches do not yet function properly With soft limits off you should only drive slowly and carefully If the check mark is greyed out deactivating the soft limit...

Page 54: ... the message window the status of the inputs and outputs are displayed on this page The states of the reference and if present limit switches are visible as signal lamps at the top center To the left of the coordinate display are buttons for triggering a reference run Either the selected axis or all axes one after the other move slowly to their reference switch to find the position of the zero poi...

Page 55: ...s may cause machine parts to move Lookahead display The bar of the lookahead buffer indicates the level of the command buffer in CncPod This allows conclusions about the quality of the network connection and the computing load of the PC When driving longer distances the display should be in the upper quarter i e bar to almost far right If the buffer runs low because the connection is bad or if the...

Page 56: ...lecting the user macros at the bottom of the list in the Macro dialog Configuration Macros menu Or you can install macros using the import function menu File Import Settings downloaded from the Internet or supplied with a machine accessory Application examples Typical application examples for user macros are Spindle warm up tool length measurement with mobile probe borehole center finding and much...

Page 57: ...tton which is located under the graphics window on the program page File extensions The file must contain G code according to DIN ISO and usually has one of the endings din iso nc tap txt G code contains the coordinates of the actual tool path and additional commands such as tool spindle and coolant Drawings created with a CAD program on the other hand contain only contours or areas or volumes of ...

Page 58: ...t set zero point In this case either select the correct zero point G54 to G59 below the coordinate display or set a new zero point The location of the zero point may e g can be changed by moving the axis to the correct position using the arrow keys Setup page and pressing the zero button next to the corresponding coordinate display Alternatively you can double click on the Coordinate display and e...

Page 59: ... a file name the text editor opens and you can write an NC program by hand The automatic coloring of the keywords leads to a clearer presentation and makes it easier to find typos Save saves the program on the data medium and automatically loads it as a preview in the graphics window If you still want to change the program afterwards you can return to the text editor via the Edit button ...

Page 60: ...he manual For example it describes an HPGL Importfilter and a DXF Importfilter that are included in the standard version of this software Import settings With this function you can load the complete machine parameters and all settings of the software or parts thereof from an external file This can happen for several purposes You want to undo changes and import a previously made backup You want to ...

Page 61: ...on insert the media with the options file that you have received to the product and open the file If you want to install an option that is part of the standard scope of the software open the Default Parameters The subdirectory Addons within the standard parameters contains parameter sets for extensions and additional options such as tangential knife cutting The parameters in Addons are subsets of ...

Page 62: ...ade for later use You want to transfer the settings made to another identical machine Create backup For a backup it makes sense to select all setting categories When transferring to another machine however you should definitely omit the module addresses because otherwise the other machine would no longer recognize its own hardware modules after the import Of course you can only select individual c...

Page 63: ...on the icon starts the software with this configuration This is useful if you have multiple machine configurations and you want to select one at the start of the software The software then starts directly with these settings without you having to select import settings Exit This menu item terminates the program which of course is only allowed when the machine is stopped when no NC program is curre...

Page 64: ...aining the meaning of all the parameters here is beyond the scope of this manual and in most cases is not necessary because standard parameter sets are available for machines sold with the software A brief introduction to the most important settings can be found in the chapter Initial Start up For advanced users and designers of special machines or self construction please refer to the separately ...

Page 65: ...tion the current position of the tool is entered in the coordinates of the currently selected offset This has the same effect as pressing All Zero 0 XYZ next to the coordinate display in the main window In other words after the offset has been activated with the coordinates of the current position the coordinate display in the main window indicates the relative position X 0 Y 0 Z 0 etc Copy Offset...

Page 66: ... with the most important parameters Type and name are for convenience only The T number is the number used to identify the tool in the G code The P number is the number of the place in the tool magazine This is only needed if an automatic tool changer is used where the T number is not the same as the location number Diameter 1 Dm 1 is the effective diameter of the main cutting edges and is also us...

Page 67: ... currently selected or a new tool The type and parameters of the tool can be entered Standing times and max Speed is currently not used The track color is used for the 3D graphics If different colors are chosen the paths of the tools can be better distinguished Assign names If automatic is activated a name is automatically generated from the selected settings You can also replace the tool name wit...

Page 68: ...er certain functions via the keyboard and also determine which keys should be By default for example the arrow keys of the numeric keypad for manual driving jog are allocated so that you can change the tool position at any time without having to change to the Setup Page of the main window So that machine movements are not triggered unintentionally while typing all Hotkeys are deactivated while tex...

Page 69: ...an be flexibly adapted to different machines by programming so called macros Macros are small programs written in an extended G Code programing language and executed whenever special commands such as automatic tool change M6 are executed The macro defines the behaviour of the controller for these commands In addition there are macros that are always executed at certain times or events for example ...

Page 70: ... order to prevent the password from being changed if it is mistyped All numbers letters and special characters are allowed the password may be between 0 and 255 characters long This means that the field may also be empty which means there is no password assigned If you are the only user on the machine it may make sense not to assign a password So you do not have to log in every time However if oth...

Page 71: ...r the minimum and maximum duty cycle of the PWM output in percent The value for the maximum voltage at the bottom right is just for control Testing In the upper part of the window the setting can be tested When the M3 output is turned on the spindle should rotate at the indicated speed or the displayed voltage at the analog output should be measured If this deviates it can be adjusted by adjusting...

Page 72: ...ffect the graphical user interface GUI i e the display of the text in the program window and the tool path in the graphics window is influenced This opens a dialog box with two pages GCode Lexer and Graphics Change G code representation The G Code Lexer page allows you to change the color and font attributes for all the text elements of the syntax highlighting ...

Page 73: ...and delayed The response time of the other screen elements such as the coordinate display can be delayed By reducing the pixels and the data volume this can be optimized When the optimization is active very short lines of the tool path are summarized in the graphic display Accuracy vs resolution This has no effect on the accuracy of the actual tool path of the machine but causes only a barely noti...

Page 74: ...change machine parameters you have to log in as Customer Admin which has the default password of 1234 Automatic login If the user has not assigned a password the next time the program is started it is automatically logged back in without opening this dialog The currently logged in user is displayed in the status bar at the bottom of the main window for example User Default User or User Logged Out ...

Page 75: ...If you leave the machine without switching it off you can also log out by clicking on Menu User Logout The user is then logged off and the machine can no longer be operated Logout If you leave the machine without switching it off you can also log out by clicking on Menu User Logout The user is then logged off and the machine can no longer be operated ...

Page 76: ...equired in this case to assign the request and to contact you if necessary Of course this is only at your request We do not share your information with third parties or use them for unsolicited advertising Updates Attention Unlike Internet browsers and anti virus software where it is always advisable to work with the latest version for security reasons we strongly recommend that you do an update o...

Page 77: ...e program in the Messages window at the start of the program Before you start an update it is always recommended to backup your settings This is described in the chapter create backup The update process is started via the menu item Search updates A hint box opens which version was found and if you want to download it now To save the update choose a location on your computer that you can easily fin...

Page 78: ... was successful you will be notified If the download was unsuccessful just start over again After the download a note dialog opens with the exact path where the installation file was saved Now stop the program and install the update by starting in this example the C Users Nicolas Downloads Test KinetiC NC_180316_V166_setup exe Follow the instructions to the Install the Software and follow the Inst...

Page 79: ...remember that support can only contact you when all the data entered is complete Problem Description If you have problems with the software you can use this feature to send an automatic e mail to the support team This contains all important information about the current state of the software and the last executed operations log file Apart from the machine parameters and the address entered in the ...

Page 80: ...e sent to support now If the control PC does not have an Internet connection you will be notified You now have the opportunity to save the information in a file transfer it with a USB stick to another PC with Internet connection and send it to the support via e mail The e mail address of the support can be found on the dealer s website or via the help menu info about ...

Page 81: ...gories are selected and the smaller the priority is set the more data is written to the log file In normal operation the log file is not needed and only a few categories and a high priority should be selected in order not to generate an unnecessarily high volume of data which could possibly have a negative impact on system performance Support But the log file can become important when it comes to ...

Page 82: ...al Reference manual With this menu item you can open the PDF version of this manual directly via the software To do this the default PDF reader is opened If you do not have a PDF reader installed a warning message will appear asking you to install a PDF reader first For example the Adobe Acrobat Reader from www adobe com or any other PDF reader This manual is also great for printing if you prefer ...

Page 83: ...eldern Germany Page 83 Support 49 0 2831 91021 50 10 11 2018 Help This menu item opens the Windows interactive help for this program Search With this help you have a powerful tool at your disposal You can search for individual terms which are then marked in the found text ...

Page 84: ...eldern Germany Page 84 Support 49 0 2831 91021 50 10 11 2018 Information about Here you will see a message with information about the current software version version number and creation date the registered user data and the e mail and website addresses of the manufacturer ...

Page 85: ...art is milled out and the part thus completely separated from the plate From the raw material remains a thin frame and possibly leftover material There are many applications that work on this principle Production of front panels for housings or sheet metal parts in general also plasma cutting Parts for modelling plywood fiberglass CFK Engraving signs Advantages The advantage of this type of proces...

Page 86: ...along the contour are normally displayed in green possibly with different tools in other colors rapid traverse movements with dashed red lines The position of the zero point is represented by the three arrows in red green and blue The text window below shows the source code of the program Normally the first few lines contain comments with the name of the part and possibly further information about...

Page 87: ...daries is displayed in orange Error messages The associated error message could be for example X 200 263 is above the upper limit of 200 0 X 200 263 offset G54 200 00 400 263 axis limit 400 Number out of range row 30069 column 3 The first line shows that the coordinate in the NC program G code in the program window is programmed to a target position of 200 263 With the current settings however the...

Page 88: ...irection of smaller X values Set zero point The following description assumes that the zero point in the drawing is at the top of the material as in the example of the image and at the bottom left in the X Y direction If the coordinate display on the top right screen still has a green background color then no workpiece offset has been selected and G53 Machine Coordinates is displayed below the coo...

Page 89: ...esired position in the processing space completely within the acceptable limits as indicated by no part is marked in orange and all lines are inside the gray box In the message window no error message should appear anymore only used zero points Zero adjustment You can now carry out a fine adjustment of the zero point for example with the paper method described in the chapter Setting up the zero po...

Page 90: ...abled gray In this case you can first click on Rewind then the text display jumps to the beginning of the program and the start button becomes active again Adjust feed Before starting a new program for the first time it is recommended to set the feed override slider Feed top right to a small value eg 10 20 to slow down the machine If you have made a mistake while setting the zero point if the wron...

Page 91: ...n After eliminating the problem you can resume editing at the same location Continue again However after a tool break the controller may have allowed a small part of the program to continue without the broken tool being engaged In order not to omit any piece of the tool path you would actually have to rewind this section again Depending on how far you have travelled since the break you can scroll ...

Page 92: ...still raw material on the way there If you cannot be sure that a collision will not occur then rewind until you reach a non hazardous location such as a safe Z height outside of the material For short programs that only run for a few minutes and if the part is not too valuable it may not be worth continuing and it is better to run the program completely from scratch instead of risking another tool...

Page 93: ...execution of a program The user clock and the parts counter can be set to zero if necessary Tool path settings Right next to the tool display in the middle column of the main window there is a button for the tool path settings This can be useful in order to influence the path of tolerance chord error or feed and spindle speed afterwards without having to change machine parameters or having to edit...

Page 94: ...lf a diameter from the surface For example if you drove to the edge in the X direction and the tool diameter is 6mm then the cutter center is 3mm from the edge Double click on the X coordinate display and enter 3 Of course the same procedure is necessary once again for the Y and Z coordinates Probe The measuring process can be automated if you have a 3D probe In contrast to the height sensor the 3...

Page 95: ...ero point automatically This is a significant reduction in labour compared to the direct scratching of the workpiece surface or the paper method mentioned above The procedure The procedure is as follows The button is connected to the controller and placed on the material surface The tool is moved vertically over the button of the probe Then a macro is called which means a small program is started ...

Page 96: ...first use To do this please switch to the Diagnostic page For the inputs top right a tool length sensor entry should be visible with a box to the left In the normal state no check mark may be displayed Now press the button with your hand Now a tick must be visible If nothing changes the probe is either not connected correctly or the signal is assigned to the wrong pin If the behavior is exactly th...

Page 97: ...up the macro double click on Height measurement with mobile probe on the Special Page the measuring process will be carried out If you now remove the probe and lower it with the tool until it just touches the material a Zero coordinate should be displayed near Zero The small difference ideal would be exactly zero comes from the fact that the real switching point of the probe is located at a slight...

Page 98: ...can for example to produce holes with different diameters select a tool to match the smallest hole and mill for the larger one circle In this way one often gets amazingly far with a single tool 13 5 1 1 Distribution of the program If you need several tools in succession the processing is divided into several programs Each processing step is carried out separately In between the tool is changed man...

Page 99: ...must be re measured after each change Tool length sensor For this reason when switching directly it is strongly advised to purchase a tool length sensor This is the same as the height probe described above only fixedly mounted at a certain point on the machine There are also combined length and height probe where the same probe can be used for both purposes Such a button usually has a magnetic foo...

Page 100: ...mewhere in the distance next to the button This prevents the probe from being damaged if after a measurement a program is started which moves as the first movement with the Z axis all the way down The offset Z axis 962 can later be adjusted so that the measured tool length corresponds to a dimension in principle arbitrary but verifiable for example the length of the part of the tool that protrudes...

Page 101: ... holder usually SK steep taper HSK hollow taper or other systems During the actual tool change the pictures are then loaded into the tool spindle The tool remains in its receptacle as long as it is not worn or damaged Advantage This has the advantage that the length measurement must be performed only after the insertion of a new tool in the recording This can be done either automatically as descri...

Page 102: ... requires a magazine in which several tools can be stored Magazine types There are fixed linear magazines in which each tool is picked up at a different position by utilizing the X Y and Z positioning of the spindle or moving magazines revolvers where the pickup is always at the same X Y Z position but there is an additional drive to select the tool Since the exact position of the tool is not alwa...

Page 103: ... lengths are measured by hand and entered in the tool list no probe or G79 macro is required Rotary axis and cylindrical engraving With the normal three axis machining X Y Z the workpiece can only be machined from one side vertically from the top If you also want to machine the reverse side you will need to turn the workpiece over after the first pass and start a second pass With a rotation axis a...

Page 104: ...ertain distance on the surface Simply without CAM For drum engraving no special CAM program with rotary axis support is required You can even use an existing NC program that was originally designed only for flat plate flat machining later for drum engraving Where is the rotary axis mounted All you have to do in the machine configuration configuration machine special drum engraving see picture abov...

Page 105: ...and first set the Y axis to zero Then clamp the real workpiece again and set the Z coordinate to zero on the top Load NC program Open now the NC Program The tool path is initially displayed flat i e parallel to the XY plane Now go to the tool path dialog via the button to the right of the tool display see picture above right Switch to the Drum Engraving tab and activate the check mark Engrave drum...

Page 106: ... in the subfolder Addons of the default parameters menu File Import Settings Default Parameters There all necessary parameters for the most common tangential knife type with stepper motor and 1 1 gearbox are already predefined Backup If the machine is also used alternately for milling do not forget to make a backup of parameter before importing the tangential file Checking the knife Before using f...

Page 107: ...ement vertically downwards one or more XY movements within the material G1 G2 or G3 without Z and a lifting movement G1 with Z movement vertically upwards and any number of repetitions Sharp corners or not It is important that the drawing has tangent continuous transitions at all points where liquid is to be passed through Wherever sharp edged lines about each other the control automatically gener...

Page 108: ...Presentation in the graphic The points at which the knife is lifted out can be recognized as vertical lines in the path preview see picture on the right at the corners of the rectangle and on the left at the circle If lifting motions are present at locations on the web where they should not actually be this is an indication that there are either tiny gaps or intersections possibly not visible depe...

Page 109: ...d solutions In case of unforeseen problems you can contact the Support If possible try to solve the problem first by using this guide Functions locked Not all functions of the software are allowed at any time It may happen that certain buttons and menu items are locked In the picture below for example the machine movement spindle and coolant function and tool change and homing are disabled greyed ...

Page 110: ...pted Regardless of the state of the machine there is another reason why functions may be limited Some functions require special rights In order to be able to change the machine parameters for example you have to be logged in as an administrator Therefore in the picture below Configuration Machine is greyed out See also User Login Connection interrupted The above icon indicates that the connection ...

Page 111: ...ur CAM software Tips for creating or customizing your own post processor can be found in the Reference manual The machine does not react as expected If the machine is working properly in manual mode means in Setup mode all axes can be moved the spindle switched on and off etc but the program does not run the expected tool path moves too fast or too slow or stops at certain points may be the faulty...

Page 112: ...s In this case there is nothing left but to break the vicious circle by overriding the blockage caused by the alarm condition This is the maintenance mode which is activated with the button on the setup page Since overriding the security feature involves a high level of risk this feature is only available when logged in as an administrator Before releasing the machine and switching outputs the fol...

Page 113: ...e circle with center vector in 2D or 3D and radius Arc angle Polyline as open or closed line Vertex 2D or 3D points for polyline Point 2D or 3D What is imported Not supported are B splines Bezier lines also no 3D solid data However all supported elements are also supported in 3D ie with z values If the elements Point or Polyline with only one vertex are included they are interpreted as drilling po...

Page 114: ...opens In the upper field the layers are displayed with data Layers in the file that contain no evaluable data are not displayed Layers can be activated deactivated individually Only active layers will be imported The size of the data to be imported is always updated and applies only to the active layers segments By clicking on the tabs of the left side the following additional settings appear Tab ...

Page 115: ...s 3D data The Z values from the layer data are used Feed 1 For all layers the value specified in the Global Setting field is used 2 Each layer has individual feed values Zero offset 1 The zero point is not changed but remains as specified in the file 2 The zero point is placed in the lower left corner of the workpiece 3 The zero point is placed in the middle of the workpiece Tools 1 For all layers...

Page 116: ...he material to be milled drilled Spindle speed Value for the speed of the milling spindle XY feed Value for the G1 feed in mm min Tool The tool to use from the tool list Z feed G1 feed to be used for immersion in the material Settings for drilling These data can be set separately from the milling data G81 G82 G83 no cycle Here you choose whether a drilling cycle should be used If no cycle is selec...

Page 117: ...21 50 10 11 2018 Tab Settings This field displays the general data for the machine or workpiece material Z values of material and machine Material top Highest part of the material to be milled drilled Z level security Height at which it is safe to travel at rapid traverse G0 without colliding with the clamping device ...

Page 118: ... selected line numbers are output in the G code File in inches scale When this box is checked the coordinates in the file are interpreted as inches scaling Any value for scaling the file can be specified here 0 5 for example cuts the file in half meaning that a 100x100mm template is now only 50x50mm in size but an indication of 2 35 would scale a 100x100mm file to 235x235mm Program extreme values ...

Page 119: ...or feed Z depth tool or drilling can be set for each layer The description of the individual values is identical to the global values described above Advanced Editing Path Details Clicking on the Path Details button opens the following window Segment selection In the upper left corner is a list of all segments that contain this file Clicking on one of these segments turns this light green At the s...

Page 120: ...segments it may be useful to sort the segments again and chain them together This can be triggered by the Optimize path button Unfortunately this option is NOT reversible so if an unexpected result arises for example with double lines the import is to be repeated again The conversion After confirming the button Start conversion the data will be converted into G code and automatically loaded as a p...

Page 121: ...arked as closed or not Unfortunately this does not always work Therefore the import will see if the first point matches the last one If that is the case the line will always be marked as closed even if it is open in the DXF file If the file was saved as a closed line but the endpoints do not match the line will be closed Note for experienced users Double elements Unfortunately many programs export...

Page 122: ...egments and which should be deleted You can make a note of the wrong segment numbers in such a test run Import the file with the correct feeds and Z values Open the file with the editor and remove all previously noted duplicate segments No existing import data or message Error while parsing the DXF file wrong version It may happen that some programs in DXF export e g Disassemble fonts into splines...

Page 123: ...es usually have the extension hpgl or plt and are provided by most drawing programs These types of files are originally intended for controlling character plotters and cutting plotters Language supported The HPGL import filter supports the following commands IN DF IP SC VS WU PW SP PU PD PA PR AA AR All other HPGL commands are ignored The import process To import an HPGL file open it via Menu File...

Page 124: ...is created in the same directory as the HPGL file to be imported Therefore make sure that the HPGL file is in a folder with write permissions Do not import from a CD or DVD or a folder where you do not have write permission KinetiC NC HPGL Import Filter Filter Version V1 0 converted from C plotter out 222 plt circle mode JK relative N10 G64 constant velocity mode N20 G21 metrical N30 G90 N40 G0 Z1...

Page 125: ...ed you can right click on the pen in the table above to select a different tool for each pen Feed Feed is pen speed VS In a HPGL file individual speeds can be specified to the pens with the VS command If your drawing program supports this you can specify a speed for each pen when exporting If you select this option then the milling feed is automatically and comfortably taken over by each pin Feed ...

Page 126: ...cking on the button Reset to default values all settings are reset to the default values CV Mode In CV mode curving and cornering do not slow down until the machine stops but similar to motorcycling the curve is cut So you get a faster jerk free movement but the path is not 100 accurate traversed The maximum permissible error can be changed in the machine settings Create line numbers The NC progra...

Page 127: ...Co KG Siemensstraße 13 15 D 47608 Geldern Phone 49 0 2831 91021 50 Mo Fr 07 00 am 03 15 pm Mobile 49 0 2831 91021 20 Only in urgent cases Mo Thu 03 15 pm 06 00 pm Fax 49 0 2831 91021 99 E Mail support cnc step de Web https www cnc step com If you have any questions please contact our customer service by e mail or telephone We are happy to help Numerous suggestions and information can also be found...

Reviews: