22
VACUUM PUMP DRIVE BELTS
To tighten the vacuum pump belts:
1.
Loosen the centre nut (left hand)that holds
the tensioner to the tensioner bracket.
2.
Using a tensioner wrench rotate the rear of
the tensioner to 75° for the Compact 45 or
47. For more information contact your local
authorized Cleanco service center.
3.
Roll the belts back onto the blower pulley.
The centre line on the inside of the tensioner
should be positioned between the second
and third line on the outside of the tensioner.
NOTE: When adjusting belt tension,
make certain that the PTO shaft and
vacuum pump shaft remain parallel,
and the belt tension is equal
throughout the belt width.
4.
After adjusting, check belt alignment with
straight-edge.
Make certain that when you re-torque these
screws, that you use a clockwise pattern and
continue until proper torque is achieved.
TORQUE VALUES
COMPONENT
INCH/LBS
FOOT/LBS
Rear PTO Hub
300
15
Vacuum Pump Hub
300
15
5.
Check for pulley groove wear, clean belts
and pulley grooves, check for worn belts, proper
belt tension, and pulley alignment after the
first
25 hours
and then again at
100 hours.
Check for belt ride in the groove.
PRESSURE REGULATOR
Lubricate the o-rings and bullet
every 50 hours.
Use o-ring lubricant or synthetic grease.
For the procedure, see the “General Service
Adjustments” section in this manual for details.
VACUUM HOSES
To assure maximum hose life, we recommend
that the hoses be washed out with clean water at
the end of each
working day.
HIGH PRESSURE HOSES
Inspect your high pressure hoses for wear after
the
first 100 hours
of use. Inspect
every 25
hours thereafter.
If hoses show any signs of
damage or impending rupture,
replace the
hose.
DO NOT attempt to repair high pressure
hoses! Repairing high pressure hoses
may result in severe burns and serious
injury!
All high pressure hoses must be rated for
3000 PSI at 250 deg F. Thermoplastic hoses
do not meet these specifications and should
not be used. Severe burns and injury may
result if the hoses do not meet these
requirements.
OPTIONAL WASTE PUMP-OUT
At the end of each work day
, make certain that
you remove any debris or sediment which may
be inside the waste pump by pumping fresh
water through the pump.
Summary of Contents for Compact 45
Page 1: ...VERSION AUG 2017...
Page 13: ...12...
Page 14: ...13...
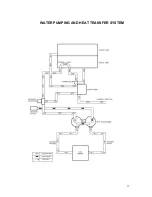
Page 18: ...17 WATER PUMPING AND HEAT TRANSFER SYSTEM...
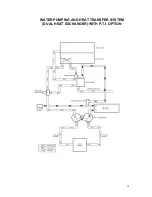
Page 19: ...18 WATER PUMPING AND HEAT TRANSFER SYSTEM DUAL HEAT EXCHANGER WITH P T I OPTION...
Page 28: ...27 CLEANCO COMPACT OVERHEAD VIEW...
Page 29: ...28...
Page 30: ...29 FRONT PANEL 45 47 FRONT VIEW...
Page 31: ...30 FRONT PANEL 45 47 BACK VIEW...
Page 33: ...32 FRONT PANEL PLUMBING P 1...
Page 34: ...33 FRONT PANEL PLUMBING P 2...
Page 37: ...36 COMPACT RECOVERY TANK...
Page 39: ...38 COMPACT BASEPLATE 45 47 P 1...
Page 40: ...39 COMPACT BASEPLATE 45 47 P 2...
Page 45: ...44 KIT INSTALLATION 45 47 P 1...
Page 46: ...45 KIT INSTALLATION 45 47 P 2...
Page 49: ...48 DUAL HEAT EXCHANGER...
Page 51: ...50 P T I...
Page 53: ...52 COVER HOLDER KIT...
Page 55: ...54 PTO SHAFT...
Page 58: ...57 C A D EXTERNAL OPTION PAGE 1...
Page 59: ...58 C A D EXTERNAL OPTION PAGE 2...
Page 61: ...60 F W TANK AQUA STORAGE 120 GALLON...
Page 63: ...62 F W TANK AQUA REEL TANK 125 GAL P 1...
Page 64: ...63 F W TANK AQUA REEL TANK 125 GAL P 2...
Page 75: ...74 CLEANCO COMPACT ELECTRIC WIRING P 1...
Page 76: ...75 CLEANCO COMPACT ELECTRIC WIRING P 2...
Page 77: ...76...
Page 78: ...77...
Page 79: ...78...
Page 80: ...79...
Page 81: ...80...
Page 82: ...81...
Page 83: ...82...
Page 84: ...83...


