


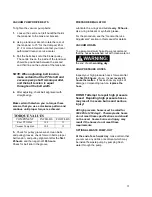

7
repeating the extra vacuum pass. A good rule to
remember is for every one wet pass, two dry (vacuum)
passes are required. Failure to adopt good wanding
procedures can result in streaking, over wetting,
browning and longer drying times.
Over wetting not only leaves a bad impression with your
client but may also require an extra trip back to correct
annoying problems such as browning. There are several
things that could cause over wetting:
1.
Not enough vacuum strokes, or incorrect wanding
procedures.
2.
Clogged vacuum blower filter.
3.
Clogged lint basket filter.
4.
Vacuum tank not sealed properly.
5.
Obstruction in the vacuum hose, or kink in the
vacuum hose.
6.
Vacuum tank drain valve partially open.
7.
Cleaning a heavily foam-saturated carpet without
defoamer.
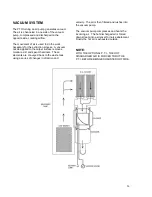
OPERATING INSTRUCTIONS
NOTE:
Before operating the unit, make sure you are in a
well-ventilated area. Exhaust fumes from the vehicle
contain carbon monoxide and are hazardous to your
health and your client’s health. Do not operate the unit or
the vehicle near any building doorways, windows, or
openings of any kind.
1. Check your fuel gauge to ensure you have enough
fuel for the job.
2. Check to make sure you have an adequate amount
of fresh water in your fresh water tank to complete
the entire job. If not, fill fresh water tank prior to
starting the job.
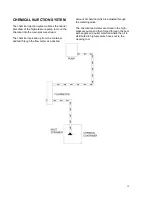
3. Check your chemical jug to ensure that you have
enough concentrated solution for the required job. If
not, mix and fill the chemical jug with the desired
cleaning solution.
4. Connect all hoses required. When connecting
hoses start from the furthest point to be cleaned
and work back towards the unit. This will ensure
that you have the proper length required. Once at
the Cleanco unit, connect the high-pressure hose to
the quick discount on the front panel. Then repeat
the same process with the vacuum hose and
connect it to the vacuum port on top of the recovery
tank.
START UP
1. Make sure the van is in the park position and the
emergency brake is set.
2. With the van engine running, turn the main power
switch to UPHOLSTERY or CARPET MODE
depending on the work you are about to do.
3. Connect the fill (primer) hose to the second high
pressure quick connect on the instrument panel, and
place the open end in the second vacuum port.
4.
Turn on the high pressure pump switch to the “ON”
position. (Water will start to flow through the fill
(primer) hose into the recovery tank.)
5. Adjust the chemical metering system by turning the
chemical metering knob counter clock wise until the
float ball in the chemical meter sits at 2 or 3 GPH.
6.
Turn the pump switch to the “OFF” position and
disconnect the fill (primer) hose.
7.
Turn the pump switch to the “ON” position and check
the pressure setting on the high pressure gauge.
Standard carpet cleaning pressures should be
between 300 and 500 psi. Upholstery pressures
should be between 100 and 200 psi.
8. Connect the vacuum and the male end of the
pressure hose to the carpet wand or tool being used.
9. You are now ready to start cleaning.
NOTE:
The machine will automatically shut down when
it reaches full capacity due to the high level float switch
located inside the recovery tank. When this occurs,
empty the recovery tank at an approved disposal site. To
save time on emptying recovery tanks Cleanco
recommends that you have a Cleanco C.A.D. (Cleanco
Auto Drain) installed on your recovery tank.
SHUT DOWN
1. Lay vacuum hoses out in order for all moisture to be
removed from hoses. This prevents spillage of any
soiled water in your vehicle when storing hoses.
2.
Turn the MAIN POWER SWITCH to the “OFF”
position.
3.
Turn the high pressure pump switch to the “OFF”
position.
4. Disconnect all vacuum and high pressure hose and
place them in the van. Also place the carpet wand
and any tools that were on the job site into the van.
5. Remove the lift out lint basket, clean, and replace
the lint basket back into the recovery tank.
6. Drain recovery tank at an approved disposal site.
Summary of Contents for Compact 45
Page 1: ...VERSION AUG 2017...
Page 13: ...12...
Page 14: ...13...
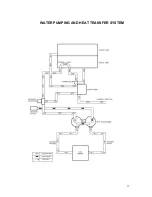
Page 18: ...17 WATER PUMPING AND HEAT TRANSFER SYSTEM...
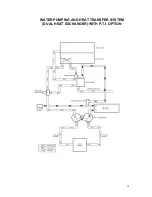
Page 19: ...18 WATER PUMPING AND HEAT TRANSFER SYSTEM DUAL HEAT EXCHANGER WITH P T I OPTION...
Page 28: ...27 CLEANCO COMPACT OVERHEAD VIEW...
Page 29: ...28...
Page 30: ...29 FRONT PANEL 45 47 FRONT VIEW...
Page 31: ...30 FRONT PANEL 45 47 BACK VIEW...
Page 33: ...32 FRONT PANEL PLUMBING P 1...
Page 34: ...33 FRONT PANEL PLUMBING P 2...
Page 37: ...36 COMPACT RECOVERY TANK...
Page 39: ...38 COMPACT BASEPLATE 45 47 P 1...
Page 40: ...39 COMPACT BASEPLATE 45 47 P 2...
Page 45: ...44 KIT INSTALLATION 45 47 P 1...
Page 46: ...45 KIT INSTALLATION 45 47 P 2...
Page 49: ...48 DUAL HEAT EXCHANGER...
Page 51: ...50 P T I...
Page 53: ...52 COVER HOLDER KIT...
Page 55: ...54 PTO SHAFT...
Page 58: ...57 C A D EXTERNAL OPTION PAGE 1...
Page 59: ...58 C A D EXTERNAL OPTION PAGE 2...
Page 61: ...60 F W TANK AQUA STORAGE 120 GALLON...
Page 63: ...62 F W TANK AQUA REEL TANK 125 GAL P 1...
Page 64: ...63 F W TANK AQUA REEL TANK 125 GAL P 2...
Page 75: ...74 CLEANCO COMPACT ELECTRIC WIRING P 1...
Page 76: ...75 CLEANCO COMPACT ELECTRIC WIRING P 2...
Page 77: ...76...
Page 78: ...77...
Page 79: ...78...
Page 80: ...79...
Page 81: ...80...
Page 82: ...81...
Page 83: ...82...
Page 84: ...83...