


O
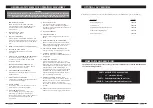
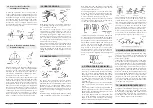
GENERAL SAFETY RULES FOR OPERATING MACHINERY
1.
KNOW YOUR MACHINE.
Read the manual carefully. Learn the
machines applications and limitations, as
well as the specific potential hazards
peculiar to it.
2.
KEEP GUARDS IN PLACE
and in working order.
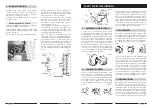
3.
EARTH ALL MACHINES.
If the machine is equipped with three-pin
plug, it should be plugged into a three-pin
electrical socket. Never remove the earth
pin.
4.
REMOVE ADJUSTING KEYS AND WRENCHES.
5.
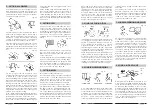
KEEP WORK AREA CLEAN.
Cluttered areas and benches invite
accidents.
6.
DON’T USE IN DANGEROUS ENVIRONMENT.
Don’t use machinery in damp or wet
locations, or expose them to rain. Keep
work area well lit.
7.
KEEP CHILDREN AND VISITORS AWAY.
All children and visitors should be kept a
safe distance from work area.
8.
MAKE WORKSHOP CHILDPROOF
Use padlocks, master switches or remove
starter keys etc.
9.
DON’T FORCE THE MACHINE.
It will do the job better and safer, at the rate
for which it was designed.
10. USE RIGHT TOOL.
Don’t force a tool or attachment to do a
job for which it was not designed.
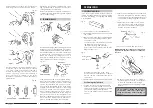
11. WEAR PROPER APPAREL.
Loose clothing, gloves, neckties, rings,
bracelets, or other jewellery may get
caught in moving parts. Nonslip footwear is
recommended. Long hair should be
contained.
12. USE SAFETY GLASSES.
Also use face or dust mask if cutting
operation is dusty. Everyday eyeglasses
only have impact resistant lenses, they are
NOT safety glasses.
13. USE EAR DEFENDERS.
14. DON’T OVERREACH.
Keep proper footing and balance at all
times.
15. MAINTAIN TOOLS IN TOP CONDITION.
Keep tools sharp and clean for best and
safest performance. Follow instructions for
lubricating and changing accessories.
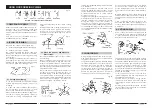
16. ALWAYS DISCONNECT THE MACHINE
before servicing or changing accessories.
17. AVOID ACCIDENTAL STARTING.
Ensure the machine is switched OFF before
plugging in.
18. CHECK FOR DAMAGE.
If part of the machine (eg. A cover or
guard), is damaged, it should be carefully
inspected to ensure that it can perform its’
intended function correctly. If in doubt, the
part should be renewed. Damage to
moving parts or major components should
be Inspected by a qualified technician
before operating the machine. Contact
your local dealer for advice.
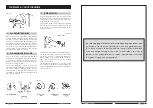
19. DO NOT STAND ON THE MACHINE.
Serious injury could occur if the machine is
tipped over. Do not store materials above
or near the machine such that it is
necessary to stand on the machine to get
to them.
20. NEVER operate a machine when under the
influence of alcohol, drugs or medication.
WARNING
As with all machinery, there are certain hazards involved with their operation and use. Exercising
respect and caution will considerably lessen the risk of personal injury. However, if normal safety
precautions are overlooked, or ignored, personal injury to the operator may result.
4
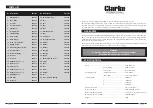
OPTIONAL
ACCESSORIES
A full range of optional accessories (detailed below) are available from your local dealer.
Accessory
Part No
Cup Turning Chuck
6500641
Screw Chuck
6500642
4 Jaw Independent Lathe Chuck
6500645
6" Face Plat (Right Hand)
6500646
8 Piece Chisel Set
6500649
29
PARTS & SERVICE TEL: 020 8988 7400
or e-mail as follows:
PARTS: [email protected]
SERVICE: [email protected]
SPARE PARTS AND SERVICING
For spare parts or servicing, please contact your nearest Clarke dealer or Clarke International on
one of the following numbers.