v1.7 04.
19
282
4DE0H0ZN1C
802
411DE
de > 2
en > 17
fr > 32
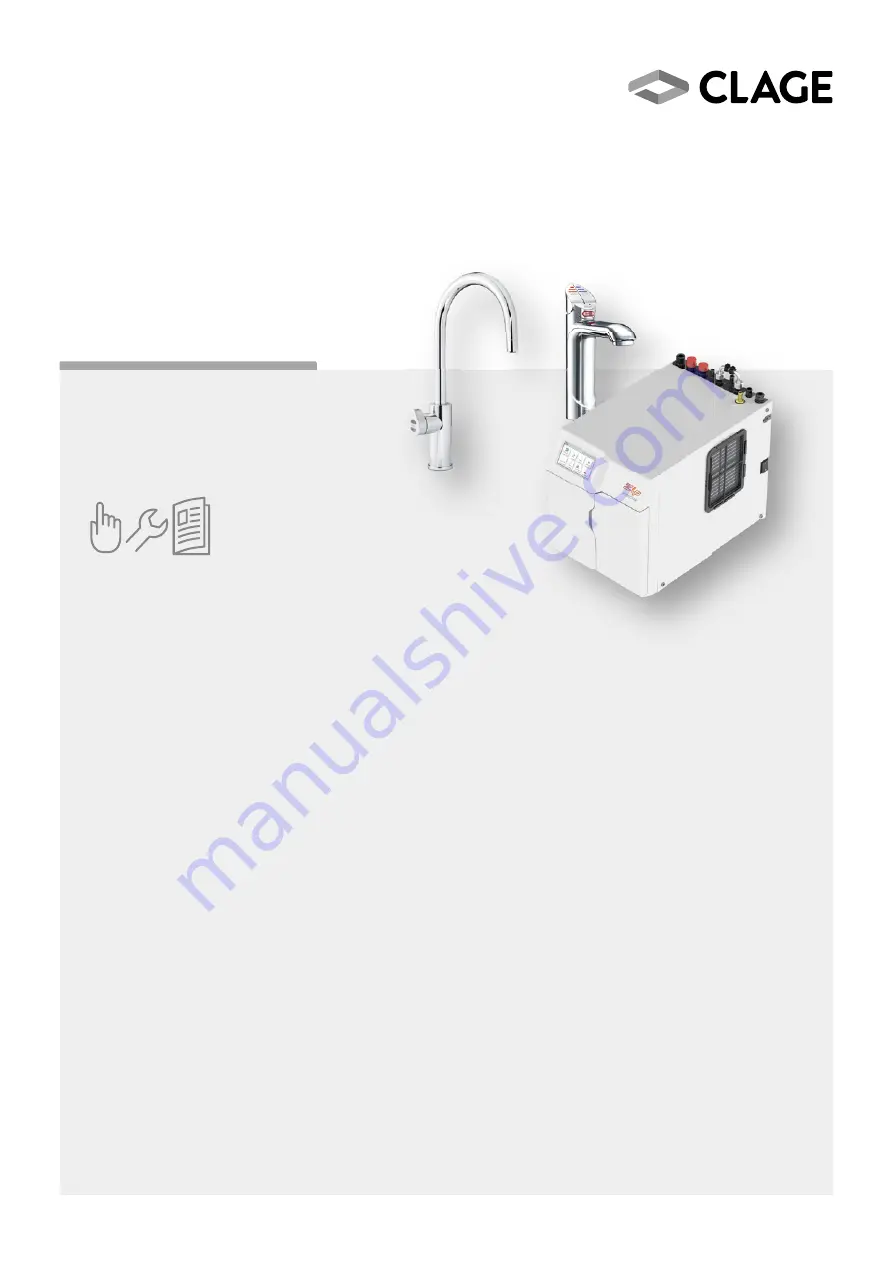
Zip HydroTap
®
G4 BC 100/75
Gebrauchs- und Montageanleitung
Operating and installation instructions
Page 1: ...v1 7 04 19 2824DE0H0ZN1C 802411DE de 2 en 17 fr 32 Zip HydroTap G4 BC 100 75 Zip HydroTap G4 BC 100 75 Gebrauchs und Montageanleitung Operating and installation instructions ...
Page 2: ...ontage 5 Installation Classic 6 Installation Arc 6 Installation der Untertischeinheit 7 Optional Installation des Tableaus 8 Installation eines externen Ionenaustauschers 8 Inbetriebnahme 9 5 Gebrauch 10 Bedienung 10 Kindersicherung 11 Menü 11 Längere Nichtbenutzung 13 6 Wartung und Pflege 14 Reinigung 14 Filterwechsel 14 Weitere Wartungsarbeiten 14 7 Problemlösung 15 8 Umwelt und Recycling 16 9 G...
Page 3: ...t werden Öffnen Sie niemals das Gerät ohne vorher die Strom zufuhr zum Gerät dauerhaft unterbrochen zu haben Nehmen Sie am Gerät oder an den Elektro und Wasser leitungen keine techni schen Änderungen vor Das Gerät ist nur für den Hausgebrauch und ähnliche Zwecke innerhalb geschlos sener Räume geeignet und darf nur zum Bereiten von Trinkwasser verwendet wer den Die Umgebungstemperatur muss zwischen...
Page 4: ...lachen Ablauftableau an beliebiger Stelle platziert 2 Gerätebeschreibung 3 Technische Daten Typ Zip HydroTap G4 BC 100 75 Nennspannung Nennleistung 230V AC 2 05kW Nenndruck MPa bar 0 17 0 70 1 7 7 0 Temperaturbereich Heißwasser C 68 100 Heißwassertankvolumen Liter 2 3 Temperaturbereich Kaltwasser C 5 15 Kaltwassertankvolumen Liter 1 8 Wasseranschluss G oder G Maße H B T cm 33 5 29 0 46 0 Gewicht g...
Page 5: ...zeugen werden gegebenenfalls folgende Spezialwerkzeuge benötigt Blech Lochstanze mit 35mm Durchmesser für Spülen nicht im Lieferumfang enthalten Lochsäge mit 35mm Durchmesser für Holzarbeitsplatten nicht im Lieferumfang enthalten Rohrschlüssel zum Befestigen der Armatur im Lieferumfang enthalten Handhabung der mitgelieferten Kunststoffschläuche und Schnellverbinder Beim Kürzen der Schläuche ist da...
Page 6: ...r dem Boden des Untertischgerätes installiert werden um einen zu niedrigen Wasserdruck zu ver meiden Hinweis Die Armatur darf unter keinen Umständen gedreht werden nachdem sie fest montiert wurde Die Arc kann für Links und Rechtshandbedienung in jeweils 3 Positionen fixiert und die Auslaufhöhe in zwei Ebenen eingestellt werden siehe links 1 Bestimmen Sie die Position der Armatur so dass austretend...
Page 7: ...Flexschlauch Adapter Eckventil Hydrotap Gerät O Ring Gummi dichtung Sockel Befestigungs mutter Sperr scheibe 9 Schieben Sie zuerst die Gummidichtung dann die Sperrscheibe und die Befestigungsmutter von unten über die Schläuche Kabel und anschließend über die Gewindestange der Armatur Befestigen Sie die Armatur mit der Befestigungsmutter Vergewissern Sie sich vor dem Festziehen der Mutter dass der ...
Page 8: ...schrieben 4 Verbinden Sie den Abfluss mit einer Siphon Rohrmuffe Verwenden Sie dazu einen 22mm durchmessenden Schlauch Sollte keine freie Siphon Rohrmuffe zur Verfügung stehen ist die Schnapp Rohrmuffe zu verwenden a Platzieren Sie die Schnapp Rohrmuffe an der der Spüle zugewandten Seite des Siphons Bohren Sie ein Loch mit einem Durchmesser von 13mm in das Abflussrohr hinter der Schnapp Rohrmuffe ...
Page 9: ...mögen benötigt a Öffnen Sie die Wartungsklappe an der Vorderseite des Gerätes Führen Sie den Kunststoffschlauch in den Auffangbehälter und öffnen Sie das Ventil am Schlauch b Tippen Sie Start um die Spülung zu starten c Lassen Sie etwa 10 Liter Wasser ablaufen und tippen Sie anschließend Stopp um die Spülung zu beenden Schließen Sie das Ventil am Schlauch und tippen Sie Weiter 4 Starten Sie die Ka...
Page 10: ...am Zip Hebel der Armatur Rot Kochendes Wasser Blau Gekühltes Wasser Drehen Sie den Hebel um Wasser zu zapfen Wenn der Hebel nach hinten gedreht wird fließt Wasser solange der Hebel gehalten wird Wird der Hebel nach vorne gedreht fließt Wasser für eine im Menü einstellbare Zeitdauer zwischen 5 und 15 Sekunden Anschließend muss der Hebel in die Aus Stellung zurück bewegt werden Rotes Licht durchgäng...
Page 11: ...findet sich ein Touchscreen an dem die Betriebsparameter des Gerätes eingestellt und abgelesen werden können Im Menü können folgende Einstellungen vorgenommen werden Sprache Auswahl der im Menü verwendeten Sprache Info Zeigt Geräte spezifische Daten und eventuell aufgetretene Fehler an Install Die bei der Erstinbetriebnahme notwendigen Schritte können zu Wartungszwecken erneut aufgerufen werden Fi...
Page 12: ...en reduziert werden um eine verkürzte Aufwärmzeit bei erneuter Benutzung zu erreichen Der Ruhezustand reduziert den Energiebedarf automatisch in Abhängigkeit von der Nutzung oder dem Umgebungslicht Die Zeitschaltung reduziert den Energiebedarf entsprechend der eingestellten Zeit Für eine einwandfreie Funktion ist es notwendig dass das Datum und die Uhrzeit am Gerät korrekt eingestellt sind Sicherh...
Page 13: ...gekühltes und heißes Wasser bis kein Wasser mehr fließt um das Gerät zu leeren 3 Schalten Sie das Gerät aus und ziehen Sie den Netzstecker Nach längerer Nichtbenutzung 1 Schließen Sie die Wasserversorgung wieder an und öffnen Sie das Eckventil Achten Sie auf eventuelle Undichtigkeiten 2 Stecken Sie den Netzstecker wieder in die Steckdose und schalten das Gerät ein 3 Lassen Sie nach Nichtbenutzung ...
Page 14: ...ie die neue Ersatzfilterpatrone in die Filterfassung und verriegeln Sie diese durch eine Drehung nach rechts bis zum Anschlag 7 Um den neuen Filter zu spülen aktivieren Sie am Bedienfeld des Gerätes im Menü Installation den Punkt Filter spülen wie im Kapitel Menü beschrieben 8 Setzten Sie den Verbrauchszähler für den Filter zurück indem Sie am Bedienfeld im Menü unter Install und Filter zurücksetz...
Page 15: ...cher Verbrühschutz aktiviert Verbrühschutz deaktivieren Langsames Wiederauffüllen des Gerätes nach Entnahme Filter verstopft Überprüfen ob ein notwendiger Filterwechsel durch Blinken der weißen LED angezeigt wird Wasser nicht heiß Gerät im Ruhezustand Rote Taste betätigen und warten bis sie durch gängig leuchtet Möglicher interner Fehler Kundendienst kontaktieren Wasser nicht kalt Sehr häufiger Ge...
Page 16: ...hrt Diese Garantieerklärung ist eine freiwillige Leistung von uns als Hersteller Für Ihr privat genutztes Trinkwassergerät gewähren wir ab Kaufdatum eine Garantie von 24 Monaten bei gewerblicher Nutzung beträgt die Garantie 12 Monate Voraussetzung für den Garantieanspruch ist dass der mitgelieferte Garantieschein ordnungsgemäß und vollständig ausgefüllt wurde Dieser Garantieschein muss bei der Ina...
Page 17: ...alling Classic 21 Installation Arc 21 Installing the undersink unit 22 Optional Installing the tray 23 Installing an external ion exchanger 23 Commissioning 24 5 Using the Tap 25 Operation 25 Child safety lock 26 Menu 26 Long period of non use 28 6 Cleaning and Maintenance 29 Cleaning 29 Filter Replacement 29 Further maintenance 29 7 Troubleshooting 30 8 Environment and Recycling 31 9 Warranty 31 ...
Page 18: ...times Do not remove the front cover under any circumstances before switching off the mains electrical supply to the unit Never make technical modifications either to the appliance itself or the electrical leads and water pipes The appliance is only suitable for domestic use and similar applications inside closed rooms and must only be used to prepare incoming water from the mains supply The ambien...
Page 19: ...aining tray as desired 2 Description of Appliance 3 Technical Data Model Zip HydroTap G4 BC 100 75 Rated voltage rated power 230V AC 2 05kW Rated pressure MPa bar 0 17 0 70 1 7 7 0 Hot water temperature range C 68 100 Hot water tank volume litres 2 3 Cold water temperature range C 5 15 Cold water volume litres 1 8 Water connection G or G Size H W D cm 33 5 29 0 46 0 Weight filled kg 24 Ambient tem...
Page 20: ...e feed pipe and the connection will still be accessible after the unit has been installed In addition to standard tools the following special tools may be required 35mm diameter sheet metal hole punch for sink tops not supplied 35mm diameter hole saw for timber worktops not supplied Pipe wrench supplied for fixing the tap Handling the plastic hoses and push fit connector supplied If shortening the...
Page 21: ...tances should the tap be twisted after the installation is complete The Arc can be fixed in three positions for left and right handed operation and the spout height can be set in two levels see left 1 Make sure that the tap location will allow water from the tap to fall into a sink or other basin fitted with a drain to drain away 2 Cut a 35mm diameter hole in the worktop sink at the place where th...
Page 22: ...p and the undersink unit Attach the plug connection at a location away from any water splashes Flexible hose Adapter Angle valve Hydrotap Appliance O Ring Rubber seal Socket Nut Locking washer plate with the fastening nut Check the tap head is in the correct position before tightening up the nut Pay attention to the correct position of the O ring at the socket Triple silicone tube Boiling water St...
Page 23: ...he snap connecting sleeve on the side of the siphon facing the sink Drill a 13mm diameter hole in the drain pipe behind the snap connecting sleeve for a drain connection Use a suitable sealant to make a watertight seal between the snap connecting sleeve and the drain pipe Installing an external ion exchanger An external ion exchanger should be used from 10 dH to reduce limescale deposits in the ho...
Page 24: ...tres will be needed to collect the water a Open the service hatch on the front of the unit Place the end of the plastic hose in the collecting container and open the valve on the hose b Touch Start to start flushing c Allow about 10 litres of water to drain out and then touch Stop to stop flushing Close the valve on the hose and touch Next 4 Start temperature calibration following the instructions...
Page 25: ... water Turn the lever to dispense water When the lever is turned back water will flow as long as the lever is held If the lever is turned forwards water will flow continually for 5 to 15 seconds This time can be set in the menu The lever then has to be manually returned to the Off position Red light On all the time boiling water is ready and can be dispensed Flashing the water has not yet been hea...
Page 26: ...wing settings can be carried out in the menu Language Select the language used in the menu Information Shows data specific to the unit and any errors occurring Install The steps that are necessary when using the unit for the first time can be viewed again for maintenance purposes Flush filter place the end of the hose located at the filter in a collecting container and open the isolating valve on ...
Page 27: ......
Page 28: ...schlussschläuche Hole for tap connecting hoses Trou pour les tuyaux de raccordement de la robinetterie Öffnung für die Tableauvertiefung Hole for tray recess Ouverture pour la cuvette du tableau Aussparung für den Befestigungsbolzen Hole for fastening bolt Orifice pour le boulon de fixation ...
Page 29: ......
Page 30: ...bleaus Outside diameter of tray Diamètre extérieur du tableau Loch für die Armatur Anschlussschläuche Hole for tap connecting hoses Trou pour les tuyaux de raccordement de la robinetterie Öffnung für die Tableauvertiefung Hole for tray recess Ouverture pour la cuvette du tableau ...
Page 31: ...template for the tray Arc Gabarit de montage pour le tableau Arc 77 5 38 8 67 1 67 1 10 Maßstab 1 1 Scale 1 1 Échelle 1 1 Bohrung für den Befestigungsbolzen Hole for fastening bolt Orifice pour le boulon de fixation ...
Page 32: ......
Page 33: ...60 21 73 Loch für die Armatur Anschlussschläuche Ø 35mm 0 5 mm Maßstab 1 3 3 Scale 1 3 3 Échelle 1 3 3 Maßstab 1 1 Scale 1 1 Échelle 1 1 Außendurchmesser des Tableaus Outside diameter of tray Diamètre extérieur du tableau Gabarit de montage pour le tableau Classic ...
Page 34: ......
Page 35: ...phases for a shorter warm up time when the unit is used again Sleep mode automatically reduces the energy demand according to use or to the ambient light The time switch reduces the energy demand according to the time set The date and time must be correctly set on the unit for this to operate correctly Safety the Safety button can be enabled to prevent boiling water being dispensed accidentally At...
Page 36: ...eed as follows 1 Turn off the water supply 2 Tap chilled and hot water until no more water flows to empty the system 3 Switch off the appliance and disconnect it from power supply After prolonged non use 1 Reconnect the water supply Pay attention to any leaks 2 Reconnect the appliance to the power supply and switch it on 3 After non use for several days drain the first water out of the appliance C...
Page 37: ...al contamination of the filter 6 Push a new replacement filter cartridge into the filter holder and turn it clockwise as far as it will go to lock it in position 7 To flush through the new filter enable the Flush filter option in the Installation menu on the unit control panel as described in the Menu section 8 To reset the filter consumption meter choose Reset filter under Install on the control ...
Page 38: ...ing protection Unit is slow to refill after drawing water Filter blocked Check whether the white LED is flashing indicating that the filter needs to be replaced Water not hot Unit is in Sleep mode Press red lever and wait for it to show a steady light Possible internal fault Contact customer service Water not cold Very frequent use Wait for the blue lever to show a steady light Possible internal f...
Page 39: ...on and reduction of the purchase price We provide this warranty voluntarily as the manufacturer Our warranty period is 24 months from the date of purchase on a drinking water appliance for home use and 12 months in the case of commercial industrial use No claims under the warranty will be considered unless the warranty certificate supplied with the unit has been duly and completely filled in The w...
Page 40: ...tion Classic 36 Installation Arc 36 Installation de l unité sous évier 37 En option Installation du tableau 38 Installation d un échangeur d ions externe 38 Mise en service 39 5 Utilisation 40 Utilisation 40 Sécurité enfants 41 Menu 41 Non usage prolongé 43 6 Maintenance et entretien 44 Nettoyage 44 Changement de filtre 44 Autres travaux de maintenance 44 7 Résolution de problèmes 45 8 Environneme...
Page 41: ...exposé au gel Les valeurs indiquées sur la plaque signalétique doivent être respectées En cas de dysfonctionnement désactiver immédiatement le fusible En cas de fuite dans le dispositif fermer immédiatement la conduite d eau Faire réparer le dysfonctionnement uniquement par le service client d usine ou par une entreprise spécialisée Ce dispositif peut être utilisé par des enfants de plus de 3 ans ...
Page 42: ...c un tableau d écoulement plat 2 Description du dispositif 3 Données techniques Type Zip HydroTap G4 BC 100 75 Tension puissance nominale 230V AC 2 05kW Pression nominale MPa bar 0 17 0 70 1 7 7 0 Plage de température eau chaude C 68 100 Volume du réservoir d eau chaude litres 2 3 Plage de température eau froide C 5 15 Volume du réservoir d eau froide Liter 1 8 Raccord d eau G ou G Dimensions H x ...
Page 43: ... s avérer nécessaires Poinçonneuse de tôle avec un diamètre de 35mm pour éviers non comprise dans l étendue de livraison Scie cloche avec un diamètre de 35mm pour plans de travail en bois non comprise dans l étendue de livraison Clé serre tube pour la fixation de la robinetterie comprise dans l étendue de livraison Manipulation des tuyaux en plastique et des connecteurs rapides inclus Lors du racc...
Page 44: ...ion trop faible Indications La robinetterie ne doit en aucun cas être tournée une fois qu elle a été montée de manière fixe Le modèle Arc peut être fixé sur 3 positions pour les droitiers et les gauchers et la hau teur de sortie peut être réglée sur deux niveaux voir à gauche 1 Déterminer la position de la robinetterie de telle sorte que l eau qui s écoule soit recueillie dans un évier ou un autre...
Page 45: ...ier Fixer la connexion enfichable à un emplacement qui n est pas expose à l humidité Tuyau flexible Adapteur Robinet équerre Dispositif HydroTap Joint torique Joint en caoutchouc Socle Écrou de fixation Rondelle de blocage Triple tube de silicone Eau bouillante Vapeur Eau froide Collier de serrage Herbie 20 mm Montez le jeu de tube 1 Glissez le collier de serrage Herbie par le bas sur le triple tu...
Page 46: ...psable a Placer le manchon de tuyaux enclipsable sur le côté du siphon orienté vers l évier Percer un trou de 13mm de diamètre dans le tube d écoulement derrière le manchon de tuyaux enclipsable pour permettre l écoulement Utiliser un mastic approprié pour étanchéifier le manchon de tuyaux enclipsable contre le tube d écoulement Installation d un échangeur d ions externe Un échangeur d ions extern...
Page 47: ...nécessaire a Ouvrir le capot de maintenance sur la face avant du dispositif Placer le tuyau en plastique dans le récipient collecteur et ouvrir la valve du tuyau b Appuyer sur Démarrage pour lancer le rinçage c Laisser s écouler environ 10 litres d eau et appuyer ensuite sur Arrêt pour finaliser le rinçage Fermer la valve du tuyau et appuyer sur Continuer 4 Lancer le calibrage de la température en...
Page 48: ...suite être remises en position arrêt Arc Celsius Arc AIO Sélectionnez le type d eau souhaité en appuyant sur la touche de sélection Select du levier Zip de la robinetterie Rouge eau bouillante Bleu eau glacée Blanc gazeuse Tournez le levier pour prendre de l eau Lorsque le levier est tourné vers l arrière l eau coule tant que le levier est maintenu Lorsque le levier est tourné vers l avant l eau c...
Page 49: ...r lequel les paramètres de fonctionnement du dispositif peuvent être configurés et lus Les réglages suivants peuvent être effectués dans le menu Langue Sélection de la langue utilisée dans le menu Info Montre des données spécifiques au dispositif et des erreurs éventuelles Installation Les étapes nécessaires lors de la première mise en service peuvent être visualisées de nouveau à des fins de main...
Page 50: ...durant les phases de veille pour obtenir un temps de réchauffement plus court lors de la reprise de l utilisa tion L état de veille réduit automatiquement la demande énergétique en fonction de l uti lisation ou de la lumière ambiante La temporisation réduit la demande énergétique en fonction de l heure réglée Pour un fonctionnement parfait la date et l heure doivent être réglées correctement dans ...
Page 51: ...er de l eau glacée et chaude jusqu à ce que l eau cesse de couler pour vider le dispositif 3 Mettre le dispositif hors tension et débrancher la fiche du réseau Après un non usage prolongé 1 Reconnecter l alimentation en eau et ouvrir le robinet équerre Vérifier la présence de fuites éventuelles 2 Brancher de nouveau la fiche dans la prise de secteur et remettre le dispositif en marche 3 Après un a...
Page 52: ...cement dans le support de filtre et la verrouiller en la tournant jusqu à la butée vers la droite 7 Pour rincer le nouveau filtre activer le point Rincer le filtre sous Installation dans le menu du panneau de commande du dispositif comme décrit dans le chapitre Menu 8 Réinitialiser le compteur de consommation pour le filtre en réinitialisant le filtre interne sous Installation et Réinitialiser le ...
Page 53: ... Filtre bouché Vérifier si un changement de filtre nécessaire est indiqué par le clignotement de la LED blanche L eau n est pas chaude Dispositif en état de veille Actionner la touche rouge et attendre jusqu à ce qu elle s allume en continu Erreur interne possible Contacter le service après vente L eau n est pas froide Utilisation très fréquente Attendre jusqu à ce que la LED bleue soit allu mée e...
Page 54: ... résiliation dédommagements et réduction ne sont pas affectés par la présente garantie La présente déclaration de garantie est une prestation volontaire de notre part en tant que fabricant Pour votre dispositif d eau potable utilisé à des fins privées nous donnons une garantie de 24 mois à partir de la date d achat en cas d utilisation commerciale la garantie est de 12 mois Une condition pour la r...
Page 55: ...tton at the same time For cold water Press the blue lever Tirer de l eau bouillante Appuyer simultanément sur la touche rouge et la touche de sécurité Tirer de l eau froide Appuyer sur la touche bleue De l eau bouillante coule De l eau froide coule Heißwasser zapfen Select Taste drücken bis LEDs rot leuchten Safety Taste zwei mal tippen dann Hebel drehen Heißes Wasser fließt Kaltes Wasser fließt K...
Page 56: ...o technical changes design changes and errors Sauf modifications techniques changements constructifs et erreur ou omission 9120 91934 04 19 CLAGE GmbH Pirolweg 1 5 21337 Lüneburg Deutschland Telefon 49 4131 8901 0 Telefax 49 4131 83200 E Mail service clage de Internet www clage de ...