5-47
Cisco XR 12416 and Cisco XR 12816 Router Chassis Installation Guide
OL-17440-01
Chapter 5 Maintaining the Router
Removing and Replacing Cards from the Chassis
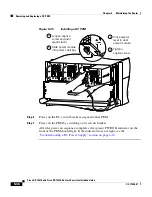
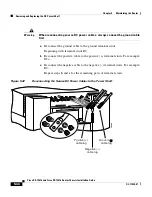
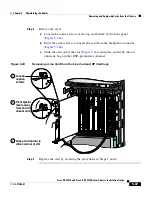
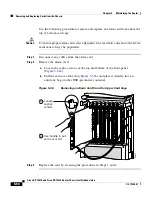
Step 2
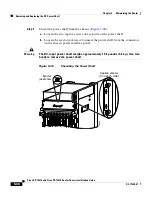
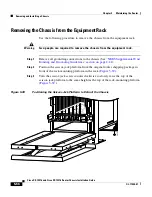
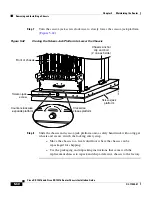
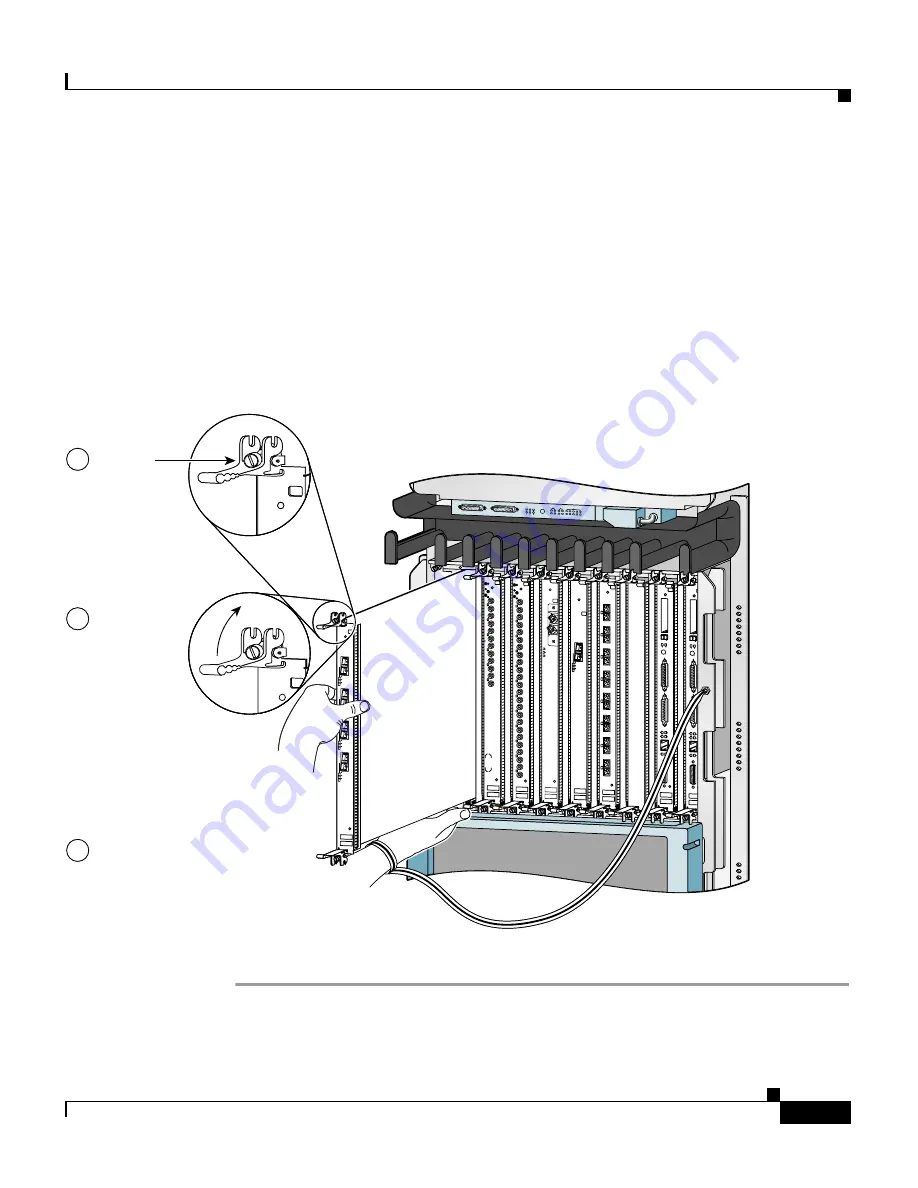
Remove the card:
a.
Loosen the captive screws at the top and bottom of the front panel
(
Figure 5-34
a).
b.
Pivot the ejector levers to unseat the card from the backplane connector
(
Figure 5-34
b.)
c.
Slide the card out of the slot (
Figure 5-34
c) and place it directly into an
antistatic bag or other ESD-preventive container.
Figure 5-34
Removing a Line Card from the Line Card and RP Card Cage
Step 3
Replace the card by reversing the procedures in Steps 1 and 2.
ALARM A
ALARM B
ALARM
EN
AB
LE
D
FA
IL
AC
O
/LT
ALARM
CS
C
0
FA
IL
1
0
1
2
EN
AB
LE
D
CR
IT
IC
AL
M
AJ
O
R
M
IN
O
R
SF
C
AC
TIV
E
0
CA
RR
IE
R
RX
P
KT
AC
TIV
E
1
CA
RR
IE
R
RX
P
KT
AC
TIV
E
2
CA
RR
IE
R
RX
P
KT
AC
TIV
E
3
CA
RR
IE
R
RX
P
KT
Q OC-3/STM-POS
Pivot ejector
levers away
from card to
unseat card
Grasp card carrier to
slide card out of slot
c
b
Loosen
captive
screws
a
AC
TIV
E
0
CA
RR
IE
R
RX
P
KT
AC
TIV
E
1
CA
RR
IE
R
RX
P
KT
AC
TIV
E
2
CA
RR
IE
R
RX
P
KT
AC
TIV
E
3
CA
RR
IE
R
RX
P
KT
Q OC-3/STM-POS
Pivot ejector
levers away
from card to
unseat card
Grasp card carrier to
slide card out of slot
c
b
Loosen
captive
screws
a
6DS3–SMB P
/
H
/
F
DO
WN
LOOP
RA
LA
CDHNT
CD
TX
0
RX
TX
1
RX
TX
2
RX
TX
3
RX
TX
4
RX
TX
5
RX
6DS3–SMB P
/
H
/
F
DO
WN
LOOP
RA
LA
CDHNT
CD
TX
0
RX
TX
1
RX
TX
2
RX
TX
3
RX
TX
4
RX
TX
5
RX
12DS3–SMB P
/
H
/
F
DO
WN
LOOP
RA
LA
CDHNT
CD
TX
0
RX
TX
1
RX
TX
2
RX
TX
3
RX
TX
4
RX
TX
5
RX
TX
6
RX
TX
7
RX
TX
8
RX
TX
9
RX
TX
10
RX
TX
11
RX
ACTIV
E
CARR
IER
RX PKT
OC-48/STM-16-SCPOS
AC
TIV
E
0
CA
RR
IE
R
RX
C
EL
L
OC-12/STM-4 A
T
M
F
A
ST ETERNET
SL
OT
-0
R
O
UTE PR
OCESSOR
SL
OT
-1
CO
LL
LIN
K
TX
RX
RJ
-45
M
II
RE
SE
T
AU
X
CON
SO
LE
EJ
EC
T
ALARM A
ALARM B
A
A
MBUS
MI
NO
R
B
FAIL
ENABLE
MA
JO
R
CR
ITI
CA
L
B
0
CSC
1
0
SFC
1
2
3
4
52644
SL
OT
-0
R
OUTE PR
OCESSOR
SL
OT
-1
CO
LL
LIN
K
TX
RX
RJ
-4
5
M
II
RE
SE
T
AU
X
CO
NSO
LE
EJ
EC
T

