5-55
Cisco XR 12416 and Cisco XR 12816 Router Chassis Installation Guide
OL-17440-01
Chapter 5 Maintaining the Router
Removing and Installing a Chassis
Step 6
Disconnect the cables from each alarm card.
Label each of the alarm card cables before you disconnect them.
Step 7
Disconnect the line card interface cables:
a.
Identify the type of line card and its slot number. Write this information on a
piece of paper before you disconnect the cables. You’ll need this information
when you reinstall the line cards.
b.
Identify the line card cable and its port connection. Label the cable with this
information.
c.
Loosen the captive screw at each end of the line card cable-management
bracket and pull the cable-management bracket away from the line card.
d.
Carefully remove the cables from the cable tray and carefully place the cable
bundle out of the way.
e.
Repeat steps
a
through
d
for each line card.
Step 8
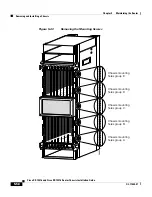
Remove the vertical cable-management troughs (see
Attaching the Vertical
Cable-Management Trough, page 3-23
).
Removing and Installing System Components
Use the following procedure to remove and install system components from one
chassis to another.
Step 1
Remove the blower modules and then install them into the replacement chassis.
(see the
“Removing and Replacing Blower Modules” section on page 5-10
).
Step 2
Remove the power supplies and the power shelf and then install them into the
replacement chassis (see
“Removing and Replacing AC and DC Power Subsystem
Components” section on page 5-14
).
Step 3
Remove the cards from all three card cages and then install them into the
replacement chassis (see
“Removing and Replacing Cards from the Chassis”
section on page 5-46
).

