Replacing a CPU and Heatsink
CPUs and their sockets are fragile and must be handled with extreme care to avoid damaging pins. The CPUs
must be installed with heatsinks and thermal interface material to ensure cooling. Failure to install a CPU
correctly might result in damage to the server.
Caution
Step 1
Caution
Never remove a CPU module without shutting down and removing power from the server.
Prepare the server for component removal:
a) Shut down and remove power from the server as described in
Shutting Down and Removing Power From the Server,
.
You do not have to pull the server out of the rack or remove the server cover because the CPU modules
are accessible from the front of the server.
Note
Step 2
Remove an existing CPU module from the chassis:
Verify that the power LED on the front of the CPU module is off before removing the module.
Note
a) Grasp the two ejector levers on the front of the CPU module and pinch their latches to release the levers.
b) Rotate both levers to the outside at the same time to evenly disengage the module from the midplane connectors.
c) Pull the module straight out from the chassis and then set it on an antistatic surface.
Step 3
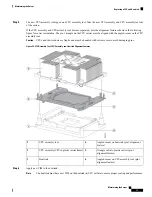
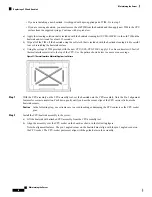
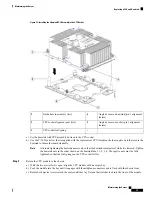
Remove the existing CPU/heatsink assembly from the CPU module:
a) Use the T-30 Torx driver that is supplied with the replacement CPU to loosen the four captive nuts that secure the
assembly to the board standoffs.
Alternate loosening the heatsink nuts evenly so that the heatsink remains level as it is raised. Loosen the
heatsink nuts in the order shown on the heatsink label: 4, 3, 2, 1.
Note
b) Lift straight up on the CPU/heatsink assembly and set it heatsink-down on an antistatic surface.
Maintaining the Server
70
Maintaining the Server
Replacing a CPU and Heatsink


