background image


2-2

Cisco UCS C420 Server Installation and Service Guide

OL-27640-01

Chapter 2      Installing the Server

Unpacking and Inspecting the Server

Unpacking and Inspecting the Server

Caution

When handling internal server components, wear an ESD strap and handle modules by the carrier edges 
only. 

Tip

Keep the shipping container in case the server requires shipping in the future.

Note

The chassis is thoroughly inspected before shipment. If any damage occurred during transportation or 
any items are missing, contact your customer service representative immediately. 

To inspect the shipment, follow these steps:

Step 1

Remove the server from its cardboard container and save all packaging material.

Step 2

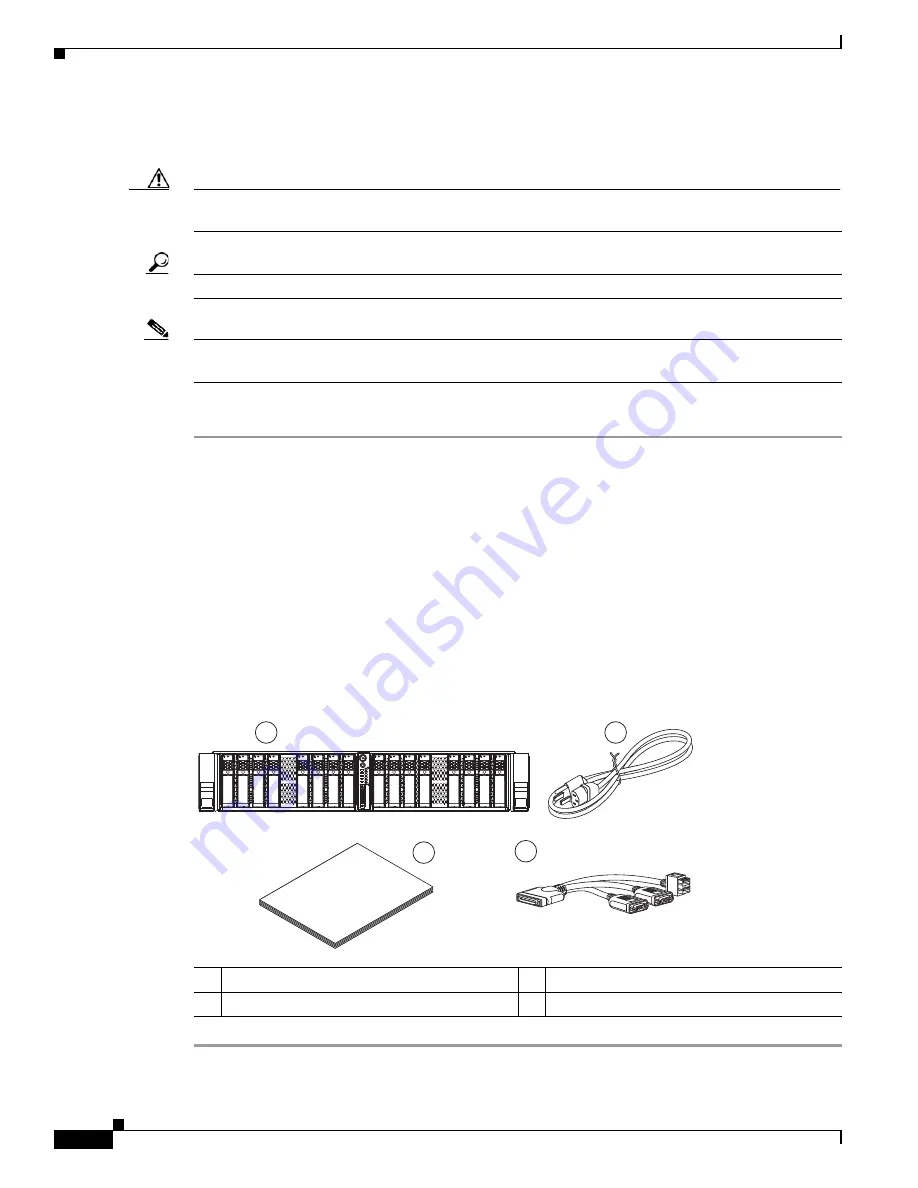
Compare the shipment to the equipment list provided by your customer service representative and 

Figure 2-1

. Verify that you have all items.

Step 3

Check for damage and report any discrepancies or damage to your customer service representative. Have 
the following information ready: 

  •

Invoice number of shipper (see the packing slip)

  •

Model and serial number of the damaged unit

  •

Description of damage

  •

Effect of damage on the installation

Figure 2-1

Shipping Box Contents 

1

Server

3

Documentation

2

Power cord (up to two)

4

KVM cable

Cisco

UCS C-Ser

ies

3

330037

4

2

1

Summary of Contents for UCS C420

Page 1: ...0 West Tasman Drive San Jose CA 95134 1706 USA http www cisco com Tel 408 526 4000 800 553 NETS 6387 Fax 408 527 0883 Cisco UCS C420 Server Installation and Service Guide Covers Server Generation M3 October 29 2013 Text Part Number OL 27640 01 ...

Page 2: ...oduct not authorized by Cisco could void the FCC approval and negate your authority to operate the product The Cisco implementation of TCP header compression is an adaptation of a program developed by the University of California Berkeley UCB as part of UCB s public domain version of the UNIX operating system All rights reserved Copyright 1981 Regents of the University of California NOTWITHSTANDIN...

Page 3: ...es 2 3 Rack Requirements 2 4 Equipment Requirements 2 4 Slide Rail Adjustment Range 2 4 Installing the Server In a Rack 2 5 Initial Server Setup 2 8 Connecting and Powering On the Server Standalone Mode 2 8 NIC Modes and NIC Redundancy Settings 2 11 System BIOS and CIMC Firmware 2 12 Updating the BIOS and CIMC Firmware 2 12 Accessing the System BIOS 2 13 Service DIP Switch 2 14 DIP Switch Location...

Page 4: ... 3 14 Replacing Fan Modules 3 17 Replacing a Fan Tray 3 19 Replacing DIMMs 3 21 DIMM Performance Guidelines and Population Rules 3 21 DIMM Replacement Procedure 3 26 Replacing CPUs and Heatsinks 3 27 Additional CPU Related Parts To Order With RMA Replacement Motherboards 3 27 CPU Replacement Procedure 3 28 Replacing the Motherboard RTC Battery 3 33 Replacing a PCIe Riser Assembly 3 35 Replacing an...

Page 5: ...fications A 1 Environmental Specifications A 2 Power Specifications A 2 A P P E N D I X B Power Cord Specifications B 1 Supported Power Cords and Plugs B 1 AC Power Cord Illustrations B 3 A P P E N D I X C RAID Controller Considerations C 1 Supported RAID Controllers and Required Cables C 1 Supercap Power Modules RAID Backup Units C 2 Mixing Drive Types in RAID Groups C 2 RAID Controller Cabling C...

Page 6: ...Contents vi Cisco UCS C420 Server Installation and Service Guide OL 24342 01 ...

Page 7: ...tem C420 server Chapter 2 Installing the Server Describes how to install the server in a rack how to cable and power on the server and how to initially set up the server in standalone mode Chapter 3 Maintaining the Server Describes the server LEDs and buttons identifies the replaceable components of the server and describes how to replace them Appendix A Server Specifications Lists physical enviro...

Page 8: ...tement number provided at the end of each warning to locate its translation in the translated safety warnings that accompanied this device Statement 1071 SAVE THESE INSTRUCTIONS Waarschuwing BELANGRIJKE VEILIGHEIDSINSTRUCTIES Dit waarschuwingssymbool betekent gevaar U verkeert in een situatie die lichamelijk letsel kan veroorzaken Voordat u aan enige apparatuur gaat werken dient u zich bewust te z...

Page 9: ...sto simbolo di avvertenza indica un pericolo La situazione potrebbe causare infortuni alle persone Prima di intervenire su qualsiasi apparecchiatura occorre essere al corrente dei pericoli relativi ai circuiti elettrici e conoscere le procedure standard per la prevenzione di incidenti Utilizzare il numero di istruzione presente alla fine di ciascuna avvertenza per individuare le traduzioni delle a...

Page 10: ...el número que le ayudará a encontrar el texto traducido en el apartado de traducciones que acompaña a este dispositivo GUARDE ESTAS INSTRUCCIONES Varning VIKTIGA SÄKERHETSANVISNINGAR Denna varningssignal signalerar fara Du befinner dig i en situation som kan leda till personskada Innan du utför arbete på någon utrustning måste du vara medveten om farorna med elkretsar och känna till vanliga förfar...

Page 11: ...ção fornecido ao final de cada aviso para localizar sua tradução nos avisos de segurança traduzidos que acompanham o dispositivo GUARDE ESTAS INSTRUÇÕES Advarsel VIGTIGE SIKKERHEDSANVISNINGER Dette advarselssymbol betyder fare Du befinder dig i en situation med risiko for legemesbeskadigelse Før du begynder arbejde på udstyr skal du være opmærksom på de involverede risici der er ved elektriske kre...

Page 12: ...xii Cisco UCS C420 Server Installation and Service Guide OL 27640 01 Preface ...

Page 13: ...xiii Cisco UCS C420 Server Installation and Service Guide OL 27640 01 Preface ...

Page 14: ...ase send your comments to ucs docfeedback external cisco com We appreciate your feedback Obtaining Documentation and Submitting a Service Request For information on obtaining documentation submitting a service request and gathering additional information see What s New in Cisco Product Documentation at http www cisco com en US docs general whatsnew whatsnew html Subscribe to What s New in Cisco Pr...

Page 15: ...re 1 1 Front Panel Features 1 Modular drive bay 1 8 System status LED 2 Operations panel 9 Fan status LED 3 Modular drive bay 2 10 Temperature status LED 4 Hard drive fault LED 11 Power supply status LED 5 Hard drive activity LED 12 Network link activity LED 6 Power button LED 13 Asset tag serial number 7 Identification button and LED 14 KVM console connector used with a KVM cable that provides tw...

Page 16: ...32 serial connector 11 Optional RAID controller cards up to 2 supported in designated PCIe slots 3 and 5 4 PCIe slots 2 through 6 on motherboard five half height half length x8 slots PCIe slot 4 supports NCSI 12 1 Gb Base T LOM ports four RJ 45 5 Horizontal PCIe slot 7 on riser card full height half length x16 with NCSI 13 Rear identification button and LED 6 Power supply 2 7 USB 2 0 ports three 8...

Page 17: ...ervisor Disk Management For a list of supported RAID controller options see RAID Controller Considerations page C 1 There are also two mounting points inside the chassis for the optional LSI RAID battery backup units that can be used with the controller cards RAID Backup There are two mounting points inside the chassis on the removable air baffle that can be used for Supercap power module backup u...

Page 18: ...ntroller CIMC firmware Depending on your CIMC settings the CIMC can be accessed through the 10 100 1000 dedicated management ports the 1 Gb LOM ports or a Cisco virtual interface card Video Resolution up to 1600 x1200 16 bpp at 60 Hz Up to 256 MB of video memory 1 SAS serial attached SCSI 2 SATA serial advanced technology attachment 3 PCIe peripheral component interconnect express 4 VGA video grap...

Page 19: ...re you install operate or service a server review the Regulatory Compliance and Safety Information for Cisco UCS C Series Servers for important safety information Warning IMPORTANT SAFETY INSTRUCTIONS This warning symbol means danger You are in a situation that could cause bodily injury Before you work on any equipment be aware of the hazards involved with electrical circuitry and be familiar with...

Page 20: ...vice representative immediately To inspect the shipment follow these steps Step 1 Remove the server from its cardboard container and save all packaging material Step 2 Compare the shipment to the equipment list provided by your customer service representative and Figure 2 1 Verify that you have all items Step 3 Check for damage and report any discrepancies or damage to your customer service repres...

Page 21: ... 1005 Warning Installation of the equipment must comply with local and national electrical codes Statement 1074 When you are installing a server use the following guidelines Plan your site configuration and prepare the site before installing the server See the Cisco UCS Site Preparation Guide for the recommended site planning tasks Ensure that there is adequate space around the server to allow for...

Page 22: ... 24 UNC or 10 32 UNC when you use the supplied slide rails The minimum vertical rack space per server must be two RUs equal to 3 5 in 88 9 mm Equipment Requirements The slide rails supplied by Cisco Systems for this server do not require tools for installation if you install them in a rack that has square 0 38 inch 9 6 mm round 0 28 inch 7 1 mm or 12 24 UNC threaded holes The inner rails mounting ...

Page 23: ...k see Figure 2 2 a Align the slide rail assembly inside the rack posts with the length adjustment bracket Figure 2 2 item 4 toward the rear of the rack b Compress the length adjustment bracket until the mounting pegs item 5 and locking clips item 6 on the slide rail assembly engage the desired rack holes on the front and rear rack posts The mounting pegs fit square 0 38 inch 9 6 mm round 0 28 inch...

Page 24: ...ont ends of the empty slide rails b Push the server into the slide rails until it stops at the internal stops c Push in the slide rail locking clip item 2 on each inner rail and then continue pushing the server into the rack until its front flanges latch onto the rack posts Figure 2 3 Inserting the Server into the Slide Rails Step 3 Attach the optional cable management arm CMA to the rear of the s...

Page 25: ...ded peg The peg must align with and enter the hole in the mounting bracket to lock the CMA in place Figure 2 4 Attaching the Cable Management Arm 1 OUTER RAIL CMA tab attached to outer slide rail 4 Rear of left slide rail assembly 2 INNER RAIL CMA tab attached to inner slide rail on server 5 INNER RAIL CMA tab attached to inner slide rail on server 3 Rear of left slide rail assembly 6 OUTER RAIL C...

Page 26: ...our server and then attach the power cord to a grounded AC power outlet See the Power Specifications page A 2 for power specifications Wait for approximately two minutes to let the server boot in standby power during the first bootup You can verify the power status by looking at the Power Status LED see Figure 1 1 on page 1 1 Off There is no AC power present in the server Amber The server is in st...

Page 27: ...g Cisco Card The ports on an installed Cisco UCS virtual interface card VIC are used to access the CIMC You must select a NIC redundancy and IP setting Note Cisco Card NIC mode is currently supported only with a Cisco UCS VIC that is installed in PCIe slot 1 4 or 7 See also Special Considerations for Cisco UCS Virtual Interface Cards page 3 49 d Use this utility to change the NIC redundancy to you...

Page 28: ...ty The IP address is based upon the settings that you made in Step 4 either a static address or the address assigned by your DHCP server Note The default user name for the server is admin The default password is password To manage the server see the Cisco UCS C Series Rack Mount Server Configuration Guide or the Cisco UCS C Series Rack Mount Server CLI Configuration Guide for instructions on using...

Page 29: ... select a NIC redundancy and IP setting Shared LOM The 1 Gb Ethernet ports are used to access the CIMC You must select a NIC redundancy and IP setting Cisco Card The ports on an installed Cisco UCS virtual interface card VIC are used to access the CIMC You must select a NIC redundancy and IP setting Note The Cisco Card NIC mode is currently supported only with a Cisco UCS VIC that is installed in ...

Page 30: ...here are several methods for updating the firmware Recommended method for systems running firmware level 1 2 or later Use the Cisco Host Upgrade Utility to simultaneously upgrade the CIMC BIOS LOM LSI storage controller and Cisco UCS VIC firmware to compatible levels See the Cisco Host Upgrade Utility Quick Reference Guide for your firmware level at the documentation roadmap link that is listed in...

Page 31: ...ootup Note The version and build of the current BIOS are displayed on the Main page of the utility Step 2 Use the arrow keys to select the BIOS menu page Step 3 Highlight the field to be modified by using the arrow keys Step 4 Press Enter to select the field that you want to change and then modify the value in the field Step 5 Press the right arrow key until the Exit menu screen is displayed Step ...

Page 32: ... O Riser page 2 14 Using the BIOS Recovery DIP Switch page 2 15 DIP Switch Location on the I O Riser The block of DIP switches is located on the I O riser see Figure 2 5 The default position for all switches is open down The I O riser is the removable card that includes the rear panel serial and VGA connectors See Figure 3 5 for the location of the I O riser in the server Figure 2 5 DIP Switches o...

Page 33: ...must have CIMC version 1 4 6 or later to use these procedures Procedure 1 Reboot With recovery cap File Step 1 Download the BIOS update package and extract it to a temporary location Step 2 Copy the contents of the extracted recovery folder to the root directory a USB thumb drive The recovery folder contains the recovery cap file that is required in this procedure Note The recovery cap file must b...

Page 34: ...t such as a screwdriver to move DIP switch 2 to the closed upper position Step 9 Reconnect AC power cords to the server The server powers up to standby power mode Step 10 Insert the USB thumb drive that you prepared in Step 2 into a USB port on the server Step 11 Return the server to main power mode by pressing the Power button on the front panel The server boots with the updated BIOS boot block W...

Page 35: ...terfaces See the user documentation for your firmware release at the following URL http www cisco com en US products ps10739 products_installation_and_configuration_guides_list html Server Configuration Utility Cisco has also developed the Cisco Server Configuration Utility for C Series servers which can aid and simplify the following tasks Monitoring server inventory and health Diagnosing common ...

Page 36: ...Diagnostic LEDs page 3 7 Front Panel LEDs Figure 3 1 shows the front panel LEDs Table 3 1 on page 3 3 defines the front panel LED states Figure 3 1 Front Panel LEDs 1 Hard drive fault LED 6 Fan status LED 2 Hard drive activity LED 7 Temperature status LED 3 Power button and Power status LED 8 Power supply status LED 4 Identification button and LED 9 Network link activity LED 5 System status LED 33...

Page 37: ...s not in use Blue The Identification LED is activated System status Green The server is running in normal operating condition Green blinking The server is performing system initialization and memory check Amber steady The server is in a degraded operational state For example Power supply redundancy is lost CPUs are mismatched At least one CPU is faulty At least one DIMM is faulty At least one driv...

Page 38: ...One or more power supplies are in a critical fault state Network link activity Off The Ethernet link is idle Green One or more Ethernet LOM ports are link active Table 3 1 Front Panel LEDs States continued LED Name State 1 Power supply status 6 10 Gb Ethernet link status present only if 10 Gb VIC is installed 2 Power supply fault 7 10 Gb Ethernet link speed present only if 10 Gb VIC is installed 3...

Page 39: ...nk is present Green Link is active Green blinking Traffic is present on the active link System status Green The server is running in normal operating condition Green blinking The server is performing system initialization and memory check Amber steady The server is in a degraded operational state For example Power supply redundancy is lost CPUs are mismatched At least one CPU is faulty At least on...

Page 40: ...r Status LEDs and Buttons 1 Gb Ethernet link status Off No link is present Green Link is active Green blinking Traffic is present on the active link Identification Off The identification LED is not in use Blue The identification LED is activated Table 3 2 Rear Panel LED States continued LED Name State ...

Page 41: ...ons of these internal LEDs Figure 3 3 Internal Diagnostic LED Locations 1 Fan module fault LEDs one on each fan 5 PCIe card fault LEDs one for each PCIe socket on motherboard 2 CPU fault LEDs on motherboard CPU1 LED CR69 CPU2 LED CR68 CPU3 LED CR42 CPU4 LED CR43 6 TPM fault LED on motherboard CR40 3 DIMM fault LEDs on motherboard one for each DIMM socket 7 I O riser fault LED on motherboard CR39 4...

Page 42: ...supplied only to the service processor and the cooling fans and it is safe to power off the server from this mode You can invoke a graceful shutdown or a hard shutdown by using either the CIMC management interface or the Power button on the front panel To use the Power button follow these steps Step 1 Check the color of the Power Status LED see the Front Panel LEDs section on page 3 2 Green The se...

Page 43: ...o release buttons See Figure 3 4 b Push the top cover toward the server rear about one half inch 1 27 cm until it stops c Lift the top cover straight up from the server and set it aside Step 2 Replace the top cover a Place the cover on top of the server about one half inch 1 27 cm behind the lip of the chassis front cover panel The cover should sit flat when the edge flanges are sitting in the gro...

Page 44: ...lso Figure 3 23 on page 3 43 for details 4 Drive backplane transition cards up to two on chassis floor not visible under fan tray in this view 12 I O riser includes two sockets for Cisco FlexFlash cards 5 CPUs and heatsinks two or four 13 Power supply 1 hot pluggable 6 DIMM sockets on motherboard up to 48 14 PCIe riser 2 horizontal PCIe slot 1 7 RTC battery on motherboard 15 TPM socket on motherbo...

Page 45: ...ment and they direct the flow of cooling air through the chassis Do not operate the system unless all cards faceplates front covers and rear covers are in place Statement 1029 Warning Class 1 laser product Statement 1008 Caution When handling server components wear an ESD strap to avoid damage This section describes how to install and replace server components and it includes the following topics ...

Page 46: ...e Bay Modules and Drive Bay Numbering Observe these drive population guidelines for optimum performance When populating drives in a drive bay module add drives in empty slots from left to right If your server has two drive bay modules populate all eight bays in module 1 before you populate the module 2 bays Keep an empty drive blanking tray in any unused slots to ensure proper airflow You can mix ...

Page 47: ...he drive tray See Figure 3 7 b Grasp and open the ejector lever and then pull the drive tray out of the slot c If you are replacing an existing drive remove the four drive tray screws that secure the drive to the tray and then lift the drive out of the tray Step 2 Install a new drive a Place a new drive in the empty drive tray and replace the four drive tray screws b With the ejector lever on the ...

Page 48: ...The transition card is available in two versions Nonexpander Two internal connections to the RAID controller card are required to control eight drives This version includes two connectors for the cables from your RAID controller One connector allows control of drives 1 through 4 on the backplane The other connector allows control of drives 5 through 8 on the backplane Expander One internal connect...

Page 49: ... card that you are replacing Tip Label the cables before you disconnect them to aid replacement g Use a Number 2 Phillips screwdriver to remove the two screws that secure the transition card to the chassis floor see Figure 3 9 h Slide the drive bay with the attached backplane and transition card out the front of the chassis The transition card disengages from its motherboard connector Note Tilt th...

Page 50: ...Replacing the Drive Bay Module 1 Transition card on chassis floor shown with fan tray removed 3 Transition card connector to motherboard 2 Transition card securing screws 2 DIMM L DIMM M DIMM G DIMM H DIMM K DIMM J DIMM F DIMM E DIMM R DIMM C DIMM S DIMM D PCle 7 PCle 6 PCle 5 PCle 4 PCle 3 PCle 2 PCle 1 DIMM P DIMM B DIMM N DIMM A CPU 3 CPU 2 CPU 4 CPU 1 2 1 3 334355 ...

Page 51: ...g see Figure 3 11 a Slide the server out the front of the rack far enough so that you can remove the top cover You might have to detach cables from the rear panel to provide clearance Caution If you cannot safely view and access the component remove the server from the rack b Remove the top cover as described in Removing and Replacing the Server Top Cover page 3 9 c Insert your thumb and forefinge...

Page 52: ...ervice Guide OL 27640 01 Chapter 3 Maintaining the Server Installing or Replacing Server Components Figure 3 11 Removing and Replacing Fan Modules 1 Fan tray 3 Connector location on underside of fan module 2 Fan module release latches 1 2 3 334357 ...

Page 53: ...from the rack c Remove the top cover as described in Removing and Replacing the Server Top Cover page 3 9 d Use a Number 2 Phillips head screwdriver to loosen the three captive thumbscrews that secure the fan tray to the chassis e Lift the fan tray straight up and out of the chassis Step 2 Install a new fan tray see Figure 3 12 a Carefully align the new tray with the chassis and lower it in place ...

Page 54: ...ce Guide OL 27640 01 Chapter 3 Maintaining the Server Installing or Replacing Server Components Figure 3 12 Removing and Replacing a Fan Tray 1 Captive thumbscrews 3 3 Motherboard connector location 2 Guide pegs 2 on each end of fan tray 2 3 1 334358 ...

Page 55: ...isco does not support third party DIMMs Using non Cisco DIMMs in the server might result in system problems or damage to the motherboard Note To ensure the best server performance it is important that you are familiar with memory performance guidelines and population rules before you install or replace the memory DIMM Performance Guidelines and Population Rules This section describes the type of m...

Page 56: ...MM sockets The blue socket in a channel is always socket 1 Figure 3 13 DIMM and CPU Sockets on the Motherboard 334359 CPU 3 CPU 2 CPU 4 CPU 1 Front of Server CPU3 Channel L CPU2 Channel G CPU3 Channel M CPU2 Channel H L1 L2 L3 M1 M2 M3 G1 G2 G3 H1 H2 H3 CPU3 Channel K CPU2 Channel F CPU3 Channel J CPU2 Channel E K3 K2 K1 J3 J2 J1 CPU4 Channel R CPU1 Channel C CPU4 Channel S CPU1 Channel D R1 R2 R3...

Page 57: ...or LRDIMMs Do not mix RDIMMs and LRDIMMs in a server Unregistered DIMMs UDIMMs and non ECC DIMMs are not supported For memory mirroring population rules see Memory Mirroring Mode page 3 25 There is no requirement to install DIMMs evenly across all CPUs However for optimal performance you should populate sockets in the order that is shown in Table 3 4 for two CPU systems or Table 3 5 for four CPU s...

Page 58: ...1 A2 Black 6 CPU2 F1 Blue 30 CPU2 G2 Black 7 CPU3 K1 Blue 31 CPU3 L2 Black 8 CPU4 S1 Blue 32 CPU4 N2 Black 9 CPU1 B1 Blue 33 CPU1 C3 Black 10 CPU2 H1 Blue 34 CPU2 E3 Black 11 CPU3 M1 Blue 35 CPU3 J3 Black 12 CPU4 P1 Blue 36 CPU4 R3 Black 13 CPU1 A1 Blue 37 CPU1 D3 Black 14 CPU2 G1 Blue 38 CPU2 F3 Black 15 CPU3 L1 Blue 39 CPU3 K3 Black 16 CPU4 N1 Blue 40 CPU4 S3 Black 17 CPU1 C2 Black 41 CPU1 B3 Bl...

Page 59: ...e 3 4 For a four CPU system you must install DIMMs in identical sets of eight Use each set of eight identical DIMMs to populate the DIMM sockets in the order shown in Table 3 5 Lockstep Channel Mode When you enable lockstep channel mode each memory access is a 128 bit data access that spans four channels Lockstep channel mode requires that all four memory channels on a CPU must be populated identi...

Page 60: ...anel to provide clearance Caution If you cannot safely view and access the component remove the server from the rack c Remove the top cover as described in Removing and Replacing the Server Top Cover section on page 3 9 d Remove the internal air baffle that covers the DIMM sockets e Locate the faulty DIMM and remove it from the socket on the motherboard by opening the ejector levers at both ends o...

Page 61: ...U or motherboard spare bill of materials BOM The TAC engineer might need to add the additional parts to the RMA to help ensure a successful replacement Scenario 1 You are re using the existing heatsinks Heat sink cleaning kit UCSX HSCK Thermal grease kit for C420 UCS CPU GREASE Intel CPU Pick n Place tool for EP CPUs UCS CPU EP PNP Scenario 2 You are replacing the existing heatsinks Heat sink UCSB...

Page 62: ...a CPU heatsink and CPU follow these steps Step 1 Prepare the server for replacement a Power off the server as described in Shutting Down and Powering Off the Server page 3 8 b Slide the server out the front of the rack far enough so that you can remove the top cover You might have to detach cables from the rear panel to provide clearance Caution If you cannot safely view and access the component r...

Page 63: ...resent If you are installing a new CPU to a socket that was shipped empty the socket has a protective cap that is intended to prevent bent contact pins If you are removing an old CPU instead skip to Step 6 Use the tool as shown in Figure 3 15 to grasp the protective cap and then pivot to remove the cap Figure 3 15 Protective Cap Removal Tool 1 CPU retaining latch 3 Hinged CPU cover plate 2 CPU ret...

Page 64: ...moving or Inserting a CPU Step 7 Insert the new CPU into the Pick and Place tool a Remove the new CPU from the packaging and place it on the pedestal that is included in the kit Align the registration mark on the corner of the CPU with the arrow on the corner of the pedestal see Figure 3 17 b Press down on the top button of the tool to lock it open c Set the Pick and Place tool on the CPU pedestal...

Page 65: ...ty tool c Close the hinged CPU cover plate d Clip down the CPU retaining latch with the icon then clip down the CPU retaining latch with the icon See Figure 3 14 on page 3 29 Step 9 Install a heatsink Caution The heatsink must have a new undamaged thermal pad on the heatsink to CPU surface to ensure proper cooling If you are reusing a heatsink you must remove the old thermal pad If you are install...

Page 66: ...rn d For a new heatsink peel the protective film from the thermal pad that is on the bottom of the new heatsink Note Do not apply a syringe of thermal grease if you are installing a new heatsink that already has a preapplied thermal pad e Align the heatsink captive screws with the motherboard standoffs and then use a Number 2 Phillips head screwdriver to tighten the captive screws evenly Note Tigh...

Page 67: ...rver page 3 8 b Slide the server out the front of the rack far enough so that you can remove the top cover You might have to detach cables from the rear panel to provide clearance Caution If you cannot safely view and access the component remove the server from the rack c Remove the top cover as described in Removing and Replacing the Server Top Cover page 3 9 d Locate the RTC battery See Figure 3...

Page 68: ...g the Motherboard RTC Battery 1 RTC battery socket on motherboard 2 Retaining clip enlarged view The flat positive side of the battery faces the clip FAN 1 FAN 2 FAN 3 FAN 4 FAN 5 FAN 6 DIMM L DIMM M DIMM G DIMM H DIMM K DIMM J DIMM F DIMM E DIMM R DIMM C DIMM S DIMM D PCle 7 PCle 6 PCle 5 PCle 4 PCle 3 PCle 2 PCle 1 DIMM P DIMM B DIMM N DIMM A CPU 3 CPU 2 CPU 4 CPU 1 1 334360 ...

Page 69: ...ght have to detach cables from the rear panel to provide clearance Caution If you cannot safely view and access the component remove the server from the rack c Remove the top cover as described in Removing and Replacing the Server Top Cover page 3 9 d Use a Number 2 Phillips head screwdriver to loosen the two captive thumbscrews that secure the PCIe riser assembly e Lift straight up on both ends o...

Page 70: ...ng and Replacing the PCIe Riser Assembly 1 PCIe riser 1 PCIe slot 7 3 PCI riser captive thumbscrews two 2 PCIe riser 2 PCIe slot 1 FAN 1 FAN 2 FAN 3 FAN 4 FAN 5 FAN 6 DIMM L DIMM M DIMM G DIMM H DIMM K DIMM J DIMM F DIMM E DIMM R DIMM C DIMM S DIMM D PCle 7 PCle 6 PCle 5 PCle 4 PCle 3 PCle 2 PCle 1 DIMM P DIMM B DIMM N DIMM A CPU 3 CPU 2 CPU 4 CPU 1 3 1 2 334361 ...

Page 71: ...22 a Power off the server as described in Shutting Down and Powering Off the Server page 3 8 b Slide the server out the front of the rack far enough so that you can remove the top cover You might have to detach cables from the rear panel to provide clearance Caution If you cannot safely view and access the component remove the server from the rack c Remove the top cover as described in Removing an...

Page 72: ...Ensure that the I O riser rear panel tab sits flat against the chassis rear panel opening d Install the single screw that secures the I O riser to the chassis e Replace the top cover f Replace the server in the rack replace cables and then power on the server by pressing the Power button Figure 3 22 Removing and Replacing an I O Riser 1 I O riser in designated motherboard socket 2 I O riser securi...

Page 73: ...sh drive is preloaded with three software bundles each on one of four preconfigured virtual drives VDs The fourth VD allows you to install an operating system or embedded hypervisor The VDs are configured as follows 1 Cisco UCS Server Configuration Utility SCU 2 Hypervisor HV This is a VD that you can use for your own purposes 3 Cisco Drivers Drivers 4 Cisco Host Upgrade Utility HUU Enabling a Cis...

Page 74: ...o FlexFlash Virtual Drive page 3 39 Step 2 In the CIMC GUI interface navigate through the tabs to Server BIOS Step 3 Click Configure Boot Override Priority The Boot Override Priority dialog opens Step 4 From the drop down list choose SCU or HUU and then click OK Step 5 Reboot the server The server boots the selected VD Note This is a one time boot option After running Cisco SCU or Cisco HUU the se...

Page 75: ...upt Step 1 Click the Hypervisor Sync icon on the toolbar of the SCU interface A dialog prompts you to confirm that you want to synchronize the Hypervisor RAID Step 2 Click Yes A dialog is displayed when the synchronization is complete Step 3 Click OK After you click OK the Hypervisor Sync icon on the toolbar is greyed out For more information about the utility see the Cisco UCS Server Configuratio...

Page 76: ...tioning described in Overview of the Preinstalled Cisco FlexFlash Drive page 3 39 Data is overwritten on the SD card where Cisco stores the configuration metadata a Pull the card retainer back lightly then insert the Cisco FlexFlash drive into SD card slot 1 on the I O riser with the label side facing outward b Press down on the top of the card until it clicks in the slot and stays in place c Repl...

Page 77: ...on slots See Figure 3 23 and Table 3 6 for information about the slots The replacement procedures differ depending on whether the PCIe slot is in a riser or on the motherboard This section includes the following topics PCIe Slots page 3 43 PCIe Configuration Guide page 3 44 Replacing a PCIe Card in a Riser Slot page 3 44 Replacing a PCIe Card in a Motherboard Slot page 3 47 Special Considerations ...

Page 78: ... rack far enough so that you can remove the top cover You might have to detach cables from the rear panel to provide clearance Table 3 6 PCIe Expansion Slots Slot Number Electrical Lane Width Connector Length Card Length1 1 This is the supported length because of internal clearance Card Height 2 2 This is the size of the rear panel opening NCSI3 Support 3 NCSI Network Communications Services Inter...

Page 79: ...d or filler panel into the riser g Pull evenly on both corners of the PCIe card to remove it from the socket on the PCIe riser Step 2 Install a PCIe card a Align the new PCIe card with the empty socket on the PCIe riser assembly b Push down evenly on both ends of the card until it is fully seated in the socket c Ensure that the card s rear panel tab sits flat against the PCIe riser rear panel open...

Page 80: ...tallation and Service Guide OL 27640 01 Chapter 3 Maintaining the Server Installing or Replacing Server Components Figure 3 24 PCIe Riser Assembly Side View 1 PCIe card socket on PCIe riser assembly 2 Card retaining clip 1 2 334365 ...

Page 81: ...ibed in Removing and Replacing the Server Top Cover page 3 9 d Open the hinged PCIe card retainer Pinch the two release latches toward the center of the retainer while you lift up on the front edge of the retainer to open it See Figure 3 25 e Lift the card straight up from the motherboard connector Note Lift up on both ends of the card evenly to avoid damaging its connector Step 2 Install a PCIe c...

Page 82: ...8 Cisco UCS C420 Server Installation and Service Guide OL 27640 01 Chapter 3 Maintaining the Server Installing or Replacing Server Components Figure 3 25 Hinged PCIe Card Retainer on Rear of Chassis 330617 ...

Page 83: ...ace Cards Virtual Interface Card VIC Number of VICs Supported in Server Slots That Support VICs 1 1 See PCIe Slots page 3 43 Primary Slot For UCS Integration or Cisco Card NIC Mode Minimum CIMC Firmware Minimum VIC Firmware for Use With UCS Integration Minimum Cisco Nexus OS on an Upstream Nexus Fabric Interconnect Cisco UCS VIC 1225 UCSC PCIE CSC 02 3 PCIE 4 PCIE 1 PCIE 7 PCIE 4 1 4 7 2 1 0 5 0 C...

Page 84: ...ted slot 1 slot 2 slot 3 and so on If the system BIOS does not have sufficient memory space to load any PCIe option ROM it skips loading that option ROM reports a system event log SEL event to the CIMC controller and reports the following error in the Error Manager page of the BIOS Setup utility PCI OUT OF RESOURCES CONDITION ERROR Insufficient PCI Resources Detected System is running with Insuffi...

Page 85: ...ight not have sufficient memory space to execute In that case disable other option ROMs that are not needed for the system configuration to free up some memory space for the RAID controller option ROM Guidelines for onboard NIC PXE booting If the system is configured to primarily perform PXE boot from onboard NICs make sure that the option ROMs for the onboard NICs to be booted from are enabled in...

Page 86: ...e option ROMs might report initialization errors These errors are seen before the BIOS passes control to the operating system The keyboard might not work To work around this problem rebalance the 16 bit I O load using the following methods 1 Physically remove any unused PCIe cards 2 If the system has one or more Cisco virtual interface cards VICs installed disable the PXE boot on the VICs that are...

Page 87: ... Shutting Down and Powering Off the Server page 3 8 b Slide the server out the front of the rack far enough so that you can remove the top cover You might have to detach cables from the rear panel to provide clearance Caution If you cannot safely view and access the component remove the server from the rack c Remove the top cover as described in Removing and Replacing the Server Top Cover page 3 9...

Page 88: ...de OL 27640 01 Chapter 3 Maintaining the Server Installing or Replacing Server Components Figure 3 28 Removing the SCPM 1 Upper SCPM tray on air baffle 3 SCPM retaining clips on tray 2 Lower SCPM tray on air baffle 4 SCPM tray release levers 4 3 1 2 334370 ...

Page 89: ... which contains PCIe slot 1 see Figure 3 23 on page 3 43 See Replacing a PCIe Riser Assembly page 3 35 for details e Remove power supply 1 from its cage See Replacing Power Supplies page 3 58 for details Step 2 Install a TPM see Figure 3 29 a Locate the TPM socket on the motherboard as shown in Figure 3 29 b Align the connector that is on the bottom of the TPM circuit board with the motherboard TP...

Page 90: ...ed Execution Technology Feature For the TPM Intel Trusted Execution Technology TXT provides greater protection for information that is used and stored on the business server A key aspect of that protection is the provision of an isolated execution environment and associated sections of memory where operations can be conducted on sensitive data invisibly to the rest of the system Intel TXT provides...

Page 91: ... feature a On the Advanced tab select Intel TXT LT SX Configuration to open the Intel TXT LT SX Hardware Support screen Note The Intel Trusted Execution Technology feature can be enabled only when the server has a TPM installed on the TPM header b Set TXT Support to Enabled Step 3 On the same screen verify that the Intel Virtualization Technology VT and the Intel VT for Directed I O VT d features ...

Page 92: ...r off the server as described in the Shutting Down and Powering Off the Server section on page 3 8 If your server has two power supplies you do not have to shut down the server b Remove the power cord from the power supply that you are replacing c Grasp the power supply handle while pinching the release lever towards the handle d Pull the power supply out of the bay Step 2 Install a new power supp...

Page 93: ...abled or disabled in the server BIOS To enable or disable the internal USB port follow these steps Step 1 Enter the BIOS Setup utility by pressing the F2 key when prompted during bootup Step 2 Navigate to the Advanced tab Step 3 On the Advanced tab select USB Configuration Step 4 On the USB Configuration page select USB Ports Configuration Step 5 Scroll to USB Port Internal press Enter and then se...

Page 94: ...3 60 Cisco UCS C420 Server Installation and Service Guide OL 27640 01 Chapter 3 Maintaining the Server Installing or Replacing Server Components ...

Page 95: ...1 Environmental Specifications page A 2 Power Specifications page A 2 Physical Specifications Table A 1 lists the physical specifications for the server Table A 1 Physical Specifications Description Specification Height 3 5 in 89 mm Width 17 6 in 447 mm Length including slide rail inner rails 31 5 in 800 mm Weight maximum configuration 78 lbs 35 38 kg Weight maximum configuration including slide r...

Page 96: ...cifications Description Specification Temperature operating 5ºC to 35ºC 41ºF to 95ºF Temperature nonoperating 40ºC to 65ºC 40ºF to 149ºF Humidity nonoperating 10 to 90 Altitude operating Derated 1ºC for each 305 m 0 m to 3048 m 0 ft to 10 000 ft Altitude nonoperating 0 m to 12 192 m 0 ft to 40 000 ft Table A 3 1200 W Power Supply Specifications Description Specification AC input voltage 200 to 240...

Page 97: ... provided with the server are supported Table B 1 lists the power cords for the server power supplies Table B 1 Supported Power Cords for the Server Description Length Power Cord Reference Illustration Feet Meters SFS 250V 10A AR Power Cord 250 VAC 10 A IRAM 2073 Plug Argentina 8 2 2 5 Figure B 1 CAB 9K10A AU 250 VAC 10 A 3112 Plug Australia 8 2 2 5 Figure B 2 SFS 250V 10A CN Power Cord 250 VAC 10...

Page 98: ...13 A IEC60320 Plug North America 6 6 2 0 Figure B 10 CAB N5K6A NA Power Cord 250 VAC 13 A NEMA 6 15 Plug North America 8 2 2 5 Figure B 11 CAB 9K12A NA Power cord 125 VAC 13 A NEMA 5 15 Plug North America 8 2 2 5 Figure B 12 CAB C13 CBN Cabinet Jumper Power Cord 250 VAC 10 A C13 C14 Connectors 2 2 0 68 Figure B 13 CAB C13 C14 2M Cabinet Jumper Power Cord 250 VAC 10 A C13 C14 Connectors 6 6 2 0 Fig...

Page 99: ...Figure B 1 through Figure B 15 Figure B 1 SFS 250V 10A AR Figure B 2 CAB 9K10A AU Figure B 3 SFS 250V 10A CN 186571 2500 mm Cordset rating 10 A 250 500 V MAX Length 8 2 ft Plug EL 219 IRAM 2073 Connector EL 701 IEC60320 C13 Plug EL 206 A S 3112 2000 Cordset rating 10 A 250 V 500V Length 2500mm 186581 Connector EL 701C IEC 60320 C15 Cordset rating 10A 250V 2500 mm Plug EL 218 CCEE GB2009 186573 Con...

Page 100: ...e B 4 CAB 9K10A EU Figure B 5 SFS 250V 10A ID Figure B 6 SFS 250V 10A IS Connector VSCC15 Cordset rating 10A 16 A 250 V Length 8 ft 2 in 2 5 m Plug M2511 186576 OVE Cordset rating 16A 250V 2500mm Plug EL 208 187490 Connector EL 701 Cordset rating 10A 250V 500V MAX 2500 mm Plug EL 212 SI 32 186574 Connector EL 701B IEC60320 C13 EL 212 16A 250V ...

Page 101: ...Figure B 8 CAB 9K10A SW Figure B 9 CAB 9K10A UK Plug I 3G CEI 23 16 Connector C15M EN60320 C15 Cordset rating 10 A 250 V Length 8 ft 2 in 2 5 m 186575 Plug MP232 R Cordset rating 10 A 250 V Length 8 ft 2 in 2 5 m 186578 Connector IEC 60320 C15 Plug Cordset rating 10 A 250 V 500 V MAX Length 2500mm 186580 Connector EL 701C EN 60320 C15 EL 210 BS 1363A 13 AMP fuse ...

Page 102: ...0 CAB AC 250V 13A Figure B 11 CAB N5K6A NA Figure B 12 CAB 9K12A NA Cordset rating 13A 250V 6 6 feet 79 2m Plug EL312MoldedTwistlock NEMA L6 20 186568 Connector EL 701 IEC60320 C13 Cordset rating 10 A 250 V Length 8 2 ft 186570 Plug NEMA 6 15P Connector IEC60320 C13 Connector IEC60320 C15 Cordset rating 13A 125V 8 2 feet 2 5m Plug NEMA 5 15P 192260 ...

Page 103: ... Figure B 13 CAB C13 CBN Jumper Power Cord 0 68 m Figure B 14 CAB C13 C14 2M Jumper Power Cord 2 m Figure B 15 CAB C13 C14 AC Jumper Power Cord 3 m Cordset rating 10A 250V 686mm Plug SS10A 186569 Connector HS10S Cordset rating 10A 250V 2 0 m Plug SS10A 336014 Connector HS10S Cordset rating 10A 250V 3 0 m Plug SS10A 336013 Connector HS10S ...

Page 104: ...B 8 Cisco UCS C420 Server Installation and Service Guide OL 24342 01 Appendix B Power Cord Specifications Supported Power Cords and Plugs ...

Page 105: ...RAID Options Controller Style Maximum Drives Optional SCPM RAID Levels Required Cables1 1 The number and type of cables vary depending on which type of transition card is used and how many controllers are used See also RAID Controller Cabling page C 2 LSI MegaRAID SAS 9271CV 8i PCIe 8 internal2 or 16 internal with expander3 2 When using the nonexpander style transition card each controller can sup...

Page 106: ...recommendations that follow for the best performance Best Practices For Mixing Drive Types in RAID Groups For the best performance follow these guidelines Use either all SAS or all SATA drives in a RAID group Use the same capacity for each drive in the RAID group Never mix HDDs and SSDs in the same RAID group RAID Controller Cabling The maximum two supported RAID controller cards should be populat...

Page 107: ...quired 1 UCSC CABLE S and 1 UCSC CABLE L The blue line is a 0 8m cable UCSC CABLE S from the RAID controller SAS 0 connector to the nonexpander connector for PORT 1 4 The red line is a 1m cable UCSC CABLE L from the RAID controller SAS 1 connector to the nonexpander connector for PORT 5 8 The green line is the cable from the RAID controller to the SCPM backup unit Figure C 1 RAID Controller Cablin...

Page 108: ...ctor for PORT 1 4 The upper red line is a 1m cable UCSC CABLE L from the slot 5 RAID controller SAS 1 connector to the nonexpander connector for PORT 5 8 The violet line is a 1m cable UCSC CABLE L from the slot 3 RAID controller SAS 0 connector to the nonexpander connector for PORT 1 4 The lower blue line is a 0 8m cable UCSC CABLE S from the slot 3 RAID controller SAS 1 connector to the nonexpand...

Page 109: ... UCSC CABLE S The upper blue line is a 0 8m cable UCSC CABLE S from the RAID controller SAS 0 connector to the first expander connector A for drives 1 through 8 The lower blue line is a 0 8m cable UCSC CABLE S from the RAID controller SAS 1 connector to the second expander connector B for drives 9 through 16 The green line is a cable from the RAID controller to the battery backup unit Figure C 3 R...

Page 110: ... other than C to continue when you see the following onscreen prompt All of the disks from your previous configuration are gone If this is an unexpected message then please power of your system and check your cables to ensure all disks are present Press any key to continue or C to load the configuration utility Step 6 Watch the subsequent screens for confirmation that your RAID configuration was i...

Page 111: ...C 7 Cisco UCS C420 Server Installation and Service Guide OL 27640 01 Appendix C RAID Controller Considerations For More Information ...

Page 112: ...C 8 Cisco UCS C420 Server Installation and Service Guide OL 27640 01 Appendix C RAID Controller Considerations For More Information ...

Page 113: ... I X D Installation for Cisco UCS Integration The Cisco UCS integration instructions have been moved to the integration guides found here Cisco UCS C Series Server Integration with UCS Manager Guides Refer to the guide that is for the version of Cisco UCS Manager that you are using ...

Page 114: ...D 2 Cisco UCS C420 Server Installation and Service Guide OL 24342 01 Appendix D Installation for Cisco UCS Integration ...

Reviews: