Managing the System
Applications
Cisco Small Business NSS300 Series Smart Storage Administration Guide
185
3
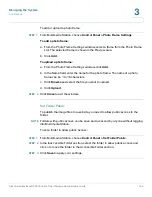
To add or upload a photo frame:
STEP 1
From Multimedia Station, choose
Control Panel > Photo Frame Settings
.
To add a photo frame
:
a. From the
Photo Frame Settings
window, select a frame from the Photo Frame
List. The selected frame is shown in the Preview area.
b. Click
Add
.
To upload a photo frame
:
a. From the
Photo Frame Settings
window, click
Add
.
b. In the Name field, enter the name for the photo frame. The name of a photo
frame can be 1 to 16 characters.
c. Click
Browse
and select the file you want to upload.
d. Click
Upload
.
STEP 2
Click
Close
to exit the window.
Set Folder Public
To publish the image files to a website, you need to allow public access to the
folder.
NOTE
Folders with public access can be seen and accessed by anyone without logging
into Multimedia Station.
To set a folder to allow public access:
STEP 1
From Multimedia Station, choose
Control Panel > Set Folder Public
.
STEP 2
In the Inaccessible Folder section, select the folder to allow public access and
click
>
to move the folder to the Accessible Folder section.
STEP 3
Click
Save
to apply your settings.


