


Managing the System
Disk Management
Cisco Small Business NSS300 Series Smart Storage Administration Guide
114
3
!
CAUTION
This process may take as little as a few hours or more than 24 hours to complete
depending on the number and size of the drives being replaced. Please wait
patiently for the process to finish. Do not turn off power to the NAS during this
process.
After drive expansion, the number of drives in the configuration and the total
capacity will reflect the changes implemented. You can use the larger capacity.
To migrate a disk configuration to a higher RAID level:
STEP 1
Prepare a hard drive of the same format and same capacity (or larger) as an
existing drive in the RAID configuration. The drive configuration status must be
“Ready.”
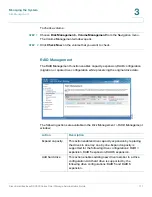
STEP 2
Choose
Disk Management > RAID Management
from the Navigation menu. The
RAID Management
window opens.
STEP 3
Select an available drive and click
Migrate
.
STEP 4
Select one or more available drives. The drive capacity after migration is
displayed. Click
Migrate
.
When migration is in process, the required time and total drive capacity after
migration are displayed in the Description field. After migration completes, the
new drive configuration is displayed and the status is Ready. You can use the new
drive configuration.
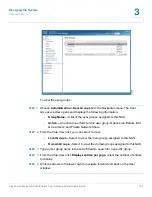
To configure a spare drive:
STEP 1
Prepare a drive of the same format and same capacity (or larger) as an existing
drive in the RAID configuration. The drive configuration status must be Ready.
STEP 2
Choose
Disk Management > RAID Management
from the Navigation menu. The
RAID Management
window opens.
STEP 3
Select a volume to have a spare drive added to it and click
Configure Spare Drive
.
STEP 4
Select a drive to be added to the volume that you previously selected and click
Configure Spare Drive
. When you add a spare drive, all the data on the selected
drive will be deleted during this process. Click
OK
to proceed.


