40
Setting Up: Advanced
Linksys E-Series
You can extend your network by turning the downstream router into an
access point . (See “How to use a router as an access point” on page 36) .
When you use a router as an access point, computers connected to the
access point are on the same IP subnet as all other devices connected to
the router . File, printer, and media sharing is much easier if all devices are
on the same subnet .
How to expose a device to the Internet
For
ALL
Why would I expose a device to the Internet?
If you are operating a web
server, a mail server, or a web camera, you may want to expose that device to
the Internet so anybody can access it . Your router includes a
DMZ
(Demilitarized
Zone) feature that forwards all inbound ports presented on the WAN interface,
except those that are specifically forwarded, to an individual IP address or
MAC address . This feature is normally not used, because it presents significant
security risks to the device that you designate for the DMZ . The DMZ device is
not protected by the built-in firewalls, Internet filters, or router web filters, and
is open to attacks from hackers .
A much better way of “exposing” devices to the Internet would be to use port
forwarding . See “How to set up port forwarding” on page 57 .
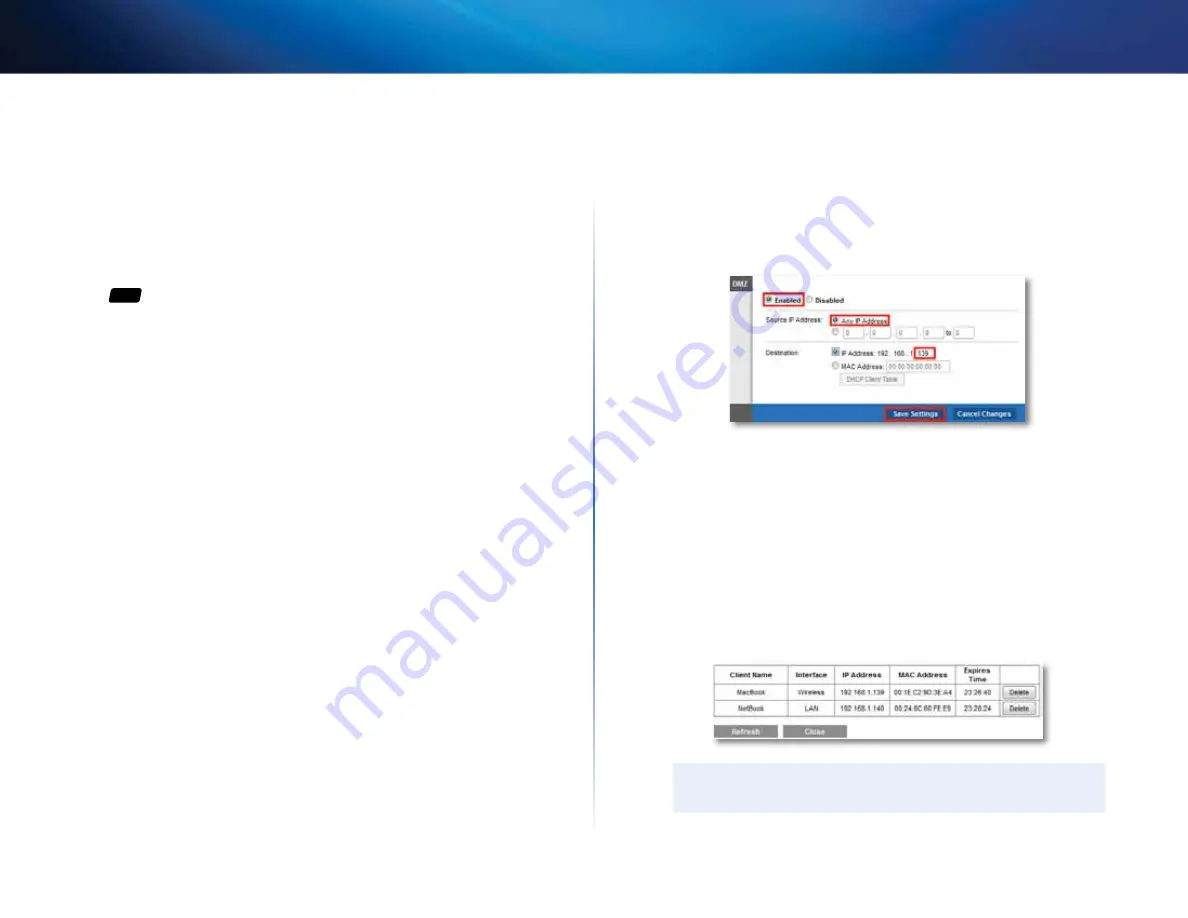
To set up a device in the DMZ:
Applications & Gaming > DMZ
1.
Configure your device with a static IP address . See your device’s
documentation for help with setting a static IP address or use DHCP
reservation (see “How to set up the DHCP server on your router” on
page 29) .
2.
Log into the browser-based utility (see “How to open the browser-based
3.
Click the
Applications & Gaming
tab, then click the
DMZ
page .
4.
Select
Enabled
.
5.
In the
Source IP Address
section, select
Any IP Address
to allow access
to your DMZ device from the entire Internet, or select the
source range
button and enter a range of allowed source addresses .
6.
In the
Destination
section, enter the last three digits of the IP address of
the device that will be in the DMZ . The rest of the IP address is already
completed .
7.
Click
Save Settings
to apply your changes .
If you prefer to specify the 12-digit MAC address of the device you want
to place in the DMZ instead of setting up a DHCP address reservation,
you can replace Step 6 with the following steps:
a.
Click
Enabled
.
b.
In the
Source IP Address
section, select
Any IP Address
(default) to
allow access to your DMZ device from the entire Internet, or select the
source range
button and enter a range of allowed source addresses .
c.
In the
Destination
section, select
MAC Address
, then click
DHCP
Client Table
. A separate window opens showing the current DHCP
client list .
TIP
The DHCP Client Table is only available if you select
MAC Address
.


