


2-10
Cisco Aironet 1400 Series Wireless Bridges Software Configuration Guide
OL-4059-01
Chapter 2 Configuring the Bridge for the First Time
Using the IP Setup Utility
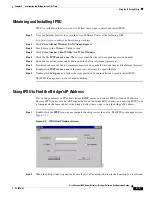
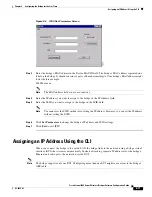
Step 3
Enter the bridge’s MAC address in the Device MAC ID field. The bridge’s MAC address is printed on
the label on the bottom of the unit. It should contain six pairs of hexadecimal digits. Your bridge’s MAC
address might look like the following example:
000164xxxxxx
Note
The MAC address field is not case-sensitive.
Step 4
Click
Get IP Address
.
Step 5
When the bridge’s IP address appears in the IP Address field, write it down.
If IPSU reports that the IP address is 10.0.0.1, the default IP address, then the bridge did not receive a
DHCP-assigned IP address. To change the bridge IP address from the default value using IPSU, refer to
the
“Using IPSU to Set the Bridge’s IP Address and SSID” section on page 2-10
.
Using IPSU to Set the Bridge’s IP Address and SSID
If you want to change the default IP address (10.0.0.1) of the bridge, you can use IPSU. You can also set
the bridge’s SSID at the same time.
Note
IPSU can change the bridge’s IP address and SSID only from their default settings. After the IP address
and SSID have been changed, IPSU cannot change them again.
Note
The computer you use to assign an IP address to the bridge must have an IP address in the same subnet
as the bridge (10.0.0.x).
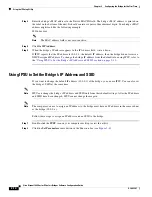
Follow these steps to assign an IP address and an SSID to the bridge:
Step 1
Double-click the
IPSU
icon on your computer desktop to start the utility.
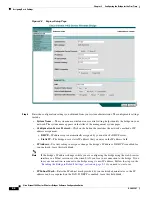
Step 2
Click the
Set Parameters
radio button in the Function box (see
Figure 2-4
).


