background image


17-18

Cisco Aironet 1400 Series Wireless Bridges Software Configuration Guide

OL-4059-01

Chapter 17      Managing Firmware and Configurations

Working with Configuration Files

This example shows how to copy the running configuration file named 

ap2-confg

 to the 

netadmin1


directory on the remote host with an IP address of 172.16.101.101: 

BR# 

copy system:running-config rcp://[email protected]/ap2-confg

Write file br-confg on host 172.16.101.101?[confirm]

Building configuration...[OK]

Connected to 172.16.101.101

BR#

This example shows how to store a startup configuration file on a server:

BR# 

configure terminal

BR(config)# 

ip rcmd remote-username netadmin2

BR(config)# 

end

BR# 

copy nvram:startup-config rcp:

Remote host[]? 

172.16.101.101

Name of configuration file to write [ap2-confg]?

Write file ap2-confg on host 172.16.101.101?[confirm]

![OK]

Clearing Configuration Information

This section describes how to clear configuration information. 

Deleting a Stored Configuration File

Caution

You cannot restore a file after it has been deleted. 

To delete a saved configuration from Flash memory, use the 

delete flash:

filename

 privileged EXEC 

command. Depending on the setting of the 

file prompt

 global configuration command, you might be 

prompted for confirmation before you delete a file. By default, the bridge prompts for confirmation on 
destructive file operations. For more information about the 

file prompt

 command, refer to the 

Cisco IOS 

Command Reference for Release 12.1

.

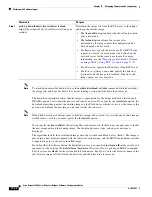
Step 5

end

Return to privileged EXEC mode. 

Step 6

copy system:running-config 
rcp:

[[[

//

[

username

@

]

location

]

/

directory

]

/

filename

or 

copy nvram:startup-config 
rcp:

[[[

//

[

username

@

]

location

]

/

directory

]

/

filename

Using RCP, copy the configuration file from an bridge 
running or startup configuration file to a network server.

Command

Purpose

Summary of Contents for Aironet 1400 Series

Page 1: ...t Tasman Drive San Jose CA 95134 1706 USA http www cisco com Tel 408 526 4000 800 553 NETS 6387 Fax 408 526 4100 Cisco Aironet 1400 Series Wireless Bridge Software Configuration Guide Cisco IOS Release 12 2 11 JA June 2003 Text Part Number OL 4059 01 ...

Page 2: ...HE POSSIBILITY OF SUCH DAMAGES CCDE CCENT CCSI Cisco Eos Cisco Explorer Cisco HealthPresence Cisco IronPort the Cisco logo Cisco Nurse Connect Cisco Pulse Cisco SensorBase Cisco StackPower Cisco StadiumVision Cisco TelePresence Cisco TrustSec Cisco Unified Computing System Cisco WebEx DCE Flip Channels Flip for Good Flip Mino Flipshare Design Flip Ultra Flip Video Flip Video Design Instant Broadba...

Page 3: ...ssistance Center xix Cisco TAC Website xix Cisco TAC Escalation Center xix Obtaining Additional Publications and Information xx C H A P T E R 1 Overview 1 1 Features 1 2 Management Options 1 2 Network Configuration Examples 1 3 Point to Point Bridging 1 3 Point to Multipoint Bridging 1 4 Redundant Bridging 1 4 C H A P T E R 2 Configuring the Bridge for the First Time 2 1 Before You Start 2 2 Reset...

Page 4: ...ry Fields 3 4 Using Online Help 3 5 C H A P T E R 4 Using the Command Line Interface 4 1 IOS Command Modes 4 2 Getting Help 4 3 Abbreviating Commands 4 3 Using no and default Forms of Commands 4 3 Understanding CLI Messages 4 4 Using Command History 4 4 Changing the Command History Buffer Size 4 4 Recalling Commands 4 5 Disabling the Command History Feature 4 5 Using Editing Features 4 5 Enabling ...

Page 5: ...on 5 13 Configuring TACACS Login Authentication 5 13 Configuring TACACS Authorization for Privileged EXEC Access and Network Services 5 14 Displaying the TACACS Configuration 5 15 Configuring the Bridge for Local Authentication and Authorization 5 15 Configuring the Bridge for Secure Shell 5 16 Understanding SSH 5 16 Configuring SSH 5 17 Managing the System Time and Date 5 17 Understanding the Sys...

Page 6: ...uring the Radio Distance Setting 6 3 Configuring Radio Data Rates 6 3 Configuring Radio Transmit Power 6 4 Configuring Radio Channel Settings 6 5 Disabling and Enabling Aironet Extensions 6 6 Configuring the Ethernet Encapsulation Transformation Method 6 6 Configuring the Beacon Period 6 6 Configuring RTS Threshold and Retries 6 7 Configuring the Maximum Data Retries 6 7 Configuring the Fragmentat...

Page 7: ...with VLANs 8 12 Displaying Spanning Tree Status 8 14 C H A P T E R 9 Configuring WEP and WEP Features 9 1 Understanding WEP 9 2 Configuring WEP and WEP Features 9 2 Creating WEP Keys 9 2 Enabling and Disabling WEP and Enabling TKIP and MIC 9 3 C H A P T E R 10 Configuring Authentication Types 10 1 Understanding Authentication Types 10 2 Open Authentication to the Bridge 10 2 Shared Key Authenticat...

Page 8: ...Communication 11 14 Displaying the RADIUS Configuration 11 15 Configuring and Enabling TACACS 11 16 Understanding TACACS 11 16 TACACS Operation 11 17 Configuring TACACS 11 17 Default TACACS Configuration 11 18 Identifying the TACACS Server Host and Setting the Authentication Key 11 18 Configuring TACACS Login Authentication 11 19 Configuring TACACS Authorization for Privileged EXEC Access and Netw...

Page 9: ...b Browser Interface 14 2 Configuring and Enabling MAC Address Filters 14 3 Creating a MAC Address Filter 14 4 Configuring and Enabling IP Filters 14 5 Creating an IP Filter 14 7 Configuring and Enabling Ethertype Filters 14 8 Creating an Ethertype Filter 14 9 C H A P T E R 15 Configuring CDP 15 1 Understanding CDP 15 2 Configuring CDP 15 2 Default CDP Configuration 15 2 Configuring the CDP Charact...

Page 10: ...g the Contents of a tar File 17 7 Extracting a tar File 17 7 Displaying the Contents of a File 17 8 Working with Configuration Files 17 8 Guidelines for Creating and Using Configuration Files 17 9 Configuration File Types and Location 17 9 Creating a Configuration File by Using a Text Editor 17 10 Copying Configuration Files by Using TFTP 17 10 Preparing to Download or Upload a Configuration File ...

Page 11: ...ing RCP 17 29 Uploading an Image File by Using RCP 17 31 Reloading the Image Using the Web Browser Interface 17 32 Browser HTTP Interface 17 32 Browser TFTP Interface 17 32 Reloading the Image Using the Power Injector MODE button 17 33 C H A P T E R 18 Configuring System Message Logging 18 1 Understanding System Message Logging 18 2 Configuring System Message Logging 18 2 System Log Message Format...

Page 12: ... Button 19 8 Using the Web Browser Interface 19 9 Reloading the Bridge Image 19 9 Using the MODE button 19 9 Web Browser Interface 19 10 Browser HTTP Interface 19 10 Browser TFTP Interface 19 11 Obtaining the Bridge Image File 19 11 Obtaining the TFTP Server Software 19 12 A P P E N D I X A Channels and Antenna Settings A 1 Channels A 2 IEEE 802 11a 5 GHz Band A 2 Maximum Power Levels A 2 5 8 GHz ...

Page 13: ...vice and Support TechnicalDocuments On the Cisco Product Documentation home page select Release 12 2 from the Cisco IOS Software drop down list This guide also includes an overview of the bridge web based interface which contains all the funtionality of the command line interface CLI This guide does not provide field level descriptions of the web based windows nor does it provide the procedures fo...

Page 14: ... and flexible administrative control over authentication and authorization processes Chapter 12 Configuring VLANs describes how to configure your bridge to interoperate with the VLANs set up on your wired LAN Chapter 13 Configuring QoS describes how to configure quality of service QoS on your bridge With this feature you can provide preferential treatment to certain traffic at the expense of other...

Page 15: ...action but could be useful information Note Means reader take note Notes contain helpful suggestions or references to materials not contained in this manual Caution Means reader be careful In this situation you might do something that could result equipment damage or loss of data Warning This warning symbol means danger You are in a situation that could cause bodily injury Before you work on any e...

Page 16: ...nte delle pratiche standard per la prevenzione di incidenti La traduzione delle avvertenze riportate in questa pubblicazione si trova nell appendice Translated Safety Warnings Traduzione delle avvertenze di sicurezza Advarsel Dette varselsymbolet betyr fare Du befinner deg i en situasjon som kan føre til personskade Før du utfører arbeid på utstyr må du være oppmerksom på de faremomentene som elek...

Page 17: ... Wireless Outdoor Wireless Cisco Aironet 1400 Series Obtaining Documentation and Submitting a Service Request For information on obtaining documentation submitting a service request and gathering additional information see the monthly What s New in Cisco Product Documentation which also lists all new and revised Cisco technical documentation at http www cisco com en US docs general whatsnew whatsn...

Page 18: ...xviii Cisco Aironet 1400 Series Wireless Bridges Software Configuration Guide OL 4059 01 Preface Related Publications ...

Page 19: ...The bridge is a self contained unit designed for outdoor installations You can connect external antennas to the bridge to attain various antenna gains and coverage patterns The bridge supports both point to point and point to multipoint configurations You can configure and monitor the bridge using the command line interface CLI the browser based management system or Simple Network Management Proto...

Page 20: ...ect against sophisticated attacks on your wireless network s WEP keys Message Integrity Check MIC and WEP key hashing Enhanced authentication services Set up non root bridges to authenticate to your network like other wireless client devices After you provide a network username and password for the non root bridge it authenticates to your network using LEAP Cisco s wireless authentication method a...

Page 21: ...ge associates to a root bridge In installation mode the bridge listens for another 1400 series bridge If it does not recognize another bridge the bridge becomes a root bridge If it recognizes another bridge it becomes a non root bridge associated to the bridge it recognizes See Chapter 2 Configuring the Bridge for the First Time for instructions on initial bridge setup Figure 1 1 shows bridges in ...

Page 22: ...on Figure 1 2 Point to Multipoint Bridge Configuration Note If your bridges connect one or more large flat networks a network containing more than 256 users on the same subnet we recommend that you use a router to connect the bridge to the large flat network Redundant Bridging You can set up two pairs of bridges to add redundancy or load balancing to your bridge link The bridges must use non adjac...

Page 23: ...figuration Guide OL 4059 01 Chapter 1 Overview Network Configuration Examples Figure 1 3 shows two pairs of redundant bridges Figure 1 3 Redundant Bridge Configuration 88900 Switch on LAN 1 Switch on LAN 2 Root Bridge Non Root Bridge Non Root Bridge Root Bridge ...

Page 24: ...1 6 Cisco Aironet 1400 Series Wireless Bridges Software Configuration Guide OL 4059 01 Chapter 1 Overview Network Configuration Examples ...

Page 25: ...but it might be simplest to browse to the bridge s web browser interface to complete the initial configuration and then use the CLI to enter additional settings for a more detailed configuration This chapter contains these sections Before You Start page 2 2 Obtaining and Assigning an IP Address page 2 3 Assigning Basic Settings page 2 4 Protecting Your Wireless LAN page 2 8 Using the IP Setup Util...

Page 26: ...e MODE button on the long reach power injector Step 1 Disconnect power from the power injector Step 2 Press and hold the MODE button while you reconnect the power cable Step 3 Hold the MODE button until the Status LED on the power injector turns amber approximately 3 to 4 seconds and release the button Wait until the status LED turns green to indicate that the bridge has booted up All bridge setti...

Page 27: ...to the Associations page on the root bridge to which the non root is associated The non root bridge s MAC address and IP address appear on the root bridge s Associations page Connecting to the Bridge Locally If you need to configure the bridge locally without connecting the bridge to a wired LAN you can connect a PC to the Ethernet port on the long reach power injector using a Category 5 Ethernet ...

Page 28: ...by rebooting your PC or by entering ipconfig release and ipconfig renew commands in a command prompt window Consult your PC operating instructions for detailed instructions Assigning Basic Settings After you determine or assign the bridge s IP address you can browse to the bridge s Express Setup page and perform an initial configuration Step 1 Open your Internet browser The bridge web browser inte...

Page 29: ... Software Configuration Guide OL 4059 01 Chapter 2 Configuring the Bridge for the First Time Assigning Basic Settings Figure 2 1 Summary Status Page Step 5 Click Express Setup The Express Setup screen appears Figure 2 2 shows the Express Setup page ...

Page 30: ...e automatically assigned by your network s DHCP server Static IP The bridge uses a static IP address that you enter in the IP address field IP Address Use this setting to assign or change the bridge s IP address If DHCP is enabled for your network leave this field blank Note If the bridge s IP address changes while you are configuring the bridge using the web browser interface or a Telnet session ...

Page 31: ...ing Radio Data Rates section on page 6 3 for more information on data rates and throughput Throughput Maximizes the data volume handled by the bridge but might reduce its range When you select Throughput the bridge sets all data rates to basic Range Maximizes the bridge s range but might reduce throughput When you select Range the bridge sets the 6 Mbps rate to basic and the other rates to enabled...

Page 32: ...IP Setup Utility IPSU enables you to find the bridge s IP address when it has been assigned by a DHCP server You can also use IPSU to set the bridge s IP address and SSID if they have not been changed from the default settings This section explains how to download the utility from Cisco com and install it how to use it to find the bridge s IP address and how to use it to set the IP address and the...

Page 33: ...se Agreement Step 7 Download and save the file to a temporary directory on your hard drive and then exit the Internet browser Step 8 Double click IPSUvxxxxxx exe in the temporary directory to expand the file Step 9 Double click Setup exe and follow the steps provided by the installation wizard to install IPSU The IPSU icon appears on your computer desktop Using IPSU to Find the Bridge s IP Address...

Page 34: ...ive a DHCP assigned IP address To change the bridge IP address from the default value using IPSU refer to the Using IPSU to Set the Bridge s IP Address and SSID section on page 2 10 Using IPSU to Set the Bridge s IP Address and SSID If you want to change the default IP address 10 0 0 1 of the bridge you can use IPSU You can also set the bridge s SSID at the same time Note IPSU can change the bridg...

Page 35: ...ign to the bridge in the IP Address field Step 5 Enter the SSID you want to assign to the bridge in the SSID field Note You cannot set the SSID without also setting the IP address However you can set the IP address without setting the SSID Step 6 Click Set Parameters to change the bridge s IP address and SSID settings Step 7 Click Exit to exit IPSU Assigning an IP Address Using the CLI When you co...

Page 36: ...et is not listed in your Accessories menu select Start Run type Telnet in the entry field and press Enter Step 2 When the Telnet window appears click Connect and select Remote System Note In Windows 2000 the Telnet window does not contain drop down menus To start the Telnet session in Windows 2000 type open followed by the bridge s IP address Step 3 In the Host Name field type the bridge s IP addr...

Page 37: ...erface for the First Time page 3 2 Using the Management Pages in the Web Browser Interface page 3 2 Using Online Help page 3 5 The web browser interface contains management pages that you use to change bridge settings upgrade firmware and monitor and configure other wireless devices on the network Note The bridge web browser interface is fully compatible with these browsers Microsoft Internet Expl...

Page 38: ...sername and password and press Enter The default username is Cisco and the default password is Cisco The Summary Status page appears Using the Management Pages in the Web Browser Interface The system management pages use consistent techniques to present and save configuration information A navigation bar is on the left side of the page and configuration action buttons appear at the bottom You use ...

Page 39: ...ist of recent bridge activity Express Setup Displays the Express Setup page that includes basic settings such as system name IP address and SSID Network Map Displays a list of infrastructure devices on your wireless LAN Association Displays a list of all devices on your wireless LAN listing their system names network roles and parent client relationships Network Interfaces Displays status and stat...

Page 40: ...naging firmware Event Log Displays the bridge event log and provides links to configuration pages where you can select events to be included in traps set event severity levels and set notification methods Configuration Action Buttons Apply Saves changes made on the page and remains on the page Refresh Updates status information or statistics displayed on a page Cancel Discards changes to the page ...

Page 41: ... Help Click the help icon at the top of any page in the web browser interface to display online help Figure 3 2 shows the print and help icons Figure 3 2 Print and Help Icons When a help page appears in a new browser window use the Select a topic drop down menu to display the help index or instructions for common configuration tasks such as configuring VLANs ...

Page 42: ...3 6 Cisco Aironet 1400 Series Wireless Bridges Software Configuration Guide OL 4059 01 Chapter 3 Using the Web Browser Interface Using Online Help ...

Page 43: ...CLI that you can use to configure your bridge It contains these sections IOS Command Modes page 4 2 Getting Help page 4 3 Abbreviating Commands page 4 3 Using no and default Forms of Commands page 4 3 Understanding CLI Messages page 4 4 Using Command History page 4 4 Using Editing Features page 4 5 Searching and Filtering Output of show and more Commands page 4 8 Accessing the CLI page 4 8 ...

Page 44: ... stored and used when the bridge reboots To access the various configuration modes you must start at global configuration mode From global configuration mode you can enter interface configuration mode and line configuration mode Table 4 1 describes the main command modes how to access each one the prompt you see in that mode and how to exit the mode The examples in the table use the host name BR T...

Page 45: ...or reverse the action of a command For example the no shutdown interface configuration command reverses the shutdown of an interface Use the command without the keyword no to re enable a disabled feature or to enable a feature that is disabled by default Table 4 2 Help Summary Command Purpose help Obtains a brief description of the help system in any command mode abbreviated command entry Obtains ...

Page 46: ...mmands page 4 5 Disabling the Command History Feature page 4 5 Changing the Command History Buffer Size By default the bridge records ten command lines in its history buffer Beginning in privileged EXEC mode enter this command to change the number of command lines that the bridge records during the current terminal session BR terminal history size number of lines Table 4 3 Common CLI Error Message...

Page 47: ...eatures This section describes the editing features that can help you manipulate the command line It contains these sections Enabling and Disabling Editing Features page 4 6 Editing Commands Through Keystrokes page 4 6 Editing Command Lines that Wrap page 4 7 Table 4 4 Recalling Commands Action1 1 The arrow keys function only on ANSI compatible terminals such as VT100s Result Press Ctrl P or the u...

Page 48: ...l F or the right arrow key Move the cursor forward one character Ctrl A Move the cursor to the beginning of the command line Ctrl E Move the cursor to the end of the command line Esc B Move the cursor back one word Esc F Move the cursor forward one word Ctrl T Transpose the character to the left of the cursor with the character located at the cursor Recall commands from the buffer and paste them i...

Page 49: ...shifted ten spaces to the left BR config access list 101 permit tcp 131 108 2 5 255 255 255 0 131 108 1 BR config 101 permit tcp 131 108 2 5 255 255 255 0 131 108 1 20 255 25 BR config t tcp 131 108 2 5 255 255 255 0 131 108 1 20 255 255 255 0 eq BR config 108 2 5 255 255 255 0 131 108 1 20 255 255 255 0 eq 45 Capitalize or lowercase words or capitalize a set of letters Esc C Capitalize at the cur...

Page 50: ...ude output that you do not need to see To use this functionality enter a show or more command followed by the pipe character one of the keywords begin include or exclude and an expression that you want to search for or filter out command begin include exclude regular expression Expressions are case sensitive For example if you enter exclude output the lines that contain output are not displayed bu...

Page 51: ...lso Cisco Usernames and passwords are case sensitive Opening the CLI with Secure Shell Secure Shell Protocol is a protocol that provides a secure remote connection to networking devices set up to use it Secure Shell SSH is a software package that provides secure login sessions by encrypting the entire session SSH features strong cryptographic authentication strong encryption and integrity protecti...

Page 52: ...4 10 Cisco Aironet 1400 Series Wireless Bridges Software Configuration Guide OL 4059 01 Chapter 4 Using the Command Line Interface Accessing the CLI ...

Page 53: ...thorized Access to Your Bridge page 5 2 Protecting Access to Privileged EXEC Commands page 5 2 Controlling Bridge Access with RADIUS page 5 7 Controlling Bridge Access with TACACS page 5 12 Configuring the Bridge for Local Authentication and Authorization page 5 15 Configuring the Bridge for Secure Shell page 5 16 Managing the System Time and Date page 5 17 Configuring a System Name and Prompt pag...

Page 54: ...ess with RADIUS section on page 5 7 Protecting Access to Privileged EXEC Commands A simple way of providing terminal access control in your network is to use passwords and assign privilege levels Password protection restricts access to a network or network device Privilege levels define what commands users can issue after they have logged into a network device Note For complete syntax and usage in...

Page 55: ...fault password is Cisco The password is encrypted in the configuration file Table 5 1 Default Password and Privilege Levels continued Feature Default Setting Command Purpose Step 1 configure terminal Enter global configuration mode Step 2 enable password password Define a new password or change an existing password for access to privileged EXEC mode The default password is Cisco For password speci...

Page 56: ...ncrypted password or enable secret level level password encryption type encrypted password Define a new password or change an existing password for access to privileged EXEC mode or Define a secret password which is saved using a nonreversible encryption method Optional For level the range is from 0 to 15 Level 1 is normal user EXEC mode privileges The default level is 15 privileged EXEC mode priv...

Page 57: ... the bridge These pairs are assigned to lines or interfaces and authenticate each user before that user can access the bridge If you have defined privilege levels you can also assign a specific privilege level with associated rights and privileges to each username and password pair Beginning in privileged EXEC mode follow these steps to establish a username based authentication system that request...

Page 58: ...configure command you can assign it level 3 security and distribute that password to a more restricted group of users This section includes this configuration information Setting the Privilege Level for a Command page 5 6 Logging Into and Exiting a Privilege Level page 5 7 Setting the Privilege Level for a Command Beginning in privileged EXEC mode follow these steps to set the privilege level for ...

Page 59: ... specified privilege level Controlling Bridge Access with RADIUS This section describes how to control administrator access to the bridge using Remote Authentication Dial In User Service RADIUS For complete instructions on configuring the bridge to support RADIUS see Chapter 11 Configuring RADIUS and TACACS Servers RADIUS provides detailed accounting information and flexible administrative control...

Page 60: ...he defined authentication methods are performed The only exception is the default method list which by coincidence is named default The default method list is automatically applied to all interfaces except those that have a named method list explicitly defined A method list describes the sequence and authentication methods to be queried to authenticate a user You can designate one or more security...

Page 61: ...n authentication method list To create a default list that is used when a named list is not specified in the login authentication command use the default keyword followed by the methods that are to be used in default situations The default method list is automatically applied to all interfaces For list name specify a character string to name the list you are creating For method1 specify the actual...

Page 62: ... timeout command is used Optional For retransmit retries specify the number of times a RADIUS request is resent to a server if that server is not responding or responding slowly The range is 1 to 1000 If no retransmit value is set with the radius server host command the setting of the radius server retransmit global configuration command is used Optional For key string specify the authentication a...

Page 63: ...dius server 172 20 0 1 auth port 2000 acct port 2001 bridge config sg radius exit Configuring RADIUS Authorization for User Privileged Access and Network Services AAA authorization limits the services available to a user When AAA authorization is enabled the bridge uses information retrieved from the user s profile which is in the local user database or on the security server to configure the user...

Page 64: ...rization processes TACACS is facilitated through AAA and can be enabled only through AAA commands Note For complete syntax and usage information for the commands used in this section refer to the Cisco IOS Security Command Reference for Release 12 2 These sections describe TACACS configuration Default TACACS Configuration page 5 13 Configuring TACACS Login Authentication page 5 13 Configuring TACA...

Page 65: ... all interfaces except those that have a named method list explicitly defined A defined method list overrides the default method list A method list describes the sequence and authentication methods to be queried to authenticate a user You can designate one or more security protocols to be used for authentication thus ensuring a backup system for authentication in case the initial method fails The ...

Page 66: ...authentication method list To create a default list that is used when a named list is not specified in the login authentication command use the default keyword followed by the methods that are to be used in default situations The default method list is automatically applied to all interfaces For list name specify a character string to name the list you are creating For method1 specify the actual m...

Page 67: ...for Local Authentication and Authorization You can configure AAA to operate without a server by setting the bridge to implement AAA in local mode The bridge then handles authentication and authorization No accounting is available in this configuration Beginning in privileged EXEC mode follow these steps to configure the bridge for local AAA Command Purpose Step 1 configure terminal Enter global co...

Page 68: ... 4 aaa authorization exec local Configure user AAA authorization to determine if the user is allowed to run an EXEC shell by checking the local database Step 5 aaa authorization network local Configure user AAA authorization for all network related service requests Step 6 username name privilege level password encryption type password Enter the local database and establish a username based authent...

Page 69: ...om Cisco com For more information refer to the release notes for this release For information about configuring SSH and displaying SSH settings refer to the Configuring Secure Shell section in the Cisco IOS Security Configuration Guide for Release 12 2 Managing the System Time and Date You can manage the system time and date on your bridge automatically using the Network Time Protocol NTP or manua...

Page 70: ...ing to a device whose time might not be accurate by never synchronizing to a device that is not synchronized NTP also compares the time reported by several devices and does not synchronize to a device whose time is significantly different than the others even if its stratum is lower The communications between devices running NTP known as associations are usually statically configured each device i...

Page 71: ...t available This section contains this configuration information Default NTP Configuration page 5 20 Configuring NTP Authentication page 5 20 Configuring NTP Associations page 5 21 Configuring NTP Broadcast Service page 5 22 Configuring NTP Access Restrictions page 5 23 Configuring the Source IP Address for NTP Packets page 5 25 Displaying the NTP Configuration page 5 26 Catalyst 3550 switch Catal...

Page 72: ...rictions No access control is specified NTP packet source IP address The source address is determined by the outgoing interface Command Purpose Step 1 configure terminal Enter global configuration mode Step 2 ntp authenticate Enable the NTP authentication feature which is disabled by default Step 3 ntp authentication key number md5 value Define the authentication keys By default none are defined F...

Page 73: ...ify your entries Step 7 copy running config startup config Optional Save your entries in the configuration file Command Purpose Command Purpose Step 1 configure terminal Enter global configuration mode Step 2 ntp peer ip address version number key keyid source interface prefer or ntp server ip address version number key keyid source interface prefer Configure the bridge system clock to synchronize...

Page 74: ...nd or receive NTP broadcast packets on an interface by interface basis if there is an NTP broadcast server such as a router broadcasting time information on the network The bridge can send NTP broadcast packets to a peer so that the peer can synchronize to it The bridge can also receive NTP broadcast packets to synchronize its own clock This section provides procedures for both sending and receivi...

Page 75: ...ess Restrictions You can control NTP access on two levels as described in these sections Creating an Access Group and Assigning a Basic IP Access List page 5 24 Disabling NTP Services on a Specific Interface page 5 25 Step 6 copy running config startup config Optional Save your entries in the configuration file Step 7 Configure the connected peers to receive NTP broadcast packets as described in t...

Page 76: ...ly serve peer access list number Create an access group and apply a basic IP access list The keywords have these meanings query only Allows only NTP control queries serve only Allows only time requests serve Allows time requests and NTP control queries but does not allow the bridge to synchronize to the remote device peer Allows time requests and NTP control queries and allows the bridge to synchr...

Page 77: ... on an interface use the no ntp disable interface configuration command Configuring the Source IP Address for NTP Packets When the bridge sends an NTP packet the source IP address is normally set to the address of the interface through which the NTP packet is sent Use the ntp source global configuration command when you want to use a particular source IP address for all NTP packets The address is ...

Page 78: ...co IOS Configuration Fundamentals Command Reference for Release 12 1 Configuring Time and Date Manually If no other source of time is available you can manually configure the time and date after the system is restarted The time remains accurate until the next system restart We recommend that you use manual configuration only as a last resort If you have an outside source to which the bridge can sy...

Page 79: ...s been set by a timing source such as NTP the flag is set If the time is not authoritative it is used only for display purposes Until the clock is authoritative and the authoritative flag is set the flag prevents peers from synchronizing to the clock when the peers time is invalid The symbol that precedes the show clock display has this meaning Time is not authoritative blank Time is authoritative...

Page 80: ...mand is clock timezone AST 3 30 To set the time to UTC use the no clock timezone global configuration command Command Purpose Step 1 configure terminal Enter global configuration mode Step 2 clock timezone zone hours offset minutes offset Set the time zone The bridge keeps internal time in universal time coordinated UTC so this command is used only for display purposes and when the time is manuall...

Page 81: ...e config clock summer time PDT recurring 1 Sunday April 2 00 last Sunday October 2 00 Command Purpose Step 1 configure terminal Enter global configuration mode Step 2 clock summer time zone recurring week day month hh mm week day month hh mm offset Configure summer time to start and end on the specified days every year Summer time is disabled by default If you specify clock summer time zone recurr...

Page 82: ... on April 26 2001 at 02 00 bridge config clock summer time pdt date 12 October 2000 2 00 26 April 2001 2 00 Command Purpose Step 1 configure terminal Enter global configuration mode Step 2 clock summer time zone date month date year hh mm month date year hh mm offset or clock summer time zone date date month year hh mm date month year hh mm offset Configure summer time to start on the first date a...

Page 83: ...nfiguration information Default System Name and Prompt Configuration page 5 31 Configuring a System Name page 5 31 Understanding DNS page 5 32 Default System Name and Prompt Configuration The default bridge system name and prompt is bridge Configuring a System Name Beginning in privileged EXEC mode follow these steps to manually configure a system name When you set the system name it is also used ...

Page 84: ...p domain names to IP addresses you must first identify the host names specify the name server that is present on your network and enable the DNS This section contains this configuration information Default DNS Configuration page 5 32 Setting Up DNS page 5 32 Displaying the DNS Configuration page 5 33 Default DNS Configuration Table 5 3 shows the default DNS configuration Setting Up DNS Beginning i...

Page 85: ...cted terminals at login and is useful for sending messages that affect all network users such as impending system shutdowns The login banner also appears on all connected terminals It appears after the MOTD banner and before the login prompts Note For complete syntax and usage information for the commands used in this section refer to the Cisco IOS Configuration Fundamentals Command Reference for ...

Page 86: ...delimiter bridge config banner motd This is a secure site Only authorized users are allowed For access contact technical support bridge config This example shows the banner displayed from the previous configuration Unix telnet 172 2 5 4 Trying 172 2 5 4 Connected to 172 2 5 4 Escape character is This is a secure site Only authorized users are allowed For access contact technical support Command Pu...

Page 87: ... the beginning and ending delimiter bridge config banner login Access for authorized users only Please enter your username and password bridge config Command Purpose Step 1 configure terminal Enter global configuration mode Step 2 banner login c message c Specify the login message For c enter the delimiting character of your choice such as a pound sign and press the Return key The delimiting chara...

Page 88: ...5 36 Cisco Aironet 1400 Series Wireless Bridges Software Configuration Guide OL 4059 01 Chapter 5 Administering the Bridge Creating a Banner ...

Page 89: ...ing the Radio Distance Setting page 6 3 Configuring Radio Data Rates page 6 3 Configuring Radio Transmit Power page 6 4 Configuring Radio Channel Settings page 6 5 Disabling and Enabling Aironet Extensions page 6 6 Configuring the Ethernet Encapsulation Transformation Method page 6 6 Configuring the Beacon Period page 6 6 Configuring RTS Threshold and Retries page 6 7 Configuring the Maximum Data ...

Page 90: ...ure terminal Enter global configuration mode Step 2 interface dot11radio 0 Enter interface configuration mode for the radio interface Step 3 shutdown Disable the radio port Step 4 end Return to privileged EXEC mode Step 5 copy running config startup config Optional Save your entries in the configuration file 88906 Switch Switch Non Root Bridge Root Bridge Command Purpose Step 1 configure terminal ...

Page 91: ...te that allows data transmission You can set each data rate to one of three states Basic this is the default state for all data rates Allows transmission at this rate for all packets both unicast and multicast At least one of the bridge s data rates must be set to Basic Enabled The bridge transmits only unicast packets at this rate multicast packets are sent at one of the data rates set to Basic D...

Page 92: ...ps to set the transmit power on your bridge radio Command Purpose Step 1 configure terminal Enter global configuration mode Step 2 interface dot11radio 0 Enter interface configuration mode for the radio interface Step 3 speed 6 0 9 0 12 0 18 0 24 0 36 0 48 0 54 0 basic 6 0 basic 9 0 basic 12 0 basic 18 0 basic 24 0 basic 36 0 basic 48 0 basic 54 0 range throughput Set each data rate to basic or en...

Page 93: ... 5785 for bridges that are close to each other Beginning in privileged EXEC mode follow these steps to set the bridge s radio channel Step 3 power local 12 15 18 21 22 23 24 maximum Set the transmit power to one of the power levels allowed in your regulatory domain All settings are in dBm Note The settings allowed in your regulatory domain might differ from the settings listed here Step 4 end Retu...

Page 94: ...e between bridge beacons in Kilomicroseconds One Kµsec equals 1 024 microseconds The default beacon period is 100 Beginning in privileged EXEC mode follow these steps to configure the beacon period Command Purpose Step 1 configure terminal Enter global configuration mode Step 2 interface dot11radio 0 1 Enter interface configuration mode for the radio interface The 2 4 GHz radio is radio 0 and the ...

Page 95: ...et the RTS settings to defaults Configuring the Maximum Data Retries The maximum data retries setting determines the number of attempts the bridge makes to send a packet before giving up and dropping the packet The default setting is 32 Beginning in privileged EXEC mode follow these steps to configure the maximum data retries Use the no form of the command to reset the setting to defaults Command ...

Page 96: ...nts Prior to configuring the packet concatenation feature ensure all your network devices support packet concatenation Also ensure that all bridges are running Cisco IOS Release 12 2 11 JA or later If connectivity problems develop after implementing packet concatenation deactivate the concatenation feature to determine if that is the cause of the problem Beginning in privileged EXEC mode follow th...

Page 97: ...max Settings for Point to Point and Point to Multipoint Bridge Links section on page 13 9 for instructions on adjusting these settings Performing a Carrier Busy Test You can perform a carrier busy test to check the radio activity on bridge channels During the carrier busy test the bridge drops all associations with wireless networking devices for around 4 seconds while it conducts the carrier test...

Page 98: ...6 10 Cisco Aironet 1400 Series Wireless Bridges Software Configuration Guide OL 4059 01 Chapter 6 Configuring Radio Settings Performing a Carrier Busy Test ...

Page 99: ...ess Bridges Software Configuration Guide OL 4059 01 7 Configuring SSIDs This chapter describes how to configure a service set identifier SSID on the bridge This chapter contains these sections Understanding SSIDs page 7 2 Configuring the SSID page 7 2 ...

Page 100: ...nt authentication types see Chapter 10 Configuring Authentication Types If you want the bridge to allow associations from bridges that do not specify an SSID in their configurations you can include the SSID in the bridge s beacon The bridge s default SSID autoinstall is included in the beacon However to keep your network secure you should remove the SSID from the beacon You can assign an authentic...

Page 101: ...an SSID and enter SSID configuration mode for the new SSID The SSID can consist of up to 32 alphanumeric characters SSIDs are case sensitive Note You can include spaces in an SSID but be careful not to add spaces to an SSID accidentally especially at the end of an SSID Step 4 authentication client username username password password Optional Set an authentication username and password that the bri...

Page 102: ...ironet 1400 Series Wireless Bridges Software Configuration Guide OL 4059 01 Chapter 7 Configuring SSIDs Configuring the SSID bridge config ssid vlan 1 bridge config ssid infrastructure ssid bridge config ssid end ...

Page 103: ...re Spanning Tree Protocol STP on your bridge This chapter contains these sections Understanding Spanning Tree Protocol page 8 2 Configuring STP Features page 8 8 Displaying Spanning Tree Status page 8 14 Note For complete syntax and usage information for the commands used in this chapter refer to the Cisco IOS Command Reference for Access Points and Bridges for this release ...

Page 104: ...ructure devices might also learn end station MAC addresses on multiple Layer 2 interfaces These conditions result in an unstable network STP defines a tree with a root bridge and a loop free path from the root to all infrastructure devices in the Layer 2 network Note STP discussions use the term root to describe two concepts the bridge on the network that serves as a central point in the spanning ...

Page 105: ... age protocol timers When a bridge receives a configuration BPDU that contains superior information lower bridge ID lower path cost and so forth it stores the information for that port If this BPDU is received on the root port of the bridge the bridge also forwards it with an updated message to all attached LANs for which it is the designated bridge If a bridge receives a configuration BPDU that c...

Page 106: ...ogy All paths that are not needed to reach the spanning tree root from anywhere in the network are placed in the spanning tree blocking mode BPDUs contain information about the sending bridge and its ports including bridge and MAC addresses bridge priority port priority and path cost STP uses this information to elect the spanning tree root and root port for the network and the root port and desig...

Page 107: ...to expire for forwarded frames that have used the old topology Each interface on a bridge using spanning tree exists in one of these states Blocking The interface does not participate in frame forwarding Listening The first transitional state after the blocking state when the spanning tree determines that the interface should participate in frame forwarding Learning The interface prepares to parti...

Page 108: ...n the learning state the interface continues to block frame forwarding as the bridge learns end station location information for the forwarding database 4 When the forward delay timer expires spanning tree moves the interface to the forwarding state where both learning and frame forwarding are enabled Blocking State An interface in the blocking state does not participate in frame forwarding After ...

Page 109: ...ived on the port Does not learn addresses Receives BPDUs Learning State An interface in the learning state prepares to participate in frame forwarding The interface enters the learning state from the listening state An interface in the learning state performs as follows Discards frames received on the port Learns addresses Receives BPDUs Forwarding State An interface in the forwarding state forwar...

Page 110: ...bridge are assigned to bridge group 1 by default When you enable STP and assign a priority on bridge group 1 STP is enabled on the radio and Ethernet interfaces and on the primary VLAN and those interfaces adopt the priority assigned to bridge group 1 You can create bridge groups for sub interfaces and assign different STP settings to those bridge groups Configuring STP Settings Beginning in privi...

Page 111: ...d 2312 station role root no cdp enable infrastructure client bridge group 1 Step 3 bridge group number Assign the interface to a bridge group You can number your bridge groups from 1 to 255 Step 4 no bridge group number spanning disabled Counteract the command that automatically disables STP for a bridge group STP is enabled on the interface when you enter the bridge n protocol ieee command Step 5...

Page 112: ...meout 0 0 line vty 0 4 login line vty 5 15 login end Non Root Bridge Without VLANs This example shows the configuration of a non root bridge with no VLANs configured with STP enabled hostname client bridge north ip subnet zero bridge irb interface Dot11Radio0 no ip address no ip route cache ssid tsunami authentication open guest mode speed basic 6 0 9 0 12 0 18 0 24 0 36 0 48 0 54 0 rts threshold ...

Page 113: ...me out 120 ip ssh authentication retries 3 bridge irb interface Dot11Radio0 no ip address no ip route cache ssid vlan1 vlan 1 infrastructure ssid authentication open speed basic 6 0 9 0 12 0 18 0 24 0 36 0 48 0 54 0 rts threshold 2312 station role root no cdp enable infrastructure client interface Dot11Radio0 1 encapsulation dot1Q 1 native no ip route cache no cdp enable bridge group 1 interface D...

Page 114: ...5 255 0 0 no ip route cache ip default gateway 1 4 0 1 bridge 1 protocol ieee bridge 1 route ip bridge 1 priority 9000 bridge 2 protocol ieee bridge 2 priority 10000 bridge 3 protocol ieee bridge 3 priority 3100 line con 0 exec timeout 0 0 line vty 5 15 end Non Root Bridge with VLANs This example shows the configuration of a non root bridge with VLANs configured with STP enabled hostname client br...

Page 115: ... cache no cdp enable bridge group 3 interface FastEthernet0 no ip address no ip route cache duplex auto speed auto interface FastEthernet0 1 encapsulation dot1Q 1 native no ip route cache bridge group 1 interface FastEthernet0 2 encapsulation dot1Q 2 no ip route cache bridge group 2 interface FastEthernet0 3 encapsulation dot1Q 3 no ip route cache bridge group 3 bridge group 3 path cost 400 interf...

Page 116: ... 8 3 Commands for Displaying Spanning Tree Status Command Purpose show spanning tree Displays information on your network s spanning tree show spanning tree blocked ports Displays a list of blocked ports on this bridge show spanning tree bridge Displays status and configuration of this bridge show spanning tree active Displays spanning tree information on active interfaces only show spanning tree ...

Page 117: ... OL 4059 01 9 Configuring WEP and WEP Features This chapter describes how to configure Wired Equivalent Privacy WEP Message Integrity Check MIC and Temporal Key Integrity Protocol TKIP This chapter contains these sections Understanding WEP page 9 2 Configuring WEP and WEP Features page 9 2 ...

Page 118: ...key See Chapter 10 Configuring Authentication Types for detailed information on EAP and other authentication types Two additional security features defend your wireless network s WEP keys Message Integrity Check MIC MIC prevents attacks on encrypted packets called bit flip attacks During a bit flip attack an intruder intercepts an encrypted message alters it slightly and retransmits it and the rec...

Page 119: ...ect the VLAN for which you want to create a key WEP MIC and TKIP are supported only on the native VLAN Name the key slot in which this WEP key resides You can assign up to 4 WEP keys for each VLAN but key slot 4 is reserved for the session key Enter the key and set the size of the key either 40 bit or 128 bit 40 bit keys contain 10 hexadecimal digits 128 bit keys contain 26 hexadecimal digits Opti...

Page 120: ...ry mic key hash Enable WEP MIC and TKIP Optional Select the VLAN for which you want to enable WEP and WEP features Set the WEP level and enable TKIP and MIC If you enter optional another bridge can associate to the bridge with or without WEP enabled You can enable TKIP with WEP set to optional but you cannot enable MIC If you enter mandatory other bridges must have WEP enabled to associate to the ...

Page 121: ...10 Configuring Authentication Types This chapter describes how to configure authentication types on the bridge This chapter contains these sections Understanding Authentication Types page 10 2 Configuring Authentication Types page 10 5 Matching Authentication Types on Root and Non Root Bridges page 10 9 ...

Page 122: ...root bridge can communicate only if its WEP keys match the root bridge s A bridge that is not using WEP does not attempt to authenticate with a bridge that is using WEP Open authentication does not rely on a RADIUS server on your network Figure 10 1 shows the authentication sequence between a non root bridge trying to authenticate and a root bridge using open authentication In this example the dev...

Page 123: ... for Shared Key Authentication EAP Authentication to the Network This authentication type provides the highest level of security for your wireless network By using the Extensible Authentication Protocol EAP to interact with an EAP compatible RADIUS server the root bridge helps another bridge and the RADIUS server to perform mutual authentication and derive a dynamic unicast WEP key The RADIUS serv...

Page 124: ... access thereby approximating the level of security in a wired switched segment to an individual desktop The non root bridge loads this key and prepares to use it for the logon session During the logon session the RADIUS server encrypts and sends the WEP key called a session key over the wired LAN to the root bridge The root bridge encrypts its broadcast key with the session key and sends the encr...

Page 125: ...outs and Intervals page 10 7 Default Authentication Settings The default SSID on the bridge is autoinstall Table 10 1 shows the default authentication settings for the default SSID Assigning Authentication Types to an SSID Beginning in privileged EXEC mode follow these steps to configure authentication types for SSIDs Table 10 1 Default Authentication Configuration Feature Default Setting SSID aut...

Page 126: ...authentication type to open with EAP authentication The bridge forces all other bridges to perform EAP authentication before they are allowed to join the network For list name specify the authentication method list Note A bridge configured for EAP authentication forces all bridges that associate to perform EAP authentication Bridges that do not use EAP cannot communicate with the bridge Step 5 aut...

Page 127: ...ds to reset the values to default settings Command Purpose Step 1 configure terminal Enter global configuration mode Step 2 dot11 holdoff time seconds Enter the number of seconds a non root bridge must wait before it can reattempt to authenticate following a failed authentication Enter a value from 1 to 65555 seconds Step 3 interface dot11radio 0 Enter interface configuration mode for the radio in...

Page 128: ...onfigures Network EAP as the authentication type for the SSID on the non root bridge bridge configure terminal bridge config configure interface dot11radio 0 bridge config if ssid bridgeman bridge config ssid authentication client username bugsy password run4yerlife bridge config ssid authentication network eap romeo bridge config ssid end Command Purpose Step 1 configure terminal Enter global con...

Page 129: ...ists the settings required for each authentication type on the root and non root bridges Table 10 2 Client and Bridge Security Settings Security Feature Non Root Bridge Setting Root Bridge Setting Static WEP with open authentication Set up and enable WEP Set up and enable WEP and enable Open Authentication Static WEP with shared key authentication Set up and enable WEP and enable Shared Key Authen...

Page 130: ...10 10 Cisco Aironet 1400 Series Wireless Bridges Software Configuration Guide OL 4059 01 Chapter 10 Configuring Authentication Types Matching Authentication Types on Root and Non Root Bridges ...

Page 131: ...us TACACS which provide detailed accounting information and flexible administrative control over authentication and authorization processes RADIUS and TACACS are facilitated through AAA and can be enabled only through AAA commands Note For complete syntax and usage information for the commands used in this chapter refer to the Cisco IOS Security Command Reference for Release 12 2 This chapter cont...

Page 132: ...re authenticated through a RADIUS server that is customized to work with the Kerberos security system Turnkey network security environments in which applications support the RADIUS protocol such as an access environment that uses a smart card access control system In one case RADIUS has been used with Enigma s security cards to validate users and to grant access to network resources Networks alrea...

Page 133: ... with the appropriate level of network access thereby approximating the level of security in a wired switched segment to an individual desktop The non root bridge loads this key and prepares to use it for the logon session During the logon session the RADIUS server encrypts and sends the WEP key called a session key over the wired LAN to the root bridge The root bridge encrypts its broadcast key w...

Page 134: ... should configure a RADIUS server before configuring RADIUS features on your bridge This section contains this configuration information Default RADIUS Configuration page 11 4 Identifying the RADIUS Server Host page 11 4 required Configuring RADIUS Login Authentication page 11 7 required Defining AAA Server Groups page 11 9 optional Configuring RADIUS Authorization for User Privileged Access and N...

Page 135: ... the AAA security commands you must specify the host running the RADIUS server daemon and a secret text key string that it shares with the bridge The timeout retransmission and encryption key values can be configured globally per server for all RADIUS servers or in some combination of global and per server settings To apply these settings globally to all RADIUS servers communicating with the bridg...

Page 136: ... of the radius server timeout command is used Optional For retransmit retries specify the number of times a RADIUS request is resent to a server if that server is not responding or responding slowly The range is 1 to 1000 If no retransmit value is set with the radius server host command the setting of the radius server retransmit global configuration command is used Optional For key string specify...

Page 137: ...which by coincidence is named default The default method list is automatically applied to all interfaces except those that have a named method list explicitly defined A method list describes the sequence and authentication methods to be queried to authenticate a user in this case a non root bridge You can designate one or more security protocols to be used for authentication thus ensuring a backup...

Page 138: ...s method returns an error not if it fails Select one of these methods line Use the line password for authentication You must define a line password before you can use this authentication method Use the password password line configuration command local Use the local username database for authentication You must enter username information in the database Use the username password global configurati...

Page 139: ...f the IP address and UDP port number allowing different ports to be individually defined as RADIUS hosts providing a specific AAA service If you configure two different host entries on the same RADIUS server for the same service such as accounting the second configured host entry acts as a fail over backup to the first one You use the server group server configuration command to associate a partic...

Page 140: ...ryption key used between the bridge and the RADIUS daemon running on the RADIUS server Note The key is a text string that must match the encryption key used on the RADIUS server Always configure the key as the last item in the radius server host command Leading spaces are ignored but spaces within and at the end of the key are used If you use spaces in your key do not enclose the key in quotation ...

Page 141: ...port 1000 acct port 1001 BR config sg radius exit BR config aaa group server radius group2 BR config sg radius server 172 20 0 1 auth port 2000 acct port 2001 BR config sg radius exit Configuring RADIUS Authorization for User Privileged Access and Network Services AAA authorization limits the services available to a user When AAA authorization is enabled the bridge uses information retrieved from ...

Page 142: ... exec start stop method1 global configuration command Command Purpose Step 1 configure terminal Enter global configuration mode Step 2 aaa authorization network radius Configure the bridge for user RADIUS authorization for all network related service requests Step 3 aaa authorization exec radius Configure the bridge for user RADIUS authorization to determine if the user has privileged EXEC access ...

Page 143: ... Note The key is a text string that must match the encryption key used on the RADIUS server Leading spaces are ignored but spaces within and at the end of the key are used If you use spaces in your key do not enclose the key in quotation marks unless the quotation marks are part of the key Step 3 radius server retransmit retries Specify the number of times the bridge sends each RADIUS request to t...

Page 144: ...ecurity Configuration Guide for Release 12 2 Configuring the Bridge for Vendor Proprietary RADIUS Server Communication Although an IETF draft standard for RADIUS specifies a method for communicating vendor proprietary information between the bridge and the RADIUS server some vendors have extended the RADIUS attribute set in a unique way Cisco IOS software supports a subset of vendor proprietary RA...

Page 145: ...ow running config privileged EXEC command Command Purpose Step 1 configure terminal Enter global configuration mode Step 2 radius server host hostname ip address non standard Specify the IP address or host name of the remote RADIUS server host and identify that it is using a vendor proprietary implementation of RADIUS Step 3 radius server key string Specify the shared secret text string used betwe...

Page 146: ...thentication of administrators through login and password dialog challenge and response and messaging support The authentication facility can conduct a dialog with the administrator for example after a username and password are provided to challenge a user with several questions such as home address mother s maiden name service type and social security number The TACACS authentication service can ...

Page 147: ...ge typically tries to use an alternative method for authenticating the administrator CONTINUE The administrator is prompted for additional authentication information After authentication the administrator undergoes an additional authorization phase if authorization has been enabled on the bridge Administrators must first successfully complete TACACS authentication before proceeding to TACACS autho...

Page 148: ...t and contains the list of IP addresses of the selected server hosts Beginning in privileged EXEC mode follow these steps to identify the IP host or host maintaining TACACS server and optionally set the encryption key Command Purpose Step 1 configure terminal Enter global configuration mode Step 2 tacacs server host hostname port integer timeout integer key string Identify the IP host or hosts mai...

Page 149: ...es the sequence and authentication methods to be queried to authenticate an administrator You can designate one or more security protocols to be used for authentication thus ensuring a backup system for authentication in case the initial method fails The software uses the first method listed to authenticate users if that method fails to respond the software selects the next authentication method i...

Page 150: ...d in the login authentication command use the default keyword followed by the methods that are to be used in default situations The default method list is automatically applied to all interfaces For list name specify a character string to name the list you are creating For method1 specify the actual method the authentication algorithm tries The additional methods of authentication are used only if...

Page 151: ...ng attribute value AV pairs and is stored on the security server This data can then be analyzed for network management client billing or auditing Beginning in privileged EXEC mode follow these steps to enable TACACS accounting for each Cisco IOS privilege level and for network services Command Purpose Step 1 configure terminal Enter global configuration mode Step 2 aaa authorization network tacacs...

Page 152: ...sable accounting use the no aaa accounting network exec start stop method1 global configuration command Displaying the TACACS Configuration To display TACACS server statistics use the show tacacs privileged EXEC command Step 5 show running config Verify your entries Step 6 copy running config startup config Optional Save your entries in the configuration file Command Purpose ...

Page 153: ...guration Guide OL 4059 01 12 Configuring VLANs This chapter describes how to configure your bridge to operate with the VLANs set up on your wired LAN These sections describe how to configure your bridge to support VLANs Understanding VLANs page 12 2 Configuring VLANs page 12 4 ...

Page 154: ...ts of a number of end systems either hosts or network equipment such as bridges and routers connected by a single bridging domain The bridging domain is supported on various pieces of network equipment such as LAN switches that operate bridging protocols between them with a separate group for each VLAN VLANs provide the segmentation services traditionally provided by routers in LAN configurations ...

Page 155: ...wse to this document http www cisco com en US docs internetworking design guide idg4 html Cisco Internetworking Technology Handbook Click this link to browse to this document http www cisco com en US docs internetworking technology handbook ito_doc html Cisco Internetworking Troubleshooting Guide Click this link to browse to this document http www cisco com en US docs internetworking troubleshooti...

Page 156: ...AN page 12 4 Viewing VLANs Configured on the Bridge page 12 7 Configuring a VLAN Configuring your bridge to support VLANs is a five step process 1 Create subinterfaces on the radio and Ethernet interfaces 2 Enable 802 1q encapsulation on the subinterfaces and assign one subinterface as the native VLAN 3 Assign a bridge group to each VLAN 4 Optional Enable WEP on the native VLAN 5 Assign the bridge...

Page 157: ...signate the VLAN as the native VLAN On many networks the native VLAN is VLAN 1 Step 8 bridge group number Assign the subinterface to a bridge group You can number your bridge groups from 1 to 255 Step 9 exit Return to global configuration mode Step 10 interface dot11radio 0 Enter interface configuration mode for the radio interface Step 11 ssid ssid string Create an SSID and enter SSID configurati...

Page 158: ...ional Enable WEP and WEP features on the native VLAN Optional Select the VLAN for which you want to enable WEP and WEP features Set the WEP level and enable TKIP and MIC If you enter optional another bridge can associate to the bridge with or without WEP enabled You can enable TKIP with WEP set to optional but you cannot enable MIC If you enter mandatory other bridges must have WEP enabled to asso...

Page 159: ...N ID 1 IEEE 802 1Q Encapsulation vLAN Trunk Interfaces Dot11Radio0 FastEthernet0 Virtual Dot11Radio0 This is configured as native Vlan for the following interface s Dot11Radio0 FastEthernet0 Virtual Dot11Radio0 Protocols Configured Address Received Transmitted Bridging Bridge Group 1 201688 0 Bridging Bridge Group 1 201688 0 Bridging Bridge Group 1 201688 0 Virtual LAN ID 2 IEEE 802 1Q Encapsulati...

Page 160: ...12 8 Cisco Aironet 1400 Series Wireless Bridges Software Configuration Guide OL 4059 01 Chapter 12 Configuring VLANs Configuring VLANs ...

Page 161: ...he bridge offers best effort service to each packet regardless of the packet contents or size It sends the packets without any assurance of reliability delay bounds or throughput Note For complete syntax and usage information for the commands used in this chapter refer to the Cisco IOS Command Reference for Cisco Aironet Access Points and Bridges for this release This chapter consists of these sec...

Page 162: ...t construct internal DSCP values they only support mapping by assigning IP DSCP Precedence or Protocol values to Layer 2 COS values They carry out EDCF like queuing on the radio egress port only They do only FIFO queueing on the Ethernet egress port They support only 802 1Q P tagged packets Bridges do not support ISL They support only MQC policy map set cos action To contrast the wireless LAN QoS ...

Page 163: ...after previously classified packets 3 Default classification for all packets on VLAN If you set a default classification for all packets on a VLAN that policy is third in the precedence list Note Because client devices cannot associate to the bridge the QoS element for wireless phones setting is not supported on the bridge Configuring QoS QoS is disabled by default This section describes how to co...

Page 164: ...s link to browse to the Cisco Aironet documentation home page http www cisco com cisco web psa default html 2 Follow this path to the product document and chapter Aironet 1400 Series Wireless LAN Products Cisco Aironet 1400 Series Bridges Cisco Aironet 1400 Series Bridge Command Reference Follow these steps to configure QoS Step 1 If you use VLANs on your wireless LAN make sure the necessary VLAN ...

Page 165: ...1 Chapter 13 Configuring QoS Configuring QoS Figure 13 1 QoS Policies Page Step 3 With NEW selected in the Create Edit Policy field type a name for the QoS policy in the Policy Name entry field The name can contain up to 25 alphanumeric characters Do not include spaces in the policy name ...

Page 166: ...lude Best Effort 0 Background 1 Spare 2 Excellent 3 Control Lead 4 Video 100ms Latency 5 Voice 10ms Latency 6 Network Control 7 Step 6 Click the Add button beside the Class of Service menu for IP Precedence The classification appears in the Classifications field To delete a classification select it and click the Delete button beside the Classifications field Step 7 If the packets that you need to ...

Page 167: ...at you selected from the Filter menu The bridge matches your filter selection with your class of service selection Step 12 Click the Add button beside the Class of Service menu for Filter The classification appears in the Classifications field Step 13 If you want to set a default classification for all packets on a VLAN use the Apply Class of Service drop down menu to select the class of service t...

Page 168: ...e or that you use the settings described in section x Changing these values can lead to unexpected blockages of traffic on your wireless LAN and the blockages might be difficult to diagnose If you change these values and find that you need to reset them to defaults use the default settings listed in Table 13 1 The values listed in Table 13 1 are to the power of 2 The bridge computes Contention Win...

Page 169: ... for point to point links However for point to multipoint links you should adjust the settings depending on the number of non root bridges that associate to the root bridge Note If packet concatenation is enabled you need to adjust the CW min and CW max settings only for traffic class 0 Concatenation is enabled by default Table 13 2 CW min and CW max Settings for Point to Point and Point to Multip...

Page 170: ... of service to traffic from Spectralink phones protocol 119 packets The user applies the voice_policy to the incoming and outgoing radio ports and to the outgoing Ethernet port for VLAN 77 Figure 13 3 shows the administrator s QoS Policies page Command Purpose Step 1 configure terminal Enter global configuration mode Step 2 interface dot11radio 0 Enter interface configuration mode for the radio in...

Page 171: ...13 11 Cisco Aironet 1400 Series Wireless Bridges Software Configuration Guide OL 4059 01 Chapter 13 Configuring QoS QoS Configuration Examples Figure 13 3 QoS Policies Page for Voice Example ...

Page 172: ... a QoS policy to a VLAN on your network dedicated to video traffic In this example the network administrator creates a policy named video_policy that applies video class of service to video traffic The user applies the video_policy to the incoming and outgoing radio ports and to the outgoing Ethernet port for VLAN 87 Figure 13 4 shows the administrator s QoS Policies page Figure 13 4 QoS Policies ...

Page 173: ... Filters This chapter describes how to configure and manage MAC address IP and Ethertype filters on the bridge using the web browser interface This chapter contains these sections Understanding Filters page 14 2 Configuring Filters Using the CLI page 14 2 Configuring Filters Using the Web Browser Interface page 14 2 ...

Page 174: ...figuring QoS for detailed instructions on setting up QoS policies Configuring Filters Using the CLI To configure filters using IOS commands you use access control lists ACLs and bridge groups You can find explanations of these concepts and instructions for implementing them in these documents Cisco IOS Bridging and IBM Networking Configuration Guide Release 12 2 Click this link to browse to the Co...

Page 175: ...er or both the Ethernet and radio ports and to either or both incoming and outgoing packets Note MAC address filters are powerful and you can lock yourself out of the bridge if you make a mistake setting up the filters If you accidentally lock yourself out of your bridge use the CLI to disable the filters or use the Mode button on the bridge power injector to reset the bridge to factory defaults U...

Page 176: ...s from left to right the filter checks against the MAC address For example to require an exact match with the MAC address to check all bits enter FFFF FFFF FFFF To check only the first 4 bytes enter FFFF FFFF 0000 Step 6 Select Forward or Block from the Action menu Step 7 Click Add The MAC address appears in the Filters Classes field To remove the MAC address from the Filters Classes list select i...

Page 177: ...allow the use of specific protocols through the bridge s Ethernet and radio ports and IP address filters allow or prevent the forwarding of unicast and multicast packets either sent from or addressed to specific IP addresses You can create a filter that passes traffic to all addresses except those you specify or you can create a filter that blocks traffic to all addresses except those you specify ...

Page 178: ...uring Filters Configuring Filters Using the Web Browser Interface Figure 14 3 IP Filters Page Follow this link path to reach the IP Filters page 1 Click Services in the page navigation bar 2 In the Services page list click Filters 3 On the Apply Filters page click the IP Filters tab at the top of the page ...

Page 179: ...tion menu Step 8 Click Add The address appears in the Filters Classes field To remove the address from the Filters Classes list select it and click Delete Class Repeat Step 5 through Step 8 to add addresses to the filter If you do not need to add IP protocol or IP port elements to the filter skip to Step 15 to save the filter on the bridge Step 9 To filter an IP protocol select one of the commmon ...

Page 180: ...io ports and to either or both incoming and outgoing packets Step 18 Click Apply The filter is enabled on the selected ports Configuring and Enabling Ethertype Filters Ethertype filters prevent or allow the use of specific protocols through the bridge s Ethernet and radio ports You can apply the filters you create to either or both the Ethernet and radio ports and to either or both incoming and ou...

Page 181: ...new filter make sure NEW the default is selected in the Create Edit Filter Index menu To edit an existing filter select the filter number from the Create Edit Filter Index menu Step 3 In the Filter Index field name the filter with a number from 200 to 299 The number you assign creates an access control list ACL for the filter Step 4 Enter an Ethertype number in the Add Ethertype field See Appendix...

Page 182: ...k as the action for all of them you must choose Forward All as the filter s default action Step 9 Click Apply The filter is saved on the bridge but it is not enabled until you apply it on the Apply Filters page Step 10 Click the Apply Filters tab to return to the Apply Filters page Figure 14 6 shows the Apply Filters page Figure 14 6 Apply Filters Page Step 11 Select the filter number from one of ...

Page 183: ...on your bridge Note For complete syntax and usage information for the commands used in this chapter refer to the Cisco Aironet 1400 Series Bridge Command Reference for this release and the Cisco IOS Configuration Fundamentals Command Reference for Release 12 2 This chapter contains these sections Understanding CDP page 15 2 Configuring CDP page 15 2 Monitoring and Maintaining CDP page 15 5 ...

Page 184: ...thernet and radio ports by default Note For best performance on your wireless LAN disable CDP on all radio interfaces and on sub interfaces if VLANs are enabled on the bridge Configuring CDP This section contains CDP configuration information and procedures Default CDP Configuration page 15 2 Configuring the CDP Characteristics page 15 3 Disabling and Enabling CDP page 15 3 Disabling and Enabling ...

Page 185: ...oldtime value of 120 seconds Sending CDP packets every 50 seconds For additional CDP show commands see the Monitoring and Maintaining CDP section on page 15 5 Disabling and Enabling CDP CDP is enabled by default Beginning in Priveleged Exec mode follow these steps to disable the CDP device discovery capability Command Purpose Step 1 configure terminal Enter global configuration mode Step 2 cdp hol...

Page 186: ...fig if end Command Purpose Step 1 configure terminal Enter global configuration mode Step 2 cdp run Enable CDP after disabling it Step 3 end Return to privileged EXEC mode Command Purpose Step 1 configure terminal Enter global configuration mode Step 2 interface interface id Enter interface configuration mode and enter the interface on which you are disabling CDP Step 3 no cdp enable Disable CDP o...

Page 187: ...P table of information about neighbors show cdp Display global information such as frequency of transmissions and the holdtime for packets being sent show cdp entry entry name protocol version Display information about a specific neighbor You can enter an asterisk to display all CDP neighbors or you can enter the name of the neighbor about which you want information You can also limit the display ...

Page 188: ...formation for talSwitch14 IP address 172 20 135 194 Protocol information for tstswitch2 IP address 172 20 135 204 IP address 172 20 135 202 Protocol information for tstswitch2 IP address 172 20 135 204 IP address 172 20 135 202 bridge show cdp interface GigabitEthernet0 1 is up line protocol is up Encapsulation ARPA Sending CDP packets every 60 seconds Holdtime is 180 seconds GigabitEthernet0 2 is...

Page 189: ...or Capability Codes R Router T Trans Bridge B Source Route Bridge S Switch H Host I IGMP r Repeater Device IDLocal IntrfceHoldtmeCapabilityPlatformPort ID Perdido2Gig 0 6125R S IWS C3550 1Gig0 6 Perdido2Gig 0 5125R S IWS C3550 1Gig 0 5 bridge show cdp traffic CDP counters Total packets output 50882 Input 52510 Hdr syntax 0 Chksum error 0 Encaps failed 0 No memory 0 Invalid packet 0 Fragmented 0 CD...

Page 190: ...15 8 Cisco Aironet 1400 Series Wireless Bridges Software Configuration Guide OL 4059 01 Chapter 15 Configuring CDP Monitoring and Maintaining CDP ...

Page 191: ...your bridge Note For complete syntax and usage information for the commands used in this chapter refer to the Cisco IOS Command Reference for Cisco Aironet Access Points and Bridges for this release and to the Cisco IOS Configuration Fundamentals Command Reference for Release 12 2 This chapter consists of these sections Understanding SNMP page 16 2 Configuring SNMP page 16 4 Displaying SNMP Status...

Page 192: ...nager Functions page 16 3 SNMP Agent Functions page 16 3 SNMP Community Strings page 16 3 Using SNMP to Access MIB Variables page 16 4 SNMP Versions This software release supports these SNMP versions SNMPv1 The Simple Network Management Protocol a full Internet standard defined in RFC 1157 SNMPv2C which has these features SNMPv2 Version 2 of the Simple Network Management Protocol a draft Internet ...

Page 193: ...ited to when a port or module goes up or down when spanning tree topology changes occur and when authentication failures occur SNMP Community Strings SNMP community strings authenticate access to MIB objects and function as embedded passwords In order for the NMS to access the bridge the community string definitions on the NMS must match at least one of the three community string definitions on th...

Page 194: ...ertain events to the SNMP manager which receives and processes the traps Traps are messages alerting the SNMP manager to a condition on the network such as improper user authentication restarts link status up or down MAC address tracking and so forth The SNMP agent also responds to MIB related queries sent by the SNMP manager in get request get next request and set request format Figure 16 1 SNMP ...

Page 195: ...ne or more of these characteristics associated with the string An access list of IP addresses of the SNMP managers that are permitted to use the community string to gain access to the agent A MIB view which defines the subset of all MIB objects accessible to the given community Read and write or read only permission for the MIB objects accessible to the community Note In the current IOS MIB agent ...

Page 196: ... management stations to retrieve and modify MIB objects By default the community string permits read only access to all objects Note To access the IEEE802dot11 MIB you must enable either a separate community string and view on the IEEE802dot11 MIB or a common view and community string on the ISO object in the MIB object tree Step 3 access list access list number deny permit source source wildcard ...

Page 197: ...d and no traps are issued Bridges running this IOS release can have an unlimited number of trap managers Community strings can be any length Table 16 3 describes the supported bridge traps notification types You can enable any or all of these traps and configure a trap manager to receive them Some notification types cannot be controlled with the snmp server enable global configuration command such...

Page 198: ...cify informs to send SNMP informs to the host Specify the SNMP version to support Version 1 the default is not available with informs Note Though visible in the command line help string the version 3 keyword SNMPv3 is not supported For community string specify the string to send with the notification operation Though you can set this string using the snmp server host command we recommend that you ...

Page 199: ...d only permissions using the community string public This configuration does not cause the bridge to send any traps bridge config snmp server community public This example shows how to assign the strings open and ieee to SNMP to allow read write access for both and to specify that open is the community string for queries on non IEEE802dot11 MIB objects and ieee is the community string for queries ...

Page 200: ...e community string public bridge config snmp server community comaccess ro 4 bridge config snmp server enable traps snmp authentication bridge config snmp server host cisco com version 2c public This example shows how to send Entity MIB traps to the host cisco com The community string is restricted The first line enables the bridge to send Entity MIB traps in addition to any traps previously enabl...

Page 201: ... and download software images Note For complete syntax and usage information for the commands used in this chapter refer to the Cisco IOS Command Reference for Cisco Aironet Access Points and Bridges for this release and the Cisco IOS Configuration Fundamentals Command Reference for Release 12 2 This chapter consists of these sections Working with the Flash File System page 17 2 Working with Confi...

Page 202: ...ry page 17 4 Creating and Removing Directories page 17 4 Copying Files page 17 5 Deleting Files page 17 5 Creating Displaying and Extracting tar Files page 17 6 Displaying the Contents of a File page 17 8 Displaying Available File Systems To display the available file systems on your bridge use the show file systems privileged EXEC command as shown in this example BR show file systems File Systems...

Page 203: ...ain a configuration file with the same name Similarly before copying a Flash configuration file to another location you might want to verify its filename for use in another command Type Type of file system flash The file system is for a Flash memory device network The file system is for a network device nvram The file system is for a nonvolatile RAM NVRAM device opaque The file system is a locally...

Page 204: ...les on a file system show file information file url Display information about a specific file show file descriptors Display a list of open file descriptors File descriptors are the internal representations of open files You can use this command to see if another user has a file open Command Purpose Step 1 dir filesystem Display the directories on the specified file system For filesystem use flash ...

Page 205: ... NVRAM section of Flash memory to be used as the configuration during system initialization Network file system URLs include ftp rcp and tftp and have the following syntax File Transfer Protocol FTP ftp username password location directory filename Remote Copy Protocol RCP rcp username location directory filename Trivial File Transfer Protocol TFTP tftp location directory filename Local writable f...

Page 206: ...r File To create a tar file and write files into it use this privileged EXEC command archive tar create destination url flash file url For destination url specify the destination URL alias for the local or network file system and the name of the tar file to create These options are supported For the local Flash file system the syntax is flash file url For the File Transfer Protocol FTP the syntax ...

Page 207: ...ws how to display the contents of the c1200 k9w7 mx 122 8 JA tar file that is in Flash memory BR archive tar table flash c1200 k9w7 mx 122 8 JA tar info 219 bytes c1400 k9w7 mx 122 11 JA directory c1400 k9w7 mx 122 11 JA html directory c1400 k9w7 mx 122 11 JA html foo html 0 bytes c1400 k9w7 mx 122 11 JA c1200 k9w7 mx 122 8 JA bin 610856 bytes c1400 k9w7 mx 122 11 JA info 219 bytes info ver 219 by...

Page 208: ...Files This section describes how to create load and maintain configuration files Configuration files contain commands entered to customize the function of the Cisco IOS software To better benefit from these instructions your bridge contains a minimal default running configuration for interacting with the system software You can copy download configuration files from a TFTP FTP or RCP server to the...

Page 209: ...nds as it executes the file The copy ftp rcp tftp system running config privileged EXEC command loads the configuration files on the bridge as if you were entering the commands at the command line The bridge does not erase the existing running configuration before adding the commands If a command in the copied configuration file replaces a command in the existing configuration file the existing co...

Page 210: ...nfiguration files you create download from another bridge or download from a TFTP server You can copy upload configuration files to a TFTP server for storage This section includes this information Preparing to Download or Upload a Configuration File by Using TFTP page 17 10 Downloading the Configuration File by Using TFTP page 17 11 Uploading the Configuration File by Using TFTP page 17 11 Prepari...

Page 211: ...ation File by Using TFTP section on page 17 10 Step 3 Log into the bridge through a Telnet session Step 4 Download the configuration file from the TFTP server to configure the bridge Specify the IP address or host name of the TFTP server and the name of the file to download Use one of these privileged EXEC commands copy tftp location directory filename system running config copy tftp location dire...

Page 212: ...d The password set by the ip ftp password password global configuration command if the command is configured The bridge forms a password named username apname domain The variable username is the username associated with the current session apname is the configured host name and domain is the domain of the bridge The username and password must be associated with an account on the FTP server If you ...

Page 213: ... FTP server it must be properly configured to accept the write request from the user on the bridge For more information refer to the documentation for your FTP server Downloading a Configuration File by Using FTP Beginning in privileged EXEC mode follow these steps to download a configuration file by using FTP This example shows how to copy a configuration file named host1 confg from the netadmin1...

Page 214: ... File by Using FTP Beginning in privileged EXEC mode follow these steps to upload a configuration file by using FTP This example shows how to copy the running configuration file named ap2 confg to the netadmin1 directory on the remote host with an IP address of 172 16 101 101 BR copy system running config ftp netadmin1 mypass 172 16 101 101 ap2 confg Write file ap2 confg on host 172 16 101 101 con...

Page 215: ... copying a file from one place to another you must have read permission on the source file and write permission on the destination file If the destination file does not exist RCP creates it for you The RCP requires a client to send a remote username with each RCP request to a server When you copy a configuration file from the bridge to a server the Cisco IOS software sends the first valid username...

Page 216: ...a Telnet session and you have a valid username this username is used and you do not need to set the RCP username Include the username in the copy command if you want to specify a username for only that copy operation When you upload a file to the RCP server it must be properly configured to accept the RCP write request from the user on the bridge For UNIX systems you must add an entry to the rhost...

Page 217: ...5 255 172 16 101 101 Name of configuration file rtr2 confg host2 confg Configure using host2 confg from 172 16 101 101 confirm Connected to 172 16 101 101 Loading 1112 byte file host2 confg OK OK BR SYS 5 CONFIG_NV Non volatile store configured from host2 config by rcp from 172 16 101 101 Uploading a Configuration File by Using RCP Beginning in privileged EXEC mode follow these steps to upload a c...

Page 218: ...ap2 confg on host 172 16 101 101 confirm OK Clearing Configuration Information This section describes how to clear configuration information Deleting a Stored Configuration File Caution You cannot restore a file after it has been deleted To delete a saved configuration from Flash memory use the delete flash filename privileged EXEC command Depending on the setting of the file prompt global configu...

Page 219: ...age 17 20 Copying Image Files by Using FTP page 17 23 Copying Image Files by Using RCP page 17 27 Reloading the Image Using the Web Browser Interface page 17 32 Reloading the Image Using the Power Injector MODE button page 17 33 Note For a list of software images and supported upgrade paths refer to the release notes for your bridge Image Location on the Bridge The IOS image is stored in a directo...

Page 220: ... TFTP page 17 22 Preparing to Download or Upload an Image File by Using TFTP Before you begin downloading or uploading an image file by using TFTP perform these tasks Ensure that the workstation acting as the TFTP server is properly configured On a Sun workstation make sure that the etc inetd conf file contains this line tftp dgram udp wait root usr etc in tftpd in tftpd p s tftpboot Make sure tha...

Page 221: ...Make sure the TFTP server is properly configured see the Preparing to Download or Upload an Image File by Using TFTP section on page 17 20 Step 2 Log into the bridge through a Telnet session Step 3 archive download sw overwrite reload tftp location directory image name Download the image file from the TFTP server to the bridge and overwrite the current image The overwrite option overwrites the sof...

Page 222: ...sion string and the system boot path variable is updated to point to the newly installed image If you kept the old image during the download process you specified the leave old sw keyword you can remove it by entering the delete force recursive filesystem file url privileged EXEC command For filesystem use flash for the system board Flash device For file url enter the directory name of the old ima...

Page 223: ...bridge to a server by using FTP the Cisco IOS software sends the first valid username in this list The username specified in the archive download sw or archive upload sw privileged EXEC command if a username is specified The username set by the ip ftp username username global configuration command if the command is configured Anonymous The bridge sends the first valid password in this list The pas...

Page 224: ...rname Include the username in the archive download sw or archive upload sw privileged EXEC command if you want to specify a username for that operation only When you upload an image file to the FTP server it must be properly configured to accept the write request from the user on the bridge For more information refer to the documentation for your FTP server Downloading an Image File by Using FTP Y...

Page 225: ...ownloaded image The reload option reloads the system after downloading the image unless the configuration has been changed and not saved For username password specify the username and password these must be associated with an account on the FTP server For more information see the Preparing to Download or Upload an Image File by Using FTP section on page 17 23 For location specify the IP address of...

Page 226: ...rd Flash device For file url enter the directory name of the old software image All the files in the directory and the directory are removed Uploading an Image File by Using FTP You can upload an image from the bridge to an FTP server You can later download this image to the same bridge or to another bridge of the same type Caution For the download and upload algorithms to operate properly do not ...

Page 227: ... bridge Unlike TFTP which uses User Datagram Protocol UDP a connectionless protocol RCP uses TCP which is connection oriented To use RCP to copy files the server from or to which you will be copying files must support RCP The RCP copy commands rely on the rsh server or daemon on the remote system To copy files by using RCP you do not need to create a server for file distribution as you do with TFT...

Page 228: ... server supports the remote shell rsh Ensure that the bridge has a route to the RCP server The bridge and the server must be in the same subnetwork if you do not have a router to route traffic between subnets Check connectivity to the RCP server by using the ping command If you are accessing the bridge through a Telnet session and you do not have a valid username make sure that the current RCP use...

Page 229: ...tep is required only if you override the default remote username see Steps 4 and 5 Step 4 ip rcmd remote username username Optional Specify the remote username Step 5 end Return to privileged EXEC mode Step 6 archive download sw overwrite reload rcp username location directory image na me tar Download the image file from the RCP server to the bridge and overwrite the current image The overwrite op...

Page 230: ... flash The image is placed into a new directory named with the software version string and the BOOT environment variable is updated to point to the newly installed image If you kept the old software during the download process you specified the leave old sw keyword you can remove it by entering the delete force recursive filesystem file url privileged EXEC command For filesystem use flash for the ...

Page 231: ...Step 1 Verify that the RCP server is properly configured by referring to the Preparing to Download or Upload an Image File by Using RCP section on page 17 27 Step 2 Log into the bridge through a Telnet session Step 3 configure terminal Enter global configuration mode This step is required only if you override the default remote username see Steps 4 and 5 Step 4 ip rcmd remote username username Opt...

Page 232: ...re Upgrade The HTTP Upgrade screen appears Step 6 Click the Browse button to locate the image file on your PC Step 7 Click the Upload button For additional information click the Help icon on the Software Upgrade screen Browser TFTP Interface The TFTP interface allows you to use a TFTP server on a network device to load the bridge image file Follow the instructions below to use a TFTP server Step 1...

Page 233: ...ion settings to factory defaults including passwords WEP keys the bridge IP address and SSIDs Follow the steps below to reload the bridge image file Step 1 The PC you intend to use must be configured with a static IP address in the range of 10 0 0 2 to 10 0 0 30 Step 2 Make sure that the PC contains the bridge image file in the TFTP server folder and the TFTP server is activated Step 3 Connect the...

Page 234: ...17 34 Cisco Aironet 1400 Series Wireless Bridges Software Configuration Guide OL 4059 01 Chapter 17 Managing Firmware and Configurations Working with Software Images ...

Page 235: ...tem message logging on your bridge Note For complete syntax and usage information for the commands used in this chapter refer to the Cisco IOS Configuration Fundamentals Command Reference for Release 12 2 This chapter consists of these sections Understanding System Message Logging page 18 2 Configuring System Message Logging page 18 2 Displaying the Logging Configuration page 18 12 ...

Page 236: ...by saving them to a properly configured syslog server The bridge software saves syslog messages in an internal buffer You can remotely monitor system messages by accessing the bridge through Telnet or by viewing the logs on a syslog server Configuring System Message Logging This section describes how to configure system message logging It contains this configuration information System Log Message ...

Page 237: ...number only if the service sequence numbers global configuration command is configured For more information see the Enabling and Disabling Sequence Numbers in Log Messages section on page 18 6 timestamp formats mm dd hh mm ss or hh mm ss short uptime or d h long uptime Date and time of the message or event This information appears only if the service timestamps log datetime log global configuratio...

Page 238: ...and output The logging synchronous global configuration command also affects the display of messages to the console When this command is enabled messages appear only after you press Return For more information see the Enabling and Disabling Timestamps on Log Messages section on page 18 6 To re enable message logging after it has been disabled use the logging on global configuration command Timesta...

Page 239: ...2 logging buffered size level Log messages to an internal buffer The default buffer size is 4096 The range is 4096 to 2147483647 bytes Levels include emergencies 0 alerts 1 critical 2 errors 3 warnings 4 notifications 5 informational 6 and debugging 7 Note Do not make the buffer size too large because the bridge could run out of memory for other tasks Use the show memory privileged EXEC command to...

Page 240: ...y refer to a single message By default sequence numbers in log messages are not displayed Beginning in privileged EXEC mode follow these steps to enable sequence numbers in log messages To disable sequence numbers use the no service sequence numbers global configuration command Command Purpose Step 1 configure terminal Enter global configuration mode Step 2 service timestamps log uptime or service...

Page 241: ...ging monitor global configuration command To disable logging to syslog servers use the no logging trap global configuration command Command Purpose Step 1 configure terminal Enter global configuration mode Step 2 logging console level Limit messages logged to the console By default the console receives debugging messages and numerically lower levels see Table 18 3 on page 18 8 Step 3 logging monit...

Page 242: ...age is only for information bridge functionality is not affected Limiting Syslog Messages Sent to the History Table and to SNMP If you have enabled syslog message traps to be sent to an SNMP network management station by using the snmp server enable trap global configuration command you can change the level of messages sent and stored in the bridge history table You can also change the number of m...

Page 243: ...gging rate limit global configuration command Command Purpose Step 1 configure terminal Enter global configuration mode Step 2 logging history level1 1 Table 18 3 lists the level keywords and severity level For SNMP usage the severity level values increase by 1 For example emergencies equal 1 not 0 and critical equals 3 not 2 Change the default level of syslog messages stored in the history file a...

Page 244: ...ion on the facilities The debug keyword specifies the syslog level see Table 18 3 on page 18 8 for information on the severity levels The syslog daemon sends messages at this level or at a more severe level to the file specified in the next field The file must already exist and the syslog daemon must have permission to write to it Step 2 Create the log file by entering these commands at the UNIX s...

Page 245: ...slog servers receive informational messages and lower See Table 18 3 on page 18 8 for level keywords Step 4 logging facility facility type Configure the syslog facility See Table 18 4 on page 18 11 for facility type keywords The default is local7 Step 5 end Return to privileged EXEC mode Step 6 show running config Verify your entries Step 7 copy running config startup config Optional Save your ent...

Page 246: ...aying the Logging Configuration To display the current logging configuration and the contents of the log buffer use the show logging privileged EXEC command For information about the fields in this display refer to the Cisco IOS Configuration Fundamentals Command Reference for Release 12 2 To display the logging history file use the show logging history privileged EXEC command ...

Page 247: ... to date detailed troubleshooting information refer to the Cisco TAC website at the following URL select Hardware Support Wireless Devices http www cisco com tac Sections in this chapter include Checking the Bridge LEDs page 19 2 Power Injector LEDs page 19 4 Checking Basic Configuration Settings page 19 7 Antenna Alignment page 19 8 Resetting to the Default Configuration page 19 8 Reloading the B...

Page 248: ...s the unit s status For information on using the LEDs during the installation and alignment of the bridge antenna refer to the Bridge LEDs section in the Cisco Aironet 1400 Series Wireless Bridge Hardware Installation Guide Click this link to browse to the Hardware Installation Guide http www cisco com en US docs wireless bridge 1400 installation guide 1400hig4 html Figure 19 1 shows the bridge LE...

Page 249: ...s or improper antenna alignment You should check the SSID and security settings of all bridges and verify antenna alignment If the problem continues contact technical support for assistance Green Root mode associated to at least one remote bridge Non root mode associated to the root bridge This is normal operation Blinking amber General warning disconnect and reconnect the power injector power jac...

Page 250: ...ector detects the returned discovery tone it applies 48 VDC to the dual coax cables to the bridge When power is applied to the bridge the bridge activates the bootloader and begins the POST operations The bridge begins to load the IOS image when the Post operations are successfully completed Upon successfully loading the IOS image the bridge initializes and tests the radio Table 19 2 Bridge LED Bl...

Page 251: ...D Indications Uplink Activity Injector Status Ethernet Activity Description Off Wired LAN Ethernet link is not active Green Wired LAN Ethernet link is operational Blinking Green Transmitting and receiving packets over the wired LAN Ethernet link Amber Power injector internal memory error disconnect and reconnect the power injector power plug If the problem continues contact technical support for a...

Page 252: ... the IOS image Blinking Green Bridge power is active and the bridge is loading IOS image or POST operation has started Blinking Amber Bridge has not been detected and bridge power is not active This might be caused by bad connections or a defective cable or connector Verify that the dual coax cables are connected correctly to the power injector grounding block and bridge If the cables are connecte...

Page 253: ...perly connected to the power injector the grounding block and the bridge If the dual coax cable is connected properly and not defective contact technical support for assistance Checking Basic Configuration Settings Mismatched basic settings are the most common causes of lost wireless connectivity If the bridge does not associate with a remote bridge check the following areas SSID To associate all ...

Page 254: ...ignment instructions refer to the Cisco Aironet 1400 Series Wireless Bridge Mounting Instructions that shipped with your bridge Resetting to the Default Configuration If you forget the password that allows you to configure the bridge you may need to completely reset the configuration You can use the MODE button on the power injector or the web browser interface Note The following steps reset all c...

Page 255: ... static IP address the IP address does not change Step 8 After the bridge reboots you must reconfigure the bridge by using the Web browser interface the Telnet interface or IOS commands Reloading the Bridge Image If your bridge has a firmware failure you must reload the complete bridge image file using the Web browser interface or by pressing and holding the MODE button for around 30 seconds You c...

Page 256: ...elnet interface or IOS commands Note The bridge is configured with the factory default values including the IP address set to receive an IP address using DHCP To obtain the bridge s new IP address refer to the Using the IP Setup Utility section on page 2 8 Web Browser Interface You can also use the Web browser interface to reload the bridge image file The Web browser interface supports loading the...

Page 257: ...me for the bridge image file c1410 k9w7 tar 122 13 JA tar in the Upload New System Image Tar File field If the file is located in a subdirectory of the TFTP server root directory include the relative path of the TFTP server root directory with the filename If the file is in the TFTP root directory enter only the filename Step 9 Click Upload For additional information click the Help icon on the Sof...

Page 258: ...ile again to download it Step 10 Save the file to a directory on your hard drive and then exit the Internet browser Obtaining the TFTP Server Software You can download TFTP server software from several web sites Cisco recommends the shareware TFTP utility available at this URL http tftpd32 jounin net Follow the instructions on the website for installing and using the utility ...

Page 259: ...4059 01 A P P E N D I X A Channels and Antenna Settings This appendix lists the IEEE 802 11a 5 GHz channels and maximum power levels for the bridge supported by the Americas regulatory domain These topics are covered in this appendix Channels page A 2 Maximum Power Levels page A 2 ...

Page 260: ...s the maximum power levels and antenna gains allowed Table A 1 Channels for IEEE 802 11a Channel Identifier Center Frequency MHz Regulatory Domains Americas A 149 5745 X 153 5765 X 157 5785 X 161 5805 X Table A 2 Maximum Power Levels and Antenna Gains Regulatory Domains Maximum Power Settings Orientation 9 dBi Omnidirectional Antenna 9 5 dBi Sector Antenna 22 5 dBi Integrated Antenna 28 dBi Dish A...

Page 261: ...e of the protocols that you can filter on the bridge The tables include Table E 1 Ethertype Protocols Table E 2 IP Protocols Table E 3 IP Port Protocols In each table the Protocol column lists the protocol name the Additional Identifier column lists other names for the same protocol and the ISO Designator column lists the numeric designator for each protocol ...

Page 262: ...eley Trailer Negotiation 0x1000 LAN Test 0x0708 X 25 Level3 X 25 0x0805 Banyan 0x0BAD CDP 0x2000 DEC XNS XNS 0x6000 DEC MOP Dump Load 0x6001 DEC MOP MOP 0x6002 DEC LAT LAT 0x6004 Ethertalk 0x809B Appletalk ARP Appletalk AARP 0x80F3 IPX 802 2 0x00E0 IPX 802 3 0x00FF Novell IPX old 0x8137 Novell IPX new IPX 0x8138 EAPOL old 0x8180 EAPOL new 0x888E Telxon TXP TXP 0x8729 Aironet DDP DDP 0x872D Enet Co...

Page 263: ... Designator dummy 0 Internet Control Message Protocol ICMP 1 Internet Group Management Protocol IGMP 2 Transmission Control Protocol TCP 6 Exterior Gateway Protocol EGP 8 PUP 12 CHAOS 16 User Datagram Protocol UDP 17 XNS IDP IDP 22 ISO TP4 TP4 29 ISO CNLP CNLP 80 Banyan VINES VINES 83 Encapsulation Header encap_hdr 98 Spectralink Voice Protocol SVP Spectralink 119 raw 255 ...

Page 264: ...ote 17 Message Send Protocol msp 18 ttytst source chargen 19 FTP Data ftp data 20 FTP Control 21 ftp 21 Secure Shell 22 ssh 22 Telnet 23 Simple Mail Transport Protocol SMTP mail 25 time timserver 37 Resource Location Protocol RLP 39 IEN 116 Name Server name 42 whois nicname 43 43 Domain Name Server DNS domain 53 MTP 57 BOOTP Server 67 BOOTP Client 68 TFTP 69 gopher 70 rje netrjs 77 finger 79 Hyper...

Page 265: ...ws nntp 119 Network Time Protocol ntp 123 NETBIOS Name Service netbios ns 137 NETBIOS Datagram Service netbios dgm 138 NETBIOS Session Service netbios ssn 139 Interim Mail Access Protocol v2 Interim Mail Access Protocol IMAP2 143 Simple Network Management Protocol SNMP 161 SNMP Traps snmp trap 162 ISO CMIP Management Over IP CMIP Management Over IP cmip man CMOT 163 ISO CMIP Agent Over IP cmip age...

Page 266: ... 515 talk 517 ntalk 518 route RIP 520 timeserver timed 525 newdate tempo 526 courier RPC 530 conference chat 531 netnews 532 netwall wall 533 UUCP Daemon UUCP uucpd 540 Kerberos rlogin klogin 543 Kerberos rsh kshell 544 rfs_server remotefs 556 Kerberos kadmin kerberos adm 749 network dictionary webster 765 SUP server supfilesrv 871 swat for SAMBA swat 901 SUP debugging supfiledbg 1127 ingreslock 1...

Page 267: ...Pv2 This appendix contains these sections MIB List page C 1 Using FTP to Access the MIB Files page C 2 MIB List BRIDGE MIB CISCO AAA SERVER MIB CISCO CDP MIB CISCO CLASS BASED QOS MIB CISCO CONFIG COPY MIB CISCO CONFIG MAN MIB CISCO DOT11 ASSOCIATION MIB CISCO DOT11 IF MIB CISCO ENTITY VENDORTYPE OID MIB CISCO ENV MON MIB CISCO FLASH MIB CISCO IETF DOT11 QOS MIB CISCO IETF DOT11 QOS EXT MIB CISCO ...

Page 268: ...RFC1213 MIB RFC1398 MIB SNMPv2 MIB SNMPv2 SMI SNMPv2 TC Using FTP to Access the MIB Files Follow these steps to obtain each MIB file by using FTP Step 1 Use FTP to access the server ftp cisco com Step 2 Log in with the username anonymous Step 3 Enter your e mail username when prompted for the password Step 4 At the ftp prompt change directories to pub mibs v1 or pub mibs v2 Step 5 Use the get MIB_...

Page 269: ...essage exactly as it appears and report it to your technical support representative SW_AUTO_UPGRADE 7 FAILURE boot_file_pathent creation failed Auto upgrade of the software failed due to error in creation of pathent internal data structure Copy the error message exactly as it appears and report it to your technical support representative Association Management Messages DOT11 2 RADIO_HW_RESET Radio...

Page 270: ... disassociated from a bridge None DOT11 6 ROAMED Station mac address Roamed to mac address A station has roamed to a new bridge None Unzip Messages SOAP 4 UNZIP_OVERFLOW Failed to unzip Flash c1200 k9w7 mx 122 3 6 JA1 ht ml level15 ap_xxx htm gz exceeds maximum uncompressed html size The HTTP server cannot retrieve a compressed file in response to an HTTP GET request because the size of the file i...

Page 271: ...ne DOT11 4 CANT_ASSOC Cannot associate chars The unit could not establish a connection to a parent bridge for the displayed reason Check the configuration of both the parent bridge and this unit to make sure the basic settings SSID WEP and others match Inter Bridge Protocol Messages DOT11 6 ROAMED Station mac address Roamed to mac address A station has roamed to a new bridge None DOT11 6 STANDBY_A...

Page 272: ...D 4 Cisco Aironet 1400 Series Wireless Bridges Software Configuration Guide OL 4059 01 Appendix D Error and Event Messages ...

Page 273: ...ed of stations without access points antenna gain The gain of an antenna is a measure of the antenna s ability to direct or focus radio energy over a region of space High gain antennas have a more focused radiation pattern in a specific direction associated A station is configured properly to enable it to wirelessly communicate with an access point B beacon A wireless LAN packet that signals the a...

Page 274: ...sion the type of antenna used and the physical environment as well as other factors client A radio device that uses the services of an access point to communicate wirelessly with other devices on a local area network CSMA Carrier sense multiple access A wireless LAN media access method specified by the IEEE 802 11 specification D data rates The range of data transmission rates supported by a devic...

Page 275: ...pending on the physical layer used F file server A repository for files so that a local area network can share files mail and programs firmware Software that is programmed on a memory chip G gateway A device that connects two otherwise incompatible networks GHz Gigahertz One billion cycles per second A unit of measure for frequency I IEEE Institute of Electrical and Electronic Engineers A professi...

Page 276: ... to a primarily circular antenna radiation pattern Orthogonal Frequency Division Multiplex OFDM A modulation technique used by IEEE 802 11a compliant wireless LANs for transmission at 6 9 12 18 24 36 48 and 54 Mbps P packet A basic message unit for communication across a network A packet usually includes routing information data and sometimes error detection information Q quadruple phase shift key...

Page 277: ...h than otherwise required in order to gain benefits such as improved interference tolerance and unlicensed operation SSID Service Set Identifier also referred to as Radio Network Name A unique identifier used to identify a radio network and which stations must use to be able to communicate with each other or to an access point The SSID can be any alphanumeric entry up to a maximum of 32 characters...

Page 278: ...e The WLSE is a specialized appliance for managing Cisco Aironet wireless LAN infrastructures It centrally identifies and configures access points in customer defined groups and reports on throughput and client associations WLSE centralized management capabilities are further enhanced with an integrated template based configuration tool for added configuration ease and improved productivity workst...

Page 279: ...cation types Network EAP 10 3 open 10 2 shared key 10 3 authoritative time source described 5 18 authorization with RADIUS 5 11 11 11 with TACACS 5 14 11 16 11 20 B Back button 3 4 banners configuring login 5 35 message of the day login 5 34 default configuration 5 34 when displayed 5 33 basic settings checking 19 7 bridge image 19 9 C Cancel button 3 4 carrier busy test 6 9 CDP disabling for rout...

Page 280: ...ions when copying 17 5 system contact and location information 16 9 types and location 17 9 uploading preparing 17 10 17 13 17 16 reasons for 17 8 using FTP 17 14 using RCP 17 17 using TFTP 17 11 connections secure remote 5 16 crypto software image 5 16 D daylight saving time 5 29 default commands 4 3 default configuration banners 5 34 DNS 5 32 NTP 5 20 password and privilege level 5 2 RADIUS 5 8 ...

Page 281: ...g the contents of 17 8 tar creating 17 6 displaying the contents of 17 7 extracting 17 7 image file format 17 19 file system displaying available file systems 17 2 displaying file information 17 3 local file system names 17 2 network file system names 17 5 setting the default 17 3 filtering show and more command output 4 8 Flash device number of 17 2 forward delay time STP 8 6 frequencies A 2 FTP ...

Page 282: ...ogging M MAC 2 10 2 11 management options CLI 4 1 Message Integrity Check 9 1 messages to users through banners 5 33 MIBs accessing files with FTP C 2 location of files C 2 overview 16 2 SNMP interaction with 16 4 MIC 9 1 Mode button 17 33 19 9 monitoring CDP 15 5 N Network EAP 10 3 Network Time Protocol See NTP no commands 4 3 NTP associations authenticating 5 20 defined 5 18 enabling broadcast m...

Page 283: ...13 configuring accounting 11 12 authentication 5 8 11 7 authorization 5 11 11 11 communication global 11 5 11 13 communication per server 11 4 11 5 multiple UDP ports 11 5 default configuration 5 8 11 4 defining AAA server groups 5 9 11 9 displaying the configuration 5 12 11 15 identifying the server 11 4 limiting the services to the user 5 11 11 11 method list defined 11 4 operation of 11 3 overv...

Page 284: ...log messages to NMS 18 8 manager functions 16 3 MIBs location of C 2 overview 16 2 16 4 snmp server view 16 9 status displaying 16 10 system contact and location 16 9 trap manager configuring 16 8 traps described 16 3 enabling 16 7 overview 16 2 16 4 types of 16 7 versions supported 16 2 software images location in Flash 17 19 tar file format described 17 19 SSH 4 9 configuring 5 17 crypto softwar...

Page 285: ...tination device 18 5 timestamps enabling and disabling 18 6 UNIX syslog servers configuring the daemon 18 10 configuring the logging facility 18 10 facilities supported 18 11 system name default configuration 5 31 manual configuration 5 31 See also DNS system prompt default setting 5 31 T TAC 19 1 TACACS accounting defined 11 16 authentication defined 11 16 authorization defined 11 16 configuring ...

Page 286: ...ting 19 1 with CiscoWorks 16 4 with system message logging 18 2 U UNIX syslog servers daemon configuration 18 10 facilities supported 18 11 message logging configuration 18 10 upgrading software images See downloading uploading configuration files preparing 17 10 17 13 17 16 reasons for 17 8 using FTP 17 14 using RCP 17 17 using TFTP 17 11 image files preparing 17 20 17 23 17 27 reasons for 17 19 ...

Reviews: