


www.charltonandjenrick.co.uk
21
LT8227 (ISS 1)
SECTION ELEVEN To Install the Appliance (installation instructions)
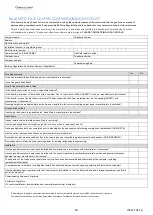
INSTALLING THE APPLIANCE INTO CAVITY WALL
(When installing in a timber framed dwelling reference must be made to the specific installation requirements stated
later in this
Section ‘Installing The Appliance In Timber Framed Dwelling’
)
.
•
Ensure it is a suitable outside wall constructed of non-
combustible materials and that the flue position meets the
requirements previously described in
Section 8
.
•
Mark a horizontal line on the wall at the intended hearth
surface or appliance base height (50mm min for Hole in
Wall installation (the skirting board must be cut away from
behind the fire).
•
Mark a vertical line on the wall at the intended centre of
the appliance up from the horizontal line for a height of
565mm.
•
Mark two more vertical lines 203mm either side of the
centre line for a height of 565mm.
•
Mark a horizontal line at a height of 565mm above the
hearth line, joining the two outside lines together.
•
Mark the position for a lintel above the top horizontal line.
•
Mark a short horizontal line so it crosses the centre line at 438mm above hearth level line. This is the centre point
for the flue hole.
•
Using a long masonry drill, make a pilot hole completely through the wall, ensure the hole is drilled accurately at
the centre and square to the wall both horizontally and vertically.
•
Cut out the brickwork of the inner skin of the cavity wall for the lintel, and position and fix the lintel with mortar.
•
Cut out the brickwork under the lintel, between the two outside vertical lines into the cavity. Ensure the cut-out
width is square, try the appliance into the opening.
•
Using 150mm (6”) core drill, cut a hole following
the pilot hole, drill from the outside through to
the cavity.
•
Remove any cavity insulation from the cut-out
opening and for a further 100mm into the cavity
gap each side and above.
•
Pack “Rockwool” around the sides and top of
the opening into the cavity for a depth of
100mm.
•
Lay the hearth if required so that it is positioned
correctly to the horizontal line.
•
Position and fix the back panel and surround if required.
•
Offer the appliance into the opening and mark through the gas pipe entry hole (see connecting the gas supply later
in this manual).
•
Pass a tape measure through the core-drilled hole and record the distance from the back of the spigots to the
surface of the outside wall.
Centre Line of
Installation
438m
m
Mark out wall for
cavity recessed
installation
203
203
Mark position
of lintel
565
mm
FLOOR SURFACE
HEARTH SURFACE LINE
LINTEL SET
IN POSITION
CAVITY PACKED 100mm
DEEP W ITH ROCKW OOL
ALL FOUR SIDES
OUTER SKIN
OF W ALL
125mm CORE
DRILLED HOLES
CUT OUT IN W ALL FOR
CAVITY RECESSED
INSTALLATIONS


