


▲
!
DEUTSCH
ESPAÑOL
▲
!
13
18
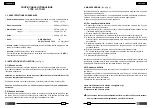
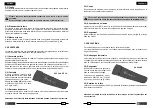
SEGELTUCHTASCHE
2.3) Schneiden
Den Pumparm gleichmäßig betätigen um ein konstantes Vorfahren des Schneidmessers
zu erreichen bis das Kabel geschnitten ist.
D
AS
W
ERKZEUG
IST
ZUM
S
CHNEIDEN
VON
K
UPFER
-, A
LLUMINIUM
UND
T
ELEFONKABELN
GEEIGNET
. N
IEMALS
S
TAHLSEILE
ODER
A
LUMUNIUM
-S
TAHL
S
EILE
SCHNEIDEN
.
2.4) Zurückfahren des Schneidmesser
Durch das Betätigen des Druckablaßhebels (58) fährt der Kolben mit dem Schneidmesser
(18) zurück .
2.5) Nachbereitung
Das Werkzeug sollte nach Beendigung der Arbeit in die Ausgangsposition gebracht und
in die Verpackungseinheit gelegt werden. Der Druck muß vorher vollständig abgelassen
sein (Druckablaßhebel (58) betätigen) siehe § 2.4.
3. HINWEISE
Das Werkzeug ist robust und benötigt keine spezielle Pfl ege oder Instandhaltung.
Zur Erhaltung der Garantieansprüche beachten Sie folgende Hinweise:
3.1) Pfl ege
Dieses hydraulische Werkzeug sollte vor starker Verschmutzung geschützt werden, da
diese für ein hydraulisches System gefährlich ist. Jeden Tag nach der Arbeit sollte das
Werkzeug mit einem Tuch von Schmutz und Staub gereinigt werden; besonders die
beweglichen Teile.
3.2) Lagerung
Wenn das Werkzeug nicht benötigt
wird, sollte es in der Segeltuchtasche
gelagert werden, und ist somit gegen
Beschädigungen wie Stoß und Staub
geschützt.
Die Segeltuchtasche (Typ 010) hat die
Abmasse 545x160 mm (21.4x6.3 in.)
und ein Gewicht von 0,15 kg (0.33 lbs).
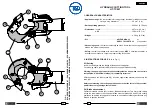
3.3) Drehbewegung des Kopfes
Das Werkzeug ist mit einem Kopf ausgerüstet, der um 90° drehbar ist und somit ein
komfortables Arbeiten ermöglicht.
Der Kopf sollte nicht unter Druck stehend gedreht werden.
BOLSA DE TELA
2.3) Corte
Continuando accionando el mango móvil, se conseguirá un avance gradual y progresivo
de la cuchilla inferior hasta cortar completamente el cable.
E
STA
HERRAMIENTA
HA
SIDO
CONCEBIDA
ESPECÍFICAMENTE
PARA
CORTAR
CABLES
DE
COBRE
,
DE
ALUMINIO
O
PARA
TELECOMUNICACIONES
.
N
O
EMPLEARLA
BAJO
NINGÚN
CONCEPTO
CON
CABLES
DE
ACERO
O
DE
ALUMINIO
-
ACERO
.
2.4) Reapertura de las cuchillas
Presionando la palanca de despresurización (58), situada en el cuerpo (13) de la herra-
mienta, el pistoncillo (49) permitirá el rápido retroceso del pistón principal, y consiguien-
temente, las cuchillas se separarán.
2.5) Posición de reposo
La herramienta debe dejarse en posición de descanso para ser almacenada, cuando el
trabajo haya fi nalizado. Depresurice el aceite, accionando la palanca (58) correspondiente
(ver Epigr. 2.4).
3. ADVERTENCIAS
Esta herramienta es robusta y no requiere cuidados especiales para obtener un funcio-
namiento correcto, bastára observar algunas precauciones sencillas:
3.1) Limpieza adecuada
Tenga presente que el polvo, la arena y la suciedad en general, rapresentan un peligro
para toda herramienta hidráulica.
Tras cada día de uso, se debe limpiar la herramienta con un paño limpio, teniendo cuidado
de eliminar la suciedad depositada, especialmente junto a las partes móviles.
3.2) Almacenamiento
Para proteger la herramienta de
golpes accidentales y del polvo
cuando no se va a utilizar, es con-
veniente guardarla en su bolsa de
tela de cierre hermético.
Dicha bolsa (mod. 010) de dimen-
siones 545x160 mm (21.4x6.3 in.)
y pesa 0,15 kg (0.33 lbs).
3.3) Rotación de la cabeza
La cabeza de la herramienta puede rotar hasta 90° respecto al cuerpo, permitiendo al
operario realizar el trabajo en la posición más adecuada.
Atención: no fuerce la cabeza, intentando rotarla, mientras el circuito hidráulico
esté presurizado.