background image

15

Using the DISC TITLE PRINTER Application

This section describes the computer system required to run the DISC TITLE
PRINTER application.

Your Computer and Minimum System Requirements

PC

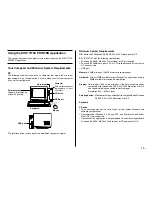
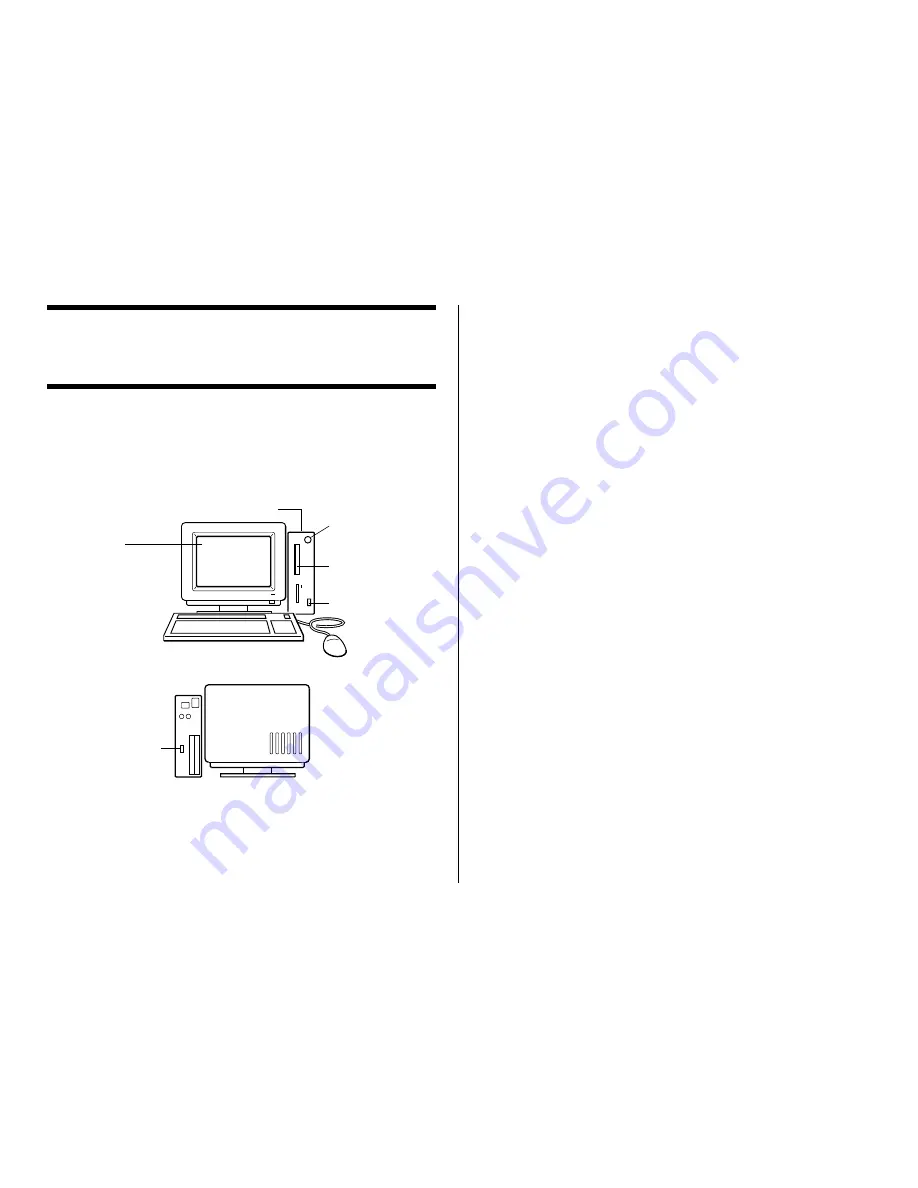
The following shows an example of a computer that meets the minimum
requirements to run the application. Check to make sure that your computer
has a similar configuration.

The locations of the various ports may be different on your computer.

Minimum System Requirements

OS:

Microsoft® Windows® 98, 98SE, Me, 2000 Professional, or XP

PC:

IBM PC/AT with the following specifications.

Windows 98, 98SE, Me, 2000 Professional, or XP pre-installed

Pentium®

II

 266MHz or higher CPU or CPU recommended for running the

OS you are using.

USB port

Memory:

64MB minimum (128MB minimum recommended)

Hard disk:

At least 40MB available for installation of this application, at least

60MB available for running the application.

Display:

Color display (256 colors minimum, High-Color recommended),

compatible with Windows 98, 98SE, Me, 2000 Professional, or XP,
and capable of being connected to your computer.
Resolution: 800 

×

 600 or higher

Pointing device:

Mouse or other equivalent device compatible with Windows

98, 98SE, Me, 2000 Professional, or XP

Keyboard

CD drive

The application may not run correctly on certain system hardware and
software configurations.

Operation under Windows 3.1, 95, and NT®, on a Macintosh®, and under
Mac® OS is not supported.

Operation of this application is not guaranteed on a computer upgraded to
Windows 98, 98SE, Me, 2000 Professional, or XP from another OS.

Computer

With a display adaptor
that supports at least
256 colors.

CD drive

Color display

Capable of displaying
at least 256 colors.

Hard disk

Keyboard

Mouse

USB port

USB port

Summary of Contents for CW-50 - Disc Title Printer Color Thermal Transfer

Page 1: ...eady has data recorded on it may cause the data to become corrupted Note that CASIO COMPUTER CO LTD shall not be held liable for any loss or corruption of data recorded on CD R discs and other media arising through the use of this product Be sure to read the Safety Precautions contained in this manual before trying to use for the first time and always keep this manual on hand for future reference ...

Page 2: ...separation between the equipment and receiver Connect the equipment into an outlet on a circuit different from that to which the receiver is connected Consult the dealer or an experienced radio TV technician for help Caution Changes or modification to the product not expressly approved by CASIO could void the user s authority to operate the product FCC WARNING Changes or modifications not expressl...

Page 3: ... or entity that may arise through the use of this product Reproduction of this manual in any form either in part or its entirety is forbidden without the express permission of CASIO COMPUTER CO LTD You are granted permission to use this software for your own personal use Any and all other use of this software without the express permission of CASIO COMPUTER CO LTD is forbidden under international ...

Page 4: ...fire and electric shock Immediately perform the following steps whenever any of the above symptoms are present 1 Disconnect the USB cable 2 Unplug the power cord from the wall outlet 3 Contact your original retailer Power cord AC adaptor USB cable Misuse of the power cord AC adaptor or USB cable creates the risk of fire and electric shock Make sure you follow the precautions listed below Use only ...

Page 5: ...way any dust built up in the area around the prongs of the power cord s plug Warning Power cord AC adaptor USB cable Never touch the power cord AC adaptor or USB cable or its plugs while your hands are wet Doing so creates the risk of electric shock Dropping and rough treatment Continued use of the product after it has been damaged due to dropping or other rough treatment creates the risk of fire ...

Page 6: ...ecting a non bundled item creates the risk of fire and electric shock High temperature precaution Never touch the print head or other metal objects near the head These items become very hot and touching them creates the risk of burn injury Operating Precautions Observe the following precautions to ensure that the printer provides you with the years of trouble free operation for which it is designe...

Page 7: ...ITLE PRINTER application 30 Label Making with Preset Templates Automated Label Layout 31 Using the Assistant Feature 33 Using the Assistant screen 33 Using the Main Window 34 Importing Text Data 36 Importing CD Text Data for a Music Label 36 Importing Media Player Data for a Music Label 37 Importing Easy CD Creator Data for a Music Label 39 Importing File and Folder Name for a Data Label or Digita...

Page 8: ...y 61 To input text imported from a file 61 To configure font settings for the text in a field 62 To delete a text field 62 Inserting an Image into a Label Free Design Templete 62 To insert an image into a label 62 To delete an image field 62 Resizing a Field Free Design Template 63 Aligning and Resizing Fields Free Design Template 63 To align fields 64 Configuring Field Properties Free Design Temp...

Page 9: ...lly designed to play back CD ROM discs Audio output at a high volume setting creates the risk of damaged hearing and damage to audio speakers Using this Manual This User s Guide explains operation of the CW 50 printer and the DISCTITLE PRINTER application which is designed to run under Windows 98 98SE Me 2000 Professional or XP referred to in this manual collectively as Windows Note that this User...

Page 10: ...rs click New Dialog box button operations are indicated as shown below 3 Click Save All of the sample screens in this manual show operation under Windows XP Screens will be different when running the application under another operating system Note that the screen images shown in this manual may differ somewhat from those that actually appear on your computer screen 1 2 3 ...

Page 11: ... or digital image label template Creating an Original Label Layout page 54 This section describes how to layout text and images to create exactly the type of look you want A Free Text label template gives you wide ranging control over text you input into a label A Free Design label template provides you with maximum freedom when creating your label design Original Label Making This section explain...

Page 12: ...f discs You can also import track names from Windows MediaTM Player or Easy CD Creator or you can import CD Text from a CD page 36 Screen shots shown in this manual are based on Media Player for Windows XP Music Discs Labels can include artist names and track titles page 31 CW 50 Printer Features ...

Page 13: ...nd print them on its label You can also type in information manually pages 31 and 40 Digital Image Discs You can import recording dates and image descriptions from your PC and print them on the label You can also type in information manually pages 31 and 40 Important Business report xls Holiday work xls New employees research data doc Weekly meeting summary doc New order xls Counter error data doc...

Page 14: ...s installed on your PC page 48 Support for both text and images page 50 Note that images are printed in monochrome A collection of preset templates lets you produce great looking labels with minimum effort CW 50 Printer Features ...

Page 15: ...ate allows more control over the appearance and layout of text Free Text page 54 A Free Design template gives you almost total freedom for laying out text and images to create exactly the look you want Free Design page 54 ...

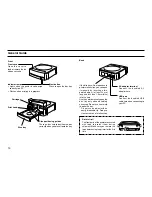
Page 16: ...ere If the disc tray will not open due to printer malfunction you can open it manually by inserting a thin pointed object at least 20 mm long and less than 1 5 mm thick into this hole Use this hole to manually open the disc tray only when absolutely necessary Do not use it normally to open the tray Do not use an object with an easily breakable tip Doing so creates the risk of malfunction USB port ...

Page 17: ...commended Hard disk At least 40MB available for installation of this application at least 60MB available for running the application Display Color display 256 colors minimum High Color recommended compatible with Windows 98 98SE Me 2000 Professional or XP and capable of being connected to your computer Resolution 800 600 or higher Pointing device Mouse or other equivalent device compatible with Wi...

Page 18: ... up Windows and place the DISCTITLE PRINTER Application CD ROM into your computer s CD drive The installer should start up automatically and display the screen shown below Note Depending on how your PC is configured the above screen may not appear automatically If this screen does not appear on your computer click the Windows Start button and then select Run On the dialog box that appears type in ...

Page 19: ...en the installation is complete Note The InstallShieldWizard Complete screen may not appear in some cases If you can see the DISC TITLE PRINTER icon on your computer s desktop it means that the application is installed properly If you want to change the installation location click Browse 6 Click Finish A DISC TITLE PRINTER shortcut icon should be on your Windows desktop ...

Page 20: ...alog box to appear 3 In the list of installed software click DISC TITLE PRINTER to select it 4 Click the Change Remove button Note Some files may cause a separate confirmation dialog box to appear before they can be deleted If you are unsure about where you should keep a file select No 5 Click Finish This deletes the DISC TITLE PRINTER application List of installed software ...

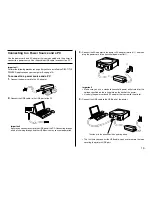
Page 21: ...ou connect directly to the USB port of the PC Connecting through a hub or chaining through another USB device may cause misoperation 3 Connect the AC adaptor to the printer s AC adaptor terminal 1 and then plug the power cord into a household power outlet 2 1 2 Important Make sure you use a standard household power outlet rated for the voltage specified on the rating plate on the back of the print...

Page 22: ...s both the AC adaptor and USB cable are connected to the printer Connecting for the First Time A USB driver installation Wizard starts up automatically the first time you connect the printer to your computer after installing the DISC TITLE PRINTER appliciation Follow the instructions that appear on the display to install the USB driver If you are running Windows XP the message shown below will app...

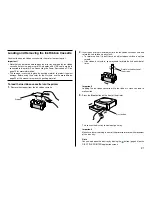
Page 23: ... into the printer 1 Remove the stopper from the ink ribbon cassette 2 Insert a pen or other similar object into the ink ribbon cassette s hub and rotate the hub to take up any slack To rotate the hub it is best to use an object whose surface is not too smooth If the ribbon is very slack you may need to rotate the hub a number of times Important Loading the ink ribbon cassette while the ribbon is s...

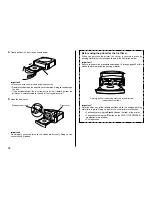
Page 24: ...re using the printer for the first time When you purchase the printer the carrier is secured in place by packing materials at the locations shown in the illustration below Important Be sure to perform the procedures from page 16 through page 22 of this manual before removing the packing material Carefully pull out the packing materials in the direction indicated by the arrows Important Never perfo...

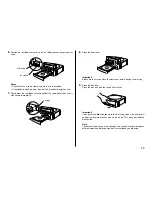
Page 25: ...ace 8 Close the front cover Important Always make sure you close the front cover before closing the disc tray 9 Close the disc tray Press the disc tray with your hand until it clicks Important If you press the Eject button while the disc tray is open the printer will perform an internal process and emit a noise This does not indicate malfunction Note The color of the disc you are printing on can c...

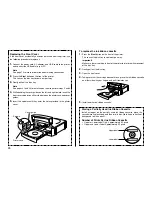
Page 26: ...ovided in the printer cover To replace the ink ribbon cassette 1 Press the Eject button on the front of the printer This causes the disc tray to come out part way Important Make sure there is nothing in front of the printer to interfere with movement of the disc tray 2 Gently pull out the disc tray 3 Open the front cover 4 Taking care that the carriage does not move grasp the ink ribbon cassette o...

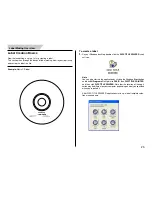
Page 27: ...Windows desktop double click the DISC TITLE PRINTER short cut icon Note You can also start up the application by clicking the Windows Start button and then All Programs Next point to CASIO then DISCTITLE PRINTER and then click DISC TITLE PRINTER Note that the location of the appli cation may be different on your computer depending on what you specified when you installed it After DISC TITLE PRINTE...

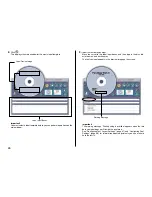
Page 28: ...overflow appears when the text data you input does not fit inside the print area See Configuring Text Layout Settings page 47 and Configuring Font Settings page 48 for information about adjustments you can make to help the text fit 2 Click This displays the main window for the music label template Important You must select a label template before you can perform operations on the main window Label...

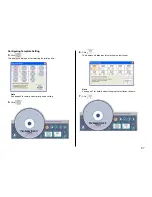
Page 29: ...ys a dialog box for selecting the print pattern Note See page 45 for details about print pattern setting 5 Click 6 Click This displays a dialog box for selecting the text layout Note See page 47 for details about changing the text layout pattern 7 Click ...

Page 30: ... settings 9 Confirm that Title tab is selected Note If a different tab is displayed click Title 10 For Size select 2 11 Click the Artist Name tab 12 Select 2 for Size and then click OK This completes input of the label data Note See page 48 for details about font settings ...

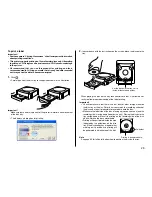
Page 31: ...ay If the disc already has a logo or other marking on it position it so printing will be performed in a blank area of the disc Note See page 69 for full details about how to position the disc on the tray Printing is performed here To print a label Important See the separate Printing Precautions sheet for important information about printing conditions This printer supports printing on 12cm diamete...

Page 32: ... Note See page 67 for details about printing To save label data 1 Click 2 On the menu that appears click Save 3 Check the file name and then click Save The label data is saved in your Windows My Documents folder Note See page 43 for details about saving label data To quit the DISC TITLE PRINTER application 1 Click 2 On the menu that appears click Exit Note You can also quit the application by clic...

Page 33: ...1 On the main window click 2 On the menu that appears click New This displays a dialog box for selecting the label template Select one of these preset tem plates for easy label creation Select one of these templates to cre ate an original layout page 54 3 Click the label template you want to use You can select from among five label templates Selecting a template displays its main window which cont...

Page 34: ...32 Digital Image Label If you want to create your own original layout select the Free Text or Free Design template See Creating an Original Label Layout on page 54 for more information ...

Page 35: ... is displayed Using the Assistant Screen When you are unsure of DISC TITLE PRINTER application operations Follow the instructions on the Assistant screen for quick and easy labels Even after you are accustomed to making labels Since the Assistant screen changes in accordance with the operation you are performing on the main window you can refer to it whenever you need a bit of advice When this opt...

Page 36: ... this Create a new label page 31 Open an existing label data Save label data you are currently working on Import CD Text Media Player Easy CD Creator data for a music label or file names and folder names for a data or digital image label Import Output a list of file names on a printer page 44 Quit the DISC TITLE PRINTER application Click a file name to display the corresponding label data Note tha...

Page 37: ...log box for selecting graphic images page 50 q Font Button Displays a dialog box for selecting the font type attributes and size w Magnifying Glass Button Displays a dialog box with an enlarged preview image e Label Input Boxes These boxes are for inputting label text either manually or by importing it The text you input immediately appears in the preview image on the screen The type of label inpu...

Page 38: ...ain CD Text data 1 On the music label template main window click the button 2 Click Import and then Import CD Text This displays a dialog box for selecting the drive where the CD that contains the text is located 3 Set the disc whose data you want to read into the CD drive of your computer confirm that the correct drive name is displayed in Drive Selection and then click the Start Import button La...

Page 39: ...on lets you import play lists created using Media Player This capability is supported for data created using Media Player 7 0 or higher Screen shots shown in this manual are based on Media Player for Windows XP Note Screen contents and operational procedures may be slightly different for other supported Windows versions 1 Start up Media Player 2 Place the disc that contains the play list data you ...

Page 40: ...list you created in step 3 and then click Open A dialog box for selecting the specific text you want to import appears after all the text on the CD is read Note In some cases you may not be able to import artist name data from a playlist file created using Media Player on a computer running WindowsXP 8 After checking the song titles in the label input boxes click OK The data you import appears in ...

Page 41: ...an audio file to a track from a computer hard disk is not imported 1 Start up Easy CD Creator 2 Place the disc that contains the data you want to import into the CD drive of your computer 3 Use Easy CD Creator to save the project list This saves the project list Note See Easy CD Creator user documentation and online help for details about its operation 4 Start up DISC TITLE PRINTER application 5 O...

Page 42: ...file names for data label or digital image label To import a folder name 1 On the data label template or digital image label template main window move the cursor to the label input box where you want to import the folder name and then click 2 Click Import and then Import Folder Name This displays a dialog box for selecting a folder 3 Select the folder name you want to import and then click OK The ...

Page 43: ...rt and then click OK The file names you import appear in the label input box and the preview image Note You can select a range of file names by clicking the name at one end of the range to select it and then holding down your PC keyboard s Shift key as you click the name at the other end of the range You can select multiple file names that are not next to each other by holding down your PC keyboar...

Page 44: ...e date that is stamped is the one being kept by your PC s clock 8 Phrase Memory Shows a list of preset phrases Clicking a phrase inserts it at the current cursor position 9 Music Displays a list of preset phrases you can input into a music label template label input box Clicking a phrase inserts it at the current cursor position 0 Digital Image Displays a list of preset phrases you can input into ...

Page 45: ...f the label data you are editing has already been saved this button name changes to Overwrite Clicking Overwrite replaces the existing data with the version you are editing on your PC screen Save as This displays a dialog box for saving the label data under a different file name Cancel This closes the dialog box without saving anything 3 Click Save As This displays the Save As dialog box 4 Specify...

Page 46: ... for selecting a folder Opening a Label Data File Perform the following steps when you want to open an existing label data file 1 Click the button 2 On the menu that appears click Open This displays a dialog box for selecting the file you want to open 3 Select the name of the file you want to open and then click Open The data in the file is displayed in the label input box and the label preview im...

Page 47: ...trol the appearance of your labels using the printing pattern and text layout panels and the Font and Image buttons Any changes you make to a label are immediately reflected in the label preview image To configure layout settings The print pattern controls the location and the orientation of the printing on a label Available Print Patterns The 11 DISC TITLE PRINTER print patterns are shown below I...

Page 48: ...alog box for configuring advanced print pattern settings The settings you configure are reflected here 3 Click the Label 1 and Label 2 down arrow buttons and select the setting you want for each of the label areas and then click OK This causes the print pattern panel and the label preview image to change in accordance with the settings you configured When you specify an image for Label 1 or Label ...

Page 49: ...ates the following Text alignment left center right Item per line 1 or 2 Numbered Non numbered lines 1 3 2 4 5 6 7 8 9 0 1 2 Templete Music Label Data Label Digital Image Label Music Label Data Label Digital Image Label Item Title Artist Name Title Tracks Contents Date Location Image Information 1 2 To configure text layout settings 1 Click the panel This displays a menu for selecting a text layou...

Page 50: ...cted Configuring Font Settings Use the procedures in this section to control the font attribute and size settings of label text 1 On the main window click the button This displays a dialog box for configuring font settings 2 Select a tab and then make the settings you want The tabs that appear on the above dialog box depend on the type of label template you are using When you are using this type o...

Page 51: ... specify a 2 line font size for the title font and artist name when creating a music CD label for example you will be able to input only two lines of song title text Important With print patterns 8 through q page 45 only one line of text can be printed in each label print area regardless of the font size 1 2 3 setting With print patterns 1 4 and 5 page 45 selecting certain font sizes can cause tex...

Page 52: ...ick To input an image from a file 1 On the main window click the button This displays the Image dialog box 2 Click Open Image 3 Select the file name of the BMP or JPEG image you want to input and then click Open This displays the selected image in color in the center of the Image Settings dialog box preview area 4 After making sure the preview shows the image you want click OK Note that the layout...

Page 53: ... operation press the Esc key or right click your mouse 6 Locate the mouse pointer at one of the corners of the area you want to select for capture Holding down the left mouse button drag the pointer to the corner that is diagonally opposite the one you started from A color image of the selected area appears in the Image Settings dialog box preview area This draws a selection boundary around the ar...

Page 54: ...d image is shown on the Image Settings dialog box click Save 2 Specify the folder in Save in and type a file name into File name 3 Click Save 4 Click OK Captured images are always saved in BMP format Controlling the Aspect Ratio of an Image Perform the following steps to specify whether the aspect ratio should be maintained when the image is resized and to specify the position of the image 1 While...

Page 55: ...ed is displayed in the layout preview image click the L button in Dithering 2 Select Pattern or Error Diffusion and then click OK The dithering setting you select is reflected in the label preview image on the screen Difference between Pattern and Error Diffusion Dithering With both dithering methods and dark colors are printed blacker while light colors are a lighter shade of gray Compared with P...

Page 56: ...ifferent images for the upper label area and the lower label area Free Design Label Template The Free Design Label Template gives you maximum control over the appearance of the label you are creating It lets you input text and images into individual fields which you can then place in label areas as you like You can have a total of 40 fields in the upper and lower label areas Free Text and Free Des...

Page 57: ...esign Label Template Main Window 1 Print Pattern Panel 2 Toolbar 3 Work Area 6 Print Area 3 Work Area 7 Measurement Unit Button 1 Print Pattern Panel 2 Toolbar 4 Insert Image Button 9 Insert Image Button 5 Insert Text Button 8 Work Area Size Button ...

Page 58: ...e of the work area as described below ONE Clicking this button displays the top label area only in the work area ALL Clicking this button expands the work area so it displays both top label area and the bottom label area 9 Insert Image Button Click to insert a image field Toolbars The following describes the tools that are available in the toolbars on the Free Text and Free Design label template m...

Page 59: ...To Front Sends the selected field to the front of all the fields To Back Sends the selected field to the back of all the fields Forward Sends the selected field one level forward Back Sends the selected field one level back Resize By Width By Height Makes all of the selected fields the same height and or width By Height and Width Other Maximize Enlarges the field so it fills the print area Center ...

Page 60: ...our font size selection is reflected in the work area and the preview image If the font size you want is not included in the list select the font size box in the toolbar and type in the size you want To change font style settings You can use the following procedure to italicize or bold text 1 Input text into the work area 2 Highlight the characters whose font style setting you want to change 3 Cli...

Page 61: ...ation about print patterns To specify the image orientation 1 On the main window click This displays the Advanced Free Text Settings dialog box 2 Specify the orientation for the images in the upper label area and the lower label area and then click OK To turn off display of background images 1 On the main window click This turns off display of the background images Clicking again turns display of ...

Page 62: ...ck anywhere inside the field boundary A text field is selected for text input and editing when it appears as shown below Image Field Click anywhere inside an image field to select it An image field that has a light gray boundary around it can be moved or de leted Common Text Field and Image Field Operations The following operations are the same for both text fields and image fields To move a field...

Page 63: ...g the specific text you want to import appears after all the text is imported 1 Indicates the number of fields that can still be inserted A label can contain up to 40 fields total The Separate and Batch buttons appear dimmed and unavailable when there are 40 fields in a label 2 Batch Imports all selected items into a single field Separate Using this option imports only the titles artist names and ...

Page 64: ...ree Design Templete Use the procedures in this section to insert an image into a label and to delete a label image To insert an image into a label 1 On the main window click configure settings for the image you want to insert and then click OK This inserts the image in the center of the print area If the selected image is larger than the work area it is resized to fit while maintaining the relatio...

Page 65: ...hift Ctrl Drag This also resizes the field while maintaining its aspect ratio The field is enlarged and reduced with its center fixed Important Resizing a text field does not affect the size of the text inside the field Aligning and Resizing Fields Free Design Template A selection of useful commands makes it possible to instantly position fields on a label and to make multiple fields the same size...

Page 66: ...elect all of the currently selected fields simply click anywhere outside of the selected fields 2 To make a different field the reference field hold down the Ctrl key as you click the new reference field 3 Click the button This displays a menu Note See Toolbars on page 56 4 On the menu select Alignment 5 On the submenu that appears select the command you want The selected fields are aligned in acc...

Page 67: ...ngs you configure are reflected in the preview image on the main window 4 Click the Size tab Size and Zoom Factor Inputting a value in one box automatically changes the value in the other box Maintain aspect ratio When this check box is selected the field is resized while maintaining the relative ratio between its vertical and horizontal dimensions When this checkbox is cleared a field can be resi...

Page 68: ...gital Image Displays digital image phrases and expressions Select the phrase you want from the submenu that appears to input it q User Shows a list of preset phrases registered by you Clicking a phrase inserts it at the current cursor position See page 70 for information about regis tering preset phrases Note See the Phrase Library List on page 74 for more information w Return to Original Size Ima...

Page 69: ...is displayed in the label input boxes click the main window s button This causes the disc tray to come out part way Gently pull out the disc tray the rest of the way This displays a dialog box for printing Note Note that the disc tray does not open automatically when you have the Manually open Disc tray before printing option selected for the Auto DiscTray Operation Setting item on the Print tab o...

Page 70: ...teps 3 and 4 4 After positioning the disc remove the positioning guide Place the positioning guide while watching the guidelines on the disc tray Note Adjust the position of the disc so printing does not overlap logos etc See Positioning the Disc on the Tray on page 69 for more information Important Make sure to remove the positioning guide before printing 5 Close the disc tray Press the disc tray...

Page 71: ...just the position of the disc on the tray in the following cases When the label of the disc already has logos or other markings When performing separate upper block and lower block printings When the label of the disc already has logos or other markings Note that you cannot print over a logo Position the disc so the logo or other markings on the disc label are not inside the shaded area When perfo...

Page 72: ...tray should be opened automatically or manually before printing is started 3 After everything is the way you want click OK Registering and Deleting a Phrase Memory Entry You can register frequently used terms and phrases for instant recall whenever you need them See Useful Text Input Functions on pages 42 and 66 for information about using phrase 1 On the main window or Print dialog box click the ...

Page 73: ...ave one setup per label template Important The Text Layout panel page 47 and font button settings cannot be saved for the Free Text layout and Free Design layout Select the check box next to Show advanced print pattern settings only if you want the Advanced Print Pattern Settings page 46 dialog box to appear when you click the Print Pattern panel The Select Print Pattern dialog box appears when th...

Page 74: ...elp 1 On the main window click the button 2 Click Help 3 Use standard Windows online help procedures to find the information you need You can also obtain assistance by accessing the CASIO Website While your computer is connected to the Internet click and then click CASIO Website This will take you to the CASIO Website where you will find the latest news and other information about CASIO or USB per...

Page 75: ...come out part way 2 Gently pull out the disc tray as far as it will go If there is a disc in the disc tray remove it 3 Open the front cover If there is an ink ribbon cassette loaded in the printer remove it 4 Unplug the USB cable from the PC and printer 5 Unplug the power cord from the wall outlet and then unplug the AC adaptor from the printer Insert the tip of the cotton swab and slide it lightl...

Page 76: ... original retailer Symptom Possible Cause Recommended Action Nothing works The disc tray does not open when the Eject buttonispressed The USB cable AC adaptor or power cord is not connected Your PC is not turned on The software is not installed The USB cable AC adaptor or power cord is not connected Your PC is not turned on Disconnect the USB cable and re install the software Installing the softwa...

Page 77: ...e again Use a smaller font size or reduce the number of characters per line Use a smaller font size or reduce the number of lines Printing is not clear Printing is poor quality Printing is too light Printing is misaligned Cannot print The last part of input data does not print Symptom Possible Cause Recommended Action Cannot import CD Text Cannot create a data index file The music CD you are tryin...

Page 78: ...re the printer is connected correctly to a power source Make sure the printer is connected correctly to your PC Make sure the printer is connected correctly to a power source Make sure the printer is connected correctly to your PC Make sure the printer is connected correctly to a power source pages 36 41 page 37 pages 29 and 67 page 19 page 19 page 19 Error Messages page 21 page 24 page 24 pages 2...

Page 79: ...nsfer Print Width Approximately 16mm Print Length Approximately 74mm Actual printing speed depends on printing environment conditions etc Power Supply Power Consumption 13W Power supplied both through household power plug and USB port Other Dimensions 57 H 180 W 186 D mm 21 4 H 71 16 W 75 16 D Weight Approximately 750g 1 7 Ibs Operating Temperature 10 C to 35 C 50 F to 95 F ...

Page 80: ...CASIO COMPUTER CO LTD 6 2 Hon machi 1 chome Shibuya ku Tokyo 151 8543 Japan Printed in China MO0208 A ...

Reviews: