Begin Verification / Calibration Cycle
1.
Verify that the Ramp 1 and Ramp 2 (if used) cure temperatures (ct1 and ct2)
settings are at the proper temperature set points used for the area.
2.
Press the “Cycle Start”
button two times with in two seconds
.
Lamp cycle should begin with a ramp-up to the final cure ramp settings. They will
be “rp1” set points on a single ramp setup and “rp2” on a dual ramp setup. (See
figure A). The temperature set point will be displayed on the bottom display of the
temperature controller. The upper display will alternate between “rp_” and the
actual temperature feedback from the pyrometer.
After the “rp_” has completed the ramp and flashing, the hold cycle will begin with
a constant temperature on the upper display at the “ct_” set point.
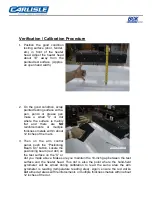
Using the handheld pyrometer, measure the temperature of the target about 1” to
the right of the positioning beam spot. (Figure D).
Hold the hand-held
pyrometer as close to 90° to the testing surface as possible by the edge of
the heater head.
This is critical for an accurate and consistent reading.
3.
Compare the handheld reading with the process temperature (upper
display) on the temperature controller. If they are within 5 degrees, no
further changes are required. If they are not, continue with doing the
following calibration procedure.
Verify “Lock” Status of Raytek Comm Module
1. Verify lock status on Raytek box
– Observe the
display for a “Padlock” on the screen as shown. If
the icon is displayed the unit is “Locked out”
preventing any parameter changes. Complete
steps below to “Unlock” the unit, otherwise continue
with next section.
2.
The unit can be unlocked by pressing the
button and the
button
button for 5
simultaneously for 3 seconds or alternatively by pressing the
seconds.
Summary of Contents for BGK AutoCure 6000-2216
Page 1: ...AutoCure 6000 2216 Overhead Heater Assembly and Operating Manual ...
Page 22: ......
Page 23: ......
Page 37: ......
Page 38: ......
Page 41: ...A DETAIL J SCALE0 40 1 REMOVET1 11SBOLTAFTERINSTAI I ATION ...
Page 43: ......
Page 44: ......
Page 45: ......
Page 46: ......
Page 47: ...AUTOCURE MODEL NUMBER AC6 2216 480 SP ...
Page 48: ......
Page 49: ......

