The paper modules
Introduction
The paper trays contain the media that are required for the print jobs. The default configuration of
the machine contains 1 paper module with 4 paper trays.
• Two standard trays with a capacity of 600 sheets each.
• Two bulk trays with a capacity of 1,700 sheets each (or 3,400 A4/Letter sheets each when the
optional dual paper trays are installed)
Contact your local authorized dealer for more information about the dual paper trays.
You can add 1 or 2 more paper modules to the machine. Then the total number of paper trays is
extended to 8 or 12 respectively. You can find more information about the capacities of the paper
trays and the supported media size in the specification chapter of this manual.
You can also install a Flex-XL PIM paper input module. In this paper module the two bulk trays
are replaced by Flex-XL trays. A Flex-XL tray can contain media until media size 350 mm x 500
mm. You can install the Flex-XL PIM instead of a standard paper module or in combination with a
standard paper module. You can install a maximum of 3 paper modules. Contact your local
authorized dealer for more information about the Flex-XL PIM. See also
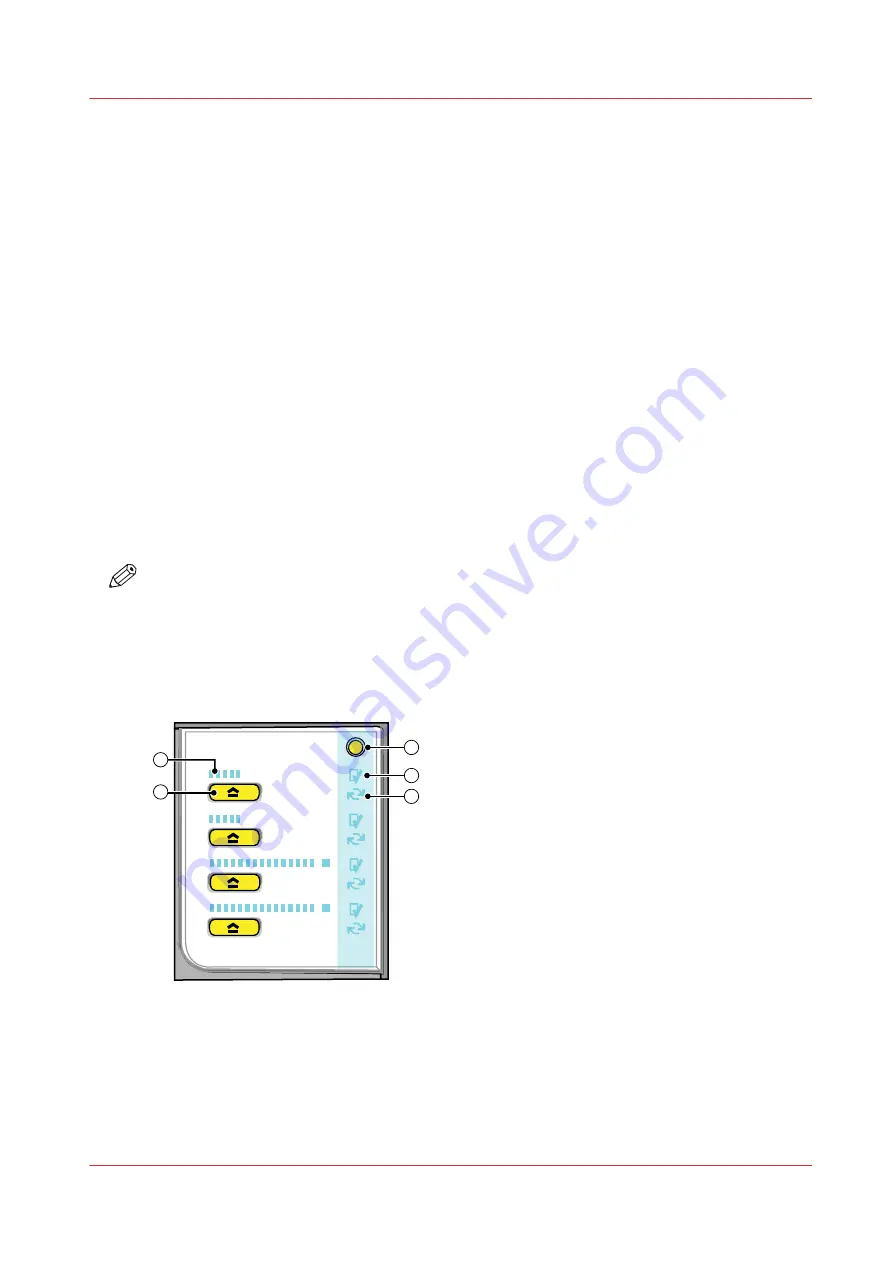
This section describes the control panel on each paper module.
NOTE
You can use the control panel on the paper modules to open the paper trays and load the media.
However, the recommended way to open the paper trays and assign the media is via the
[Schedule] view. You can also open the paper trays and/or assign the media via the [Trays] view
(see
Assign the media to a paper tray on page 256
).
The control panel
1
2
3
4
2
4
3
5
1
[1] The control panel on the paper modules
Each paper module contains a control panel next to the upper paper tray. The control panel
consists of 4 sections that correspond with the 4 paper trays. Each section displays the current
filling level of the corresponding paper tray. Furthermore, the control panel indicates whether the
media in the paper tray is assigned or not. The following table describes the various parts of the
control panel.
The paper modules
Chapter 2 - Explore the print system
19
VarioPrint 6000 line
Summary of Contents for VarioPrint 6000 Series
Page 8: ...Contents 8 VarioPrint 6000 line ...
Page 9: ...Chapter 1 Introduction ...
Page 14: ...Information in this operation guide 14 Chapter 1 Introduction VarioPrint 6000 line ...
Page 15: ...Chapter 2 Explore the print system ...
Page 31: ...Chapter 3 Explore the ease of operation ...
Page 46: ...Transaction printing workflow 46 Chapter 3 Explore the ease of operation VarioPrint 6000 line ...
Page 47: ...Chapter 4 Start the print system ...
Page 56: ...Log in to the printer 56 Chapter 4 Start the print system VarioPrint 6000 line ...
Page 63: ...Chapter 5 Prepare the print system ...
Page 101: ...Chapter 6 Prepare the print jobs ...
Page 110: ...Print a page number via PRISMAsync 110 Chapter 6 Prepare the print jobs VarioPrint 6000 line ...
Page 111: ...Chapter 7 Plan the workload remotely ...
Page 115: ...Chapter 8 Plan the jobs ...
Page 127: ...6 Touch OK Move jobs to another destination Chapter 8 Plan the jobs 127 VarioPrint 6000 line ...
Page 139: ...5 Touch OK Create a note for the operator Chapter 8 Plan the jobs 139 VarioPrint 6000 line ...
Page 165: ...Chapter 9 Carry out print jobs ...
Page 232: ...Make an intermediate check print 232 Chapter 9 Carry out print jobs VarioPrint 6000 line ...
Page 233: ...Chapter 10 Keep the system printing ...
Page 246: ...Status indicators 246 Chapter 10 Keep the system printing VarioPrint 6000 line ...
Page 247: ...Chapter 11 Media handling ...
Page 289: ...Chapter 12 Maintain the print system ...
Page 316: ...Close the doors and covers 316 Chapter 12 Maintain the print system VarioPrint 6000 line ...
Page 317: ...Chapter 13 PRISMAlytics Dashboard ...
Page 319: ...Chapter 14 Troubleshooting ...
Page 334: ...Create and download a log file 334 Chapter 14 Troubleshooting VarioPrint 6000 line ...
Page 335: ...Chapter 15 Specifications ...
Page 353: ......


