background image

46

Change the Destination of the Recording File 
and the Maximum Disk Usage

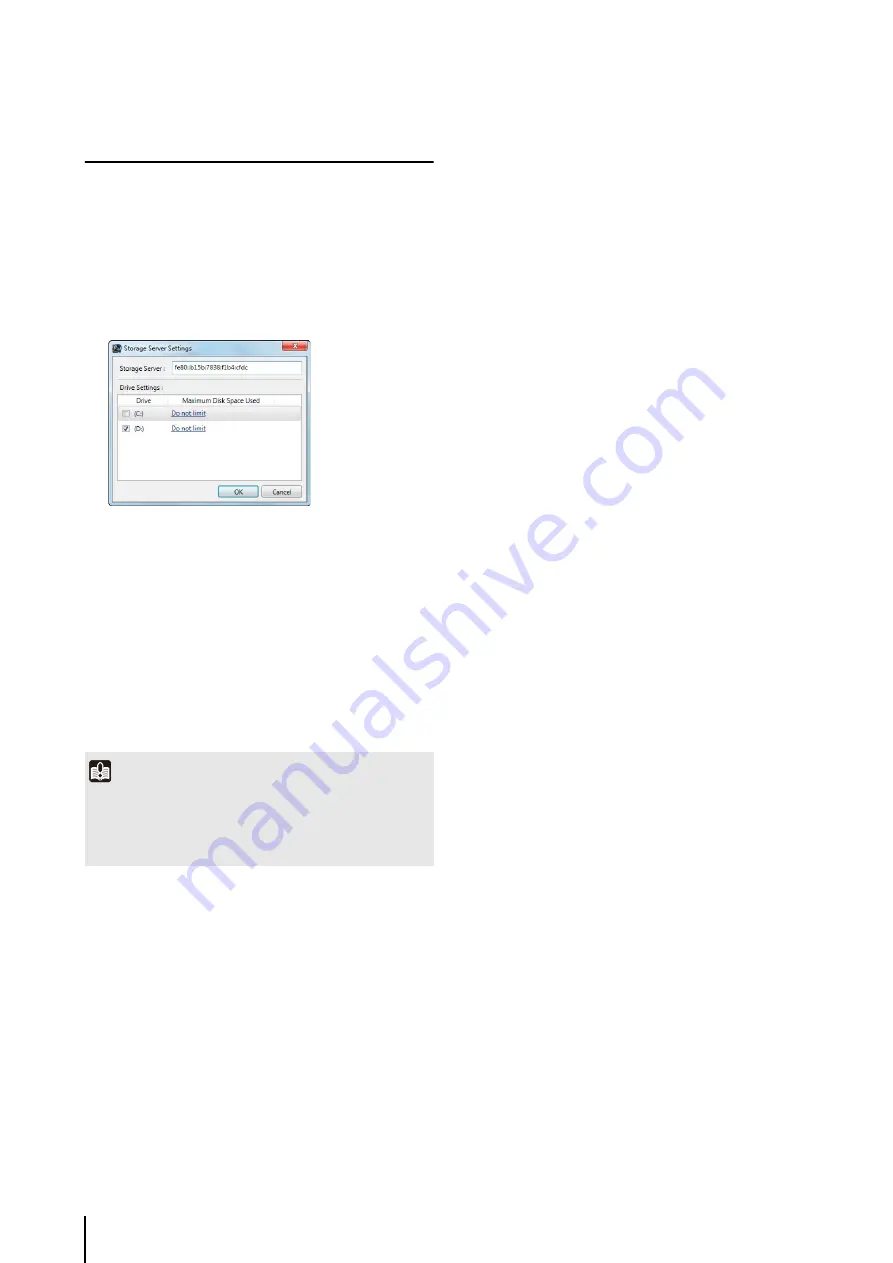
Specify a drive for recording or change the maximum disk 

usage.

Click [Do not limit] for each drive to display the 

maximum disk usage. Select the [Maximum Disk 

Space Used] check box and specify a maximum disk 

usage that does not exceed the total disk capacity.

1

S

elect a 

S

torage 

S

erver from the list of 

S

torage 

S

ervers.

2

Click [Edit] to display the [

S

torage 

S

erver 

S

ettings] 

dialog box.

3

Clear the check boxes next to the drives that are not 
used for recording.

4

S

pecify the maximum disk usage.

5

Click [OK] to close the dialog box.

Important

• We recommend that you do not specify the system drive 

(typically the C drive) as the destination for the recording file.

• You cannot specify a drive that has a capacity of less than 

1 GB.

Summary of Contents for RM-25

Page 1: ...ENGLISH Network Video Recording Software RM Series Administrator s Manual Make sure you read this manual before using the software ...

Page 2: ...data corruption or data loss Canon shall have no liability whatsoever for any loss or damages incurred by the user as a result of such problems Please use this software with this understanding Support Information For support information including software updates patch installer user manuals and operating environments see the Canon Web site Copyright Information Videos images or sounds recorded wi...

Page 3: ...S AND ADDITIONAL LICENSING MAY BE OBTAINED FROM MPEG LA LLC SEE HTTP WWW MPEGLA COM This product is licensed under AT T patents for the MPEG 4 standard and may be used for encoding MPEG 4 compliant video and or decoding MPEG 4 compliant video that was encoded only 1 for a personal and non commercial purpose or 2 by a video provider licensed under the AT T patents to provide MPEG 4 compliant video ...

Page 4: ...40 is mainly used as the example camera in this manual In addition screens from Windows 7 are used as samples to describe operations How to Display and Read This Manual This manual assumes that you display and read it on your computer s screen Icons in This Manual The following icons indicate descriptions you should pay close attention to Icons Indicating Camera Models The following icons indicate...

Page 5: ... Indicating Products The following icons indicate information that is unique to the full product and the Lite version Icon Meaning Features unique to the RM 64 25 9 They cannot be used with RM Lite Information unique to RM Lite ...

Page 6: ... high quality video and saving hard disk space when recording Only available for cameras that support the feature Dynamic layout With this feature you can automatically display videos on a layout from cameras that meet specific criteria such as the camera status Direct camera operation You can change the camera angle and use the zoom while watching the live view Only available for cameras that sup...

Page 7: ...Add cameras to the Storage Server Groups See Chapter 3 Storage Server Settings Add cameras Step 6 Configure the Viewer to match your environment and use See Chapter 4 Viewer Settings Configure the Viewer Step 7 Set the recording conditions for using the cameras including regular recording and motion detection recording See Chapter 5 Setting a Recording Schedule Set a recording schedule Step 8 Cont...

Page 8: ...ion Example 20 Configuration Example 1 Storage Server and Viewer Installed on One Computer 20 Configuration Example 2 Storage Server and Viewers Installed on Multiple Networked Computers 21 Configuration Example 3 Viewers Installed on Multiple Networked Computers 21 System Design 22 Determining the Capacity of the Storage Server 22 Sensor Recording Motion Detection Recording Intelligent Function R...

Page 9: ...a 50 Add a User 51 About User Groups 51 Display the Users Tab 51 Add a User 52 Change the User Information 52 Remove a User 53 Add a User Group and Specify Its Access Permissions 53 Chapter 4 Viewer Settings Flow for Viewer Settings 56 Configure the Viewer 57 Display the Viewer Settings dialog box 57 Configure the Viewer Display and Operation Settings 57 Configure Event Notification and Priorities...

Page 10: ...Day for the Special Day Schedule 89 Select a Camera 89 Specify the Recording Settings 89 Edit a Recording Schedule 90 Editing a Recording Schedule 90 Delete a Recording Schedule 90 Import from a Weekly Schedule 90 Chapter 6 Day to Day Operations Flow of Operations 94 Viewer Features 95 View Recorded Images 96 Record Now 96 Save a Snapshot of the Displayed Image 96 Search for a Recording 97 Play a ...

Page 11: ... Viewer Problems Occur 118 Viewer and Video windows 118 Timeline 120 Extract Video 120 Recording 120 Connection Problems 120 Error Messages 121 Messages Displayed in the Viewer 121 Messages Recorded in the Log Files 125 Event Information 128 Appendix Create a Shortcut Icon for Starting the Viewer 130 Camera Maintenance 130 About the Latest Camera Firmware 130 Update the Firmware 130 How to Check t...

Page 12: ...12 ...

Page 13: ...Chapter 1 Introduction System requirements operating environment supported cameras license conditions System configuration and design guidelines RM Lite specification comparison ...

Page 14: ...itional 500 MB is required if NET Framework 3 5 SP1 is not installed Additional space for saving extracted video files as required Network controller 1000 BASE T or similar 1 Gbps transfer speed Display 1280 1024 resolution or higher 16 bit colors or greater Graphics NVIDIA GeForce GT 220 or higher or a graphics card of equivalent class that meets the following requirements Video memory size 1 GB ...

Page 15: ...use separate computers for the Storage Server and for the Viewer 1Number of cameras selected in Motion Detection Using Storage Server for motion detection recording 2Total number of all types of events 3Assumes a standard resolution Image Quality setting is 3 and that the receive size and display size are the same If the receive size and display size are different performance may decrease due to a...

Page 16: ... Business Enterprise Service Pack 2 32 bit or 64 bit version Windows Vista Home Premium Service Pack 2 32 bit or 64 bit version Windows 7 Ultimate Professional Enterprise Service Pack 1 32 bit or 64 bit version Windows 7 Home Premium Service Pack 1 32 bit or 64 bit version Language support Japanese English French German Italian and Spanish Multi Language Windows is not supported Important The syst...

Page 17: ...gs Using IPsec may degrade the performance for recording and displaying images You can use the camera audio feature except for the VB C50Fi which does not support the function Review the following items before using the feature The Viewer supports transmission and reception of audio data Audio data cannot be recorded separately and is always recorded together with the images Synchronization is ena...

Page 18: ...rent as of February 2012 For the latest information on this product visit the Canon Web site The number of cameras that can be added to a Storage Server Group depends on the specific software product The following table describes the number of licenses required for servers and Viewers as well as the number of Storage Servers that can be configured as a Storage Server Group for each product Support...

Page 19: ...use the recording files and event information associated with VK 64 16 Lite You cannot play back recordings made with VK 64 16 Lite This software requires a computer with specifications that are higher than those required for VK 64 16 Lite The computer used for VK 64 16 Lite may not meet the operation requirements for this software Notes on Protocol Compatibility This software is not compatible wi...

Page 20: ... on the Storage Server may increase depending on the number of cameras connected and the recording settings See Determining the Capacity of the Storage Server p 22 to consider your configuration Accessing one camera or Storage Server from many Viewers at the same time may affect system performance Regularly check that the time setting is correct on the computers that are running the Storage Server...

Page 21: ...rs on multiple computers on the network Configuration Example 3 Viewers Installed on Multiple Networked Computers By setting up more than one Viewer you can simultaneously view a video at more than one location Storage Server Group Viewer Network Images from the cameras Recorded images Viewer 1 Network Images from the cameras Recorded images Viewer 2 Storage Server Group Viewer 6 ...

Page 22: ...a volume per second for various video formats The JPEG video frame rate is based on an Image Quality setting of 3 Audio data requires a Storage Server of 64 Kbps regardless of the type of camera Hint See System Information p 109 for details on the recording playback data volume per second during operation System Design Important The operating performance of this software varies depending on factor...

Page 23: ...ages from 16 cameras are recorded at 2 frames per second in continuous recording mode the required hard disk space is approximately 33 GB per day 25 KB x 16 cameras x 60 seconds x 60 minutes x 24 hours 34 560 000 KB If audio data is recorded using 2 cameras the required hard disk space is approximately 1 3 GB per day 8 KB x 2 cameras x 60 seconds x 60 minutes x 24 hours 1 382 400 KB Example 2 MPEG...

Page 24: ...ally result in values smaller than the above values Conversely complex scenes such as a crowded shopping mall would result in larger values The following tables shows typical data sizes per frame in KB for various combinations of image quality and size settings Example of the Data Size for the VB M700F VB M600D VB M600VE VB M40 JPEG Units KB Example of the Bit Rate for the VB M700F VB M600D VB M60...

Page 25: ... Image Quality Image Size 160 120 320 240 640 480 1 3 5 9 6 27 5 2 4 0 11 0 31 7 3 4 4 12 5 35 8 4 5 6 16 4 47 8 5 15 8 52 7 171 4 Image Quality Image Size and Frame Rate 10 fps 15 fps 30 fps 320 240 640 480 320 240 640 480 320 240 640 480 1 0 28 0 76 0 35 0 94 0 54 1 43 2 0 39 1 08 0 50 1 30 0 78 2 02 3 0 60 1 67 0 75 2 02 1 20 3 31 4 0 69 1 93 0 91 2 43 1 38 3 98 5 0 81 2 31 1 05 2 87 1 68 4 86 ...

Page 26: ...Motion Detection Recording Intelligent Function Recording The motion detection feature notifies you there is motion in an area when motion is not ordinarily expected Do not use this feature for busy areas where motion detection may be triggered frequently Configure motion detection on the camera side If you configure motion detection on the Storage Server side the load on the Storage Server may in...

Page 27: ...r as a file server The hard disk is frequently accessed when the computer is used as a file server and this may affect recording performance In addition the Storage Server is more likely to run out of disk capacity if the computer is operated as a file server Running other applications on the computer The additional processing load from running applications other than this software may affect reco...

Page 28: ...e Storage Server MPEG 4 and H 264 recording Motion detection recording Sensor recording Intelligent function recording Volume detection recording Special Day schedule recording Sending e mail when an event occurs Customizing event priority Adding user groups and configuring access permissions Viewer Multiple display support Layout sequences Display of multiple tabs Custom grid Dynamic layouts Sear...

Page 29: ... MPEG 4 H 264 JPEG only Max recording frame rate 30 fps 1 5 fps Recording schedule Weekly schedule recording Special Day schedule recording Weekly schedule recording Recording mode Continuous recording Sensor recording Motion detection recording Intelligent function recording Volume detection recording Manual recording Record Now Continuous recording Manual recording Record Now Max file size setti...

Page 30: ...30 ...

Page 31: ...Chapter 2 Setup How to install the software Settings after installation ...

Page 32: ...T Framework 3 5 Click Install to start installation of NET Framework 3 5 The NET Framework is not automatically installed Download the install file from the Microsoft download center and install it or use the installer bundled on the set up CD ROM Applications folder DotNetFramework folder dotnetfx35 exe Install RM Lite v1 1 without uninstalling v1 0 when upgrading If you uninstall v1 0 before ins...

Page 33: ...ear the Add storage server programs to the Windows Firewall exception list check box you need to configure Windows Firewall after the installation is complete For details see Windows Firewall Settings p 34 One of the following icon appears on your desktop when the installation is complete 5 Click Next 6 Click Next Important If you change the network interface or IP address after this point you wil...

Page 34: ...irewall Setting 3 3 Security Level Setting 3 Sound Settings for Using the Audio Feature 3 Warning When Viewer Starts 3 3 1 Click Start Control Panel to open the Control Panel 2 Click System Security Windows Firewall 3 Click Advanced Settings to display the Windows Firewall with Advanced Security window 4 Click Inbound Rules and select New Rule from the Action menu to start the New Inbound Rule Wiz...

Page 35: ... Windows Server 2008 and 2008 R2 To receive audio with the camera s Viewer follow these steps to enable the sound feature If the Control Panel is set to Classic View double click Sound and proceed to Step 3 If no audio device is installed refer to the manual for your computer on how to install an audio device Warning When Viewer Starts If User Account Control is enabled the User Account Control sc...

Page 36: ...36 ...

Page 37: ...Chapter 3 Storage Server Settings Adding cameras Configuring the Storage Server Group Adding users ...

Page 38: ... a Storage Server Display the Servers tab p 45 Specify the storage period for recorded images p 45 Change the destination of the recording file and the maximum disk usage p 46 Add a camera Display the Cameras tab p 47 Add cameras one at a time p 47 Search for and add cameras p 48 Add a user Display the Users tab p 51 Add a user p 52 Add a user group and specify its access permissions p 53 Importan...

Page 39: ...es to display the Add Camera dialog box and start adding a camera on the network For details see Add Cameras One at a Time p 47 You can configure the Viewer to start without displaying the startup screen or the Connect to Storage Server Group dialog box For details see Create a Shortcut Icon for Starting the Viewer p 130 Start the Viewer Important The Viewer cannot be started on its own Be sure to...

Page 40: ...isplay the Storage Server Group name User Name and Password Enter the use name and password The default user name and password are User Name administrator Password NVR Remember user name Select the check box if you want the software to remember the user name Use Host Name Click to specify a host name of the Storage Server for the connection 1 Double click the RM Viewer v1 0 icon on the desktop 2 C...

Page 41: ...s such as the maximum recording file size Maximum File Size Duration Specify the maximum size or the maximum recording duration for the recording file You can set a maximum file size of 512 MB or 1024 MB and a maximum recording duration of 1 to 24 hours The maximum size is fixed at 1 GB 1024 MB and the maximum duration is fixed at 24 hours Low Disk Space Warning Level Specify when to notify the us...

Page 42: ...gure the priority of an event that occurs in the Storage Server Group E mail Notification Display a list of e mail addresses for sending notification messages when an event is triggered and the priority of the event Add Edit and Remove Add edit or remove an e mail notification destination Mail Server Settings Configure the mail server used for notifications Event Priorities Configure the event pri...

Page 43: ...SMTP is selected in Authentication the Storage Server performs POP authentication before sending an e mail message Add an E mail Notification Destination To Enter an e mail address as the destination From Enter the e mail address of the sender Subject Enter the subject of the e mail Min Priority Specify the minimum event priority level which will generate an e mail notification OK and Cancel Close...

Page 44: ...es in the Events tab E mail notification is performed according to the specified priorities Click or drag the slider for each event to change the priority The priority can be set to one of the following five levels Level Value Color Highest Red High Orange Medium Yellow Low Light Green Lowest Green ...

Page 45: ...o specify the minimum storage period select the Ensure video is kept for at least check box Select the units day or week of the storage period and enter the number of days or weeks up to a maximum of 99 To specify the maximum storage period select the Ensure video is kept for upto check box Select the units day or week of the storage period and enter the number of days or weeks up to a maximum of ...

Page 46: ...s not exceed the total disk capacity 1 Select a Storage Server from the list of Storage Servers 2 Click Edit to display the Storage Server Settings dialog box 3 Clear the check boxes next to the drives that are not used for recording 4 Specify the maximum disk usage 5 Click OK to close the dialog box Important We recommend that you do not specify the system drive typically the C drive as the desti...

Page 47: ... remove a camera Close Closes the dialog box Add Cameras One at a Time Add cameras one at a time to the list of cameras on the Cameras tab Host Name Enter the host name or IP address of the camera Port Enter the port number for communicating with the camera Typically leave 80 unchanged User Name Enter the user name for the camera Password Enter the password for the user specified in Storage Server...

Page 48: ... p 109 Specifying a Camera You can specify a camera using camera tags when doing the following operations Specifying a camera with access permissions for user group operation p 53 Specifying a camera to be automatically displayed in the dynamic layout p 67 Search For and Add Cameras You can search for cameras that are on the same network as the Storage Server The cameras on the subnet are displaye...

Page 49: ...mera name Update Update the thumbnail image in the camera selection panel Tags Displays the tags assigned to the camera Edit Add a new tag to the list in Remove Remove tags selected in OK and Cancel Close the dialog box Apply Apply the settings in the dialog box Note The camera name specified in the text box is only used by this software product The camera name stored on the camera is not changed ...

Page 50: ...view video to change the camera position Select Preset Select a preset made with the camera Update Use the current preview video as the camera thumbnail image The Thumbnail dialog box closes and the camera thumbnail image is updated Cancel Close the dialog box without updating the thumbnail image You cannot use the pan tilt zoom feature You cannot use the pan tilt feature You cannot use the zoom f...

Page 51: ...or for this software program does not refer to the Windows administrator Display the Users Tab The Users tab is displayed in the Settings dialog box Storage Server Group Display the Storage Server Group name List of users Displays a list of existing users Add Edit and Remove Add edit or remove a user User Group Settings Add edit or delete a user group Close Closes the dialog box Add a User Importa...

Page 52: ...er Name All user names can be changed except for the default administrator user name Old Password Enter the old password New Password Enter the new password Confirm New Password Enter the new password again for confirmation User Group Select a user group Administrator or Operator You can also select an added user group p 53 The default administrator user is associated with the Administrator user g...

Page 53: ...l access permissions for the selected user group Close Close the dialog box Note You cannot edit or remove the Administrator and Operator user groups Specify Individual Access Permissions Click Partial Control and select the check boxes next to the desired access permissions for each feature Select the check box next to a feature to enable operation of the feature Camera tags are only displayed fo...

Page 54: ...54 ...

Page 55: ...Chapter 4 Viewer Settings Configuring the Viewer Configuring a camera Creating a layout ...

Page 56: ...and priorities p 58 Configure the camera Display the Camera Selector dialog box p 59 Select a camera p 59 Configure the Advanced Camera Settings p 61 Configure the video window p 60 Configure the video window layout Create a layout p 65 Place a video window p 66 Save the layout p 67 Configure a dynamic layout p 67 Configure a layout sequence p 68 Important We strongly recommend that only one admin...

Page 57: ...er heavy load Automatically adjust the display frame rate Use large captions for video window title bars Increase the title bar text size of the video window Confirm when changing to full screen mode Display a confirmation message when switching to full screen mode Prompt to save changes when layouts are closed Display a confirmation message when a layout in the Viewer is closed The message is not...

Page 58: ...e the event indicator flashes right after the event occurs from 1 to 99 seconds Play audio alert Beep when an event occurs Display event indicator during playback Display an event during playback Acknowledge Event Prompt the operator to acknowledge an event Equal to or higher than Specify the priority of events to be acknowledged You cannot change the Show Video Window on Event Operator Notificati...

Page 59: ...button Name Tag or Status Enter a camera name tag or camera status in the search criteria box Camera Name Enter the camera name in the search criteria box Tag Select the camera tag to be searched Camera Status Select the camera status to be searched Camera Type Select the model name to be searched Host Name camera Enter the camera host name or IP address in the search criteria box Storage Server G...

Page 60: ...ring reception see Change the Video Window Resolution p 61 Full Screen Display an image on the entire screen For details see Display the video Full Screen p 61 Note Drag the lower right corner of the video window to resize it If the video window size selected in the Video Receive Size submenu is greater than 640 x 480 the load on the CPU will increase and the Viewer may operate more slowly 4 To di...

Page 61: ...menu 2 Click Video Format and select the video format JPEG or MPEG 4 or H 264 from the submenu 1 Click the video window menu button to display the menu 2 Click Video Receive Size and select the resolution 160x120 320x240 640x480 1280x960 or Default from the submenu Important When you display more than one video window for the same camera changes to the resolution of one of these windows are applie...

Page 62: ...ghted Average or Spot Shutter Specify the shutter speed when Exposure is set to Auto Shutter Priority using 12 levels from 1 8 to 1 8000 seconds Important The settings may be different for different camera models For details see the camera manual Metering mode Description Center weighted Meters the entire scene with an emphasis on the center Correct exposure is obtained for a subject near the cent...

Page 63: ...settings displayed in the list If Manual is selected use one of the following two methods to adjust the white balance R Gain and B Gain Specify the white balance parameters by dragging the sliders Drag to the right to increase the gain the sensitivity to brightness One Shot WB Force white balance adjustment to a light source Using a white object such as piece of white paper as a standard fill the ...

Page 64: ...king the Far or Near button Click One Shot AF to focus once on the current subject and then return to manual focus Pan Tilt Specify the pan tilt speed Slow Normal or Fast Zoom Specify the zoom speed Slow or Fast The pan tilt speed is unavailable When the digital zoom on the camera is set to Disable the zoom speed is unavailable Configure External Outputs Use the External Outputs tab on the Advance...

Page 65: ...pecify the layout name layout background and the video window display conditions and open it as a new layout Layout Name Enter the name of the layout Background Specify the background of the layout Click Browse to specify an image a bmp file or JPEG file to be used for the background Playback Options Specify how the video windows are displayed when the layout is opened View Live Video Display the ...

Page 66: ...ect ratio OK and Cancel Close the dialog box Note Using a custom grid may increase the load on the CPU Move a Video Window You can drag a video window to any position When the grid is set to None the video window remains in the position to which it is dragged For options other than None the video window snaps to the grid position that is nearest to where the window is dragged Note You can enlarge ...

Page 67: ...ntinue displaying cameras for Specify how long a video window in the layout will remain displayed when it does not match the criteria specified here OK and Cancel Close the dialog box 1 Click File Save Layout 2 Change the layout name as required and click OK 1 Click Layouts New Dynamic Layout to display the New Dynamic Layout dialog box 2 Specify the criteria for the video windows displayed in the...

Page 68: ...ts list Move Up and Move Down Move the selected layout up or down in the list to change the sequence order Remove Layout Remove a layout from the list Sequence Layouts Displays a list of layouts in the order of the layout sequence Interval Specify the display time of each layout in the sequence from 5 to 9999 seconds OK and Cancel Close the dialog box Open Multiple Layouts Using Tabs You can open ...

Page 69: ...kground and the video window display Dynamic Layout Same as the properties displayed in step 2 on p 67 You can specify the conditions for displaying cameras Layout Sequence Same as the properties displayed in step 2 on p 68 You can specify the layouts that will be automatically sequenced Copy to Folder Copy the selected layout to a folder Close Close the dialog box Note The settings in the Organiz...

Page 70: ...70 ...

Page 71: ...Chapter 5 Setting a Recording Schedule Setting weekly schedules Configuring recording modes continuous recording motion detection recording and sensor recording Setting special day schedules ...

Page 72: ... schedule Select a camera p 73 Name the schedule p 88 Set a schedule p 74 Specify the day p 89 Select a camera p 89 Configure the recording mode p 76 Continuous recording p 76 Intelligent function recording p 81 Motion detection recording p 78 Volume detection recording p 81 Sensor recording p 77 Configure the advanced recording settings p 82 Camera angle p 82 Focus p 87 Recording before or after ...

Page 73: ... camera name or any associated tags The following items are displayed when you click the search button Name Tag or Status Enter the camera name any associated tags or the camera status in the search criteria box Camera Name Enter the camera name in the search criteria box Tag Select the camera tag to be searched Camera Status Select the status to be searched Camera Type Select the model name to be...

Page 74: ...ate into the night Alternately select a duration for the recording minimum of 15 min in the Duration field If Restrict Service Time is enabled on the camera recording will take place only during the service time irrespective of the recording schedule Note You cannot specify overlapping recording schedules on the same camera The time of the recording schedules is based on the Storage Server clock W...

Page 75: ...p 81 Intelligent function recording and volume detection recording are not supported Note You can specify the priority of the events generated by sensor recording motion detection recording intelligent function recording and volume detection recording For details see p 77 and p 78 When two events occur simultaneously the event with the higher priority takes precedence Only supports continuous reco...

Page 76: ...in network traffic and the environment at the time of recording The maximum frame rate is 5 fps Record audio if available Select this check box if you want to record audio together with the image Note Audio recording is enabled when the recording mode is selected You cannot schedule audio only recording If MPEG 4 or H 264 recording format is used the recorded audio will not be in sync with the rec...

Page 77: ...mage may stop You cannot select H 264 for the Video Format You cannot select 1280x960 for the Resolution You cannot select MPEG 4 for the Video Format When using Use the recording mode stream JPEG images are recorded to the camera s SD memory card when the network connection is interrupted The frame rate of the recording is 1 fps For details see the camera manual The VB C50Fi does not support Reco...

Page 78: ...ity Select the event priority For details see Check Events p 104 Important When you select the Sensor Recording check box in the recoding mode list in step 1 Do not record is selected for all of the sensors You must select Start Recording for at least one sensor to be able to start sensor recording The sensor inputs can generate a large number of events for the Storage Server thereby increasing th...

Page 79: ...torage Server for Motion Detection Note If you select MPEG 4 or H 264 in Video Format the Storage Server option in the Detect Motion Using box cannot be selected Note also that if you select MPEG 4 or H 264 in other recording modes besides motion detection recording the Storage Server option still cannot be selected Recording Settings tab Priority Select the priority of the motion detection events...

Page 80: ...vity and the Area Ratio settings Use intelligent function recording instead of motion detection recording You cannot specify motion detection on the camera Color of the Colored Bar Meaning Green The detected motion does not exceed the values specified in Sensitivity and Area Ratio In this case the colored bar remains to the left of the size marker Red The detected motion exceeds the values specifi...

Page 81: ...g Settings Do not record Do not record when audio is detected Start Recording Start recording when audio is detected After selecting the item configure the recording settings below the item Priority Select the event priority For details see Check Events p 104 The other settings are the same as those for continuous recording For details see Continuous Recording Settings p 76 This feature is not sup...

Page 82: ...t Specified Select this item when you do not want to specify the camera angle Custom Specify the camera angle using the Preview window Drag the slider to change the camera zoom and click or drag inside the video to change the camera angle Presets Select the camera angle from the list of preset camera angles registered in the camera Preset Tour Move the camera through a series of preset camera angl...

Page 83: ...n configuring multiple cameras To be able to select Preset or Preset tour you must first register camera angle presets on the camera For details see the camera manual Configuring a Preset Tour Select Preset Tour in the Camera Angle settings and specify the order of the presets that are registered in the camera The tour starts with the first preset and proceeds down the list Change the order by sel...

Page 84: ...e an event max 30 seconds sec after event Number of seconds to record after an event max 999 seconds Note Recording Options cannot be specified when setting continuous recording Even if sec before event and sec after event are both set to 0 recording will continue when events are continuously generated The higher the value for sec before event the greater the memory usage for the Storage Server If...

Page 85: ...r weighted Average or Spot Shutter Specify the shutter speed when Exposure is set to Auto Shutter Priority using 12 levels from 1 8 to 1 8000 seconds Important The settings may be different for different camera models For details see the camera manual Metering mode Description Center weighted Meters the entire image focusing on the center of the image A correct exposure is obtained for a subject n...

Page 86: ... night mode function Enabled Record in night mode Auto The camera automatically decides when to switch to night mode When recording ends the night mode setting returns to the value before recording started White Balance Specify the appropriate white balance by selecting one of the camera s light source settings displayed in the list If Manual is selected use one of the following two methods to adj...

Page 87: ...once on the current subject and then return to manual focus Configure External Outputs External Outputs tab Enable or disable output to external devices registered on the camera when the recording schedule starts Not Specified Disable the external output On Enable the external output Note You must first specify the external device settings on the camera For details see the camera manual The number...

Page 88: ...fy the day for the special day schedule selected in Camera search Find the camera that will be assigned the schedule Schedule area Displays the currently registered cameras and their corresponding recording schedules by day This area also has a search function for finding cameras using search criteria such as the camera name or tags For details see Select a Camera p 73 Close Close this window Note...

Page 89: ... Recording Settings p 82 Save the Recording Schedule The schedule is displayed in the schedule area The schedule becomes active as soon as it is displayed in the schedule area 1 Click the schedule name you want to use in the schedule type area 2 Click Add in the days area 3 Specify the date for the special day schedule on the calendar and click OK 1 Select the schedule name in the schedule type ar...

Page 90: ...ent Click Not Use Repeating Weekly Schedules to stop the semi transparent display Edit a Recording Schedule 1 Select the recording schedule you want to edit in the schedule area and click Edit 2 Change the settings of the recording schedule 3 Click OK to close the dialog box 1 Select the schedule that you want to delete in the schedule area 2 Click Delete 1 Select a camera in the schedule area 2 C...

Page 91: ...rding schedule after making the copy Hint Importing by specifying the day of the week can be used to import the schedule for any of the days of the week contained in the weekly schedule For example you can import the schedule of a day of the week that is different from the day of the week of the target day 1 Select a camera in the schedule area 2 Click Copy from Repeating Weekly Schedule 3 Select ...

Page 92: ...92 ...

Page 93: ...Chapter 6 Day to Day Operations Viewing live images Playing recordings Operating a camera Changing the layout of a video window Viewing and checking events ...

Page 94: ...recording p 97 Zoom in out of the Viewer display p 99 View live images Get control of a camera p 100 Change the camera angle using a panorama image p 102 Use the pan tilt zoom feature p 100 Play back audio p 102 Change the camera angle to a preset position p 101 Compensate for dark regions in the image p 103 Check events View a live event p 104 Search for events p 105 ...

Page 95: ...lay a grid for arranging video windows Timeline Display the time and date and events that have occurred Click an event to play back the recording Status bar Displays Viewer status messages and CPU load Audio Listen to live audio and transmit audio using the camera s two way audio feature Camera Selector Display and select cameras added to the Storage Server Group Live Events Log Display events tha...

Page 96: ...ide of the saved still image You cannot specify the position font size or color Save As Save the preview video Cancel Closes the dialog box The Save As dialog box appears The file is saved in the specified location and the focus is placed on the Capture Still Frame dialog box again If you use the on screen display feature of the camera the date and time on the snapshot may look different from the ...

Page 97: ...isplay area that are not associated with the selected camera secondary events are displayed as transparent If you do not select a camera all events are displayed as primary events not transparent Click View Timeline to display hide the timeline Search by Specifying the Time and Date The playhead moves to the specified date and time and the recorded video starts playing in the video window Search b...

Page 98: ...ewind each click changes the speed in sequence 1x 2x 5x 10x Go to previous frame Play pause Go to next frame Fast forward each click changes the speed in sequence 2x 5x 10x Jump to next event Important You cannot use rewind or go to previous frame for recordings in MPEG 4 or H 264 format Also the fast forward speed is fixed at 2x Because image data is being sent from the Storage Server to the View...

Page 99: ...players that support the mov file format If QuickTime Player is not installed you can download it for free from http www apple com quicktime We recommend that you use QuickTime Player Version 6 5 1 or later 1 On the toolbar click next to Zoom 2 Click to zoom out Important The quality of the video image in the video window decreases when you zoom in To increase the image quality increase the resolu...

Page 100: ... you want to keep control of the camera click the video window If you want to move the video window while you are in control of the camera drag the title bar You can also control the camera while recording If the camera angle to be used during recording has been set the camera returns to the set position when the Viewer releases camera control Use the Pan Tilt Zoom Feature Use the Pan Tilt Zoom Fe...

Page 101: ...telephoto position Click or drag the slider down to move toward the wide angle position Pan tilt zoom is unavailable Pan tilt is unavailable Zoom is unavailable when the camera s digital zoom is set to Disable Pan tilt zoom is unavailable if a fixed camera or an external camera such as the VC C50i is used Change the Camera Angle to a Preset Position You can select a preset camera angle in the Came...

Page 102: ...io If the audio feature on the camera is used you can play audio using the audio panel or send audio using a microphone The Audio panel appears Options view Listen to Audio Starts audio playback Use Microphone Starts audio transmission Show options button Displays the options for the Audio panel Play audio also while using microphone Select if you want to play audio even when using a microphone Us...

Page 103: ...Uses the default sensitivity for silence detection Set the sensitivity manually Drag the slider to set the detection sensitivity OK and Cancel Close the dialog box Compensate for Dark Regions in the Image Use the viewer shade control to compensate for any dark regions in the image Off Disable the shade control Low Medium High Very High Enable the shade control View the video window and select a co...

Page 104: ... pp 77 78 Other event priorities can be specified when setting the Storage Server Group p 42 Acknowledging an Event By default when a Highest priority event is displayed in the Live Events Log window an icon is displayed indicating that you should acknowledge the event The event will blink until you acknowledge it Follow these steps to acknowledge the event User authentication settings are permane...

Page 105: ...in the Event Search dialog box to specify detailed search criteria When Select Specify Date Range to specify the search period From and To Select Specify Date Range in When to specify the start and end times and dates for the search period Event Select the type of events to be searched Status Specify the status of the events All Statuses On Off Priority Specify the priority of the events to be sea...

Page 106: ...106 ...

Page 107: ...Chapter 7 Operation and Management Error and warning level events How to check the status of the Storage Server Disk space management ...

Page 108: ... when the free disk space becomes less than the threshold or the disk usage becomes greater than the threshold Pauses resumes recording due to low disk space 1 Recording Suspended Low Disk Space drive name Occurs when the free disk space becomes less than the limit level or the disk usage becomes greater than the limit level Error connecting to the camera Error Cannot Connect to Camera Occurs on a...

Page 109: ...the way you intended to refer to Chapter 1 and reconsider the system configuration The System Information dialog box shows the status on three different tabs Cameras tab This tab displays recording settings and processing information camera tag status specified frame rate actual frame rate receiving bit rate and recording bit rate on the registered cameras Storage Servers tab This tab displays inf...

Page 110: ...arning Level For example if the disk space is 80 GB and the value for Low Disk Space Warning Level is 10 the Storage Server reaches the low remaining disk space notification level when the remaining free disk space becomes 8 GB or less Note If other applications use the same hard disk you need to consider condition 2 Even if the Storage Server uses a small amount of disk space it may reach the low...

Page 111: ...pace increases above this level after deleting recording files Limit Level Conditions and Calculation Method The limit level is considered reached when the amount of free disk space drops below 64 MB This value is fixed Threshold level Delete oldest first Notification Deleting files on Drive Letter drive due to low free disk space Started Important The threshold level is to protect against reachin...

Page 112: ...112 ...

Page 113: ...Chapter 8 Backup Types of backup target files and their destinations Restoring a recording file ...

Page 114: ...ecording data Configuration Files The settings for the Storage Server and the Viewer are saved in the following folders on the computer where the program is installed You must back up all of these folders to completely back up the configuration files Configuration file path System drive ProgramData Canon WebView NVR30 System drive Users user name AppData Local Canon WebView NVR30 Note The configur...

Page 115: ...le click RM Lite Storage Server Note To restart the Storage Server follow the same steps and click Start in step 6 How to Restore a Backup 1 Prepare a new Storage Server for the restore 2 Install this software 3 Stop the Storage Server 4 Restore the configuration file for this software to its original location 5 Restore the recording files to their original location 6 Restore the event files to th...

Page 116: ...116 ...

Page 117: ...Chapter 9 Troubleshooting Actions required when recording errors occur Solutions when Viewer problems occur Error messages ...

Page 118: ...o window Double click the video window or click Control on the Camera Control panel p 100 If images are being played the title bar of the video window is gray you cannot operate the camera Click Live on the timeline and get control of the camera When I click a video window to display the Video Window menu Record Now is gray unavailable But I can use the feature in another video window Display came...

Page 119: ...ows down or it takes longer to perform various configuration changes such as registering cameras or recording schedules from the Viewer for Windows Vista Make sure that less than 10 cameras are registered on each Storage Server If the Storage Server is running Windows Vista use Windows Server 2008 instead Live images are no longer displayed from any camera for Windows Vista Make sure that less tha...

Page 120: ...ture cannot be used Make sure that the camera is not disabled on the Advanced tab in camera name Properties If the camera is disabled click Enable Camera p 49 The amount of Storage Server disk space usage is much higher than the calculated level pp 22 110 and free disk space is low When the video size or quality setting of the camera is high the amount of data per frame is large In addition if you...

Page 121: ... Camera control lost A timeout occurred while the Viewer was controlling the camera or another user with higher priority requested camera control Displayed for three seconds No recorded video Displayed when playing back a recording if there is no recorded image at the current playhead position Cannot Connect to the Storage Server Displayed when you cannot connect to the Storage Server to play back...

Page 122: ...ing a recording schedule Streaming for recording is applied only when the following conditions are satisfied the video stream format is JPEG the frame rate settings do not exceed 10 fps there is no existing recording mode stream in the camera Tried to enable a recording mode stream Message Cause Adding and editing a camera Are you sure you want to remove the camera camera name If the camera is rem...

Page 123: ...is day has already been set as special day schedule schedule name Do you want to delete the day from the special day schedule schedule name and use it in this schedule Tried to use dates that are already used for another special day schedule Special day schedules cannot be set the end time which is earlier than the start time Tried to register a schedule that goes past 24 00 A schedule with this n...

Page 124: ...cannot delete layout name because it is used by the current layout sequence Tried to delete a layout that is part of the current layout sequence You cannot delete the layout sequence layout sequence name because it is the current layout sequence Tried to delete the current layout sequence You cannot move the folder folder name because it contains an open layout sequence Tried to move the folder th...

Page 125: ...ite to config storage server name Could not save the configuration Configuration file failed consistency check exiting Inconsistency was found in the configuration file This occurs when the configuration file is rewritten directly Error Local machine not in the config Could not find the IP address or host name of the Storage Server in the configuration file Failed to bind to listen port port numbe...

Page 126: ...red in the TCP connection with the camera This occurs when the camera is powered off 10061 No connection could be made because the target machine actively refused it The camera rejected the TCP connection This occurs when the port number is incorrect or from another cause 10064 A socket operation failed because the destination host was down Occurs when the camera is powered off Normally 10060 occu...

Page 127: ...ever it may occur when an attempt is made to connect to an unsupported camera 12007 The server name could not be resolved The host name could not be resolved This error is generated when a host name that is not registered in the DNS is specified or when a problem occurred in communication with the DNS itself 12017 The operation was canceled usually because the handle on which the request was opera...

Page 128: ...ing Frame Rate due to resolution of high load issues Low Disk Space Warning Warning Files deleted due to low disk space Delete recorded files when disk space is insufficient Delete recorded files when disk space is insufficient started or Delete recorded files when disk space is insufficient stopped Delete recorded files when disk space is low Delete recorded files when disk space is low started o...

Page 129: ...Appendix Creating a shortcut icon Camera maintenance Checking the version Limitations for MPEG 4 and H 264 formats Using AXIS models ...

Page 130: ...nfiguration using the Restore Tool Create a Shortcut Icon for Starting the Viewer Important You cannot reconfigure the shortcut icon that is automatically created on your desktop when you install this software The login password can be easily viewed in the properties of the shortcut icon Make sure to take sufficient security measures when using this feature 1 Right click Viewer exe in the installa...

Page 131: ...Playback You can perform the following operations However you cannot use Rewind and Previous Frame Specify the playback time on the timeline Start playback from the live event display window and the event search window You can use Pause Fast Forward Next Frame Previous Event and Next Event If you change the recording format of a recording schedule from MPEG 4 or H 264 to JPEG part of the way throu...

Page 132: ... Available video sizes are 160 x 120 320 x 240 and 640 x 480 If Aspect ratio correction is not selected in the AXIS Q7404 Q7401 s Image tab of the Video Stream Settings the displayed video will be slightly compressed horizontally We recommend that you select Aspect ratio correction Reboot the AXIS Q7404 Q7401 if you use it to change settings Functional Limitations The following limitations apply t...

Page 133: ...ontrol panel s Presets is disabled Audio Audio input output is not supported Even if you select the AXIS Q7404 Q7401 s video window the audio panel will be disabled Text Overlay Settings The AXIS Q7404 Q7401 text overlay settings date time text image in video display cannot be set with RM 64 25 9 In addition the text overlay settings time display and RM 64 25 9 s time display are not synchronized ...

Page 134: ...lity 19 compensation 62 63 85 86 continuous recording 75 settings 76 custom grid 66 D dynamic layouts 65 settings 67 E e mail notifications adding 43 settings 42 event display 58 event notification 58 events acknowledging 104 checking 104 errors and warnings 108 priority 44 searching 105 settings 42 external outputs 64 87 F firmware 130 focus 64 87 focus and speed 64 format video 76 131 video wind...

Page 135: ...recording before and or after an event 84 manually 96 recording mode 75 advanced settings 82 settings 76 recording options 84 recording schedule editing 90 settings flow 72 Special Day 88 Weekly 73 recording settings 41 resolution video window 61 RM Lite 28 specification comparison 29 S saving a part of a recording 99 searching events 105 for recordings 97 sensor recording 26 75 settings 77 settin...

Page 136: ...22 61 76 video size 23 60 video window 59 95 controlling the camera 101 display settings 60 layout 65 menu button 60 moving 66 placing 66 playback 98 videos compensate for dark regions 103 Viewer features 95 license 19 settings 57 settings flow 56 shortcut icon 130 starting 39 viewer shade control 103 viewing area 95 zoom 99 VK 64 16 19 volume detection recording 26 75 settings 81 W Weekly schedul...

Page 137: ...Index 137 Appendix ...

Page 138: ...Kowloon Hong Kong CANON AUSTRALIA PTY LTD 1 Thomas Holt Drive North Ryde Sydney N S W 2113 Australia CANON EUROPA N V Bovenkerkerweg 59 61 P O Box 2262 1185 XB Amstelveen The Netherlands CANON EUROPE LTD 6 Roundwood Avenue Stockley Park Uxbridge Middlesex UB11 1JA United Kingdom CANON COMMUNICATION IMAGE FRANCE 12 Rue De L lndustrie 92414 Corbevoie Cedex France CANON UK LTD Woodhatch Reigate Surre...

Reviews: