313
ç
Contents
Printing Images Wirelessly from a
Connected Printer
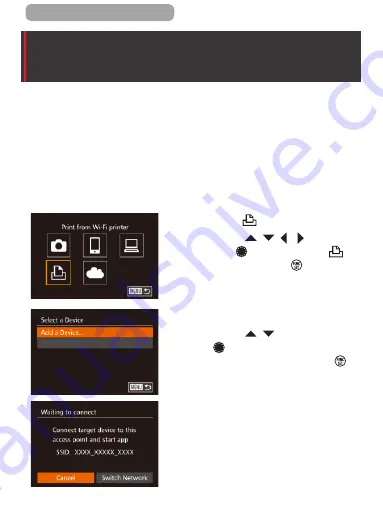
Connect the camera to a printer via Wi-Fi to print as follows.
These steps show how to use the camera as an access point, but
you can also use an existing access point (
1
Access the Wi-Fi menu.
z
Access the Wi-Fi menu as described
in step 2 in “Adding a Smartphone
Using the Wi-Fi Menu” (
2
Choose [
].
z
Press the [
][
][ ][ ] buttons or
turn the [
] dial to choose [
],
and then press the [
] button.
3
Choose [Add a Device].
z
Press the [
][
] buttons or turn
the [
] dial to choose [Add a
Device], and then press the [
]
button.
.
z
The camera’s SSID is displayed.
Summary of Contents for Power Shot G7X
Page 388: ...Appendix Helpful information when using the camera 10 388 ç Contents ...
Page 408: ...408 ç Contents 2 1 Flash 188 1 1 1 3 3 3 1 Flash Exposure Compensation 190 1 ...
Page 412: ...412 ç Contents FUNC Menu DR Correction 163 1 1 1 Shadow Correction 164 1 1 ...
Page 413: ...413 ç Contents ISO Speed 158 AUTO 1 125 12800 1 White Balance 165 1 1 1 1 ...
Page 415: ...415 ç Contents Bracketing 161 175 1 1 1 Self Timer 81 1 1 ...
Page 417: ...417 ç Contents 1 Still Image Aspect Ratio 99 1 1 1 1 Image Type 193 1 ...
Page 418: ...418 ç Contents Resolution 100 1 1 Compression 195 1 1 Movie Quality 102 1 ...
Page 421: ...421 ç Contents Off 1 1 6x 2 0x 1 AF Point Zoom 104 On 1 Off 1 Servo AF 181 On 1 Off 1 4 ...
Page 423: ...423 ç Contents Off 1 MF Point Zoom 172 Off 1 2x 1 4x 1 Safety MF 172 On 1 Off 1 ...


