background image

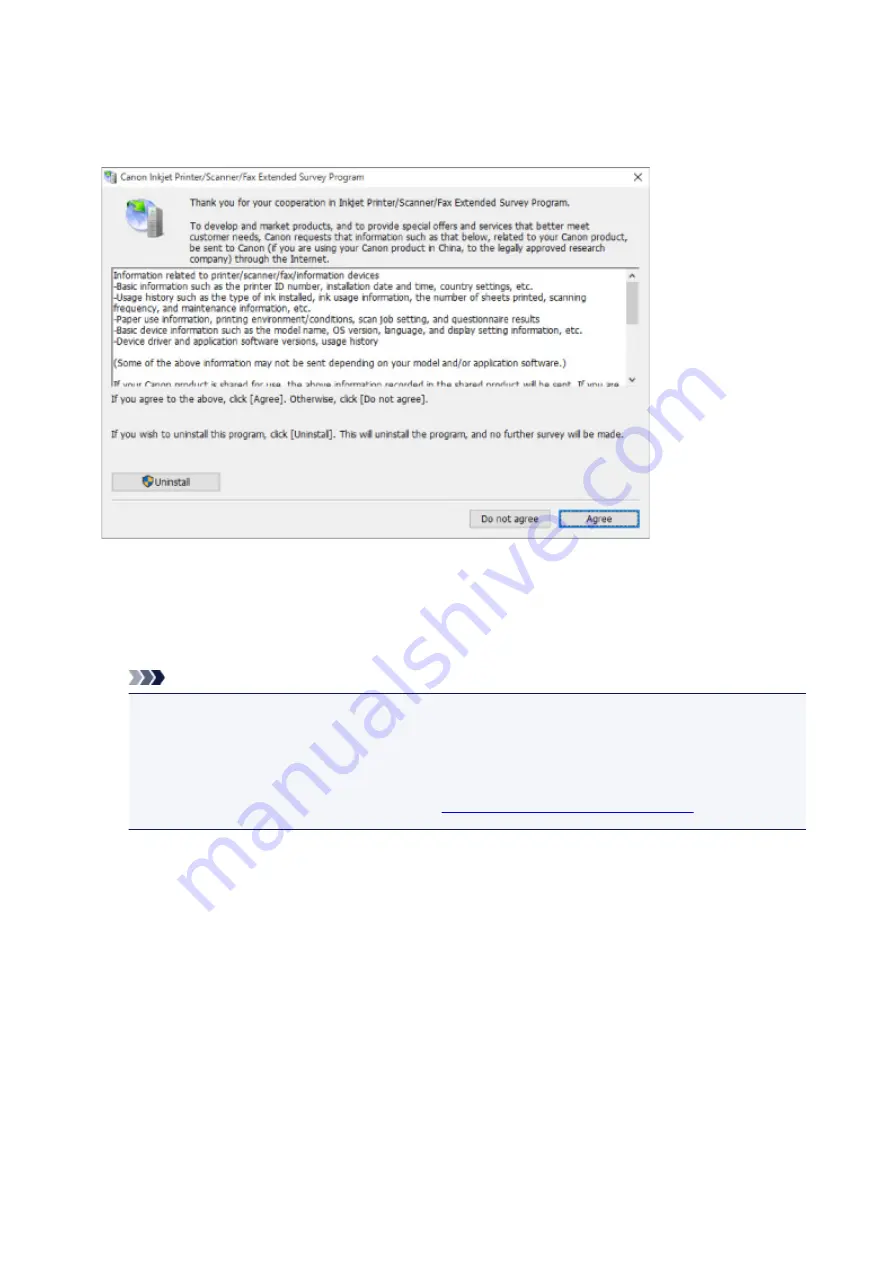
If the Inkjet Printer/Scanner/Fax Extended Survey Program is installed, a screen appears asking for
permission to send the printer and application usage information every month for about ten years.

Read the information on the screen and follow the instructions below.

If you agree to participate in survey program:

Click 

Agree

 and follow the on-screen instructions. The printer usage information is sent via the

Internet. Once you have completed the procedure, the information is subsequently sent automatically
and the confirmation screen does not reappear.

Note

• When the information is being sent, a warning such as an Internet security message may appear.

Make sure the program name is "IJPLMUI.exe" and allow it.

• If you clear 

Send automatically from the next time

 check box, the information will not be sent

automatically from next time and a confirmation screen will appear at the time of the next survey.
To send the information automatically, see 

Changing confirmation screen setting:

.

If you do not agree to participate in survey program:

Click 

Do not agree

. The confirmation screen closes and the survey is skipped. The confirmation

screen will reappear one month later.

To uninstall Inkjet Printer/Scanner/Fax Extended Survey Program:

To uninstall the Inkjet Printer/Scanner/Fax Extended Survey Program, click 

Uninstall

 and follow the

on-screen instructions.

Changing confirmation screen setting:

1. Make the following settings.

◦ In Windows 10, right-click 

Start

 button and select 

Programs and Features

.

162

Summary of Contents for Pixma TS201

Page 1: ...TS200 series Online Manual Basic Operation Maintenance Overview of the Machine Information about Paper Printing Copying Frequently Asked Questions List of Support Code for Error English...

Page 2: ...ips 38 Maintenance 39 If Printing Is Faint or Uneven 40 Maintenance Procedure 41 Printing the Nozzle Check Pattern 44 Examining the Nozzle Check Pattern 45 Cleaning the Print Head 46 Deep Print Head C...

Page 3: ...g the Printer On and Off 86 Checking the Power Plug Power Cord 88 Unplugging the Printer 89 Changing Settings 90 Changing Printer Settings from Your Computer macOS 91 Managing the Printer Power 92 Cha...

Page 4: ...Printing Is Blurry Colors Are Wrong White Streaks Appear 129 Colors Are Unclear 132 Lines Are Misaligned 134 Paper Is Smudged Printed Surface Is Scratched 135 Cannot Complete Printing 138 Lines Incomp...

Page 5: ...ror 166 List of Support Code for Error Paper Jams 167 1300 168 Paper Is Jammed inside Printer 169 1000 172 1200 173 1203 174 1401 175 1430 176 1485 177 1682 178 1686 179 1688 180 168A 181 1700 182 189...

Page 6: ...Using Online Manual Operating Environment Symbols Used in This Document Touch enabled Device Users Windows Printing Online Manual Trademarks and Licenses Screenshots in This Manual 6...

Page 7: ...personal injury or material damage caused by incorrect operation of the equipment These must be observed for safe operation Important Instructions including important information To avoid damage and i...

Page 8: ...ws For touch actions you need to replace right click in this document with the action set on the operating system For example if the action is set to press and hold on your operating system replace ri...

Page 9: ...A and or other countries Note The formal name of Windows Vista is Microsoft Windows Vista operating system Copyright c 2003 2015 Apple Inc All rights reserved Redistribution and use in source and bina...

Page 10: ...indicated by a copyright notice that is included in or attached to the work an example is provided in the Appendix below Derivative Works shall mean any work whether in Source or Object form that is...

Page 11: ...excluding those notices that do not pertain to any part of the Derivative Works and 4 If the Work includes a NOTICE text file as part of its distribution then any Derivative Works that You distribute...

Page 12: ...such obligations You may act only on Your own behalf and on Your sole responsibility not on behalf of any other Contributor and only if You agree to indemnify defend and hold each Contributor harmles...

Page 13: ...bridge Broadband Ltd copyright notice BSD Portions of this code are copyright c 2001 2003 Cambridge Broadband Ltd All rights reserved Redistribution and use in source and binary forms with or without...

Page 14: ...S OR BUSINESS INTERRUPTION HOWEVER CAUSED AND ON ANY THEORY OF LIABILITY WHETHER IN CONTRACT STRICT LIABILITY OR TORT INCLUDING NEGLIGENCE OR OTHERWISE ARISING IN ANY WAY OUT OF THE USE OF THIS SOFTWA...

Page 15: ...CIAL EXEMPLARY OR CONSEQUENTIAL DAMAGES INCLUDING BUT NOT LIMITED TO PROCUREMENT OF SUBSTITUTE GOODS OR SERVICES LOSS OF USE DATA OR PROFITS OR BUSINESS INTERRUPTION HOWEVER CAUSED AND ON ANY THEORY O...

Page 16: ...DISCLAIMED IN NO EVENT SHALL APPLE OR ITS CONTRIBUTORS BE LIABLE FOR ANY DIRECT INDIRECT INCIDENTAL SPECIAL EXEMPLARY OR CONSEQUENTIAL DAMAGES INCLUDING BUT NOT LIMITED TO PROCUREMENT OF SUBSTITUTE GO...

Page 17: ...in binary form must reproduce the above copyright notice this list of conditions and the following disclaimer in the documentation and or other materials provided with the distribution Neither the na...

Page 18: ...distribute this software for any purpose without fee is hereby granted provided that this entire notice is included in all copies of any software which is or includes a copy or modification of this s...

Page 19: ...pplies only to products supporting Wi Fi c 2009 2013 by Jeff Mott All rights reserved Redistribution and use in source and binary forms with or without modification are permitted provided that the fol...

Page 20: ...Basic Operation Printing Photos from a Computer 20...

Page 21: ...ibes how to print photos with My Image Garden 1 Open the paper support A 2 Pull out the paper output tray B and the output tray extension C 3 Load paper vertically WITH THE PRINT SIDE FACING YOU 4 Adj...

Page 22: ...rent from the Paper lamp indication E press the Paper Select button F to change the selection 6 Click the My Image Garden icon G in Quick Menu The Guide Menu screen is displayed Note The number and ty...

Page 23: ...To select two or more photos at a time click photos while pressing the Ctrl key For macOS To select two or more photos at a time click photos while pressing the command key 10 Click Print K 11 Specify...

Page 24: ...lets you use images on your computer such as photos taken with a digital camera in a number of ways For Windows My Image Garden Guide For macOS My Image Garden Guide If your printer is not displayed o...

Page 25: ...Handling Paper FINE Cartridges etc Loading Paper Replacing a FINE Cartridge 25...

Page 26: ...Loading Paper Loading Plain Paper Photo Paper 26...

Page 27: ...Canon Oc Office Colour Paper SAT213 For the page size and paper weight you can use for this printer see Supported Media Types 1 Prepare paper Align the edges of paper If paper is curled flatten it No...

Page 28: ...the rear tray WITH THE PRINT SIDE FACING YOU 4 Adjust the paper guide D with the paper left side Do not slide the paper guide too hard against the paper The paper may not be fed properly Important Al...

Page 29: ...s up according to the paper size loaded last 5 Check paper size setting If the paper size loaded on the rear tray is different from the Paper lamp indication H press the Paper Select button I to chang...

Page 30: ...quality or scratches on the printed surface If you notice blurring or uneven colors increase the print quality setting and try printing again To prevent incorrect printing this printer has a function...

Page 31: ...Replacing a FINE Cartridge Replacing a FINE Cartridge Ink Tips 31...

Page 32: ...thermore with such a FINE cartridge the printer will not be able to inform you when to replace the FINE cartridge properly Once a FINE cartridge has been installed do not remove it from the printer an...

Page 33: ...ves to the replacement position Caution Do not hold the FINE cartridge holder to stop or move it forcibly Do not touch the FINE cartridge holder until it stops completely Important The inside of the p...

Page 34: ...id staining of clothing or the surrounding area Discard the empty FINE cartridge according to the local laws and regulations regarding disposal of consumables 5 Prepare a new FINE cartridge 1 Take a n...

Page 35: ...you have removed it Discard it according to the local laws and regulations regarding disposal of consumables Do not touch the electrical contacts or print head nozzle on a FINE cartridge The printer m...

Page 36: ...hat it does not hit the electrical contacts on the FINE cartridge holder or cause trouble with the FINE cartridge 2 Push the FINE cartridge in and up firmly until it snaps into place Important Check i...

Page 37: ...printer may make noise during operation 8 Adjust the print head position For Windows Adjusting Print Head Position For macOS Adjusting Print Head Position After replacing the FINE cartridge align the...

Page 38: ...ality The printer has the function to automatically clean the ink jet nozzles to prevent clogging In the cleaning procedure used ink for nozzle cleaning is limited to a small amount Does black and whi...

Page 39: ...Maintenance If Printing Is Faint or Uneven Performing Maintenance Functions from Your Computer Windows Performing Maintenance Functions from Your Computer macOS Cleaning 39...

Page 40: ...If Printing Is Faint or Uneven Maintenance Procedure Printing the Nozzle Check Pattern Examining the Nozzle Check Pattern Cleaning the Print Head Deep Print Head Cleaning 40...

Page 41: ...from Your Computer Check if the FINE cartridge is installed correctly Replacing Procedure Also check if the protective tape on the bottom of the FINE cartridge is removed If the Alarm lamp lights or f...

Page 42: ...erforming from step 1 to step 3 twice Step4 Clean the print head deeply From the printer Deep Print Head Cleaning From the computer For Windows Cleaning the Print Heads For macOS Cleaning the Print He...

Page 43: ...When the Print Results Are Not Even such as the Ruled Lines Are Misaligned Step Align the print head For Windows Adjusting Print Head Position For macOS Adjusting Print Head Position 43...

Page 44: ...to prepare a sheet of A4 or Letter sized plain paper 1 Make sure that the power is turned on 2 Load a sheet of A4 or Letter sized plain paper on the rear tray 3 Pull out the paper output tray and the...

Page 45: ...streaks in the pattern B If there are missing lines in the pattern A C Good D Bad lines are missing If there are horizontal white streaks in the pattern B E Good F Bad horizontal white streaks are pr...

Page 46: ...turned on 2 Press and hold RESUME button and release it when Alarm lamp flashes 2 times The printer starts cleaning the print head The cleaning will be complete when the ON lamp lights after flashing...

Page 47: ...int head deeply The cleaning will be complete when the ON lamp lights after flashing Do not perform any other operations until the printer completes the deep cleaning of the print head This takes abou...

Page 48: ...Performing Maintenance Functions from Your Computer macOS Opening Remote UI for Maintenance Cleaning the Print Heads Adjusting Print Head Position Checking Ink Status from Your Computer 48...

Page 49: ...pplies 3 Click Show Printer Webpage in General tab Remote UI starts Note The password may have to be entered after Remote UI starts In such a case enter the password and click OK In case you do not kn...

Page 50: ...ing tape will hinder ink output Did you install the ink cartridges in their correct positions 3 Execute cleaning Make sure that the printer is on and then click Yes Print head cleaning starts 4 Comple...

Page 51: ...the printer is on and then click Yes Print head deep cleaning starts 4 Complete deep cleaning Next the message for nozzle check pattern printing is displayed 5 Check the results To check whether the p...

Page 52: ...ars 3 Load paper in printer In the rear tray load 2 sheets of plain A4 sized or Letter sized paper 4 Run head position adjustment Check that the printer power is on and then click Yes Head alignment s...

Page 53: ...Cleaning Cleaning Exterior Surfaces Cleaning Paper Feed Rollers Cleaning Inside the Printer Bottom Plate Cleaning 53...

Page 54: ...aper feed rollers have stopped rotating load a sheet of A4 or Letter sized plain paper or cleaning sheet available on the market on the rear tray 2 Pull out the paper output tray and the output tray e...

Page 55: ...If the problem is not resolved after cleaning the paper feed rollers contact your nearest Canon service center to request a repair 55...

Page 56: ...rear tray with the open side facing you 3 Pull out the paper output tray and the output tray extension 3 Press and hold RESUME button and release it when Alarm lamp flashes 5 times The paper cleans t...

Page 57: ...57...

Page 58: ...strictions on Printing Printer Handling Precautions Transporting Your Printer Keeping Print Quality High Main Components and Their Use Main Components Power Supply Changing Settings Changing Printer S...

Page 59: ...Safety Safety Precautions Regulatory Information WEEE EU EEA 59...

Page 60: ...ended to have two people lifting the printer Accidental dropping of the printer may cause injury For the printer s weight refer to the Specifications Do not place any object on the printer Especially...

Page 61: ...e user is encouraged to try to correct the interference by one or more of the following measures Reorient or relocate the receiving antenna Increase the separation between the equipment and receiver C...

Page 62: ...onmental benefits and the amount of energy consumption will carry the Energy Star logo accordingly Paper types This product can be used to print on both recycled and virgin paper certified to an envir...

Page 63: ...d Elektronik Altger te 2012 19 EU und nationalen Gesetzen nicht ber den Hausm ll entsorgt werden darf Dieses Produkt muss bei einer daf r vorgesehenen Sammelstelle abgegeben werden Dies kann z B durch...

Page 64: ...el voorkomen in elektrische en elektronische apparatuur EEA Bovendien werkt u door een juiste afvoer van dit product mee aan het effectieve gebruik van natuurlijke hulpbronnen Voor meer informatie ove...

Page 65: ...de deixalles dom stiques de la vostra localitat Per a m s informaci sobre la devoluci i el reciclatge de productes RAEE visiteu www canon europe com weee Solo per Unione Europea e SEE Norvegia Islanda...

Page 66: ...utos REEE v a www canon europe com weee G lder kun i Europ iske Union og E S Norge Island og Liechtenstein Dette symbol angiver at det p g ldende produkt ikke m bortskaffes sammen med dagrenovation jf...

Page 67: ...keva direktiivi SER direktiivi 2012 19 EU sek kansallinen lains d nt kielt v t tuotteen h vitt misen talousj tteen mukana Tuote on viet v asianmukaiseen ker yspisteeseen esimerkiksi kodinkoneliikkeese...

Page 68: ...n l tky Va e spolupr ce na spr vn likvidaci tohoto v robku sou asn napom e efektivn mu vyu v n p rodn ch zdroj Dal informace o m stech sb ru va eho odpadn ho za zen k recyklaci v m sd l m stn ad va o...

Page 69: ...pre t ty Eur pskej nie a EHP N rsko Island a Lichten tajnsko Tento symbol znamen e pod a Smernice 2012 19 E o odpade z elektrick ch a elektronick ch zariaden OEEZ a pod a platnej legislat vy Slovenske...

Page 70: ...dei sazinieties ar viet jo pa vald bu atkritumu sav k anas atbild go dienestu pilnvarotu EEIA strukt ru vai sadz ves atkritumu apsaimnieko anas iest di Lai sa emtu pla ku inform ciju par elektrisko un...

Page 71: ...opean i EEA Norvegia Islanda i Liechtenstein Acest simbol indic faptul c acest produs nu trebuie aruncat o dat cu reziduurile menajere n conformitate cu Directiva DEEE Directiva privind de eurile de e...

Page 72: ...kom uredu komunalnoj slu bi odobrenom WEEE programu ili slu bi za odlaganje ku nog otpada Ostale informacije o vra anju i recikliranju WEEE proizvoda potra ite na www canon europe com weee Korisnici u...

Page 73: ...Handling Precautions Canceling Print Jobs Storing Printed Images Legal Restrictions on Printing Printer Handling Precautions Transporting Your Printer Keeping Print Quality High 73...

Page 74: ...it Postage stamps canceled or uncanceled Identification badges or insignia Selective service or draft papers Checks or drafts issued by governmental agencies Motor vehicle licenses and certificates of...

Page 75: ...Precautions Do not place any object on the printer Do not place any object on the printer It may fall into the rear tray and cause the printer to malfunction Also place the printer where objects will...

Page 76: ...he box containing the printer or turn it on its side or upside down Doing so may cause the ink to leak during transport and cause damage to the printer 1 Turn the printer off 2 Confirm that the ON lam...

Page 77: ...ress the ON Stop button to turn off the power the printer caps the print head nozzles automatically to prevent from drying If you unplug the power cord from the wall outlet before the ON lamp is turne...

Page 78: ...Main Components and Their Use Main Components Power Supply 78...

Page 79: ...Main Components Front View Rear View Inside View Operation Panel 79...

Page 80: ...tray Load paper here Two or more sheets of the same size and type of paper can be loaded at the same time and fed automatically one sheet at a time Loading Plain Paper Photo Paper 5 cover Open to rep...

Page 81: ...Plug in the USB cable Make sure the terminal orientation is correct when you plug in the USB cable Important Do not touch the metal casing This can cause trouble Do not plug in or unplug the USB cabl...

Page 82: ...should be installed into the left slot and the black FINE cartridge should be installed into the right slot Note For details on replacing a FINE cartridge see Replacing a FINE Cartridge Important The...

Page 83: ...3 RESUME button Changes printer settings turns off the Alarm lamp or selects a printer maintenance menu 4 Alarm lamp Lights or flashes when an error occurs 5 Paper lamp When you load paper on the rear...

Page 84: ...Power Supply Confirming that the Power Is On Turning the Printer On and Off Checking the Power Plug Power Cord Unplugging the Printer 84...

Page 85: ...Confirming that the Power Is On The ON lamp is lit when the printer is turned on Note It may take a while for the printer to start printing immediately after you turn on the printer 85...

Page 86: ...rror Occurs You can set the printer to automatically turn on when a print operation is performed This feature is set to off by default For details on the auto power on feature see below For Windows Ma...

Page 87: ...when no operations are performed or no print jobs are sent to the printer for a certain interval This is the default setting For details on the auto power off feature see below For Windows Managing th...

Page 88: ...cord is hot The power plug power cord is rusty The power plug power cord is bent The power plug power cord is worn The power plug power cord is split Caution If you find anything unusual with the pow...

Page 89: ...the ON lamp is off Unplugging the power cord while the ON lamp is lit or flashing may cause drying or clogging of the print head and print quality may be reduced 1 Press the ON Stop button to turn the...

Page 90: ...Changing Settings Changing Printer Settings from Your Computer Windows Changing Printer Settings from Your Computer macOS Changing Settings from Operation Panel 90...

Page 91: ...Changing Printer Settings from Your Computer macOS Managing the Printer Power Changing the Printer Operation Mode 91...

Page 92: ...on function automatically turns on the printer when data is received 1 Selecting Device settings from Remote UI 2 Click Energy saving settings 3 Complete the following settings Auto power off Specify...

Page 93: ...the paper settings set in the Print dialog differs from the paper information registered to the printer Ink drying wait time You can set the length of the printer rest time until printing of the next...

Page 94: ...Changing Settings from Operation Panel Initializing Printer Settings 94...

Page 95: ...he printer settings 1 Make sure that the printer is turned on 2 Press and hold RESUME button and release it when Alarm lamp flashes 13 times All the printer settings are initialized After resetting pe...

Page 96: ...ft margin Letter 0 26 inches 6 4 mm Other sizes 0 14 inches 3 4 mm Right margin Letter 0 25 inches 6 3 mm Other sizes 0 14 inches 3 4 mm Operating environment Temperature 41 to 95 F 5 to 35 C Humidity...

Page 97: ...or later NET Framework 4 5 2 or 4 6 is required Hard Disk Space 3 1 GB Note For bundled software installation The necessary amount of hard disk space may be changed without notice Display XGA 1024 x 7...

Page 98: ...Information in this guide is subject to change without notice 98...

Page 99: ...Information about Paper Supported Media Types Paper Load Limit Unsupported Media Types Handling Paper Print Area 99...

Page 100: ...the United States Canon paper is not sold by model number Instead purchase paper by name Paper for printing documents Canon Red Label Superior WOP111 Canon Oc Office Colour Paper SAT213 Paper for prin...

Page 101: ...0 x 5 00 inches 89 0 x 127 0 mm Maximum size 8 50 x 26 61 inches 215 9 x 676 0 mm Paper Weight You can use paper in the following weight range 17 to 28 lb 64 to 105 g m2 plain paper other than genuine...

Page 102: ...10 x 15 cm 20 sheets 2 Photo Paper Plus Glossy II PP 201 1 4 x 6 10 x 15 cm 20 sheets 2 Photo Paper Plus Glossy II PP 301 1 4 x 6 10 x 15 cm 20 sheets 2 Paper other than Genuine Canon Paper Common Nam...

Page 103: ...s too thick plain paper weighing more than 28 lb 105 g m2 except for Canon genuine paper Paper thinner than a postcard including plain paper or notepad paper cut to a small size when printing on paper...

Page 104: ...the printed surface until the ink is dried Even when the ink is dried be careful not to touch the printed surface as much as possible when handling Due to the nature of the pigment ink the ink on the...

Page 105: ...Printing Printing from Computer Paper Settings 105...

Page 106: ...Printing from Computer Printing from Application Software Windows Printer Driver Printing from Application Software macOS Printing Using Canon Application Software 106...

Page 107: ...tion Software macOS Printing Using macOS Basic How to Open Printer Settings Screen Display the Printing Status Screen Deleting the Undesired Print Job Removing Printer That Is No Longer Required from...

Page 108: ...ter automatically turns itself on when receiving a print job 2 Load paper in printer 3 Start printing from your application software The Print dialog opens 4 Select printer Select your model from the...

Page 109: ...settings such as the layout and the print sequence For information about print settings refer to macOS help 6 Click Print When you execute printing the printer prints according to the specified settin...

Page 110: ...Dialog Use this procedure to set the page paper settings before printing 1 Select Page Setup from the File menu of the application software The Page Setup dialog opens Opening the Print Dialog Use thi...

Page 111: ...ent to the printer Open System Preferences and select Printers Scanners To display the printing status screen select the name of your printer model from the printer list and then click Open Print Queu...

Page 112: ...emaining Delete unnecessary print jobs from the print status check screen 1 Open System Preferences and select Printers Scanners 2 Select your model and then click Open Print Queue The print status ch...

Page 113: ...inter and PC You cannot remove the printer if not logged in as the administrator For information about an administrative user refer to the user s manual for the macOS 1 Open System Preferences and sel...

Page 114: ...Printing Using Canon Application Software My Image Garden Guide Quick Menu Guide 114...

Page 115: ...LTR Plain paper KG 4 x6 10x15cm Photo paper To register the size of the paper loaded on the rear tray in the printer After loading paper on the rear tray either of the Paper lamp lights up according t...

Page 116: ...rint after replacing paper loaded on the rear tray For example when the paper size setting for printing is KG and the paper size registered in the printer is A4 you load KG sized paper before you star...

Page 117: ...tion Mode Important When the Alarm lamp flashing which prevents misprinting is disabled The printer starts printing even though the paper size setting for printing and the paper size registered in the...

Page 118: ...Itself USB Connection Problems Cannot Communicate with Printer via USB Printing Does Not Start Printing Stops Cannot Print Using AirPrint Ink Is Not Coming Out List of Support Code for Error Paper Jam...

Page 119: ...Installation and Download Problems Errors and Messages If You Cannot Solve a Problem 119...

Page 120: ...Printing Problems Printing Does Not Start Ink Is Not Coming Out Paper Does Not Feed Properly No Paper Error Print Results Are Unsatisfactory 120...

Page 121: ...there is a problem with the relay device Contact the vendor of the relay device There could also be a problem with the USB cable Replace the USB cable and retry the printing Check3 Make sure paper set...

Page 122: ...dows If the print data is large part of image data may be cut off and printing failure may occur Click Print Options on Page Setup sheet of the printer driver Then set Prevention of Print Data Loss to...

Page 123: ...then remove the FINE cartridges Then install the FINE cartridges again Push up the FINE cartridge until it clicks into place After confirming that the FINE cartridge is installed properly close the c...

Page 124: ...eep cleaning If the problem is not resolved after performing print head deep cleaning turn off the printer and perform print head deep cleaning again 24 hours later If problem is not resolved after pe...

Page 125: ...the paper load limit Always load the paper in portrait orientation regardless of the printing orientation When you load the paper load the paper with the print side facing UP Align the paper stack ag...

Page 126: ...Check6 Clean paper feed roller Cleaning Paper Feed Rollers If the measures above do not solve the problem contact your nearest Canon service center to request a repair 126...

Page 127: ...r for For Windows you can check media type settings using the printer driver Basic Printing Setup Check2 Make sure appropriate print quality is selected on the computer Select a print quality suited t...

Page 128: ...void high temperatures high humidity and direct sunlight and store or display indoors at room temperature and normal humidity To avoid direct exposure to air we recommend that you store the paper in a...

Page 129: ...Paper Is Blank Printing Is Blurry Colors Are Wrong White Streaks Appear Printing Is Blurry Colors Are Wrong 129...

Page 130: ...print head cleaning twice Perform print head deep cleaning If the problem is not resolved after performing print head deep cleaning turn off the printer and perform print head deep cleaning again 24...

Page 131: ...talled properly If the FINE cartridge is not installed securely ink may not be ejected correctly Retract the output tray extension and the paper output tray open the cover then remove the FINE cartrid...

Page 132: ...orming print head deep cleaning turn off the printer and perform print head deep cleaning again 24 hours later If problem is not resolved after performing print head deep cleaning twice Ink may have r...

Page 133: ...nted colors may not match screen colors due to basic differences in the methods used to produce colors Color control settings and environmental differences can also affect how colors appear on the scr...

Page 134: ...es are misaligned or print results are otherwise unsatisfactory adjust the print head position For Windows Aligning the Print Head Position from Your Computer Windows For macOS Aligning the Print Head...

Page 135: ...curl before loading paper We recommend putting unused paper back into the package and storing it flat Plain Paper Turn the paper over and reload it to print on the other side Leaving the paper loaded...

Page 136: ...brasion will widen the clearance between the print head and the paper If you notice abrasion even with the media type set correctly to match the paper set the printer to prevent paper abrasion followi...

Page 137: ...nter smudging the printout Perform bottom plate cleaning to clean inside of printer Cleaning Inside the Printer Bottom Plate Cleaning Note To prevent staining inside the printer be sure to set the cor...

Page 138: ...data check box and click OK Clear the check box once printing is complete Check2 Is print data extremely large Windows If the print data is large part of image data may be cut off and printing failur...

Page 139: ...inted Try thickening the lines in the document Check2 Is print data extremely large If the print data is large part of image data may be cut off and printing failure may occur Click Print Options on P...

Page 140: ...ver Select Do not allow application software to compress print data check box and click OK Clear the check box once printing is complete Check2 Is print data extremely large If the print data is large...

Page 141: ...g with a high intensity setting on plain paper the paper may absorb too much ink and become wavy causing paper abrasion Check the intensity setting in the printer driver Adjusting Intensity Check3 Use...

Page 142: ...tings Print Results Are Unsatisfactory Check2 Perform bottom plate cleaning to clean inside of printer Cleaning Inside the Printer Bottom Plate Cleaning Note During borderless printing duplex printing...

Page 143: ...mine whether the ink ejects properly from the print head nozzles For details on printing the nozzle check pattern print head cleaning and print head deep cleaning see If Printing Is Faint or Uneven If...

Page 144: ...not resolved after performing print head deep cleaning twice Ink may have run out Replace the FINE cartridge Check3 Perform print head alignment If printed lines are misaligned or print results are o...

Page 145: ...plete Note If you are printing a document with a large printing area or printing several copies printing may pause to allow the ink to dry Check3 Has printer been printing continuously for a long peri...

Page 146: ...the printer is turned on turn it off and back on and then check whether the issue is resolved Check2 Make sure printer is registered to your computer Check3 Make sure printer has enough paper and ink...

Page 147: ...Mechanical Problems Printer Does Not Turn On Power Shuts Off By Itself USB Connection Problems Cannot Communicate with Printer via USB 147...

Page 148: ...power plug is securely connected to printer and then turn it back on Check3 Unplug printer leave it for at least 2 minutes and then plug it back in and turn it on again If this does not solve the prob...

Page 149: ...from the computer For Windows Use Canon IJ Printer Assistant Tool to disable the setting following the procedure below 1 Open Canon IJ Printer Assistant Tool Maintenance tab Description 2 Select prin...

Page 150: ...supports Hi Speed USB connection Does the USB port on your computer support Hi Speed USB connection Does the USB cable or the USB hub support Hi Speed USB connection Be sure to use a certified Hi Spe...

Page 151: ...mportant Connect the Type B terminal to the printer with the notched side facing UP For details refer to the instruction manual supplied with the USB cable Check3 Make sure Enable bidirectional suppor...

Page 152: ...Installation and Download Problems Cannot Install Printer Driver Windows 152...

Page 153: ...7 click Start and then click Computer 2 Double click the CD ROM icon in the window that appears If the contents of the CD ROM appear double click MSETUP4 EXE If you cannot install the printer driver w...

Page 154: ...the printer driver restart your computer and then reinstall the printer driver Deleting the Unnecessary Printer Driver Reinstall the printer driver with the Setup CD ROM or install it from the Canon...

Page 155: ...Errors and Messages An Error Occurs Message Support Code Appears 155...

Page 156: ...flashes Cause Support Code 2 flashes Printer is out of paper or paper does not feed 1000 If the Paper lamp is also flashing Paper settings are different from those for the rear tray registered to the...

Page 157: ...ashes Ink cartridge cannot be recognized 1684 15 flashes FINE cartridge cannot be recognized 1682 16 flashes The ink has run out 1688 Support Code Corresponding to Number of Alternate Flashes of ON La...

Page 158: ...s An error requiring a repair has occurred B202 B203 B204 B205 Other cases than above Printer error has occurred 6500 6930 6931 6932 6933 6940 6941 6942 6943 6944 6945 6946 When a Support Code and a m...

Page 159: ...Note For details on how to resolve errors without Support Codes see Message Support Code Appears 159...

Page 160: ...g the Printer for unplugging the power cord Writing Error Output Error Communication Error Windows Check1 If the ON lamp is off make sure printer is plugged in and turn it on The ON lamp flashes while...

Page 161: ...roperly connected to computer 3 Click General tab and check for a device problem If a device error is shown see Windows Help to resolve it Other Error Messages Windows Check If an error message appear...

Page 162: ...ppear Make sure the program name is IJPLMUI exe and allow it If you clear Send automatically from the next time check box the information will not be sent automatically from next time and a confirmati...

Page 163: ...ou have followed the on screen instructions the confirmation screen will appear at the time of the next survey If you select No the information will be sent automatically Note If you select Uninstall...

Page 164: ...he Inkjet Printer Scanner Fax Extended Survey Program icon will appear in the Dock at the time of the next survey If you do not agree to participate in survey program Click Do not agree The confirmati...

Page 165: ...n Utilities folder and Inkjet Extended Survey Program folder 2 Double click Canon Inkjet Printer Scanner Fax Extended Survey Program icon Do not display the confirmation screen when information is sen...

Page 166: ...Code Appears on Computer Screen 1000 to 1ZZZ 1000 1200 1203 1300 1401 1403 1430 1485 1682 1684 1686 1688 168A 1700 1701 1712 1713 1714 1715 1890 2000 to 2ZZZ 2114 2123 3000 to 3ZZZ 3442 3443 3444 344...

Page 167: ...wing the appropriate procedure as shown below If you can see the jammed paper at the paper output slot or the rear tray 1300 If you cannot see the jammed paper at the paper output slot or the rear tra...

Page 168: ...o turn off the printer to remove it press the ON Stop button to stop the printing before you turn off the printer If the paper tears and you cannot remove the jammed paper from the paper output slot o...

Page 169: ...nting before you turn off the printer 1 Turn off printer and unplug it 2 Retract paper output tray and open cover Important Do not touch clear film A If you soil or scratch this part by touching it wi...

Page 170: ...per is rolled up pull out it 5 Slowly pull out paper so as not to tear it 6 Make sure all jammed paper is removed If the paper tears when you pull out it a bit of paper may remain in the printer Check...

Page 171: ...g Note When reloading the paper make sure you are using suitable paper and loading it correctly If a paper jam message appears on your computer screen when you resume printing after removing all the j...

Page 172: ...corresponding actions below Load paper in the rear tray Align the paper guide with the paper stack when you load paper Select a paper size for the paper in the rear tray by pressing the printer s Pape...

Page 173: ...1200 Cause Cover is open What to Do Close the cover and wait for a while Do not close it while you are replacing a FINE cartridge 173...

Page 174: ...se the cover Press the printer s RESUME button to resolve the error The printer ejects one blank sheet of paper and resumes printing from the next paper The printer will not reprint the page that was...

Page 175: ...Cause FINE cartridge is not installed What to Do Install the FINE cartridge If the error is not resolved the FINE cartridge may be damaged Contact your nearest Canon service center to request a repair...

Page 176: ...o Remove the FINE cartridge and reinstall it If the error is not resolved the FINE cartridge may be damaged Replace the FINE cartridge with a new one If this still does not solve the problem contact y...

Page 177: ...ridge is not installed What to Do Printing cannot be executed because the ink cartridge is not compatible with this printer Install the appropriate ink cartridge If you want to cancel printing press t...

Page 178: ...use FINE cartridge cannot be recognized What to Do Replace the FINE cartridge If the error is not resolved the FINE cartridge may be damaged Contact your nearest Canon service center to request a repa...

Page 179: ...etected If you want to continue printing without this function press the printer s RESUME button for at least 5 seconds Canon recommends to use new genuine Canon cartridges in order to obtain optimum...

Page 180: ...r s RESUME button for at least 5 seconds with the ink cartridge installed Then printing can continue under the ink out condition The function for detecting the remaining ink level will be disabled Rep...

Page 181: ...ct the output tray extension and the paper output tray open the cover and then remove the FINE cartridges Make sure the FINE cartridge compatible with the printer is installed Then install the FINE ca...

Page 182: ...1700 Cause Ink absorber is almost full What to Do Press the printer s RESUME button to continue printing Contact your nearest Canon service center to request a repair 182...

Page 183: ...n removed from the FINE cartridge holder If the protective material or tape is still there retract the output tray extension and the paper output tray to remove it Pull down the tape to remove the pro...

Page 184: ...ON Stop button to cancel printing change the media type or paper size setting and then retry printing When the media type is set to Photo Paper Plus Glossy II Set the paper size to 4 x 6 10 x 15 cm Wh...

Page 185: ...4103 Cause Cannot perform printing with current print settings What to Do Press the printer s ON Stop button to cancel printing Then change the print settings and retry printing 185...

Page 186: ...he FINE cartridges are properly installed Push up the FINE cartridge until it clicks into place Turn the printer back on If this does not solve the problem contact your nearest Canon service center to...

Page 187: ...or has occurred What to Do Turn off the printer and unplug it After a while plug in the printer again and turn it back on If this does not solve the problem contact your nearest Canon service center t...

Page 188: ...5B00 Cause Printer error has occurred What to Do Contact your nearest Canon service center to request a repair 188...

Page 189: ...move it depending on the jammed location and cause List of Support Code for Error Paper Jams Turn off the printer and unplug it Plug in the printer again and turn it back on If this does not solve the...

Reviews: