


Advanced Guide
>
Scanning
>
Scanning with the Bundled Application Software
>
MP Navigator EX Screens
> View &
Use Images on your Computer Tab
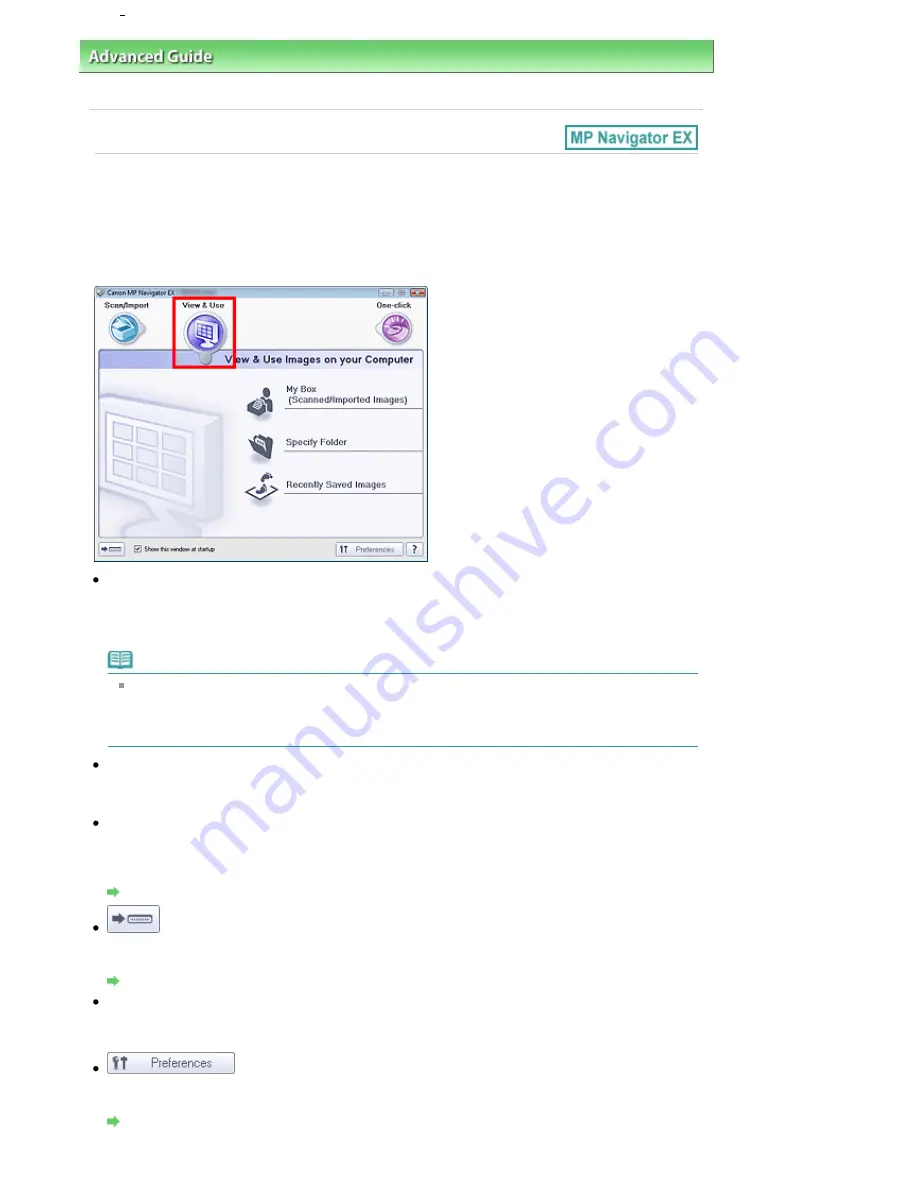
View & Use Images on your Computer Tab
Point to View & Use in the Navigation Mode screen to display the View & Use Images on your Computer
tab.
You can open images saved on a computer and print them or attach them to e-mail. You can also edit
them using an application that accompanies the machine.
My Box (Scanned/Imported Images)
Opens the View & Use window with My Box (Scanned/Imported Images) selected.
You can open and use images saved in My Box.
My Box is a specific folder for saving images scanned with MP Navigator EX.
Note
The following folders are specified by default.
Windows Vista: MP Navigator EX folder in Picture folder
Windows XP: MP Navigator EX folder in My Pictures folder
Windows 2000: MP Navigator EX folder in My Pictures folder
Specify Folder
Opens the View & Use window with Specify Folder selected.
You can open and use images saved in specific folders.
Recently Saved Images
Opens the View & Use window with Recently Saved Images selected.
You can open and use "Scanned/Imported Images" and images that have been "Attached to E-mail" or
"Sent to Application" recently.
View & Use Window
(Switch Mode)
Switches to One-click Mode screen. In the One-click Mode screen, you can complete from scanning to
saving, etc. at one time by simply clicking the corresponding icon.
One-click Mode Screen
Show this window at startup
Select this checkbox to open the Main Menu at startup. If this checkbox is not selected, the last used
screen appears.
Preferences
The Preferences dialog box opens. In the Preferences dialog box, you can make advanced settings to
MP Navigator EX functions.
Preferences Dialog Box
Pagina 501 din 1009 pagini
View Use Images on your Computer Tab
Summary of Contents for PIXMA MX860 series
Page 29: ...În partea superioară a paginii Pagina 29 din 1009 pagini Introducerea datei şi orei ...
Page 112: ...În partea superioară a paginii Pagina 112 din 1009 pagini Încărcarea hârtiei ...
Page 128: ...În partea superioară a paginii Pagina 128 din 1009 pagini Aşezarea unui document în ADF ...
Page 151: ...În partea superioară a paginii Pagina 151 din 1009 pagini Alinierea capului de imprimare ...
Page 201: ...Note See Help for details on the Edit screen Page top Pagina 201 din 1009 pagini Editing ...
Page 203: ...Page top Pagina 203 din 1009 pagini Printing ...
Page 207: ...Page top Pagina 207 din 1009 pagini Selecting the Paper and Layout ...
Page 210: ...Page top Pagina 210 din 1009 pagini Editing ...
Page 212: ...Page top Pagina 212 din 1009 pagini Printing ...
Page 219: ...Page top Pagina 219 din 1009 pagini Printing ...
Page 226: ...Page top Pagina 226 din 1009 pagini Printing ...
Page 259: ...Page top Pagina 259 din 1009 pagini Cropping Photos Photo Print ...
Page 315: ...Page top Pagina 315 din 1009 pagini Stamp Background Printing ...
Page 357: ...Page top Pagina 357 din 1009 pagini Reducing Photo Noise ...
Page 514: ...Page top Pagina 514 din 1009 pagini Stack of Documents ADF Screen Scan Import Window ...
Page 519: ...Page top Pagina 519 din 1009 pagini Save Dialog Box ...
Page 574: ...Page top Pagina 574 din 1009 pagini General Tab ...
Page 601: ...Auto Scan Mode Tab Page top Pagina 601 din 1009 pagini Scanning in Auto Scan Mode ...
Page 727: ...Page top Pagina 727 din 1009 pagini Creating an Address Book ...
Page 787: ...Text LCD Page top Pagina 787 din 1009 pagini Bluetooth Settings Screen ...
Page 827: ...În partea superioară a paginii Pagina 827 din 1009 pagini Dacă apare o eroare ...
Page 876: ...În partea superioară a paginii Pagina 876 din 1009 pagini Documentul se blochează în ADF ...


