


Advanced Guide
>
Scanning
>
Scanning with Other Application Software
>
Appendix: Useful Information on
Scanning
> Adjusting Cropping Frames
S802
Adjusting Cropping Frames
You can specify the scan area by creating a cropping frame on the image displayed in the Preview area
of the ScanGear (scanner driver) screen. "Cropping" is the act of selecting the area you want to keep in
an image and discarding the rest when scanning it.
When you click Scan, only the portion within the cropping frame will be scanned and passed to the
application. You can edit or print the scanned images.
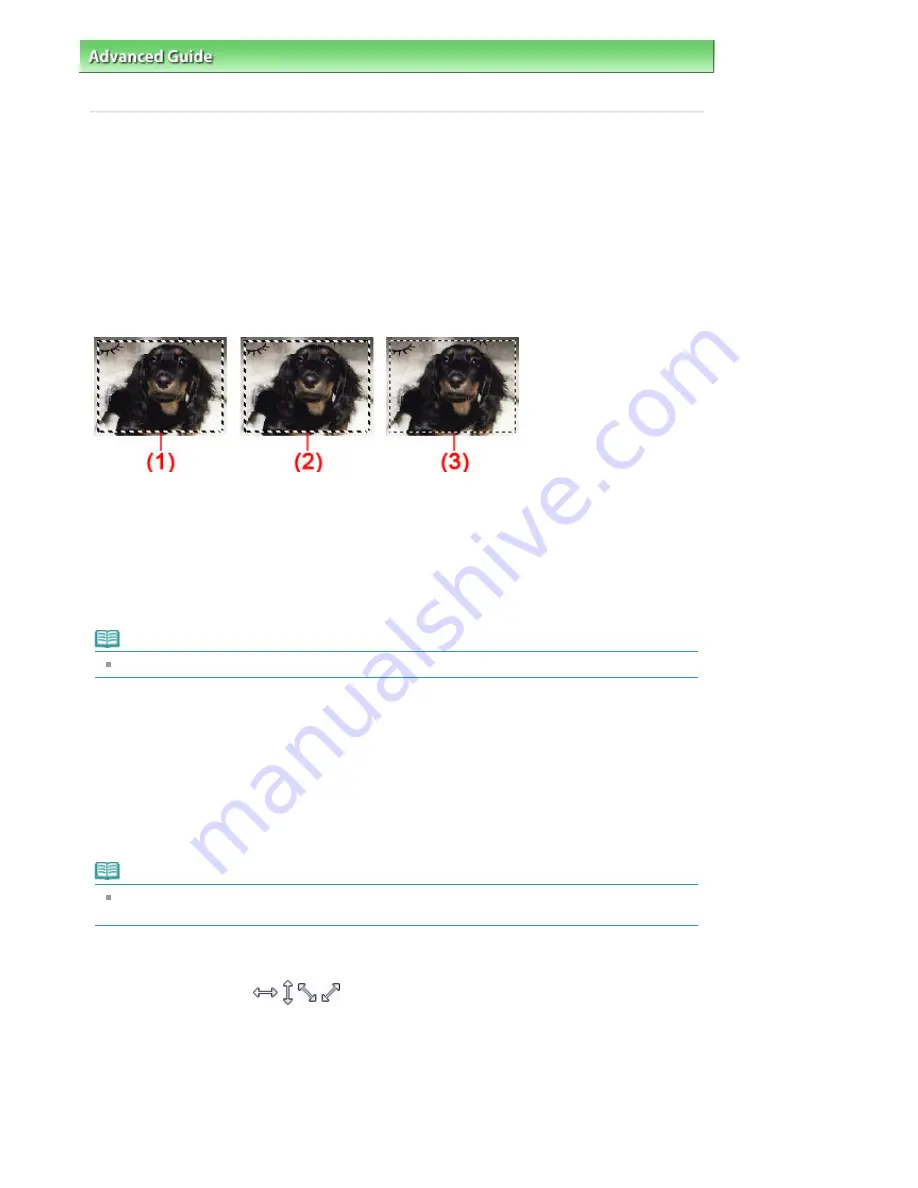
Cropping Frame Types
(1) Active cropping frame (rotating thick broken lines)
The settings on the Basic Mode tab or Advanced Mode tab will be applied.
(2) Selected cropping frame (stationary thick broken lines)
The settings will be applied to the active cropping frame and selected cropping frames simultaneously.
You can select multiple cropping frames by clicking them while pressing the Ctrl key.
(3) Unselected cropping frame (stationary thin broken lines)
The settings will not be applied.
Note
Active cropping frame and selected cropping frames are displayed in whole image view.
Initial Cropping Frame
In thumbnail view
Cropping frame is not displayed initially. Drag the mouse over a frame to create a cropping frame.
In whole image view
A cropping frame (active cropping frame) is displayed automatically around the preview image according
to the document size. You can also create a cropping frame by dragging the mouse in the Preview area.
Note
Cropping frames are set according to the document size (Auto Crop) by default. For details, see
Cropping Frame on Previewed Images in "
Preview Tab
" (Preferences dialog box).
Adjusting a Cropping Frame
The cursor will change into
(Arrow) when it is positioned over a cropping frame. If you
click and drag the mouse in the direction of the arrow, the cropping frame will expand or contract
accordingly.
Seite 608 von 922 Seiten
Adjusting Cropping Frames
Summary of Contents for MX360 Seires
Page 89: ...Page top Seite 89 von 922 Seiten Loading Originals on the Platen Glass ...
Page 92: ...Page top Seite 92 von 922 Seiten How to Load Originals for Each Function ...
Page 94: ...Page top Seite 94 von 922 Seiten Loading Originals in the ADF ...
Page 118: ...Page top Seite 118 von 922 Seiten Tips on How to Use Your Machine ...
Page 147: ...Page top Seite 147 von 922 Seiten Printing Photos ...
Page 164: ...See Help for details on the Print Settings screen Page top Seite 164 von 922 Seiten Printing ...
Page 169: ...Page top Seite 169 von 922 Seiten Selecting the Paper and Layout ...
Page 171: ...Page top Seite 171 von 922 Seiten Selecting a Photo ...
Page 173: ...Page top Seite 173 von 922 Seiten Editing ...
Page 175: ...Page top Seite 175 von 922 Seiten Printing ...
Page 180: ...Page top Seite 180 von 922 Seiten Selecting a Photo ...
Page 183: ...Page top Seite 183 von 922 Seiten Printing ...
Page 188: ...Page top Seite 188 von 922 Seiten Selecting a Photo ...
Page 191: ...See Help for details on the Print Settings screen Page top Seite 191 von 922 Seiten Printing ...
Page 243: ...Page top Seite 243 von 922 Seiten Printing ID Photos ID Photo Print ...
Page 311: ...Page top Seite 311 von 922 Seiten Printing a Color Document in Monochrome ...
Page 320: ...Adjusting Contrast Page top Seite 320 von 922 Seiten Printing with ICC Profiles ...
Page 331: ...Page top Seite 331 von 922 Seiten Representing Image Data with a Single Color ...
Page 341: ...Page top Seite 341 von 922 Seiten Canon IJ Printer Driver ...
Page 349: ...Page top Seite 349 von 922 Seiten Making Copies ...
Page 360: ...Page top Seite 360 von 922 Seiten Making Multiple Copies of an Entire Document Collated copy ...
Page 371: ...Page top Seite 371 von 922 Seiten Placing Documents ...
Page 391: ...Page top Seite 391 von 922 Seiten Easy Scanning with Auto Scan ...
Page 456: ...Page top Seite 456 von 922 Seiten Auto Scan Screen Scan Import Window ...
Page 550: ...Auto Scan Mode Tab Page top Seite 550 von 922 Seiten Scanning in Auto Scan Mode ...
Page 571: ...Page top Seite 571 von 922 Seiten Adjusting Tone Curve ...
Page 590: ...Page top Seite 590 von 922 Seiten Output Settings ...
Page 637: ...Page top Seite 637 von 922 Seiten Using the Hook Button ...
Page 689: ...Page top Seite 689 von 922 Seiten Saving a Document in Machine s Memory to USB Flash Drive ...
Page 767: ...Graphic LCD Text LCD Page top Seite 767 von 922 Seiten Bluetooth settings Screen ...
Page 816: ...Page top Seite 816 von 922 Seiten Print Results Not Satisfactory ...
Page 913: ...Page top Seite 913 von 922 Seiten Notice for Unplugging the Power Cord ...


