background image

Advanced Guide

 > 

Printing from a Computer

 > 

Printing with Other Application Software

 > 

Changing the Print Quality and

Correcting Image Data

 > Printing a Color Document in Monochrome 

P012 

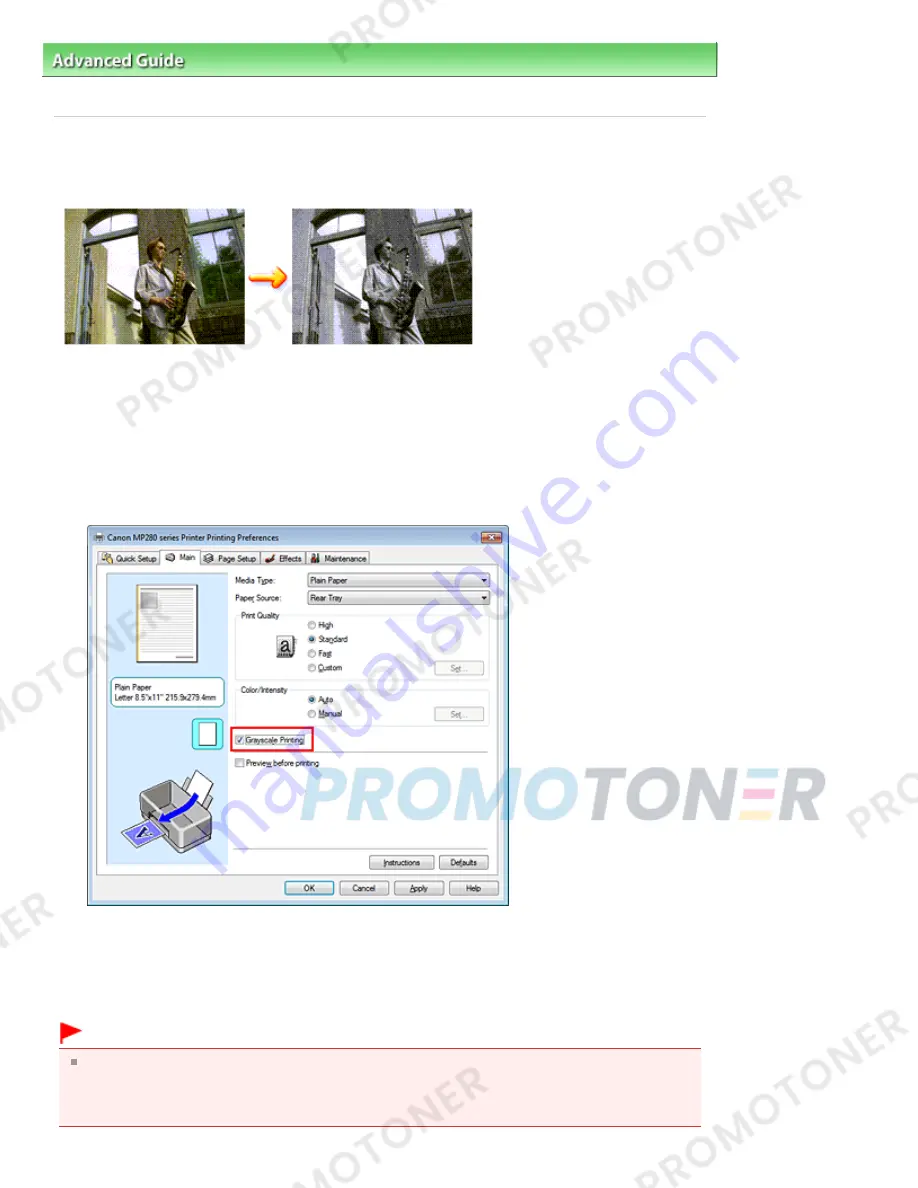
Printing a Color Document in Monochrome 

The procedure for printing a color document in monochrome is as follows: 

You can also set a grayscale printing in Additional Features on the Quick Setup tab. 

1.

Open the 

printer driver setup window

2.

Set grayscale printing 

Check the Grayscale Printing check box on the Main tab. 

3.

Complete the setup 

Click OK.
When you execute print, the document is converted to grayscale data. It allows you to print the color
document in monochrome. 

Important 

When the Grayscale Printing check box is checked, the printer driver processes image data as
sRGB data. In this case, actual colors printed may differ from those in the original image data.
When using the grayscale printing function to print Adobe RGB data, convert the data to sRGB data
using an application software. 

Page 283 of 707 pages

Printing a Color Document in Monochrome

Summary of Contents for MP282

Page 1: ...l Printing This Manual MC 4700 V1 00 Basic Guide Describes the summary of this product Advanced Guide Describes the detailed function of this product Troubleshooting Page 1 of 707 pages Canon MP280 se...

Page 2: ...from Your Computer Printing Photos Easy PhotoPrint EX Printing Documents Printing Web Pages Easy WebPrint EX Starting Various Software Applications Loading Paper Originals Loading Paper Loading Origi...

Page 3: ...Machine This section shows the component names of the machine and describes the basic operations you need to know before using it Main Components Front View Rear View Inside View Operation Panel LED D...

Page 4: ...oad various sizes or types of paper which you can use on the machine Two or more sheets of the same size and type of paper can be loaded at the same time and fed automatically one sheet at a time See...

Page 5: ...t operated for about 5 minutes To restore them press any button except the ON button or perform the print operation Rear View 9 USB Port Plug in the USB cable to connect the machine with a computer Im...

Page 6: ...ng the FINE Cartridges refer to the printed manual Getting Started 14 Scanning Unit Cover Scans originals Open it to replace the FINE Cartridges or remove jammed paper inside the machine When opening...

Page 7: ...ails refer to Troubleshooting in the on screen manual Advanced Guide POWER lamp flashes green and Alarm lamp flashes orange alternately An error that requires contacting the service center may have oc...

Page 8: ...reduced to fit the selected page size When the Fit to Page copy function is disabled you can make copies in the same size as the original 11 Maintenance button Specifies the Maintenance code 12 Paper...

Page 9: ...e error codes refer to Troubleshooting in the on screen manual Advanced Guide P and number appear alternately An error that requires contacting the service center may have occurred For details refer t...

Page 10: ...ne Bottom Plate Cleaning Switches the size of paper loaded in the Rear Tray between A4 and 8 5 x 11 Letter This setting is used for making copies Switching the Page Size between A4 and 8 5 x 11 Letter...

Page 11: ...arged or reduced copies of the original to fit the page size and borderless copies of a printed photo besides standard copies Copying Documents Switching the Page Size between A4 and 8 5 x 11 Letter C...

Page 12: ...edure described in the reference page You need to prepare Originals to copy See Originals You Can Load Paper for printing See Media Types You Can Use 1 Prepare for copying 1 Turn on the power See Oper...

Page 13: ...the types and conditions of the original which can be copied and how to load the original see Loading Originals Characters and lines written with a light colored pen or highlight pen may not be copied...

Page 14: ...olor copying or the Black button for black white copying The machine starts copying While copying is in progress the number on the LED flashes and decreases by one to indicate the remaining number of...

Page 15: ...button repeatedly until d appears 2 Press the Black button to select A4 or the Color button to select 8 5 x 11 Letter Note When you switch the page size to A4 or 8 5 x 11 Letter load paper of the sele...

Page 16: ...to on the Platen Glass See Loading Originals 2 Start copying 1 Press the button repeatedly to specify the number of copies See step 2 in Copying Documents 2 Press the Paper button repeatedly to select...

Page 17: ...l the Fit to Page copy function to copy the original in the same size See Fit to Page Copying 3 Press the Color button for color copying or the Black button for black white copying The machine starts...

Page 18: ...Page button The Fit to Page lamp lights up and the Fit to Page copy function is enabled The original is copied in the size automatically enlarged or reduced to fit the selected page size Note Press t...

Page 19: ...Page top Page 19 of 707 pages Fit to Page Copying...

Page 20: ...can save scanned data on your computer and edit or process them with the supplied software application Saving Scanned Data on the Computer Preparing for Scanning with the Operation Panel Saving Scanne...

Page 21: ...settings for saving scanned data in Preferences of MP Navigator EX For details on the settings refer to the on screen manual Advanced Guide Does the original to be scanned meet the requirements for t...

Page 22: ...lect MP Navigator EX Ver4 0 and click OK To start MP Navigator EX automatically without displaying the program selection screen follow the procedure below For Windows 7 or Windows Vista users refer to...

Page 23: ...ou can easily print photos taken with your digital camera by using Easy PhotoPrint EX supplied with the machine Printing Photos Easy PhotoPrint EX Using Various Functions of Easy PhotoPrint EX Printin...

Page 24: ...otoPrint EX in Custom Install 1 Prepare for printing 1 Make sure that the machine is turned on See Operation Panel 2 Load paper See Loading Plain Paper Photo Paper Here we load 4 x 6 10 x 15 cm photo...

Page 25: ...number of copies to zero You can also correct or enhance the selected image For details refer to the on screen manual Advanced Guide You can capture and print an image from a video See Using Various F...

Page 26: ...details on the operation refer to the on screen manual Advanced Guide 2 Click Print Note To cancel a print job in progress press the Stop Reset button on the machine or click Cancel Printing on the pr...

Page 27: ...ection introduces a few of the useful functions of Easy PhotoPrint EX For details refer to the on screen manual Advanced Guide Creating Your Own Prints You can create an album or calendar using your p...

Page 28: ...Panel 2 Load paper See Loading Plain Paper Photo Paper Here we load A4 plain paper in the Rear Tray 3 Open the Paper Output Tray gently and open the Output Tray Extension 4 Create or open a document t...

Page 29: ...ote For details on the printer driver functions click Help or Instructions to view the online help or the on screen manual Advanced Guide The Instructions button appears on the Quick Setup Main and Ma...

Page 30: ...t button on the machine or click Cancel Printing on the printer status monitor To display the printer status monitor click the printer icon on the taskbar In Windows Vista operating system hereafter r...

Page 31: ...e copyrighted work of another person without permission from the copyright holder except for personal use use within the home or other use within the limited scope as defined by the copyright Addition...

Page 32: ...Page top Page 32 of 707 pages Printing Web Pages Easy WebPrint EX...

Page 33: ...them in Custom Install Menus are displayed in Category Menu Area of Solution Menu EX Main Screen Click a menu in Category Menu Area to display icons for functions available in that menu in Function Ic...

Page 34: ...ion Menu EX and for example select one of the Easy PhotoPrint EX functions Photo Print 1 Start Solution Menu EX Double click Solution Menu EX on the desktop Click Here Solution Menu EX Note Unless the...

Page 35: ...may appear in the notification area of the taskbar To install Easy WebPrint EX click the displayed guidance and follow the instructions on the screen You can also install Easy WebPrint EX from the Set...

Page 36: ...inals you can load how to load printing paper in the Rear Tray and how to load originals to copy or scan Loading Paper Loading Plain Paper Photo Paper Loading Envelopes Media Types You Can Use Media T...

Page 37: ...Media Types You Can Use You can use general copy paper For the page size and paper weight you can use for this machine see Media Types You Can Use 1 Prepare paper Align the edges of paper If paper is...

Page 38: ...NG YOU 4 Slide the Paper Guides A to align them with both sides of the paper stack Do not slide the Paper Guides too hard The paper may not be fed properly Important Always load paper in the portrait...

Page 39: ...ter loading paper When copying select the size and type of the loaded paper using the Operation Panel on the machine See Copying When printing with a computer select the size and type of the loaded pa...

Page 40: ...ote The message on how to load envelopes will appear when printing on them This message will not appear next time if you select the Do not show this message again check box 1 Prepare envelopes Press d...

Page 41: ...e folded flap of the envelope will be faced down on the left side Up to 10 envelopes can be loaded at once 4 Slide the Paper Guides A to align them with both sides of the envelopes Do not slide the Pa...

Page 42: ...perly the address will be printed upside down or will be turned to 90 degrees Note The machine may make operating noise when feeding envelopes If the print result is upside down open the printer drive...

Page 43: ...paper can be used for making copies when selecting the media type with the Paper button on the Operation Panel You can only select A4 or Letter sized plain paper Envelopes Media type settings Printer...

Page 44: ...sly printing to avoid blurs and discoloration 1 This paper can be used for making copies when selecting the media type with the Paper button on the Operation Panel You can only select A4 or Letter siz...

Page 45: ...07 inches 90 0 x 205 0 mm Youkei 4 4 13 x 9 25 inches 105 0 x 235 0 mm Youkei 6 3 86 x 7 48 inches 98 0 x 190 0 mm Card 2 16 x 3 58 inches 55 0 x 91 0 mm Wide 4 00 x 7 10 inches 101 6 x 180 6 mm Non...

Page 46: ...Page top Page 46 of 707 pages Media Types You Can Use...

Page 47: ...hing more than 28 lb 105 g m 2 except for Canon genuine paper Paper thinner than a postcard including plain paper or notepad paper cut to a small size when printing on paper smaller than A5 Picture po...

Page 48: ...lace any object on the Document Cover It will fall into the Rear Tray when the Document Cover is opened and cause the machine to malfunction 2 Load the original WITH THE SIDE TO SCAN FACING DOWN on th...

Page 49: ...a will be the area inside these margins B 0 12 inches 3 0 mm C 0 20 inches 5 0 mm D 0 13 inches 3 4 mm 0 25 inches 6 4 mm for Letter and Legal sized paper E 0 13 inches 3 4 mm 0 25 inches 6 3 mm for L...

Page 50: ...ine or newspaper Printed photo picture card business card or disc BD DVD CD etc Size W x L Max 8 5 x 11 7 inches 216 x 297 mm Note When loading a thick original such as a book on the Platen Glass you...

Page 51: ...Printing Becomes Faint or Colors Are Incorrect Printing the Nozzle Check Pattern Examining the Nozzle Check Pattern Cleaning the Print Head Cleaning the Print Head Deeply Aligning the Print Head Repl...

Page 52: ...e Check if the orange protective tape on the bottom of the FINE Cartridge is removed See Replacing Procedure If the Alarm lamp lights or flashes orange refer to Troubleshooting in the on screen manual...

Page 53: ...e Print Results Are Not Even such as the Ruled Lines Are Misaligned See Aligning the Print Head Note You can also perform the maintenance operations from your computer For details refer to the on scre...

Page 54: ...e FINE Cartridge whose ink is low See Replacing a FINE Cartridge You need to prepare a sheet of A4 or Letter sized plain paper 1 Make sure that the power is turned on 2 Load a sheet of A4 or Letter si...

Page 55: ...if there are missing lines in the pattern 1 or horizontal white streaks in the pattern 2 1 Check if lines are missing in this pattern If yes the cleaning is required See Cleaning the Print Head A Goo...

Page 56: ...ean the Print Head 1 Press the Maintenance button repeatedly until H appears 2 Press the Black or Color button The machine starts cleaning the Print Head Do not perform any other operations until the...

Page 57: ...Color button The machine starts cleaning the Print Head deeply Do not perform any other operations until the machine completes the deep cleaning of the Print Head This takes about 2 minutes 3 Check t...

Page 58: ...whose ink is low See Replacing a FINE Cartridge You need to prepare a sheet of A4 or Letter sized plain paper including recycled paper Be sure to use paper that is white and clean on both sides 1 Mak...

Page 59: ...alignment sheet to adjust the print head position 1 Load the print head alignment sheet on the Platen Glass Load the print head alignment sheet WITH THE PRINTED SIDE FACING DOWN and align the mark on...

Page 60: ...d If adjusting the print head position has failed the error code will appear on the LED Press the Stop Reset button to release the error then refer to Troubleshooting in the on screen manual Advanced...

Page 61: ...e open This will cause the FINE Cartridge to dry out and the machine may not operate properly when it is reinstalled To maintain optimal printing quality use a FINE Cartridge within six months of firs...

Page 62: ...e Document Cover is opened and cause the machine to malfunction When opening the Scanning Unit Cover lift it with the Document Cover closed Do not touch the metallic parts or other parts inside the ma...

Page 63: ...NE Cartridge The machine may not print properly if you touch it 5 Install the FINE Cartridge 1 Put a new FINE Cartridge in the FINE Cartridge Holder The Color FINE Cartridge should be installed into t...

Page 64: ...ld the Scanning Unit Cover firmly and be careful not to get your fingers caught Note If the Alarm lamp lights or flashes orange after the Scanning Unit Cover is closed refer to Troubleshooting in the...

Page 65: ...n Troubleshooting of the on screen manual Advanced Guide and take an appropriate action With the Ink Lamps on the Operation Panel Make sure that the LED is in the copy standby mode You can confirm the...

Page 66: ...Status on the Maintenance sheet To confirm the FINE Cartridge information click the Ink Details menu Note While printing you can also display the printer status monitor by clicking the printer icon o...

Page 67: ...Machine Cleaning the Machine This section describes how to clean the inside of the machine Cleaning the Paper Feed Roller Cleaning the Inside of the Machine Bottom Plate Cleaning Cleaning the Protrusi...

Page 68: ...3 Clean the Paper Feed Roller without paper 1 Press the Maintenance button repeatedly until b appears 2 Press the Black or Color button The Paper Feed Roller will rotate as it is cleaned 4 Clean the P...

Page 69: ...is turned on and remove any paper from the Rear Tray 2 Open the Paper Output Tray gently and open the Output Tray Extension 3 Fold a single sheet of A4 or Letter sized plain paper in half widthwise an...

Page 70: ...rforming the Bottom Plate Cleaning twice the protrusions inside the machine may be stained See Cleaning the Protrusions inside the Machine to clean them Page top Page 70 of 707 pages Cleaning the Insi...

Page 71: ...eaning the Protrusions inside the Machine Caution Be sure to turn off the power and disconnect the power plug before cleaning the machine If the protrusions inside the machine are stained wipe off any...

Page 72: ...Advanced Guide Troubleshooting Contents Appendix Appendix Legal Limitations on Use of Your Product and Use of Images Tips on How to Use Your Machine Page top Page 72 of 707 pages Appendix...

Page 73: ...money Money orders Certificates of deposit Postage stamps canceled or uncanceled Identifying badges or insignias Selective service or draft papers Checks or drafts issued by governmental agencies Mot...

Page 74: ...even when printing in black and white Printing on special paper How to print with optimal quality Tip Check the machine status before printing Is the Print Head OK If print head nozzles are clogged pr...

Page 75: ...ype of loaded paper Use the Stop Reset button to cancel printing Tip Never press the ON button If you press the ON button while printing is in progress the print data sent from the computer queues in...

Page 76: ...nt from drying If you disconnect the power plug from the wall outlet before the POWER lamp is turned off the Print Head will not be capped properly and this will cause drying or clogging To disconnect...

Page 77: ...rint the nozzle check pattern Check the printed check pattern to see if the nozzles are clogged See When Printing Becomes Faint or Colors Are Incorrect Page top Page 77 of 707 pages Tips on How to Use...

Page 78: ...lecting the Paper Printing Creating an Album Starting Easy PhotoPrint EX Selecting the Paper and Layout Selecting a Photo Editing Printing Printing Calendars Starting Easy PhotoPrint EX Selecting the...

Page 79: ...ing Photos Photo Print Printing Dates on Photos Photo Print Printing Multiple Photos on One Page Printing an Index Printing ID Photos ID Photo Print Printing Photo Information Saving Photos Opening Sa...

Page 80: ...lor Correction Optimal Photo Printing of Image Data Adjusting Colors with the Printer Driver Printing with ICC Profiles Adjusting Color Balance Adjusting Brightness Adjusting Intensity Adjusting Contr...

Page 81: ...Correcting Enhancing Images Manually Adjusting Images Searching Images Classifying Images into Categories Utilizing Images in MP Navigator EX Saving Saving as PDF Files Creating Editing PDF Files Pri...

Page 82: ...at Is ScanGear Scanner Driver Scanning with Advanced Settings Using ScanGear Scanner Driver Starting ScanGear Scanner Driver Scanning in Basic Mode Scanning in Advanced Mode Scanning in Auto Scan Mode...

Page 83: ...ine Cannot Be Powered On An Error Code Is Displayed on the LED Alarm Lamp Is Lit Orange POWER Lamp Flashes Green and Alarm Lamp Flashes Orange Alternately LED Cannot Be Seen At All Cannot Install the...

Page 84: ...r more detail Is Displayed Error Regarding the Power Cord Being Unplugged Is Displayed Writing Error Output Error Communication Error Other Error Messages The Inkjet Printer Scanner Fax Extended Surve...

Page 85: ...ge Cannot be Detected Correctly When Scanning Using the Operation Panel Document Is Placed Correctly but the Scanned Image Is Slanted Document Is Placed Correctly but the Orientation Changes in the Sc...

Page 86: ...l Operating the Contents Pane Operating the Explanation Window Printing This Manual Using Keywords to Find a Document Registering Documents to My Manual Symbols Used in This Document Trademarks and Li...

Page 87: ...tents pane found to the left of the on screen manual the documents of that title are displayed in the explanation window on the right side When you click found to the left of the document titles found...

Page 88: ...reen characters to jump to the corresponding document 2 The cursor jumps to the top of this document Window Used in Operation Explanation This on screen manual describes with a window displayed when t...

Page 89: ...he Option Settings dialog box You can then set up the printing operation Print document title and page number When this check box is checked the manual name and the page number are printed in the head...

Page 90: ...click Yes The documents that are currently displayed are printed Print Selected Documents You can select and print the documents that you want to print 1 From Select Target select Selected Documents T...

Page 91: ...pecify simple print settings as necessary 4 Click Start Printing A message confirming the number of print pages is displayed 5 Execute print Confirm the number of pages to be printed and then click Ye...

Page 92: ...eck the number of print pages displayed in the Print Page Count Confirmation dialog box The Print Preview dialog box allows you to scale the printing to the paper width or to set the zoom rate However...

Page 93: ...a space between the keywords Note You can enter up to 10 search keywords or up to 255 characters Uppercase and lowercase are not distinguished The program can also search for keywords that contain sp...

Page 94: ...red Documents Containing Any Keyword Documents containing at least one of the keywords that were entered 4 Display the document that you want to read From the search results list double click or selec...

Page 95: ...f My Manual Note You can also add documents to My Manual by the following methods If you add a document to My Manual a mark is displayed in the document icons in the contents pane From the Recently Di...

Page 96: ...tle displayed in List of My Manual that document is displayed in the explanation window Note To delete a document from List of My Manual select that document title from the list and then click Delete...

Page 97: ...must be observed for safe operation Caution Instructions that if ignored could result in personal injury or material damage caused by incorrect operation of the equipment These must be observed for s...

Page 98: ...gistered in the U S and other countries Bonjour is a trademark of Apple Inc registered in the U S and other countries Adobe Adobe Photoshop Adobe RGB and Adobe RGB 1998 are either registered trademark...

Page 99: ...nced Guide Printing from a Computer Printing from a Computer Printing with the Bundled Application Software Printing with Other Application Software Page top Page 99 of 707 pages Printing from a Compu...

Page 100: ...PhotoPrint EX Printing Photos Creating an Album Printing Calendars Printing Stickers Printing Layout Correcting and Enhancing Photos Creating Still Images from Videos Downloading Images from Photo Sha...

Page 101: ...ready has Easy LayoutPrint installed Easy LayoutPrint will be replaced by Easy PhotoPrint EX Note See Help of Easy PhotoPrint EX for descriptions of Easy PhotoPrint EX screens Click Help in a screen o...

Page 102: ...X Ver 1 0 0 or later supports the following functions Photo Print Album Calendar Layout Print Important When Easy PhotoPrint EX is started by selecting a function from Solution Menu EX Menu does not a...

Page 103: ...rint EX Easy PhotoPrint EX Photo Print file el6 Easy PhotoPrint EX Album file el1 Easy PhotoPrint EX Stickers file el2 Easy PhotoPrint EX Calendar file el4 Easy PhotoPrint EX Layout file el5 Page top...

Page 104: ...Steps 1 Starting Easy PhotoPrint EX 2 Selecting a Photo 3 Selecting the Paper 4 Printing Try This Correcting and Enhancing Photos Creating Still Images from Videos Downloading Images from Photo Shari...

Page 105: ...How Can I Move or Copy the Saved File Which Side of the Displayed Image Does the Printing Start from How Do I Print with Even Margins Page top Page 105 of 707 pages Printing Photos...

Page 106: ...tware Printing Photos Starting Easy PhotoPrint EX A011 Starting Easy PhotoPrint EX 1 From the Start menu select All Programs Canon Utilities Easy PhotoPrint EX Easy PhotoPrint EX Easy PhotoPrint EX st...

Page 107: ...will not be affected 2 Select the folder that contains the image you want to print from the folder tree area The images in the folder will be displayed as thumbnails miniatures Important If Easy Photo...

Page 108: ...ll Imported Images To print two or more copies of an image click Up arrow until the number of copies you want is reached To reduce the number of copies shown in the box click Down arrow You can change...

Page 109: ...and paper to be used Printer Paper Source Paper Size Media Type Note The paper sizes and media types may vary depending on the printer See Help for details The paper sources may vary depending on the...

Page 110: ...or previewed and print results will not be affected 2 Select a layout you want to use Click a borderless layout to print borderless photos Note The layouts that can be selected may vary depending on t...

Page 111: ...enhance the selected image before printing Correcting and Enhancing Photos You can specify advanced Photo Print settings number of copies print quality etc in the Preferences dialog box To display the...

Page 112: ...Selecting a Photo 4 Editing 5 Printing Try This Correcting and Enhancing Photos Creating Still Images from Videos Downloading Images from Photo Sharing Sites Changing Layout Changing Background Addin...

Page 113: ...Questions and Answers How Can I Move or Copy the Saved File What Is C1 or C4 Page top Page 113 of 707 pages Creating an Album...

Page 114: ...ware Creating an Album Starting Easy PhotoPrint EX A021 Starting Easy PhotoPrint EX 1 From the Start menu select All Programs Canon Utilities Easy PhotoPrint EX Easy PhotoPrint EX Easy PhotoPrint EX s...

Page 115: ...Options dialog box select Front or Front Back for Cover and click Options Select the Double page album checkbox to enable the spread page layout consisting of two page master In a double page album yo...

Page 116: ...over inside pages or back cover You can customize the date position size color etc in the Date Settings dialog box To display the Date Settings dialog box select the Print date checkbox in the Change...

Page 117: ...gator EX or ZoomBrowser EX the folder tree area will not be displayed The images selected in the application will be displayed as thumbnails Note You can also use still images captured from videos Cre...

Page 118: ...image in the selected image area select the image you want to delete and click Delete Imported Image To delete all images from the selected image area click Delete All Imported Images Note You can co...

Page 119: ...s Changing Position Angle and Size of Photos Cropping Photos Framing Photos Printing Dates on Photos Attaching Comments to Photos Adding Text to Photos Important The edit information will be discarded...

Page 120: ...3 appears only when the Leave the inside of front cover blank Leave the inside of back cover blank checkbox is selected in the Cover Options dialog box Saving Note See Help for details on the Edit scr...

Page 121: ...the Duplex Printing checkbox after selecting a printer that supports automatic duplex printing and media type that supports duplex printing Select this checkbox to print on both sides of the paper au...

Page 122: ...3 Click Print Note See Help for details on the Print Settings screen Page top Page 122 of 707 pages Printing...

Page 123: ...d Layout 3 Selecting a Photo 4 Editing 5 Printing Try This Correcting and Enhancing Photos Creating Still Images from Videos Downloading Images from Photo Sharing Sites Changing Layout Changing Backgr...

Page 124: ...Opening Saved Files Questions and Answers How Can I Move or Copy the Saved File Page top Page 124 of 707 pages Printing Calendars...

Page 125: ...ware Printing Calendars Starting Easy PhotoPrint EX A041 Starting Easy PhotoPrint EX 1 From the Start menu select All Programs Canon Utilities Easy PhotoPrint EX Easy PhotoPrint EX Easy PhotoPrint EX...

Page 126: ...that can be selected You can add holidays to your calendar Setting Holidays 3 Select a layout for Design If necessary make advanced settings on the calendar and set the background Note You can custom...

Page 127: ...Note See Help for details on the Page Setup screen Page top Page 127 of 707 pages Selecting the Paper and Layout...

Page 128: ...Still Images from Videos You can also use images downloaded from photo sharing sites on the Internet Downloading Images from Photo Sharing Sites 3 Select the image s you want to print and click Import...

Page 129: ...Note You can correct or enhance the selected image before printing Correcting and Enhancing Photos See Help for details on the Select Images screen Page top Page 129 of 707 pages Selecting a Photo...

Page 130: ...hotos Swapping Positions of Photos Replacing Photos Changing Position Angle and Size of Photos Cropping Photos Framing Photos Printing Dates on Photos Adding Text to Photos Setting Calendar Display Se...

Page 131: ...See Help for details on the Edit screen Page top Page 131 of 707 pages Editing...

Page 132: ...h sides of the paper Automatic appears if you select the Duplex Printing checkbox after selecting a printer that supports automatic duplex printing and media type that supports duplex printing Select...

Page 133: ...3 Click Print Note See Help for details on the Print Settings screen Page top Page 133 of 707 pages Printing...

Page 134: ...out 3 Selecting a Photo 4 Editing 5 Printing Try This Correcting and Enhancing Photos Creating Still Images from Videos Downloading Images from Photo Sharing Sites Adding Photos Swapping Positions of...

Page 135: ...Page top Page 135 of 707 pages Printing Stickers...

Page 136: ...ware Printing Stickers Starting Easy PhotoPrint EX A051 Starting Easy PhotoPrint EX 1 From the Start menu select All Programs Canon Utilities Easy PhotoPrint EX Easy PhotoPrint EX Easy PhotoPrint EX s...

Page 137: ...ion Print date Use the same image in all frames Note Paper sizes other than Photo Stickers cannot be selected You can customize the date position size color etc in the Date Settings dialog box To disp...

Page 138: ...Still Images from Videos You can also use images downloaded from photo sharing sites on the Internet Downloading Images from Photo Sharing Sites 3 Select the image s you want to print and click Import...

Page 139: ...Note You can correct or enhance the selected image before printing Correcting and Enhancing Photos See Help for details on the Select Images screen Page top Page 139 of 707 pages Selecting a Photo...

Page 140: ...Positions of Photos Replacing Photos Changing Position Angle and Size of Photos Cropping Photos Printing Dates on Photos Adding Text to Photos Important The edit information will be discarded if you e...

Page 141: ...rces may vary depending on the printer and the media type You can set a custom print quality level in the Print Quality Settings dialog box To display the Print Quality Settings dialog box select Cust...

Page 142: ...See Help for details on the Print Settings screen Page top Page 142 of 707 pages Printing...

Page 143: ...the Paper and Layout 3 Selecting a Photo 4 Editing 5 Printing Try This Correcting and Enhancing Photos Creating Still Images from Videos Downloading Images from Photo Sharing Sites Changing Layout Ad...

Page 144: ...How Can I Move or Copy the Saved File Page top Page 144 of 707 pages Printing Layout...

Page 145: ...tware Printing Layout Starting Easy PhotoPrint EX A151 Starting Easy PhotoPrint EX 1 From the Start menu select All Programs Canon Utilities Easy PhotoPrint EX Easy PhotoPrint EX Easy PhotoPrint EX st...

Page 146: ...Settings section Paper Size Orientation Print date Note See Help on the paper size that can be selected You can customize the date position size color etc in the Date Settings dialog box To display th...

Page 147: ...Page top Page 147 of 707 pages Selecting the Paper and Layout...

Page 148: ...till Images from Videos You can also use images downloaded from photo sharing sites on the Internet Downloading Images from Photo Sharing Sites 3 Select the image s you want to print and click Import...

Page 149: ...Note You can correct or enhance the selected image before printing Correcting and Enhancing Photos See Help for details on the Select Images screen Page top Page 149 of 707 pages Selecting a Photo...

Page 150: ...os Swapping Positions of Photos Replacing Photos Changing Position Angle and Size of Photos Cropping Photos Printing Dates on Photos Adding Text to Photos Important The edit information will be discar...

Page 151: ...Page top Page 151 of 707 pages Editing...

Page 152: ...ars if you select the Duplex Printing checkbox after selecting a printer that supports automatic duplex printing and media type that supports duplex printing Select this checkbox to print on both side...

Page 153: ...3 Click Print Note See Help for details on the Print Settings screen Page top Page 153 of 707 pages Printing...

Page 154: ...hoto Fix This function will automatically analyze the captured scene and apply suitable corrections Using the Auto Photo Fix Function Red Eye Correction Function You can correct red eyes caused by a c...

Page 155: ...You can also blur the outline of the subjects or remove the base color Adjusting Images Page top Page 155 of 707 pages Correcting and Enhancing Photos...

Page 156: ...een or select Preferences from the File menu Once image is corrected with Auto Photo Fix and saved it cannot be corrected again with Auto Photo Fix Also Auto Photo Fix may not be available for images...

Page 157: ...images at once select the Apply to all images checkbox Select the Prioritize Exif Info checkbox to apply corrections primarily based on the settings made at the time of shooting Deselect this checkbo...

Page 158: ...og box and select the Enable Red Eye Correction checkbox 1 Select photos in the Select Images screen then click Correct Enhance Images The Correct Enhance Images window appears Note You can also displ...

Page 159: ...eck the result Click Reset Selected Image to undo the correction operation If you want to apply the correction to all the selected images at once select the Apply to all images checkbox Manual Correct...

Page 160: ...correction operation 6 Click Save Selected Image or Save All Corrected Images You can save corrected images as new files Note To save only the image you like click Save Selected Image To save all imag...

Page 161: ...ion 1 Select photos in the Select Images screen then click Correct Enhance Images The Correct Enhance Images window appears Note You can also display the Correct Enhance Images window by clicking Corr...

Page 162: ...t mark appears on the upper left of the image Note You can also drag to rotate the selected area Click Compare to display the images before and after the correction side by side so that you can compar...

Page 163: ...Important The corrections will be lost if you exit before saving corrected images Page top Page 163 of 707 pages Using the Face Brightener Function...

Page 164: ...indow appears Note You can also display the Correct Enhance Images window by clicking Correct Enhance Images in the Layout Print or Edit screen In that case only the image displayed in Preview can be...

Page 165: ...k Reset Selected Image to undo the correction operation If you want to apply the correction to all the selected images at once select the Apply to all images checkbox Manual Correction 3 Click Manual...

Page 166: ...the result Click Undo to undo the preceding correction operation 6 Click Save Selected Image or Save All Corrected Images You can save corrected images as new files Note To save only the image you li...

Page 167: ...ct Enhance Images window appears Note You can also display the Correct Enhance Images window by clicking Correct Enhance Images in the Layout Print or Edit screen In that case only the image displayed...

Page 168: ...Reset Selected Image to undo the enhancement operation If you want to apply the enhancement to all the selected images at once select the Apply to all images checkbox Manual Enhancement 3 Click Manua...

Page 169: ...e result Click Undo to undo the preceding enhancement operation 6 Click Save Selected Image or Save All Corrected Images You can save enhanced images as new files Note To save only the image you like...

Page 170: ...e Images window by clicking Correct Enhance Images in the Layout Print or Edit screen In that case only the image displayed in Preview can be corrected enhanced See Correct Enhance Images Window for d...

Page 171: ...ancement side by side so that you can compare and check the result Click Undo to undo the preceding enhancement operation 6 Click Save Selected Image or Save All Corrected Images You can save enhanced...

Page 172: ...icking Correct Enhance Images in the Layout Print or Edit screen In that case only the image displayed in Preview can be adjusted See Correct Enhance Images Window for details on the Correct Enhance I...

Page 173: ...orrect Enhance Images window for details Click Defaults to reset all adjustments 5 Click Save Selected Image or Save All Corrected Images You can save adjusted images as new files Note To save only th...

Page 174: ...Enhance Images window click Correct Enhance Images in the Select Images or Edit screen or in the Layout Print screen of Photo Print 1 Task Area 2 Toolbar 1 Task Area Available tasks and settings may...

Page 175: ...ng Note Exif is a standard format for embedding various shooting data in digital camera images JPEG For Photo Print you can apply suitable corrections based on Exif information automatically by select...

Page 176: ...or to sharpen the entire image Use Correct Enhance to correct enhance specific areas Adjust Brightness Adjusts the overall image brightness Move the slider to the left to darken and right to brighten...

Page 177: ...of Highlight and Shadow Move the Highlight slider to the left to brighten the image Move the Midtone slider to the left to brighten and right to darken the image Move the Shadow slider to the right to...

Page 178: ...slider Note For Photo Print red eyes are automatically corrected when printing by selecting Enable Auto Photo Fix in Color correction for printing on the Advanced tab of the Preferences dialog box an...

Page 179: ...ges displayed in the thumbnail list Exit Click to close the Correct Enhance Images window 2 Toolbar Toolbar Zoom In Zoom Out Displays the enlarged or reduced preview of the image Full Screen Displays...

Page 180: ...its utility such a change is not reflected in still images captured from the video Therefore color tones may differ between videos and captured still images 1 In the Select Images screen click Captur...

Page 181: ...isplay the frame you want to capture and click Capture The captured still image is displayed in the Captured frame s area Important You can capture up to 150 frames from one video 5 Select the image s...

Page 182: ...the Movie Print window is displayed via Solution Menu EX you can print the captured still images To print specify the printer and media in the Print area then click Print When you print from the Movi...

Page 183: ...graphic driver video card or its utility such a change is not reflected in still images captured from the video Therefore color tones may differ between videos and captured still images To display the...

Page 184: ...nting the still images selected in the Captured frame s area Auto Frame Capture Settings Area You can capture multiple still images according to the settings Note Use Down arrow Up arrow to show hide...

Page 185: ...playback Mute Clear mute Switches audio OFF ON Playback Slider Displays the video playback progress Current playback time is displayed to the left of the slider Set start time Set end time Set the st...

Page 186: ...olutions Select this checkbox to reduce the jaggies roughness in images Apply to all frames Select this checkbox to correct all the images displayed in the thumbnail list OK Applies Noise Reduction to...

Page 187: ...after the correction side by side The image before the correction is displayed on the left and the image after the correction is displayed on the right of the window Sort by Time Displays the captured...

Page 188: ...aphs of people may infringe on portrait rights You may be required permission of way to use the work from copyright holder when using the work of others except for personal use use within the home or...

Page 189: ...be small depending on the language of the search text In that case entering English search text may increase search results 5 Select the image s you want to download The selected image s is are displ...

Page 190: ...rtified by Flickr To display the Import Photos from Photo Sharing Sites window click Import photos from photo sharing sites in the Select Images screen or Add Image dialog box To display the Add Image...

Page 191: ...ense You must show the title and licensor of the original work along with your creation You may not use the work for commercial purposes You may not modify the work Attribution Non Commercial Share Al...

Page 192: ...in the Thumbnail window Important Some images such as images in formats other than JPEG do not appear Save Selected Image Saves the image selected in the Selections area Save Selected Images Saves all...

Page 193: ...ion Right click a thumbnail and select Open web page of work from the displayed menu to start a browser and display the page of a photo sharing site on which the image is posted 4 Selections Area Thum...

Page 194: ...ication Software Questions and Answers A200 Questions and Answers How Can I Move or Copy the Saved File Which Side of the Displayed Image Does the Printing Start from How Do I Print with Even Margins...

Page 195: ...well For example when you save a file named MyAlbum el1 a folder named MyAlbum el1 Data is automatically created in the same folder that contains the MyAlbum el1 file If you want to move or copy the M...

Page 196: ...the Displayed Image Does the Printing Start from As shown below printing starts from the left side of the image displayed in the Layout Print screen Outputs the paper in the direction as the arrow in...

Page 197: ...on the image and printer To always print with even margins select the Always crop images when selecting a layout with margins checkbox on the Advanced tab of the Preferences dialog box To display the...

Page 198: ...and C4 are printed as page numbers The C1 and C4 represent the front cover and back cover respectively C1 Front cover C2 Inside the front cover C3 Inside the back cover C4 Back cover Note C2 C3 appear...

Page 199: ...nt Settings Printing Vivid Photos Reducing Photo Noise Cropping Photos Photo Print Printing Dates on Photos Photo Print Printing Multiple Photos on One Page Printing an Index Printing ID Photos ID Pho...

Page 200: ...rs in a photo before printing Important This function is available only with a printer that supports Vivid Photo This function is not available when Enable ICC Profile is selected on the Advanced tab...

Page 201: ...Photo Noise Reduction checkbox in the Select Paper screen to reduce noise in the image and make the printed photos more vivid Important This function is not available when Enable ICC Profile is selec...

Page 202: ...the image to adjust the area to be cropped and click OK Note To move the cropping area place the cursor within the white frame and drag it Drag the white lines to enlarge reduce the cropping area Sele...

Page 203: ...Page top Page 203 of 707 pages Cropping Photos Photo Print...

Page 204: ...Print To print the date the photo was taken on the photo click Date Settings in the Layout Print screen then select the Print date checkbox in the Date Settings dialog box Note The date is displayed...

Page 205: ...details on how to select photos Selecting a Photo The available number of photos and layout may vary depending on the media type Photos are arranged in the following order Example Borderless x4 You c...

Page 206: ...t Index cannot be printed if you select any of the following paper sizes Credit Card You can print up to 80 images on one page Note See the following section for details on how to select photos Select...

Page 207: ...Page top Page 207 of 707 pages Printing an Index...

Page 208: ...ayout Print screen Note The number of frames per page varies depending on the size of the ID photo to create Check the number of frames in the layouts displayed in the Layout Print screen then specify...

Page 209: ...splay the Preferences dialog box click Settings or select Preferences from the File menu ID photos can only be printed on 4 x6 10x15cm paper Page top Page 209 of 707 pages Printing ID Photos ID Photo...

Page 210: ...e Exif information side by side To print them select Letter 8 5 x11 or A4 for Paper Size in the Select Paper screen and select Captured Info from the layouts in the Layout Print screen Note See the fo...

Page 211: ...in the Layout Print screen When the Save As dialog box appears specify the save location and file name then click Save Important If you edit a saved file and save it again the file will be overwritte...

Page 212: ...of files cannot be displayed on Explorer 2 Select the file you want to open and click Open The Layout Print screen appears 3 Edit the file if necessary Note Easy PhotoPrint EX supports the following f...

Page 213: ...Page top Page 213 of 707 pages Opening Saved Files...

Page 214: ...nging Background Adding Photos Swapping Positions of Photos Replacing Photos Changing Position Angle and Size of Photos Cropping Photos Framing Photos Printing Dates on Photos Attaching Comments to Ph...

Page 215: ...the subsequent pages to fill all the frames in the new layout If the number of layout frames is decreased Pages with the new layout will be added until all the images on the pages with the current lay...

Page 216: ...ut the following will happen If the number of layout frames is increased Images will move from the subsequent pages to fill all the frames in the new layout If the number of layout frames is decreased...

Page 217: ...Page top Page 217 of 707 pages Changing Layout...

Page 218: ...Page Setup screen or select the page you want to change the background of in the Edit screen then click Change Background Note The screen s for Album printing is are used as example s in the following...

Page 219: ...h you can download additional materials for free Internet connection is required to access the website Internet connection fees apply Exit Easy PhotoPrint EX before installing backgrounds When Single...

Page 220: ...Note See Help for details on how to set the background in the Change Background dialog box Page top Page 220 of 707 pages Changing Background...

Page 221: ...t it background turns blue or deselect it background turns white You can also select multiple images You can also use still images captured from videos Creating Still Images from Videos You can also u...

Page 222: ...Page top Page 222 of 707 pages Adding Photos...

Page 223: ...mages Click Swap Image Positions in the Edit screen Note The screen s for Album printing is are used as example s in the following descriptions The screen s may vary depending on what you create Selec...

Page 224: ...screen and click OK If you want to select from the images already imported click the Imported Images tab and select the image you want to replace with from the thumbnail window and click OK Important...

Page 225: ...or double click the image Note The screen s for Album printing is are used as example s in the following descriptions The screen s may vary depending on what you create Set the Center Position Rotati...

Page 226: ...lect the image you want to crop in the Edit screen and click Edit Image or double click the image Click the Crop tab in the Edit Image dialog box Note The screen s for Album printing is are used as ex...

Page 227: ...ect the image you want to frame in the Edit screen and click Edit Image or double click the image Click the Frame tab in the Edit Image dialog box Note The screen s for Album printing is are used as e...

Page 228: ...application Click Search frames to access the Canon website from which you can download additional materials for free Internet connection is required to access the website Internet connection fees ap...

Page 229: ...e tab in the Edit Image dialog box Note The screen s for Album printing is are used as example s in the following descriptions The screen s may vary depending on what you create Select the Show date c...

Page 230: ...Page top Page 230 of 707 pages Printing Dates on Photos...

Page 231: ...splayed from top to bottom in a comment box Important You cannot attach comments to Calendar Stickers and Layout Print Select the image you want to attach comments to in the Edit screen and click Edit...

Page 232: ...the checkboxes of the items you want to display and enter comments Set the size and color of font and position of the comments etc then click OK Note See Help for details on comments Page top Page 23...

Page 233: ...as example s in the following descriptions The screen s may vary depending on what you create Select the Text tab in the Edit Text Box dialog box and enter text then click OK Note In the Edit Text Box...

Page 234: ...ollowing descriptions The screen s may vary depending on what you create When the Save As dialog box appears specify the save location and file name then click Save Important If you edit a saved file...

Page 235: ...et Holidays in the Calendar General Settings dialog box to display the Holiday Settings dialog box To add a holiday click Add The Add Edit Holiday dialog box appears To edit a saved holiday select it...

Page 236: ...in Holiday Name and specify the date Select the Set as Holiday checkbox to display that day as a holiday in your calendar Note See Help for details on each dialog box Page top Page 236 of 707 pages Se...

Page 237: ...sition size etc Click Settings in the Page Setup screen of Calendar or select a calendar in the Edit screen and click Setup Calendar to display the Calendar Settings dialog box Important The Position...

Page 238: ...PhotoPrint EX in icon view only for Windows 7 Windows Vista or thumbnail view Important When using 64 bit editions of Windows 7 Windows Vista or Windows XP the contents of files cannot be displayed o...

Page 239: ...open files created with Easy PhotoPrint EX with the following methods besides from Library in Menu Click Open in the step button area of each screen then select the file you want to edit Double click...

Page 240: ...th Other Application Software Printing with Other Application Software Various Printing Methods Changing the Print Quality and Correcting Image Data Overview of the Printer Driver Page top Page 240 of...

Page 241: ...ting Order Setting the Stapling Margin Execute Borderless Printing Fit to Page Printing Scaled Printing Page Layout Printing Poster Printing Booklet Printing Duplex Printing Stamp Background Printing...

Page 242: ...ly switched to the values that were preset 3 Select the print quality For Print Quality select High Standard or Fast according to your purpose 4 Complete the setup Click OK When you execute print the...

Page 243: ...he printer driver setup window 2 Select the paper size Select a page size from the Page Size list on the Page Setup tab 3 Set Orientation Select Portrait or Landscape for Orientation Check Rotate 180...

Page 244: ...Page top Page 244 of 707 pages Setting a Page Size and Orientation...

Page 245: ...e printed For Copies on the Page Setup tab specify the number of copies to be printed 3 Specify the print order Check the Print from Last Page check box when you want to print from the last page in or...

Page 246: ...he application and this printer driver the number of copies may be multiplied numbers of the two settings or the specified printing order may not be enabled Print from Last Page and Collate appear gra...

Page 247: ...nter driver setup window 2 Specify the side to be stapled Check the position of the stapling margin from Staple Side on the Page Setup tab The printer analyzes the Orientation and Page Layout settings...

Page 248: ...data is printed with the specified staple side and margin width Important Staple Side and Specify Margin appear grayed out and are unavailable when Borderless Poster or Booklet is selected for Page L...

Page 249: ...t to print data such as a photo without providing any margin around it set borderless printing The procedure for performing borderless printing is as follows You can also set borderless printing in Ad...

Page 250: ...borderless printing the print quality may deteriorate at the top and bottom of the sheet or stains may form When the ratio of the height to the width differs from the image data a portion of the imag...

Page 251: ...border before printing Page top Page 251 of 707 pages Execute Borderless Printing...

Page 252: ...to page printing Select Fit to Page from the Page Layout list on the Page Setup tab 3 Select the paper size for the data Using Page Size select the page size that is set with your application 4 Selec...

Page 253: ...in the settings preview on the left side of the printer driver 5 Complete the setup Click OK When you execute print the document will be enlarged or reduced to fit to the page size Page top Page 253...

Page 254: ...nting Select Scaled from the Page Layout list on the Page Setup tab 3 Select the paper size for the data Using Page Size select the page size that is set with your application 4 Set the scaling rate b...

Page 255: ...t will be printed with the specified scale Important When the application software which you created the original has the scaled printing function configure the settings on your application software Y...

Page 256: ...Selecting Scaled changes the printable area of the document Page top Page 256 of 707 pages Scaled Printing...

Page 257: ...ng Select Page Layout from the Page Layout list on the Page Setup tab The current settings are displayed in the settings preview on the left side of the printer driver 3 Select the print paper size Se...

Page 258: ...change the page arrangement order select an icon from the list to change the page placement order Page Border To print a page border around each document page check this check box 5 Complete the setu...

Page 259: ...large print like a poster The procedure for performing poster printing is as follows Setting Poster Printing 1 Open the printer driver setup window 2 Set poster printing Select Poster from the Page L...

Page 260: ...ific page select Pages and enter the page number you want to print To specify multiple pages enter the page numbers by separating them with commas or by entering a hyphen between the page numbers Note...

Page 261: ...ing the page selection click OK When you execute print only specified pages will be printed Important When Poster is selected the Duplex Printing Staple Side and Print from Last Page appear grayed out...

Page 262: ...the center The procedure for performing booklet printing is as follows 1 Open the printer driver setup window 2 Set booklet printing Select Booklet from the Page Layout list on the Page Setup tab The...

Page 263: ...ument will be printed on one side of a sheet of paper When the printing of one side is complete set the paper correctly by following the message and click OK When the printing of the other side is com...

Page 264: ...dow 2 Set duplex printing Check the Duplex Printing check box on the Page Setup tab 3 Select the layout Select Normal size or Fit to Page Scaled or Page Layout from the Page Layout list 4 Specify the...

Page 265: ...media type other than Plain Paper is selected from Media Type Duplex Printing appears grayed out and is unavailable When Borderless Poster or Booklet is selected from the Page Layout list Duplex Print...

Page 266: ...cument data It also allows you to print date time and user name The Background function allows you to print a light illustration behind the document data The procedure for performing stamp background...

Page 267: ...rmally printed in the foreground of the document Print semitransparent stamp Check this check box to print a semi transparent stamp on the document This function is available only when the XPS printer...

Page 268: ...s selected the Stamp Background Stamp button appears grayed out and is unavailable Note The stamp and background are not printed on blank sheets inserted with the Insert blank page function of booklet...

Page 269: ...so change and register some of the settings of an existing stamp Unnecessary stamps can be deleted at any time The procedure for registering a new stamp is as follows Registering a New Stamp 1 Open th...

Page 270: ...e and Outline You can select the color of the stamp by clicking Select Color Important Stamp Text appears grayed out and is unavailable when Date Time User Name is selected Placement tab Select the st...

Page 271: ...e Click OK when the confirmation message appears 5 Complete the setup Click OK The Stamp Background Stamp dialog box opens again The registered title appears in the Stamp list Deleting an Unnecessary...

Page 272: ...r it as a new background You can also change and register some of the settings of an existing background An unnecessary background can be deleted at any time The procedure for registering image data t...

Page 273: ...move the slider to the right To print the background at the original bitmap intensity move the slider to the rightmost position 6 Save the background Click the Save settings tab and enter a title in t...

Page 274: ...in the Background list Deleting an Unnecessary Background 1 Click Select Background in the Stamp Background dialog box The Background Settings dialog box opens 2 Select the background to be deleted S...

Page 275: ...to the machine refer to Loading Paper in the manual Basic Guide The procedure for performing envelope printing is as follows 1 Fold down the paper support 2 Load an envelope into the machine Fold down...

Page 276: ...int Quality 8 Complete the setup Click OK When you execute print the information is printed on the envelope Important When you execute envelope printing guide messages are displayed To hide the guide...

Page 277: ...You can display and check the print result before printing The procedure for displaying the print result before printing is as follows You can also set the print results display on the Quick Setup tab...

Page 278: ...up tab 1 Set the custom size in the application software On your application s paper size feature specify the custom size Important When the application software that created the document has a functi...

Page 279: ...the Width and Height of the paper to be used Then click OK 5 Complete the setup Click OK on the Page Setup tab When you execute print the data is printed with the specified paper size Page top Page 27...

Page 280: ...ecifying Color Correction Optimal Photo Printing of Image Data Adjusting Colors with the Printer Driver Printing with ICC Profiles Adjusting Color Balance Adjusting Brightness Adjusting Intensity Adju...

Page 281: ...lftoning Method You can individually set the combined representation method for the print quality level and the halftoning method The procedure for setting the print quality level and the halftoning m...

Page 282: ...xed rules to express the halftones Diffusion places the dots randomly to express the halftones 4 Complete the setup Click OK on the Main tab When you execute print the image data is printed with the s...

Page 283: ...Set grayscale printing Check the Grayscale Printing check box on the Main tab 3 Complete the setup Click OK When you execute print the document is converted to grayscale data It allows you to print th...

Page 284: ...Note During Grayscale Printing color inks may be used as well as black ink Page top Page 284 of 707 pages Printing a Color Document in Monochrome...

Page 285: ...a effectively select ICM or ICC Profile Matching When you want to use an application software to specify a printing ICC profile select None The procedure for specifying color correction is as follows...

Page 286: ...e in an application software to print data 4 Complete the setup Click OK on the Main tab When you execute print the data is printed with the specified color correction method Important When ICM is dis...

Page 287: ...method depends on the color space Adobe RGB or sRGB of the image data or the application software to be used There are two typical printing methods Check the color space Adobe RGB or sRGB of the image...

Page 288: ...ecify them use a printing ICC profile in the application software and select settings for color management The procedure for adjusting colors with the printer driver is as follows 1 Open the printer d...

Page 289: ...the setup Click OK on the Main tab When you execute print the printer driver adjusts the colors when printing the data Related Topics Selecting a Combination of the Print Quality Level and a Halftoni...

Page 290: ...ely using the color space of the input ICC profile specified in the image data To use this printing method use your application software to select color management items and specify an input ICC profi...

Page 291: ...Specify an ICC Profile with the Printer Driver and then Print Print from an application software that cannot identify input ICC profiles or does allow you to specify one by using the color space of th...

Page 292: ...et Manual Color Adjustment dialog box opens 5 Select color correction Click Matching tab and select ICM or ICC Profile Matching for Color Correction 6 Select the input profile Select an Input Profile...

Page 293: ...tems If necessary click Color Adjustment tab and adjust the color balance Cyan Magenta Yellow and adjust Brightness Intensity and Contrast settings and then click OK 8 Complete the setup Click OK on t...

Page 294: ...want to adjust the color balance slightly The following sample shows the case when color balance is used to intensify cyan and to diminish yellow so that the overall colors are more uniform No adjust...

Page 295: ...in the settings preview on the left side of the printer driver After adjusting each color click OK Important Adjust the slider gradually 4 Complete the setup Click OK on the Main tab When you execute...

Page 296: ...is selected Dark is selected The procedure for adjusting brightness is as follows You can also set brightness on the Quick Setup tab by choosing Photo Printing under Commonly Used Settings and then ch...

Page 297: ...ta is printed at the specified brightness Related Topics Selecting a Combination of the Print Quality Level and a Halftoning Method Specifying Color Correction Adjusting Color Balance Adjusting Intens...

Page 298: ...b by choosing Photo Printing under Commonly Used Settings and then choosing Color Intensity Manual Adjustment under Additional Features 1 Open the printer driver setup window 2 Select the manual color...

Page 299: ...ute print the image data is printed with the adjusted intensity Related Topics Selecting a Combination of the Print Quality Level and a Halftoning Method Specifying Color Correction Adjusting Color Ba...

Page 300: ...s as follows You can also set contrast on the Quick Setup tab by choosing Photo Printing under Commonly Used Settings and then choosing Color Intensity Manual Adjustment under Additional Features 1 Op...

Page 301: ...ain tab When you execute print the image is printed with the adjusted contrast Related Topics Selecting a Combination of the Print Quality Level and a Halftoning Method Specifying Color Correction Adj...

Page 302: ...original profile and colors The procedure for performing Simulate Illustration is as follows 1 Open the printer driver setup window 2 Set the Simulate Illustration If necessary check the Simulate Ill...

Page 303: ...hotograph to a sepia tone image The procedure for performing Monochrome Effects is as follows 1 Open the printer driver setup window 2 Set Monochrome Effects Check the Monochrome Effects check box on...

Page 304: ...ortant When the Grayscale Printing check box on the Main tab is checked Monochrome Effects appears grayed out and is unavailable Page top Page 304 of 707 pages Representing Image Data with a Single Co...

Page 305: ...ground sceneries while maintaining the human skin color natural By using this function you can make vivid hues appear even more vivid The procedure for performing Vivid Photo is as follows You can als...

Page 306: ...plication It allows you to print smooth outlines This feature is especially useful when printing low resolution images from Web pages The procedure for performing Image Optimizer is as follows 1 Open...

Page 307: ...It may take longer to complete printing when the image optimizer is used Page top Page 307 of 707 pages Smoothing Jagged Outlines...

Page 308: ...rexposure and underexposure The procedure for performing Photo Optimizer PRO is as follows 1 Open the printer driver setup window 2 Set Photo Optimizer PRO Check the Photo Optimizer PRO check box on t...

Page 309: ...ackground is set in the Stamp Background dialog box on the Page Setup tab Define Stamp is selected in the Stamp Background dialog box on the Page Setup tab and the bitmapped stamp is configured Note D...

Page 310: ...can reduce the digital camera noise and improve the image quality of the digital print The procedure for performing Photo Noise Reduction is as follows 1 Open the printer driver setup window 2 Set Ph...

Page 311: ...the noise still bothers you Depending on application software or resolution of image data effects of digital camera noise reduction may not be obvious When this function is used for other than photos...

Page 312: ...ew of the Printer Driver Overview of the Printer Driver Printer Driver Operations Canon IJ Printer Driver XPS Printer Driver How to Open the Printer Driver Setup Window Maintenance Tab Canon IJ Status...

Page 313: ...ting Image Data with Vivid Colors Smoothing Jagged Outlines Changing Color Properties to Improve Coloration Reducing Photo Noise Changing Machine Settings from Your Computer Changing the Print Options...

Page 314: ...er Driver Help You can display the Help describing the driver setting items through the printing preferences screen of the Canon IJ printer driver To view all descriptions of a tab Click the Help butt...

Page 315: ...e the XPS printer driver the standard IJ printer driver must already be installed on your computer With the XPS printer driver application software distributed with printers such as Easy PhotoPrint EX...

Page 316: ...inter Driver Setup Window through the Start Menu Follow the procedure below to perform maintenance operations such as print head cleaning or to configure printing profile that are common for all appli...

Page 317: ...orm machine maintenance or change the settings of the machine Features Cleaning the Print Heads Cleaning the Paper Feed Rollers Aligning the Print Head Position Checking the Print Head Nozzles Cleanin...

Page 318: ...es automatically when data is sent to the printer When launched the Canon IJ Status Monitor appears as a button on the task bar Click the button of the status monitor displayed on the task bar The Can...

Page 319: ...eck the document layout print order and number of pages You can also change the media type settings When you want to display a preview before printing open the printer driver setup window click the Qu...

Page 320: ...vanced Guide Printing Using the Operation Panel of the Machine Printing Using the Operation Panel of the Machine Copying Page top Page 320 of 707 pages Printing Using the Operation Panel of the Machin...

Page 321: ...Advanced Guide Printing Using the Operation Panel of the Machine Copying Copying Making Copies Reducing or Enlarging a Copy Using Useful Copy Functions Page top Page 321 of 707 pages Copying...

Page 322: ...e Operation Panel of the Machine Copying Making Copies U031 Making Copies For the basic procedure to make copies refer to Copying Reducing or Enlarging a Copy Using Useful Copy Functions Page top Page...

Page 323: ...en the photo paper is selected for the media type the original is copied without borders and fills the entire page 5 Press the Fit to Page button The Fit to Page lamp lights up Note To cancel Fit to P...

Page 324: ...te To cancel copying press the Stop Reset button To set the print quality to Fast speed priority You can set the print quality to Fast speed priority only when A4 or Letter sized plain paper is select...

Page 325: ...he page size between A4 and Letter You can switch the size of paper loaded on the Rear Tray between A4 and Letter Switching the Page Size between A4 and Letter Borderless copy You can copy images so t...

Page 326: ...Operation Panel or vice versa 1 Press the Maintenance button repeatedly until the LED displays as follows 2 Press the Black button to select A4 or the Color button to select Letter Note When you swit...

Page 327: ...Press the Fit to Page button The Fit to Page lamp lights up Note To cancel borderless copying press the Fit to Page button again When pressing the Fit to Page button the Fit to Page lamp is off and th...

Page 328: ...or will occur when all of the loaded paper runs out Press the Stop Reset button to release the error Important Do not open the Document Cover or remove the original from the Platen Glass until copying...

Page 329: ...nning Scanning Images Scanning with Using the Operation Panel of the Machine Scanning with the Bundled Application Software Scanning with Other Application Software Other Scanning Methods Page top Pag...

Page 330: ...Advanced Guide Scanning Scanning Images Scanning Images Scanning Images Before Scanning Placing Documents Page top Page 330 of 707 pages Scanning Images...

Page 331: ...on you can scan images with advanced settings from a computer using application software Select the scanning method according to your purpose Forwarding Scanned Data to the Computer Using the Operatio...

Page 332: ...ore Scanning Make sure that the original to be scanned meets the requirements for an original to be set on the Platen Glass Refer to Placing Documents for requirements and how to load the original on...

Page 333: ...w alignment mark of the Platen Photos that have been cut to various shapes and documents smaller than 1 18 inches 3 cm square cannot be cropped accurately when scanning Reflective disc labels may not...

Page 334: ...0 39 inches 1 cm or more space between the edges diagonally striped area of the Platen and documents and between documents Portions placed on the diagonally striped area cannot be scanned more than 0...

Page 335: ...the Machine Scanning with Using the Operation Panel of the Machine Forwarding Scanned Data to the Computer Using the Operation Panel of the Machine Appendix Various Scan Settings Page top Page 335 of...

Page 336: ...the computer confirm the following The necessary application software MP Drivers and MP Navigator EX is installed If the application software MP Drivers and MP Navigator EX is not yet installed insert...

Page 337: ...rtant The position or size of an image is not scanned correctly depending on the type of the original In this case refer to Scanning Photos and Documents to change the settings in Document Type and Do...

Page 338: ...dix Various Scan Settings S010 Appendix Various Scan Settings Specifying how to respond when scanning using the Operation Panel of the machine Selecting a Response to Commands from the Operation Panel...

Page 339: ...or EX MP Navigator EX enables you to specify how to respond when scanning using the Operation Panel of the machine 1 Start MP Navigator EX Starting MP Navigator EX 2 Click Preferences The Preferences...

Page 340: ...ings Tab Save to PC 4 Click OK The operation will be performed according to the settings when you start scanning using the Operation Panel of the machine Page top Page 340 of 707 pages Selecting a Res...

Page 341: ...ation Software What Is MP Navigator EX Supplied Scanner Software Let s Try Scanning Useful MP Navigator EX Functions Utilizing Images in MP Navigator EX MP Navigator EX Screens Appendix Opening Files...

Page 342: ...h This Software This software allows you to scan multiple documents at one time or scan images larger than the Platen You can also save scanned images attach them to e mail or print them using the sup...

Page 343: ...documents View Use Window Use the View Use window to select what you want to do with the scanned images Note See File Formats for data formats extensions supported by MP Navigator EX Page top Page 34...

Page 344: ...ng with Auto Scan Scanning documents photos magazines etc from the Platen Scanning Photos and Documents Scanning two or more photos small documents at one time Scanning Multiple Documents at One Time...

Page 345: ...ting MP Navigator EX Starting MP Navigator EX 1 From the Start menu select All Programs Canon Utilities MP Navigator EX 4 0 MP Navigator EX 4 0 MP Navigator EX starts Starting One click Mode 1 Click S...

Page 346: ...at startup checkbox in the Navigation Mode screen to always open the Navigation Mode screen at startup If this checkbox is not selected the last used screen appears at startup Page top Page 346 of 70...

Page 347: ...ments and BD DVD CD To scan other documents specify the document type Scanning Photos and Documents 1 Place the document on the Platen Placing Documents 2 Start MP Navigator EX and open the Navigation...

Page 348: ...end The scanned images appear in the Thumbnail window 6 Edit the scanned images as required Use Edit Tools to rotate images select a part of an image etc See the Edit Tools in Auto Scan Screen Scan I...

Page 349: ...7 Save the scanned images Saving Saving as PDF Files Page top Page 349 of 707 pages Easy Scanning with Auto Scan...

Page 350: ...nts Scan photos and documents placed on the Platen 1 Place the document on the Platen Placing Documents 2 Start MP Navigator EX and open the Navigation Mode screen Starting MP Navigator EX 3 In Scan I...

Page 351: ...5 Click Specify to set the document size and scanning resolution as required When setting is completed click OK Scan Settings Dialog Box Photos Documents Important When scanning a large document such...

Page 352: ...ort Window for details Note First select images to edit Selected images are outlined in orange Drag the mouse or use Shift arrow keys to select multiple images You can also select images by dragging a...

Page 353: ...y In that case start ScanGear scanner driver then adjust the cropping frames scan areas in whole image view and scan again Photos that have a whitish border Documents printed on white paper hand writt...

Page 354: ...ify Select Auto Detect Multiple Documents for Document Size When setting is completed click OK Scan Settings Dialog Box Photos Documents 6 Click Scan Page 354 of 707 pages Scanning Multiple Documents...

Page 355: ...ned images as required Use Edit Tools to rotate images select a part of an image etc See the Edit Tools in Photos Documents Platen Screen Scan Import Window for details Note First select images to edi...

Page 356: ...Files Note If you want to preview the images before scanning use ScanGear Scanning Multiple Documents at One Time with ScanGear Scanner Driver Page top Page 356 of 707 pages Scanning Multiple Document...

Page 357: ...laten 1 Start MP Navigator EX and open the Navigation Mode screen Starting MP Navigator EX Note You can complete from scanning to saving etc at one time by simply clicking the corresponding icon in th...

Page 358: ...st for Document Size then specify the scanning resolution as required When setting is completed click OK Scan Settings Dialog Box Photos Documents 5 Click Scan Page 358 of 707 pages Scanning Images La...

Page 359: ...alf of the document face down on the Platen 7 Click Scan The left half of the document is scanned and appears in the Stitch assist window Note Click Cancel to cancel the scan Page 359 of 707 pages Sca...

Page 360: ...image as required Use the icons to swap the left and right halves rotate the image 180 degrees or enlarge reduce the image Swap Left Right Swaps the left and right halves Important This function is no...

Page 361: ...orrect orientation You can drag the right half of the image from right to left or up and down to adjust the position If the left and right halves do not match due to a slanted document place the docum...

Page 362: ...13 Save the scanned images Saving Saving as PDF Files Page top Page 362 of 707 pages Scanning Images Larger than the Platen Stitch Assist...

Page 363: ...one time by simply clicking the corresponding icon 1 Place the document on the Platen Placing Documents 2 Start MP Navigator EX Starting MP Navigator EX The MP Navigator EX Navigation Mode screen or O...

Page 364: ...ick Mode Screen 5 Select Document Type according to the document to be scanned 6 Set the document size and scanning resolution as required 7 Start scanning Starts scanning Note Click Cancel to cancel...

Page 365: ...d images quickly Correcting enhancing images automatically Correcting Enhancing Images Automatically Correcting enhancing images manually Correcting Enhancing Images Manually Adjusting color character...

Page 366: ...to MP Navigator EX You can also select images saved on a computer Opening Images Saved on a Computer 2 Click Edit Convert then click Fix photo images on the list The Correct Enhance Images window open...

Page 367: ...t be available for images edited using an application digital camera etc manufactured by other companies Note The Face Sharpener and Digital Face Smoothing effect levels can be changed using the slide...

Page 368: ...cted Image or Save All Corrected Images You can save corrected enhanced images as new files Note To save only the images you like select them and click Save Selected Image To save all images click Sav...

Page 369: ...You can also select images saved on a computer Opening Images Saved on a Computer 2 Click Edit Convert then click Fix photo images on the list The Correct Enhance Images window opens Note The Correct...

Page 370: ...e Smoothing or Blemish Remover Note The Face Brightener Face Sharpener and Digital Face Smoothing effect levels can be changed using the slider that appears by clicking the corresponding buttons Move...

Page 371: ...djustments applied to the selected image 7 Click Save Selected Image or Save All Corrected Images You can save corrected enhanced images as new files Note To save only the images you like select them...

Page 372: ...tor EX You can also select images saved on a computer Opening Images Saved on a Computer 2 Click Edit Convert then click Fix photo images on the list The Correct Enhance Images window opens Note The C...

Page 373: ...left of the thumbnail and preview image Note Click Advanced to make fine adjustments to the image brightness and color tone See Advanced in the descriptions of the Correct Enhance Images window for d...

Page 374: ...e Selected Image To save all images click Save All Corrected Images The file format of adjusted images is JPEG Exif 7 Click Exit Important The adjustments will be lost if you exit before saving adjust...

Page 375: ...Recently Saved Images or a selected folder and its subfolders See Starting MP Navigator EX to start MP Navigator EX Quick Search In Text box on the Toolbar enter a word or phrase included in the file...

Page 376: ...F files that enables keyword search see PDF Settings Dialog Box Password protected PDF files cannot be searched Category You can search for images by category Modified Date To search for images that h...

Page 377: ...nnot be searched Search subfolders Select this checkbox to search subfolders Case sensitive Select this checkbox to match case Match all criteria Searches for files that meet all the specified criteri...

Page 378: ...tor EX to the latest version the classification information on the second latest version is transferred upon initial startup After the initial startup the classification information cannot be transfer...

Page 379: ...ted in the View Use window Note Some images may not be detected correctly and thus may be classified into wrong categories In that case drag and drop the image to the correct category Images saved in...

Page 380: ...View Use Window Page top Page 380 of 707 pages Classifying Images into Categories...

Page 381: ...he corresponding sections below for details on using images files Creating editing PDF files from scanned images Creating Editing PDF Files Printing multiple scanned images at one time or printing at...

Page 382: ...ave settings Specify the destination folder file name and file type Save Dialog Box Important You cannot select JPEG Exif when Document Type is Text OCR You cannot select JPEG Exif when Black and Whit...

Page 383: ...are saved according to the settings To further use edit the scanned images on MP Navigator EX click Open saved location in the Save Complete dialog box Creating Editing PDF Files Printing Documents Pr...

Page 384: ...as PDF Files Save images scanned with MP Navigator EX as PDF files 1 Select the checkboxes of the images you want to save then click Save as PDF file 2 In the Save as PDF file dialog box specify the...

Page 385: ...in My Pictures folder You can set passwords for PDF files Setting Passwords for PDF Files 3 Click Save Scanned images are saved according to the settings To further use edit the scanned images on MP N...

Page 386: ...one time using MP Navigator EX Note See Let s Try Scanning to scan images into MP Navigator EX You can also select images saved on a computer Opening Images Saved on a Computer Creating Editing PDF Fi...

Page 387: ...The Save as PDF file dialog box opens Save as PDF file Dialog Box Important You cannot save images scanned at 10501 pixels or more in the vertical and horizontal directions If a password protected PDF...

Page 388: ...t supporting PDF security Files may not open if an application that can be associated with PDF files is not installed 3 Use the application to edit print the file For details refer to the application...

Page 389: ...gation Mode screen and select images Note See Let s Try Scanning to scan images into MP Navigator EX You can also select images saved on a computer Opening Images Saved on a Computer 2 Click Print the...

Page 390: ...printing after last page is spooled 6 After printing return the setting on the Advanced tab to Start printing immediately Windows Vista Windows XP 1 From the Start menu select Control Panel 2 Click P...

Page 391: ...Navigator EX You can also select images saved on a computer Opening Images Saved on a Computer When Printing Photos Using Easy PhotoPrint EX Easy PhotoPrint EX enables you to print scanned photos at h...

Page 392: ...tc Print Photo Dialog Box 4 Click Print Starts printing Note To cancel while spooling click Cancel To cancel while printing click Cancel Printing in the confirmation window for the printer status To o...

Page 393: ...I refer to the manual of the e mail software program Note If an e mail software program is not selected manually attach the scanned and saved image to e mail 1 Scan documents into MP Navigator EX and...

Page 394: ...open a dialog box and select a compression type from High Low Compression Standard or Low High Compression 4 Click OK Files are saved according to the settings and the e mail software program starts...

Page 395: ...EX You can also select images saved on a computer Opening Images Saved on a Computer Correcting Photo Images You can correct enhance images in the Correct Enhance Images window 1 Select images and cli...

Page 396: ...the document to be scanned When scanning multiple documents you can collect the extracted text into one file General Tab Text displayed in Notepad included with Windows is for guidance only Text in th...

Page 397: ...ur passwords in a safe place for future reference Password protected PDF files cannot be opened in applications not supporting PDF security In some applications the commands print edit etc restricted...

Page 398: ...ve as PDF file dialog box opens 4 Select the Password security settings checkbox The Password Security Settings dialog box opens Note You can also open the Password Security Settings dialog box by cli...

Page 399: ...4 Re enter the password and click OK The Save as PDF file dialog box returns Important If you close the Save as PDF file dialog box without clicking Save the settings in the Password Security Setting...

Page 400: ...Related Topic Opening Editing Password protected PDF Files Page top Page 400 of 707 pages Setting Passwords for PDF Files...

Page 401: ...in other applications or whose passwords were set with other applications Only MP Navigator EX version 1 1 and 2 0 or later supports opening editing and printing password protected PDF files Password...

Page 402: ...in dialog box Note To reopen the file after closing the Zoom in dialog box re enter the password Entering a Password Permissions Password to Edit or Print a File 1 In the View Use window select PDF f...

Page 403: ...t as well the Document Open Password will be required then the Permissions Password will be required 3 Enter the password and click OK The corresponding dialog box opens Important If a password protec...

Page 404: ...F file Dialog Box View Use Images on your Computer Tab View Use Window Create Edit PDF file Window Print Document Dialog Box Print Photo Dialog Box Send via E mail Dialog Box Correct Enhance Images Wi...

Page 405: ...chine View Use Images on your Computer Tab One click You can complete from scanning to saving etc at one time by simply clicking the corresponding icon Custom Scan with One click Tab Switch Mode Switc...

Page 406: ...Page top Page 406 of 707 pages Navigation Mode Screen...

Page 407: ...h Photos Documents Platen selected Scan photos and documents placed on the Platen Photos Documents Platen Screen Scan Import Window Switch Mode Switches to One click Mode screen In the One click Mode...

Page 408: ...s Windows 7 MP Navigator EX folder in My Pictures folder Windows Vista MP Navigator EX folder in Pictures folder Windows XP MP Navigator EX folder in My Pictures folder Specify Folder Opens the View U...

Page 409: ...he Preferences dialog box you can make advanced settings to MP Navigator EX functions Preferences Dialog Box Guide Opens this guide Related Topic Opening Images Saved on a Computer Page top Page 409 o...

Page 410: ...box opens and you can specify the scan save settings Save Dialog Box One click Mode Screen Save as PDF file Scan documents and save them as PDF files When you click this icon the PDF dialog box opens...

Page 411: ...last used screen appears Preferences The Preferences dialog box opens In the Preferences dialog box you can make advanced settings to MP Navigator EX functions Preferences Dialog Box Guide Opens this...

Page 412: ...ents and BD DVD CD Important The following types of documents cannot be scanned correctly To scan other documents specify the document type A4 size photos Text documents smaller than 2L 5 inches x 7 i...

Page 413: ...mages in the Thumbnail window Note Images not saved on a computer will be deleted To keep important images use Save or other methods to save them to a computer before clicking Clear Save Save the sele...

Page 414: ...window by category or by date ascending or descending Thumbnail Window Thumbnail Window Scanned images are displayed When you select the checkbox of an image the image appears in the Selected Images...

Page 415: ...Related Topic Easy Scanning with Auto Scan Page top Page 415 of 707 pages Auto Scan Screen Scan Import Window...

Page 416: ...may not be scanned correctly See Placing Documents for details on how to place documents Recommended Image Correction Select this checkbox to apply suitable corrections automatically based on the doc...

Page 417: ...ges Area Settings and Operation Buttons View Use Click this when you want to open images and PDF files saved on your computer The View Use window opens View Use Window Auto Scan Click this when you wa...

Page 418: ...creens Note This button changes to Scan when you deselect the Use the scanner driver checkbox Clear Delete all images in the Thumbnail window Note Images not saved on a computer will be deleted To kee...

Page 419: ...large the image by double clicking it Display Size Changes the size of images in the Thumbnail window Sort by Sorts the images in the Thumbnail window by category or by date ascending or descending Th...

Page 420: ...image outlined in orange in the Selected Images area Selected Images Area Images selected in the Thumbnail window are displayed Related Topic Scanning Photos and Documents Page top Page 420 of 707 pa...

Page 421: ...ze of the document to be scanned When you select Custom a screen in which you can specify the document size appears Select a Units then enter the Width and Height and click OK Important When you selec...

Page 422: ...with fine dots are scanned Descreen is the function for reducing this moire effect Important You cannot select this checkbox when Document Type is Color Photo Black and White Photo or Text OCR Note S...

Page 423: ...ect orientation Select the language of the document to be scanned in Document Language Important You cannot select this checkbox when Document Type is Color Photo or Black and White Photo You cannot s...

Page 424: ...64 characters When saving multiple files 4 digits are appended to each file name Save as type Select a file type to save the scanned images Select JPEG Exif TIFF or BMP Important You cannot select JP...

Page 425: ...g scanned images as PDF files You can save multiple documents as one PDF file or add pages to a PDF file created with MP Navigator EX Important You cannot save images scanned at 10501 pixels or more i...

Page 426: ...is displayed when you select PDF Add Page for Save as type and specify the PDF file to which images are added To change the file click Browse to specify another one Important Images can only be added...

Page 427: ...erly depending on the document language Only text documents written in languages that can be selected from Document Language are supported The orientation of the following types of documents may not b...

Page 428: ...erver Important Highly compressed PDF images may degrade if you repeatedly save them with high compression Important Compression type cannot be set when Color Mode is Black and White Security Set pass...

Page 429: ...a computer 1 Display Setting Items 2 Image Handling Buttons 3 Toolbar 4 Thumbnail Window 5 Selected Images Area Important For PDF files only those created with MP Navigator EX are displayed You cannot...

Page 430: ...ar History to clear all data date folders and images displayed in Recently Saved Images Note The actual image files are not deleted Search The advanced search options opens Searching Images Jump to Ma...

Page 431: ...t is searched Note Search images in My Box Scanned Imported Images Recently Saved Images or a selected folder and its subfolders Refresh Refreshes the Thumbnail window contents Display Size Changes th...

Page 432: ...ys images that are not classified Images N The number of images classified into the category is displayed Selected n The number of images with the checkbox selected is displayed Note This portion is d...

Page 433: ...can add delete categories displayed in Custom Categories See Classifying Images into Categories for details Classify Images Images imported from hard disks appear in Unclassified Click Classify Images...

Page 434: ...save images scanned at 10501 pixels or more in the vertical and horizontal directions If a password protected PDF file is edited the passwords will be deleted Reset the passwords Setting Passwords for...

Page 435: ...log Box for details on the Save as PDF file dialog box Save All Pages Opens the Save as PDF file dialog box Specify the save settings and save all pages in the list as one PDF file or save all pages a...

Page 436: ...s the image displayed in Preview Full screen Displays the entire image Thumbnail Mode Switches to Thumbnail Mode The pages are displayed in thumbnail view Page top Page 436 of 707 pages Create Edit PD...

Page 437: ...use Paper Source Select paper source Page Layout Select a print type Normal size Printing Print one image per sheet Scaled Printing Print images at the selected scale enlarged or reduced Fit to Page P...

Page 438: ...per for printing Print quality may be fixed depending on the paper type Note Selectable paper types depend on the selected printer Print Quality Select the print quality Density Click Density adjustme...

Page 439: ...ed Note Double click an image to display it in a different window Printer Select the printer to use Properties Displays the selected printer s advanced setting screen Paper Size Select the size of pap...

Page 440: ...Layout is Normal size Printing For others the image is automatically rotated according to the aspect ratio of the paper Copies Specify the number of copies to print Vivid Photo Select this checkbox t...

Page 441: ...ftware program set up on the General tab of the Preferences dialog box is displayed Select the e mail software program you want to use Adjust attachment file size When the file type is JPEG selecting...

Page 442: ...Page top Page 442 of 707 pages Send via E mail Dialog Box...

Page 443: ...by side for comparison 1 Task Area 2 Toolbar Important Image correction enhancement cannot be applied to PDF files or black and white binary files Note The Correct Enhance Images window can also be op...

Page 444: ...d wrinkles You can adjust the effect level using the slider Apply to all images Automatically corrects enhances all images displayed in the thumbnail list OK Applies the selected effect to the selecte...

Page 445: ...n the image Blur Blurs the outline of the subjects to soften the image Move the slider to the right to soften the image Show through Removal Removes show through of text from the reverse side or remov...

Page 446: ...by reducing the cast color and increasing the complementary color Colorcast is a phenomenon where a specific color affects the entire picture due to the weather or ambient strong colors It is usually...

Page 447: ...n the selected area You can adjust the effect level using the slider Blemish Remover Removes moles in the selected area OK Applies the selected effect to the specified area Undo Cancels the latest cor...

Page 448: ...drag to move the trimming area Note Place the main subjects along the broken white lines or at the intersections to create a balanced image Enlarge Enlarges the displayed image Reduce Reduces the disp...

Page 449: ...Page top Page 449 of 707 pages Correct Enhance Images Window...

Page 450: ...files When you click this icon the PDF dialog box opens and you can specify the scan save and application settings PDF Dialog Box Mail Scan documents or photos and attach them to e mail When you click...

Page 451: ...you scan with Document Type set to Auto Mode in the Save dialog box or Custom dialog box When you want to convert text in the scanned image to text data specify Document Type do not select Auto Mode R...

Page 452: ...178 mm such as paperback pages with the spine cut off Documents printed on thin white paper Long narrow documents such as panoramic photos Reflective disc labels may not be scanned properly Place doc...

Page 453: ...ecify a compression type for JPEG files Select High Low Compression Standard or Low High Compression When Save as type is PDF Make advanced settings for creating PDF files See PDF Settings Dialog Box...

Page 454: ...specified settings The current screen closes Defaults Returns all settings in the screen to their defaults Scan Scans and saves documents with the specified settings When Save as type is Auto a confir...

Page 455: ...es supported by Auto Mode are photos postcards business cards magazines newspapers text documents and BD DVD CD The following types of documents cannot be scanned correctly with Auto Mode In that case...

Page 456: ...n which you can make advanced scan settings Scan Settings Dialog Box One click Mode Screen Save Settings Automatically save the image to your computer after scanning it Select this to save the images...

Page 457: ...dows XP MP Navigator EX folder in My Pictures folder Save to a Subfolder with Current Date Select this checkbox to create a subfolder in the folder specified in Save in with the current date and save...

Page 458: ...and applies the specified settings Click Cancel instead of Apply to cancel the specified settings Cancel Cancels the specified settings The current screen closes Defaults Returns all settings in the...

Page 459: ...rtant Place documents correctly according to the type of document to be scanned Otherwise documents may not be scanned correctly See Placing Documents for details on how to place documents Color Mode...

Page 460: ...l when this checkbox is selected These functions are not available when the Scan Settings dialog box is opened from the OCR dialog box Auto Photo Fix is not available when Color Mode is Grayscale or B...

Page 461: ...lines tables Note Scanning takes longer than usual when you enable Correct slanted document Detect the orientation of text documents and rotate images Select this checkbox to detect the orientation o...

Page 462: ...Page top Page 462 of 707 pages Scan Settings Dialog Box One click Mode Screen...

Page 463: ...es or PDF Add Page PDF Save each of the selected images as a separate PDF file PDF Multiple Pages Save multiple images in one PDF file Note PDF Multiple Pages is displayed when multiple images are sca...

Page 464: ...rowse to specify another one Important Images can only be added to PDF files created with MP Navigator EX You cannot specify PDF files created with other applications PDF files edited in other applica...

Page 465: ...he information specified on the right side of the screen Advanced Information Settings Area You can input Exif information such as the title and shooting data Select the checkbox of the items you want...

Page 466: ...x Scan Settings Document Type Select the type of document to be scanned Color Mode Select how to scan the document Document Size Select the size of the document to be scanned When you select Custom a...

Page 467: ...e Pages Save multiple images in one PDF file PDF Add Page Add the scanned images to a PDF file The images are added to the end of the PDF file You cannot rearrange the pages of the PDF file to which t...

Page 468: ...ve dialog box after scanning the image After scanning you can set the passwords in the Save as PDF file dialog box Setting Passwords for PDF Files Application Settings Open with Specify an application...

Page 469: ...horizontal directions Save as type Select a PDF file type to save the scanned images PDF Save each of the selected images as a separate PDF file PDF Multiple Pages Save multiple images in one PDF file...

Page 470: ...be specified as well Rotate Left 90 Rotate Right 90 Rotates scanned images 90 degrees counter clockwise or clockwise Select the image you want to rotate and click Rotate Left 90 or Rotate Right 90 Fil...

Page 471: ...ode Select how to scan the document Document Size Select the size of the document to be scanned When you select Custom a screen in which you can specify the document size appears Select a Units then e...

Page 472: ...t select JPEG Exif when Color Mode is Black and White Set When Save as type is JPEG Exif You can specify a compression type for JPEG files Select High Low Compression Standard or Low High Compression...

Page 473: ...hen the dialog box is opened directly from Solution Menu EX Apply Saves and applies the specified settings Click Cancel instead of Apply to cancel the specified settings Cancel Cancels the specified s...

Page 474: ...Settings Document Type Select the type of document to be scanned Color Mode Select how to scan the document Document Size Select the size of the document to be scanned When you select Custom a screen...

Page 475: ...default the scanned images are saved in the following folders Windows 7 MP Navigator EX folder in My Pictures folder Windows Vista MP Navigator EX folder in Pictures folder Windows XP MP Navigator EX...

Page 476: ...application Important Depending on the specified application the text may not be extracted correctly or the application may not start Start scanning by clicking the one click button Select this checkb...

Page 477: ...y Auto Mode are photos postcards business cards magazines newspapers text documents and BD DVD CD The following types of documents cannot be scanned correctly with Auto Mode In that case specify the d...

Page 478: ...en Specify Opens the Scan Settings dialog box in which you can make advanced scan settings Scan Settings Dialog Box One click Mode Screen Save Settings Automatically save the image to your computer af...

Page 479: ...d save scanned files in it A subfolder with a name such as 2010_01_01 Year_Month_Date will be created If this checkbox is not selected files are saved directly in the folder specified in Save in Save...

Page 480: ...ne click Mode Apply Saves and applies the specified settings Click Cancel instead of Apply to cancel the specified settings Cancel Cancels the specified settings The current screen closes Defaults Ret...

Page 481: ...eferences dialog box In the Preferences dialog box you can specify general MP Navigator EX settings and how to respond when scanning using the Operation Panel via the General and Scanner Button Settin...

Page 482: ...igator EX folder in Pictures folder Windows XP MP Navigator EX folder in My Pictures folder Location of Temporary Files Displays the folder in which to save images temporarily To change the folder cli...

Page 483: ...uage and how to scan multiple documents Document Language Specify the language according to the language of the document to be scanned Only text written in languages that can be selected in the Docume...

Page 484: ...en scanning using the Operation Panel of the machine Event Select Event Save to PC is set Document Type Auto Scan is set Actions Scan Settings Document Size This setting is automatically set Resolutio...

Page 485: ...om Set Set When Save as type is Auto Opens the Auto Save Settings dialog box in which you can specify the file format and other advanced save settings Select a file format for items detected as docume...

Page 486: ...specified in Save in Open the save dialog box after scanning the image Select this to open the save dialog box after scanning the images and specify the save settings such as destination folder file...

Page 487: ...canned Otherwise documents may not be scanned correctly See Placing Documents for details on how to place documents Recommended Image Correction Select this checkbox to apply suitable corrections auto...

Page 488: ...r than Scanned Images S011 Appendix Opening Files Other than Scanned Images You can save or print data other than scanned images using MP Navigator EX Using images saved on a computer Opening Images S...

Page 489: ...mages Specify Folder or Recently Saved Images Click My Box Scanned Imported Images to open images saved in My Box Scanned Imported Images click Specify Folder to open images saved in a specific folder...

Page 490: ...you want to do with them See the corresponding sections below for details on using images Creating Editing PDF Files Printing Documents Printing Photos Sending via E mail Editing Files Page top Page...

Page 491: ...What Is ScanGear Scanner Driver Scanning with Advanced Settings Using ScanGear Scanner Driver Correcting Images and Adjusting Colors with ScanGear Scanner Driver ScanGear Scanner Driver Screens Append...

Page 492: ...w scan results or set document type and output size etc when scanning documents It is useful when you want to scan in a specific color tone as it allows you to make various corrections and adjust brig...

Page 493: ...Auto Scan Mode Use the Auto Scan Mode tab to scan easily by simply placing the document on the Platen and clicking Scan Page top Page 493 of 707 pages What Is ScanGear Scanner Driver...

Page 494: ...aking simple image corrections Scanning in Basic Mode Scanning documents after making advanced image corrections and brightness color adjustments Scanning in Advanced Mode Scanning with a simple opera...

Page 495: ...nGear from the Navigation Mode screen of MP Navigator EX 1 Start MP Navigator EX and open the Navigation Mode screen Starting MP Navigator EX 2 In Scan Import click Photos Documents Platen The Scan Im...

Page 496: ...Follow these steps example to start ScanGear from an application The procedure varies depending on the application For details refer to the application s manual 1 Start the application 2 On the File...

Page 497: ...hat case click Thumbnail on the Toolbar to switch to whole image view and scan Photos that have a whitish border Documents printed on white paper hand written text business cards etc Thin documents Th...

Page 498: ...ion of the cropping frame scan area on the preview image Adjusting Cropping Frames 7 Set Image corrections as required 8 Click Scan Starts scanning Note Click Information to open a dialog box in which...

Page 499: ...of documents may not be cropped correctly In that case click Thumbnail on the Toolbar to switch to whole image view and scan Photos that have a whitish border Documents printed on white paper hand wri...

Page 500: ...review first 5 Set Output Settings Output Settings 6 Adjust the cropping frame scan area correct image and adjust colors as required Adjusting Cropping Frames Image Settings Color Adjustment Buttons 7...

Page 501: ...on the Basic Mode tab or the Advanced Mode tab Scanning in Basic Mode Scanning in Advanced Mode 1 Place the document on the Platen then start ScanGear scanner driver Placing Documents Starting ScanGe...

Page 502: ...Related Topic Auto Scan Mode Tab Page top Page 502 of 707 pages Scanning in Auto Scan Mode...

Page 503: ...hite paper hand written text business cards etc Thin documents Thick documents Scanning Multiple Documents in Whole Image View The following types of documents cannot be cropped correctly Documents sm...

Page 504: ...s required Note You can correct each image separately Select the frame you want to correct In thumbnail view you can only create one cropping frame scan area per image To create multiple cropping fram...

Page 505: ...changes to Whole Image 2 Adjust the scan areas cropping frames Adjust the size and position of the cropping frame scan area on the preview image You can also create two or more cropping frames If an a...

Page 506: ...er scanning can be specified in Status of ScanGear dialog after scanning on the Scan tab of the Preferences dialog box Scan Tab Page top Page 506 of 707 pages Scanning Multiple Documents at One Time w...

Page 507: ...ewing and changing the color tone of the entire image to scan Adjusting Colors Using a Color Pattern Brightening colors that have faded with time or due to colorcast Adjusting Saturation and Color Bal...

Page 508: ...nd correct faded colors when scanning images Setting Items Click Arrow of a function and select an item from the pull down menu Important Do not apply these functions to images without moire dust scra...

Page 509: ...hotos or pictures printed with fine dots are scanned Descreen is the function for reducing this moire effect Reducing dust and scratches Set Reduce Dust and Scratches to Low Medium or High according t...

Page 510: ...orrection to Low Medium or High according to the degree of backlight None Medium Correcting shadows that appear between pages when scanning open booklets Set Gutter Shadow Correction to Low Medium or...

Page 511: ...Pattern You can preview color changes and reproduce natural colors by using the color pattern function in ScanGear scanner driver s Basic Mode tab Color Adjustment Correct colors that have faded with...

Page 512: ...nge as you adjust them Below is an example of correcting a bluish image Since Blue and Green are too strong click the Yellow and Magenta arrows to correct Before After Note Color adjustments are appli...

Page 513: ...s saturation vividness You can brighten colors that have faded with time etc Move Slider under Saturation to the left to decrease the saturation darken the image and to the right to increase the satur...

Page 514: ...reducing the cast color and increasing the complementary color It is usually difficult to correct the image completely by adjusting only one color pair It is recommended that you find a portion in th...

Page 515: ...k Down arrow to switch to detailed view Click Up arrow to return to the previous view Click Defaults to reset all adjustments in the current window Channel Each dot of an image is a mixture of Red Gre...

Page 516: ...rence between the brighter and darker parts of an image Increasing contrast will increase the difference thus sharpening the image Decreasing contrast will decrease the difference thus softening the i...

Page 517: ...ge is a mixture of Red Green and Blue in various proportions gradation These colors can be adjusted individually as a channel Master Adjust the Red Green and Blue combined Red Adjust the Red channel G...

Page 518: ...t and white point All parts to the right of White point Slider will turn white level 255 When Image Adjustment is set to anything but None the adjustments shown below are performed automatically Movin...

Page 519: ...histogram to change the setting The point clicked with Black point Dropper will be the darkest point You can also enter a value 0 to 245 The point clicked with Mid point Dropper will be the middle of...

Page 520: ...ure of Red Green and Blue in various proportions gradation These colors can be adjusted individually as a channel Master Adjust the Red Green and Blue combined Red Adjust the Red channel Green Adjust...

Page 521: ...lting in a bright toned image when viewed on a monitor Underexposure Concave curve The midtone data of the input side is stretched toward the shadow of the output side resulting in a dark toned image...

Page 522: ...Edit custom curve You can drag specific points on the Tone Curve to freely adjust the brightness of the corresponding areas Page top Page 522 of 707 pages Adjusting Tone Curve...

Page 523: ...s a color as black or white By adjusting the threshold level you can sharpen text in a document or reduce show through in newspapers This function is available when Color Mode is Black and White In Sc...

Page 524: ...ections describe ScanGear scanner driver s screens and functions and how to use ScanGear Basic Mode Tab Advanced Mode Tab Input Settings Output Settings Image Settings Color Adjustment Buttons Auto Sc...

Page 525: ...reen was opened Settings and Operation Buttons Select Source Photo Color Scan color photos Magazine Color Scan color magazines Newspaper Grayscale Scan text and line drawings in black and white Docume...

Page 526: ...ary by the item selected in Destination Flexible Allows you to freely adjust the cropping frames In thumbnail view Drag the mouse over a thumbnail to display a cropping frame When a cropping frame is...

Page 527: ...the items listed in Output Size List Important You cannot delete predefined output sizes such as A4 and 1024 x 768 pixels Note Save up to 10 items An error message appears when you enter a value outsi...

Page 528: ...tween pages when scanning open booklets Important For precautions on using this function see Gutter Shadow Correction Color Pattern Allows you to adjust the image s overall color You can correct color...

Page 529: ...l view Uncheck All Frames This button is available when two or more frames are displayed Deselects the checkbox of the image in thumbnail view Select All Frames This button is available when two or mo...

Page 530: ...lected no outline The settings will not be applied Double click a frame to zoom in on the image Click Frame Advance at the bottom of the screen to display the previous or next frame Double click the f...

Page 531: ...Related Topic Scanning in Basic Mode Page top Page 531 of 707 pages Basic Mode Tab...

Page 532: ...2 Toolbar 3 Preview Area Note The displayed items vary by document type and how the screen was opened Settings and Operation Buttons Favorite Settings You can name and save a group of settings Input S...

Page 533: ...djust the image s overall brightness or contrast and adjust its highlight and shadow values histogram or balance tone curve Color Adjustment Buttons Zoom Zooms in on an image or the portion within the...

Page 534: ...will take time to process the images if the total size of the scanned images exceeds a certain size In that case a warning message appears It is recommended that you reduce the total size To continue...

Page 535: ...e result will be reflected in the scanned image The image returns to its original state when you preview again Auto Crop Displays and adjusts the cropping frame automatically to the size of the docume...

Page 536: ...ayed Only the images with the checkbox selected will be scanned Note When multiple images are previewed different outlines indicate different selection status Focus Frame thick blue outline The displa...

Page 537: ...displayed image In thumbnail view you can only create one cropping frame per image In whole image view you can create multiple cropping frames Adjusting Cropping Frames Related Topic Scanning in Advan...

Page 538: ...ations have a limit to the amount of scan data they can receive ScanGear scanner driver can scan data that is of 21000 pixels x 30000 pixels or less If you change Paper Size after previewing the previ...

Page 539: ...an adjust the cropping frame size by entering the values into Width and Height Click Change Aspect Ratio and change it to Keep Aspect Ratio to maintain the aspect ratio when you specify the cropping f...

Page 540: ...a size for printing or displaying Select Add Delete to set custom size and save it as a new output size option Flexible You can specify the output resolution and scale and adjust the cropping frame I...

Page 541: ...or mm when Destination is Print but you can only select pixels when Destination is Image display The name of the added size appears in Output Size List Click Save to save the items listed in Output Si...

Page 542: ...message appears when you click Scan It is recommended that you adjust the settings to reduce Data Size To continue scan in whole image view Page top Page 542 of 707 pages Output Settings...

Page 543: ...Image Settings Image Settings allows you to set the following items Image Adjustment When Image Adjustment is set the brightness of the specified portion of the image is optimized Images can be adjus...

Page 544: ...t to ON some moire effects may remain if Unsharp Mask is set to ON In that case set Unsharp Mask to OFF Selecting Magazine Color in Select Source on the Basic Mode tab has the same effect as setting D...

Page 545: ...ct the gradation and sharpness of the image Important Grain Correction may not be effective if the scan area is too small Backlight Correction Use this function to correct photos that have been shot a...

Page 546: ...force exceeding 4 4 lbs 2 0 kg If you press heavily the scanner may not work correctly or you might break the glass Align the document with the edge of the Platen If not the shadow will not be correc...

Page 547: ...en you adjust the image via the Color Adjustment Buttons the results will be reflected in the preview image Click a Color Adjustment Button to set the following items Saturation Color Balance Adjust t...

Page 548: ...in this screen For a color image select a color in Channel to check either Red Green or Blue or select Master to check three colors together If you place the cursor on the preview image the portion wi...

Page 549: ...gs select the saved item from the pull down menu To delete an item select it in Tone Curve Settings List or Threshold Settings List and click Delete Click Save to save settings displayed in Tone Curve...

Page 550: ...r the Advanced Mode tab and scan A4 size photos Text documents smaller than 2L 5 inches x 7 inches 127 mm x 178 mm such as paperback pages with the spine cut off Documents printed on thin white paper...

Page 551: ...Select this checkbox to display the thumbnails of scanned images in a different window Scan Scanning starts Note When scanning starts the progress will be displayed Click Cancel to cancel the scan Wh...

Page 552: ...o specify a folder to save images temporarily and a music file to play during or at the end of a scan Scanner Tab Preview Tab Allows you to select what to do with Preview when ScanGear is started and...

Page 553: ...ound Settings You can set the machine to play music during at the end of a scan Select the Play Music During Scanning or Play Sound When Scanning is Completed checkbox then click Browse and specify a...

Page 554: ...Page top Page 554 of 707 pages Scanner Tab...

Page 555: ...splayed The Color Adjustment Button settings the Toolbar settings and the Advanced Mode tab settings are also saved None No preview image will be displayed at startup Note Select None if you do not wa...

Page 556: ...for the standard size Standard The standard size Smaller Displays 95 in width and height of the area displayed for the standard size Note When you change the Cropping Size for Thumbnail View setting t...

Page 557: ...tically Select this to return to the original application when scanning is completed Do not close ScanGear automatically Select this to return to the ScanGear screen for another scan when scanning is...

Page 558: ...ch the monitor and printer colors Color Adjustment Buttons will be disabled This function is available when Color Mode is Color Source Scanner Select scanner profile Target Select target profile Monit...

Page 559: ...ar and the colors of the original image are not accurately reflected in the monitor Click Defaults to return to the default Monitor Gamma value 2 20 Note Refer to the manual of your monitor to check i...

Page 560: ...cropping frame scan area Adjusting Cropping Frames Selecting the best resolution Resolution Learning about file formats File Formats Learning about Color Matching Color Matching Matching the colors be...

Page 561: ...Ctrl key 3 Unselected Cropping Frame stationary thin broken lines The settings will not be applied Note Active Cropping Frame and Selected Cropping Frames are displayed in whole image view Initial Cr...

Page 562: ...degrees by clicking Switch Aspect Ratio However Switch Aspect Ratio is not available when Output Size is Flexible Creating Multiple Cropping Frames In thumbnail view You can only create one cropping f...

Page 563: ...f the latest cropping frame Note Create up to 12 cropping frames Scanning takes longer than usual when multiple cropping frames are selected Deleting Cropping Frames In thumbnail view To delete a crop...

Page 564: ...n to 600 dpi With a color printer specifying the resolution at half the resolution of the printer should be fine For example if you want to print scanned paper photos using a 600 dpi color printer you...

Page 565: ...olution 600 dpi Image resolution printing resolution 300 dpi Appropriate Resolution Settings Set the resolution according to the use of the scanned image Note Although you can change Output Resolution...

Page 566: ...uadruples If the file is too large the processing speed will slow down significantly and you will experience inconvenience such as lack of memory Set the minimum required resolution according to the u...

Page 567: ...dds information such as the date of image capture camera model shutter speed shooting mode and comments to JPEG files The file format version must be Exif 2 2 or later in order to print on a Direct Pr...

Page 568: ...ar Scanner Driver Output Profile Target sRGB OS Application Application Printer Driver Monitor Printer ScanGear converts the image s color space from the scanner s color space to sRGB When displaying...

Page 569: ...Advanced Guide Scanning Other Scanning Methods Other Scanning Methods Scanning with WIA Driver Scanning Using the Control Panel Windows XP Only Page top Page 569 of 707 pages Other Scanning Methods...

Page 570: ...plication s manual Scanning with WIA Driver 2 0 The following is an example of scanning using Windows Fax and Scan 1 Place the document on the Platen Placing Documents 2 Click Scan from New on the Fil...

Page 571: ...scan images as separate files Select this checkbox to preview or scan multiple images as separate files 4 Click Preview to preview the image The preview image appears on the right 5 Click Scan When sc...

Page 572: ...ntrast of the image thus sharpening the image You can also enter a value 127 to 127 Resolution DPI Enter the resolution Specify a value between 50 dpi and 600 dpi Resolution Picture type Select the ty...

Page 573: ...hen double click WIA Canon model name The Scanner and Camera Wizard dialog box opens 3 Click Next 4 Select Picture type according to the document to be scanned Note To scan with the values previously...

Page 574: ...ue 127 to 127 Resolution DPI Enter the resolution Specify a value between 50 dpi and 600 dpi Resolution Picture type Select the type of scan you want for your document Reset Click to restore the origi...

Page 575: ...Advanced Guide Maintenance Maintenance Cleaning Your Machine Aligning the Print Head Performing Maintenance from a Computer Page top Page 575 of 707 pages Maintenance...

Page 576: ...d Guide Maintenance Cleaning Your Machine Cleaning Your Machine Cleaning Cleaning the Exterior of the Machine Cleaning the Platen Glass and Document Cover Page top Page 576 of 707 pages Cleaning Your...

Page 577: ...th or similar materials for cleaning the exterior of the machine so as not to scratch the surface Be sure to use a soft cloth Never use volatile liquids such as thinners benzene acetone or any other c...

Page 578: ...cloth and wipe off dirt on the surface gently Smooth out wrinkles on the cloth if necessary before cleaning Important Be sure to turn off the power and disconnect the power plug before cleaning the ma...

Page 579: ...the power plug before cleaning the machine With a clean soft lint free cloth wipe the Platen Glass A and the inner side of the Document Cover white sheet B gently Be sure not to leave any residue espe...

Page 580: ...Advanced Guide Maintenance Aligning the Print Head Aligning the Print Head Aligning the Print Head Page top Page 580 of 707 pages Aligning the Print Head...

Page 581: ...Make sure that the power is turned on 2 Load a sheet of A4 or Letter sized plain paper in the Rear Tray 3 Open the Paper Output Tray gently and open the Output Tray Extension 4 Print the print head al...

Page 582: ...n adjusting the print head position is completed the LED returns to the copy standby mode Remove the sheet on the Platen Glass Important Do not open the Document Cover or move the loaded print head al...

Page 583: ...ter Performing Maintenance from a Computer Cleaning the Print Heads Cleaning the Paper Feed Rollers Aligning the Print Head Position Checking the Print Head Nozzles Cleaning Inside the Machine Page to...

Page 584: ...rts 4 Complete cleaning The Nozzle Check dialog box opens after the confirmation message 5 Check the results To check whether the print quality has improved click Print Check Pattern To cancel the che...

Page 585: ...r amount of ink than Cleaning Cleaning the print heads frequently will rapidly deplete your printer s ink supply Consequently perform cleaning only when necessary Note If there is no sign of improveme...

Page 586: ...chine Remove all sheets of paper from the rear tray 2 Open the printer driver setup window 3 Click Roller Cleaning on the Maintenance tab The confirmation message appears 4 Execute paper feed roller c...

Page 587: ...tings on the Maintenance tab The Custom Settings dialog box opens 3 Switch head alignment to manual Check the Align heads manually check box 4 Transmit the settings Click Send and when the confirmatio...

Page 588: ...al white streaks A Less noticeable horizontal white streaks B More noticeable horizontal white streaks 9 Confirm the displayed message and click OK The second pattern is printed Important Do not open...

Page 589: ...e displayed message and click OK The third pattern is printed Important Do not open the Scanning Unit Cover while printing is in progress 12 Check the printed pattern Enter the numbers of the patterns...

Page 590: ...produces the least noticeable horizontal white stripes A Less noticeable horizontal white stripes B More noticeable horizontal white stripes Note To print and check the current setting open the Start...

Page 591: ...ns Click Initial Check Items to display the items that you need to check before printing the nozzle check pattern 3 Load paper in the machine Load a sheet of A4 size or Letter size plain paper into th...

Page 592: ...aning is as follows Bottom Plate Cleaning 1 Open the printer driver setup window 2 Click Bottom Plate Cleaning on the Maintenance tab The Bottom Plate Cleaning dialog box opens 3 Load paper in the mac...

Page 593: ...Advanced Guide Changing the Machine Settings Changing the Machine Settings Changing Machine Settings from Your Computer Page top Page 593 of 707 pages Changing the Machine Settings...

Page 594: ...Settings from Your Computer Changing the Print Options Registering a Frequently Used Printing Profile Setting the Ink Cartridge to be Used Managing the Machine Power Reducing the Machine Noise Changi...

Page 595: ...ilures such as part of an image data being cut off The procedure for changing the print options is as follows 1 Open the printer driver setup window 2 Click Print Options on the Page Setup tab The Pri...

Page 596: ...gistering a printing profile is as follows Registering a Printing Profile 1 Open the printer driver setup window 2 Set the necessary items From Commonly Used Settings on the Quick Setup tab select the...

Page 597: ...gistered will be deleted from Commonly Used Settings Registered print settings cannot be saved and preserved If a profile is deleted register the print settings again Deleting Unnecessary Printing Pro...

Page 598: ...r setup window 2 Click Ink Cartridge Settings on the Maintenance tab The Ink Cartridge Settings dialog box appears 3 Select the ink cartridge to be used Select the ink cartridge to be used for printin...

Page 599: ...printer power is as follows Power Off The Power Off function turns off the machine When you use this function you will not be able to turn the machine on from the printer driver 1 Open the printer dr...

Page 600: ...ary specify one of the following items Do not use quiet mode The operating noise is at normal volume Always use quiet mode Select this option when you wish to reduce the operating noise Use quiet mode...

Page 601: ...ck this check box to use this function Align heads manually Usually the Print Head Alignment function on the Maintenance tab is set to automatic head alignment but you can change it to manual head ali...

Page 602: ...ng Does Not Start Copying Printing Stops Before It Is Completed Machine Moves But Ink Is Not Ejected Printing Speed Is Not as Fast as Expected FINE Cartridge Holder Does Not Move to the Position for R...

Page 603: ...in printing such as the machine is out of paper or paper is jammed a troubleshooting message is displayed automatically Take the appropriate action described in the message The message may vary depen...

Page 604: ...plug is securely plugged into the Power Cord Connector of the machine then turn it back on Check 3 Unplug the machine from the power supply then plug the machine back in and turn the machine back on...

Page 605: ...he Paper Output Tray is closed open it The machine resumes printing If opening the Paper Output Tray does not resolve the problem or if the tray was open to begin with the paper may be jammed Remove t...

Page 606: ...ine s Stop Reset button for at least 5 seconds Canon recommends to use new genuine Canon cartridges in order to obtain optimum qualities Please be advised that Canon shall not be liable for any malfun...

Page 607: ...Glass Check the position and direction of the original loaded on the Platen Glass E 3 1 LED display The machine is not connected with the computer Connect the machine and the computer with a USB cabl...

Page 608: ...NE Cartridge Holder from moving and turn on the machine again Important Be careful not to touch the components inside the machine The machine may not print out properly if you touch it If the problem...

Page 609: ...If the POWER lamp is off The machine is not powered on Connect the power cord and press the ON button If the POWER lamp is lit The LED may be in the screen saver mode On the Operation Panel press a b...

Page 610: ...s not displayed try the following Remove the CD ROM from your computer then insert it again Restart your computer If the icon is still not displayed try different discs and see if they are displayed I...

Page 611: ...e CD ROM again then perform Easy Install to install the MP Drivers In other cases Follow the procedure described in your setup manual to reinstall the MP Drivers If the MP Drivers were not installed c...

Page 612: ...ustom Install on the Setup CD ROM then select Easy WebPrint EX to install it onto your computer Note If Easy WebPrint EX is not installed on your computer a message asking you to install it may be dis...

Page 613: ...upports Hi Speed USB connection Does the USB port on your computer support Hi Speed USB connection Does the USB cable or the USB hub support Hi Speed USB connection Be sure to use a certified Hi Speed...

Page 614: ...g the Operation Panel on the machine Copying To print from a computer Confirm by using the printer driver Printing with Easy Setup Check 2 Make sure that the appropriate print quality is selected usin...

Page 615: ...Is the size of the print data extremely large Click Print Options on the Page Setup sheet Then select the Prevent loss of print data check box in the displayed dialog Check 2 Is the space of your comp...

Page 616: ...ting Is Blurred Colors Are Wrong White Streaks U313 No Printing Results Printing Is Blurred Colors Are Wrong White Streaks No Printing Results Printing Is Blurred Colors Are Wrong White Streaks Page 6...

Page 617: ...le Check Pattern printing Print Head Cleaning and Print Head Deep Cleaning If the Nozzle Check Pattern is not printed correctly After performing the Print Head Cleaning print the Nozzle Check Pattern...

Page 618: ...nt Cover When copying see also the sections below Check 7 Make sure that the original is properly loaded on the Platen Glass Loading Paper Originals Check 8 Is the original loaded with the side to be...

Page 619: ...he ink ejects properly from the print head nozzles Refer to Routine Maintenance for the Nozzle Check Pattern printing Print Head Cleaning and Print Head Deep Cleaning If the Nozzle Check Pattern is no...

Page 620: ...s not resolved after performing the Print Head Alignment perform Print Head Alignment manually referring to Aligning the Print Head Position Check 3 Is the size of the print data extremely large Click...

Page 621: ...er driver and try printing again If you are using plain paper to print images with high intensity the paper may absorb too much ink and become wavy causing paper abrasion You can confirm the intensity...

Page 622: ...If the paper you are using is not suitable for Borderless Printing the print quality may be reduced at the top and bottom edges of the paper Printing Area Check 3 Load the paper after correcting its...

Page 623: ...or the computer Print speed may be reduced if you are selecting the Prevent paper abrasion setting Deactivate the Prevent paper abrasion setting once printing is complete If not this setting remains e...

Page 624: ...ing Area Check 7 Is the Platen Glass dirty Clean the Platen Glass Cleaning the Platen Glass and Document Cover Check 8 Is the Paper Feed Roller dirty Clean the Paper Feed Roller Routine Maintenance No...

Page 625: ...click Send 5 Confirm the message and click OK Check 11 Is the paper scratched by other loaded paper Depending on the media type the paper may be scratched by other loaded paper when feeding from the...

Page 626: ...irm the paper and print quality settings Print Results Not Satisfactory Check 2 Perform the Bottom Plate Cleaning to clean the inside of the machine Routine Maintenance Note When performing borderless...

Page 627: ...d paper is larger than that you have specified Set the paper size correctly according to the paper you loaded Print Results Not Satisfactory Note The direction of the vertical line pattern may vary de...

Page 628: ...enance for the Nozzle Check Pattern printing Print Head Cleaning and Print Head Deep Cleaning If the Nozzle Check Pattern is not printed correctly After performing the Print Head Cleaning print the No...

Page 629: ...ing the Print Head Note If the problem is not resolved after performing the Print Head Alignment perform Print Head Alignment manually referring to Aligning the Print Head Position Page top Page 629 o...

Page 630: ...ble Replace the USB cable and try printing again Check 3 Restart your computer if you are printing from the computer If there are any unnecessary print jobs delete them Deleting the Undesired Print Jo...

Page 631: ...the port named USBnnn is selected Launch Canon My Printer from the task tray select Diagnose and Repair Printer Follow the on screen instructions to set the correct printer port then select Canon XXX...

Page 632: ...rrounding area can become extremely hot inside the machine Never touch the Print Head or nearby components Check 2 Is the paper loaded Make sure that paper is loaded in the Rear Tray If the machine ha...

Page 633: ...rint Head Deep Cleaning If the problem is not resolved after performing the Print Head Deep Cleaning turn off the machine and perform another Print Head Deep Cleaning after 24 hours If the problem is...

Page 634: ...g to prioritize speed makes printing faster 1 Open the printer driver setup window Opening the Printer Driver Setup Window Click Here Printer Driver Before clicking here to open the printer driver set...

Page 635: ...resolve the error see An Error Code Is Displayed on the LED Check 3 Has the Scanning Unit Cover been left open for 10 minutes or longer If the Scanning Unit Cover is left open for more than 10 minute...

Page 636: ...at a time to less than half of the paper load limit Always load the paper in portrait orientation regardless of the printing orientation When you load the paper on the Rear Tray load the paper with th...

Page 637: ...be sure to turn off the machine unplug it from the power supply then remove the foreign object Check 5 Clean the Paper Feed Roller Routine Maintenance Note Cleaning the Paper Feed Roller will wear the...

Page 638: ...you need to turn off the machine to remove jammed paper during printing press the Stop Reset button to cancel print jobs before turning off the machine Paper Is Jammed in the Paper Output Slot or the...

Page 639: ...pull the paper out turn the machine off and turn it back on The paper may be ejected automatically 2 Reload the paper and press the Stop Reset button on the machine If you turned off the machine in st...

Page 640: ...d the Paper Output Slot Check 2 Are there any foreign objects in the Rear Tray If there are any foreign objects in the Rear Tray be sure to turn off the machine unplug it from the power supply then re...

Page 641: ...er and depends on the error occurred 5100 Is Displayed Confirm the movement of the FINE Cartridge Holder blocked Cancel printing from your computer turn off the machine Then clear the jammed paper or...

Page 642: ...securely plugged in to the machine and the computer When the machine is connected to your computer with a USB cable check the followings If you are using a relay device such as a USB hub disconnect i...

Page 643: ...nded Survey Program Screen Is Displayed If the Inkjet Printer Scanner Fax Extended Survey Program is installed a confirmation screen asking for permission to send the printer and application software...

Page 644: ...ows Vista select the Start menu Control Panel Uninstall a program In Windows XP select the Start menu Control Panel Add or Remove Programs Note In Windows 7 or Windows Vista a confirmation warning dia...

Page 645: ...dure below to specify the response on your computer If you are using Windows 7 1 Log on as a user account with administrator privilege 2 Select Devices and Printers from the Start menu 3 Right click t...

Page 646: ...he Events tab on the WIA Canon XXX ser Properties where XXX is your machine s name screen 5 Select Start this program for Actions then select MP Navigator EX Ver4 0 from the pull down menu Choose an e...

Page 647: ...es Not Appear Scan Quality Image Displayed on the Monitor Is Poor Scanned Image Is Surrounded by Extra White Areas Cannot Scan Multiple Documents at One Time Cannot Scan Properly in Auto Scan Mode Slo...

Page 648: ...ke sure that the machine is turned on Check 2 Connect the USB cable to a different USB port on the computer Check 3 If the USB cable is connected to a USB hub remove it from the USB hub and connect it...

Page 649: ...Setup CD ROM into the computer s disc drive then select Custom Install and install MP Drivers Check 2 On the File menu of the application select Select Source and select the machine Important Do not s...

Page 650: ...he USB hub and connect it to a USB port on the computer Check 5 Make sure that the MP Drivers is installed If it is not installed insert the Setup CD ROM into the computer s disc drive then select Cus...

Page 651: ...st screen resolution Advanced settings On the Monitor tab of the displayed dialog box set Colors to High Color 16 bit or True Color 32 bit Windows Vista From the Start menu select Control Panel Appear...

Page 652: ...Color Settings Tab Page top Page 652 of 707 pages Scan Quality Image Displayed on the Monitor Is Poor...

Page 653: ...age view of ScanGear scanner driver to automatically display the cropping frame scan area according to the document size You can also manually specify the scan area in thumbnail view or when there are...

Page 654: ...Cannot Scan Multiple Documents at One Time Check 1 Make sure that the documents are placed correctly on the Platen Placing Documents Check 2 Scan each item individually Some applications do not suppo...

Page 655: ...to Scan Mode Check 1 Make sure that the documents are placed correctly on the Platen Placing Documents Check 2 Multiple image scanning may not be supported Some applications do not support multiple im...

Page 656: ...it to around 300 dpi Resolution Check 2 Set Fading Correction Grain Correction etc to None Image Settings Check 3 In MP Navigator EX deselect the Correct slanted document Detect the orientation of te...

Page 657: ...emory Message Is Displayed S909 There is not enough memory Message Is Displayed Check 1 Exit other applications and try again Check 2 Reduce the resolution or output size and scan again Resolution Pag...

Page 658: ...ent free hard disk space then scan again Error message may appear if there is not enough hard disk space to scan and save when the image size is too large such as when scanning a large document at hig...

Page 659: ...te In Windows 7 or Windows Vista a confirmation warning dialog box may appear when installing uninstalling or starting up software This dialog box appears when administrative rights are required to pe...

Page 660: ...oftware Program You Want to Use Does Not Appear in the Screen for Selecting an E mail Software Program Scanned Image Is Printed Enlarged Reduced Scanned Image Is Enlarged Reduced on the Computer Monit...

Page 661: ...upported Images are attached to the mail message automatically Microsoft Outlook Windows Mail Windows Vista Outlook Express Windows XP Check 2 If an e mail software program does not operate properly c...

Page 662: ...g Software Problems Scanned Image Is Printed Enlarged Reduced S932 Scanned Image Is Printed Enlarged Reduced Check Set the printing size in the application Page top Page 662 of 707 pages Scanned Image...

Page 663: ...he application s manual If you have any questions contact the manufacturer of the application Note You cannot reduce the image size in Paint To reduce the display size open the images in an applicatio...

Page 664: ...n Check If the file format is not supported by the application scan the image again and save it in a popular file format such as JPEG For details refer to the application s manual If you have any ques...

Page 665: ...orrect Size Position or Size of the Image Cannot be Detected Correctly When Scanning Using the Operation Panel Document Is Placed Correctly but the Scanned Image Is Slanted Document Is Placed Correctl...

Page 666: ...t the documents are placed correctly on the Platen Placing Documents Check 2 Set Document Size to the actual document size and scan again If the matching size is not found scan at a larger size and tr...

Page 667: ...When Scanning Using the Operation Panel Check 1 Make sure that the documents are placed correctly on the Platen Placing Documents Check 2 Check that the settings are correctly set according to the doc...

Page 668: ...ment Is Placed Correctly but the Scanned Image Is Slanted Check In MP Navigator EX deselect the Correct slanted document checkbox and scan again Scan Settings Dialog Box Photos Documents Scan Settings...

Page 669: ...y but the Orientation Changes in the Scanned Image Check In MP Navigator EX deselect the Detect the orientation of text documents and rotate images checkbox and scan again Scan Settings Dialog Box Pho...

Page 670: ...diately Unplug the power cord from the outlet and contact the seller or the service center Never attempt to repair or disassemble the machine yourself Attempts by customers to repair or take apart the...

Page 671: ...hite Streaks Machine Moves But Ink Is Not Ejected Cannot Install the MP Drivers Printing Does Not Start Copying Printing Stops Before It Is Completed Writing Error Output Error Communication Error Pri...

Page 672: ...Print from Last Page Collate and Stamp Background Stamp on the Page Setup tab Since the resolution in the preview display differs from the printing resolution text and lines in the preview display ma...

Page 673: ...tmap printing is enabled in Adobe Illustrator Adobe Systems Inc printing may take time or some data may not be printed printing may take time or some data may not be printed Print after unchecking the...

Page 674: ...closing the application Make sure that you have adequate disk space available when scanning large images at high resolutions For example at least 300 MB of free space is required to scan an A4 docume...

Page 675: ...y and retry When image size is too large such as when scanning large images at high resolution your computer may not respond or the progress bar may remain at 0 depending on the application In that ca...

Page 676: ...ment or Reprinting from the Print History Deleting the Undesired Print Job Updating the MP Drivers Uninstalling the On Screen Manuals Transporting the Machine Opening the Printer Driver Setup Window N...

Page 677: ...wing paper Glossy Photo Paper Everyday Use GP 501 Photo Paper Glossy GP 502 Photo Paper Plus Semi gloss SG 201 Photo Paper Pro Platinum PT 101 Photo Paper Plus Glossy II PP 201 Matte Photo Paper MP 10...

Page 678: ...inches 175 2 x 249 0 mm 4 x 6 10 x 15 cm 3 73 x 5 69 inches 94 8 x 144 4 mm 4 x 8 10 x 20 cm 3 73 x 7 69 inches 94 8 x 195 2 mm 5 x 7 13 x 18 cm 4 73 x 6 69 inches 120 2 x 169 8 mm 8 x 10 20 x 25 cm 7...

Page 679: ...ize Printable Area width x height Letter 8 00 x 10 69 inches 203 2 x 271 4 mm Legal 8 00 x 13 69 inches 203 2 x 347 6 mm This page size can be used only when printing from your computer Recommended pr...

Page 680: ...ecommended Printing Area width x height European DL 4 06 x 7 07 inches 103 2 x 179 5 mm US Comm Env 10 3 86 x 7 91 inches 98 0 x 200 8 mm This page size can be used only when printing from your comput...

Page 681: ...r Detaching the Document Cover Hold up the Document Cover vertically Attaching the Document Cover As illustrated below insert both hinges A of the Document Cover vertically into the holder B until the...

Page 682: ...ng the Canon IJ XPS Preview is as follows Print Combine Documents Delete Document Reset Documents View Thumbnails Move Document Move Page Delete Page Note Click View Thumbnails to view all print pages...

Page 683: ...xt on the Edit menu select Move Page from Pages and select the appropriate item Deleting print documents and print pages To delete a print document select the target document from the Document Name li...

Page 684: ...nt is displayed in the preview Important To limit the number of print history registrations click History Entry Limit on the File menu If the limit on the number of registration is exceeded the print...

Page 685: ...isplayed on the task bar The Canon IJ Status Monitor appears 2 Display the print jobs Click Display Print Queue The print queue window opens 3 Delete the print jobs Select Cancel All Documents from th...

Page 686: ...ating the MP Drivers Updating the MP Drivers Obtaining the Latest MP Drivers Deleting the Unnecessary MP Drivers Before Installing the MP Drivers Installing the MP Drivers Page top Page 686 of 707 pag...

Page 687: ...b site through the Internet and download the latest MP Drivers for your model Important You can download the MP Drivers for free but any Internet access charges incurred are your responsibility Before...

Page 688: ...ount to continue When you are logged on to a standard account switch to an administrator account and restart the operation from the beginning 2 Execute the uninstaller Click Execute When the confirmat...

Page 689: ...e File menu select Run as administrator and then click Server Properties When the User Account Control dialog box appears click Continue Click the Drivers tab In the Installed printer drivers list cli...

Page 690: ...ns refer to the Install the Software in the manual Getting Started Turn off the machine Checking the Personal Computer Settings Terminate all running applications In Windows 7 Windows Vista log on as...

Page 691: ...do not agree to the terms of the Software License Agreement you cannot install this software Installation of the MP Drivers begins After the Installation Complete window is displayed check that the m...

Page 692: ...Page top Page 692 of 707 pages Installing the MP Drivers...

Page 693: ...Before uninstalling the on screen manuals exit all on screen manuals that are opening 1 Click Start All Programs Canon XXX Manual where XXX is your machine s name Uninstall 2 Click OK when the confir...

Page 694: ...en as it may cause malfunction or damage to the machine making the machine unable to print 3 Retract the Paper Support and the Output Tray Extension then close the Paper Output Tray 4 Disconnect the p...

Page 695: ...rt Menu Follow the procedure below to perform maintenance operations such as print head cleaning or to configure print settings that are common for all application software 1 Select items from the Sta...

Page 696: ...rm that the POWER lamp is off Unplugging the power cord while the machine is still on may cause drying or clogging of the Print Head and print quality may be reduced 1 Press the ON button to turn the...

Page 697: ...will use this printer through the network is as follows When you execute print the data is sent to the printer through the print server system Important In case an error occurred when a document is p...

Page 698: ...oard and then select Printer properties Sharing tab from the displayed File menu If you are using Windows Vista press the Alt key on your keyboard and then select Run as administrator Sharing from the...

Page 699: ...ck the icon for the printer that you have configured on the print server system to be shared and then click Next Note If the icon for the printer is not displayed check that the printer is actually co...

Page 700: ...system Click the icon for the printer that you have configured on the print server system to be shared and then click Next Note If the icon for the printer is not displayed check that the printer is...

Page 701: ...er and Faxes window on the print server system Uncheck Notify when remote documents are printed on the Advanced tab and then restart the computer The bi directional communication function is disabled...

Page 702: ...Page top Page 702 of 707 pages Restrictions on Printer Sharing...

Page 703: ...photo album is an easy task if you use Easy PhotoPrint EX All you need to do is select which photos to use select a layout then load paper into your printer and print After you bind the printed sheet...

Page 704: ...own calendar using your favorite photos It ll be exciting to turn the calendar pages You can use all kinds of photos You can also create 2 month 6 month and 12 month calendars Create Stickers Create s...

Page 705: ...Page top Page 705 of 707 pages Using Easy PhotoPrint EX...

Page 706: ...s You can scan easily by navigating through MP Navigator EX screens You can also save print scanned images using MP Navigator EX Scan Small Documents at One Time You can scan multiple small documents...

Page 707: ...ave images as PDF files or attach them to e mail automatically Scan and Correct Enhance Photos You can easily correct enhance scanned photos using MP Navigator EX You do not need to use other applicat...

Reviews: