


3
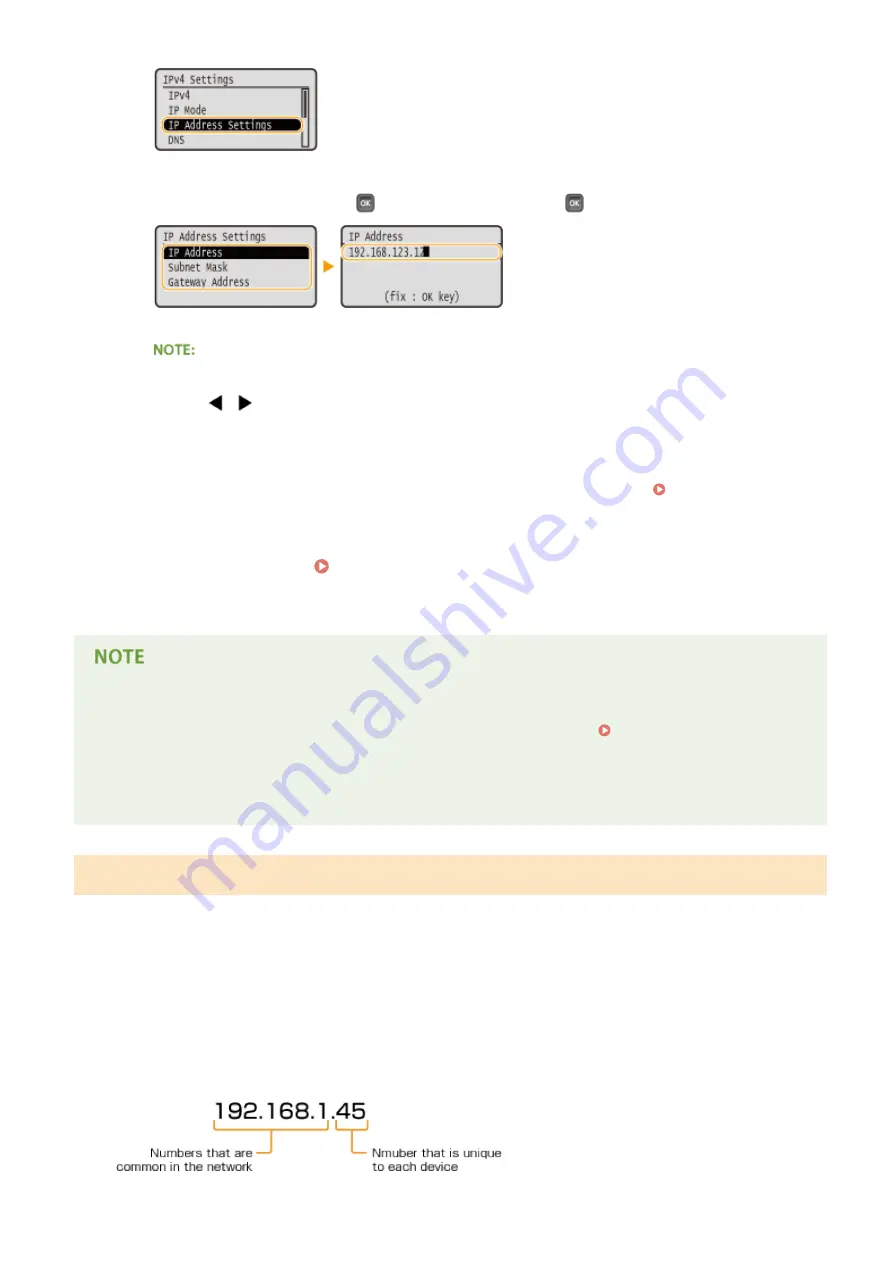
Specify the IP address, subnet mask, and gateway address (or default gateway).
●
Select the item to set, press
, enter an address, and press
.
How to enter addresses
●
Use
/
to move to the target field (a period-delimited input area), and use the numeric keys to
increase/decrease the value.
When you are unsure of the IP address to input
●
The IP address can be determined from the router settings of the network. Determining the IP
Address to Assign to the Machine(P. 190)
5
Perform a hard reset. Performing a Hard Reset(P. 451)
➠
The settings are enabled after the hard reset is performed.
Checking whether the settings are correct
●
Make sure that the Remote UI screen can be displayed with your computer. Starting Remote UI(P. 333)
If you have changed the IP address after installing the printer driver
●
By following the procedure for changing the standard TCP/IP port described in the "Printer Driver
Installation Guide", specify the port to use again.
Determining the IP Address to Assign to the Machine
When you want to use a fixed IP address for the machine, you can determine the IP address as shown below.
◼
To Determine the IP Address
An IP address consists of four numbers delimited by a period (.) (example: 192.168.1.45). Each number must be
in the range from 0 to 255. In general, set the first three numbers to be the same as those for the router
because they are common in the network. Determine the last number (for example, 45 in 192.168.1.45) that is
different from that for other devices.
Network
190
Summary of Contents for LBP352
Page 1: ...LBP352x LBP351x User s Guide USRMA 0699 00 2016 05 en Copyright CANON INC 2016...
Page 7: ...Notice 629 Office Locations 633 VI...
Page 84: ...Printing a Document 77...
Page 99: ...LINKS Basic Printing Operations P 78 Printing a Document 92...
Page 111: ...LINKS Basic Printing Operations P 78 Printing a Document 104...
Page 142: ...LINKS Using the Encrypted Print P 136 Installing an SD Card P 583 Printing a Document 135...
Page 163: ...LINKS Printing without Opening a File Direct Print P 146 Printing a Document 156...
Page 175: ...Can Be Used Conveniently with a Mobile Device 168...
Page 248: ...LINKS Entering Sleep Mode P 68 Network 241...
Page 288: ...Printing a Document Stored in the Machine Stored Job Print P 137 Security 281...
Page 294: ...Functions of the Keys Operation Panel P 24 Security 287...
Page 332: ...Using TLS for Encrypted Communications P 294 Configuring IPSec Settings P 298 Security 325...
Page 342: ...Using Remote UI 335...
Page 357: ...LINKS Remote UI Screens P 336 Using Remote UI 350...
Page 381: ...Paper Source 0X7U 058 See Select Feeder Menu P 453 Setting Menu List 374...
Page 469: ...Troubleshooting 462...
Page 533: ...8 Close the top cover Maintenance 526...
Page 551: ...LINKS Utility Menu P 445 Job Menu P 449 Maintenance 544...
Page 562: ...Third Party Software 0X7U 08U Appendix 555...
Page 607: ...Manual Display Settings 0X7U 08W Appendix 600...
Page 632: ...Scalable Fonts PCL Appendix 625...
Page 633: ...Appendix 626...
Page 634: ...Appendix 627...
Page 635: ...OCR Code Scalable Fonts PCL Bitmapped Fonts PCL Appendix 628...


