background image


1


Parts and Their Functions


1-2


Bef

ore Y

ou 

Star

t


Parts and Their Functions

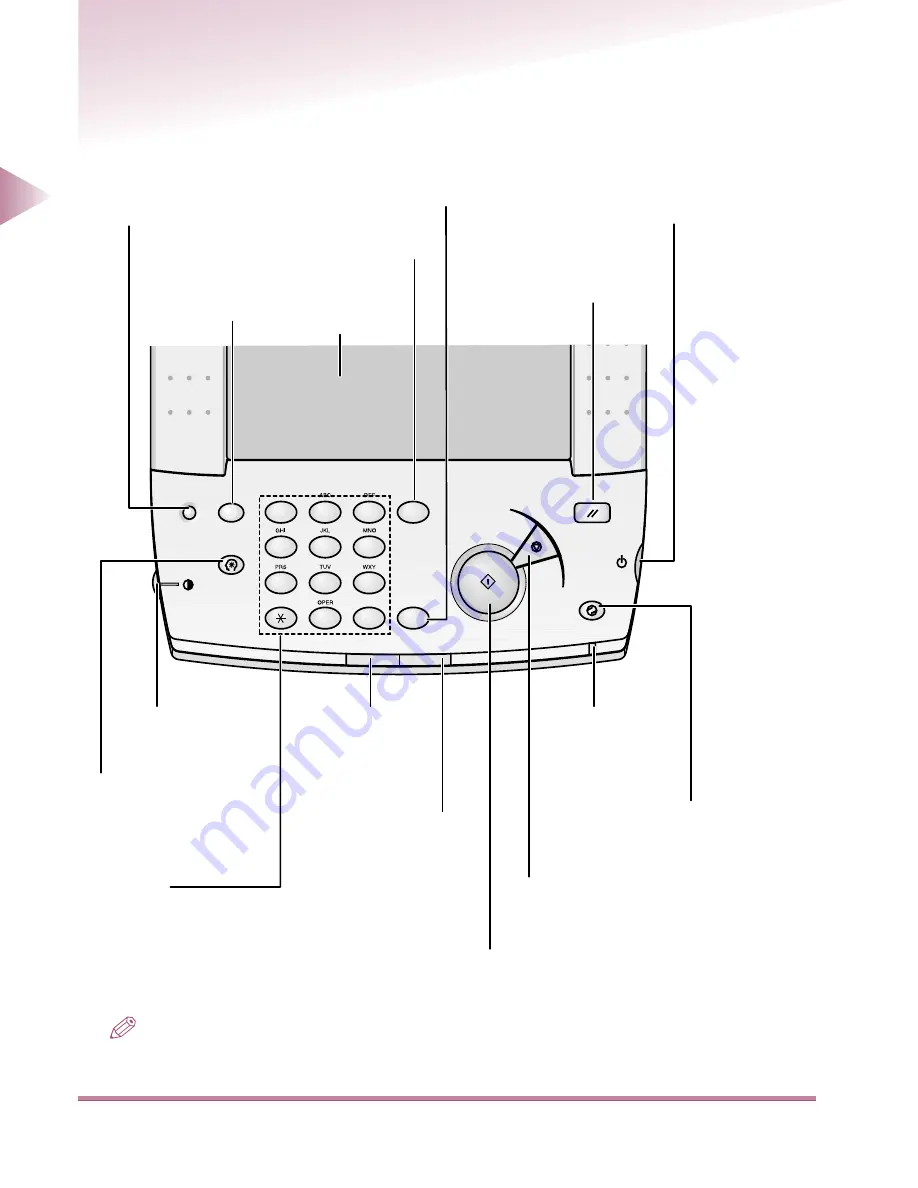
NOTE


• Before using the touch panel display, peel off the protective film from the display.

1

2

3

C

4

5

6

7

8

9

0

#

Reset

Additional
Functions

Stop

Start

Clear

?

Guide

Counter

Check

Display
Contrast

ID

Energy

Saver

Transmission/Memory

Error

ON/OFF

Power

Keypad

Press to enter 
numeric values.

Guide Key

Press to display the 
Usage and Information 
Guide screens on the 
touch panel display.

Reset Key

Press to return the selected 
copying mode to default mode.

Control Panel Power Switch 

Press to turn the control panel power 
ON or OFF. When the power is OFF, 
the unit is in Sleep mode.

Stop Key

Press to stop copying 
or scanning.

Additional Functions Key

Press to make Additional 
Function settings.

Energy Saver Key

Press to reduce power 
consumption by 
operating in Energy 
Saver mode.

Power Lamp

Lights when main power 
switch is ON; goes out 
when main power switch 
is OFF.

Start Key

Press to begin copying or 
scanning.

Clear Key

Press to clear numbers or 
characters that have been 
already entered.

ID Key

Press to use 
department ID 
control.

Transmission/ 
Memory Lamp

Flashes when there is a 
document in memory, or 
when circuits are in use.

Error Lamp

Flashes when an
error has occurred.

Counter Key

Press to display count 
information.

Touch Panel
Display

Screen Contrast Dial

Rotate to adjust the screen 
contrast.

Summary of Contents for IR3250

Page 1: ...Fax Reference Guide Please read this guide before operating this equipment After you finish reading this guide store it in a safe place for future reference Super G3 FAX Board H1...

Page 2: ...iR3250 Fax Reference Guide...

Page 3: ...its for a Class A digital device pursuant to Part 15 of the FCC Rules These limits are designed to provide reasonable protection against harmful interference when the equipment is operated in a commer...

Page 4: ...nd special codes which may cause a fax error C Power Requirements This equipment should be connected to a standard 120 volt AC three wire grounded outlet only Do not connect this unit to an outlet or...

Page 5: ...made you could be required to stop operation of the equipment NOTE This equipment has been tested and found to comply with the limits for a Class A digital device pursuant to part 15 of the FCC Rules...

Page 6: ...L are trademarks of Hewlett Packard Company The following fonts are licensed from Bitstream Technologies Inc Dutch 801 Roman Dutch 801 Bold Fixed Pitch 810 Courier 10 Pitch Text Fixed Pitch 810 Courie...

Page 7: ...ribes how to load paper and toner clean the machine remove paper jams and solve other hardware problems with the machine Remote UI User s Guide The Remote UI User s Guide describes the main features o...

Page 8: ...as well as how to enter a recipient not listed in the address book Chapter 3 Checking and Changing a Fax Job Describes how to use the System Monitor screen to check or change a fax job Chapter 4 Cust...

Page 9: ...nt 2 7 Chapter 3 Checking and Changing a Fax Job How to Check or Change a Fax Job 3 2 Canceling a Fax Job 3 5 Canceling a Send Job 3 5 Canceling a Receive Job 3 6 Canceling Fax Sending Receiving from...

Page 10: ...uments TX Terminal ID Telephone Mark 4 31 Setting the Sender Date Time Format TX Terminal ID Time Format 4 32 Address Book Settings 4 33 Entering the Recipient s Fax Number in the Address Book Store E...

Page 11: ...e Combination Image Separation Two sided Copy Booklet and Multi PG Enlarge modes from the first pages and work your way forward Place the original face down so that the original s top edge is against...

Page 12: ...the machine Output can be printed for copying printed from data sent from a personal computer printed from documents received by fax or inter net fax referred to as I fax in this manual transmission...

Page 13: ...he address list Details Press to modify an address on the address list New Recipient Fax Press to send a job to a recipient not listed in the Address Book One touch Buttons 2 Press to display addresse...

Page 14: ...24 For operations related to documents in boxes see Using Mail Boxes in the User s Guide Memory RX Box Press to display the Memory RX Box Box Number Keys Press to print transfer delete etc documents i...

Page 15: ...play jobs currently being processed as well as jobs in the standby queue Log Press to display a log of jobs processed Fax Press to view the status and log of fax sending and receiving Cancel Details P...

Page 16: ...Settings in chapter 4 For a description of set tings for functions other than Fax functions see the Reference Guide Additional Functions Report Settings Press to enter or store report settings Communi...

Page 17: ......

Page 18: ...art This chapter describes the parts of the control panel and basic operations you need to know about before you start using the machine s fax functions Parts and Their Functions 1 2 Before You Use th...

Page 19: ...power ON or OFF When the power is OFF the unit is in Sleep mode Stop Key Press to stop copying or scanning Additional Functions Key Press to make Additional Function settings Energy Saver Key Press t...

Page 20: ...formation off so that it will not print even though it is entered in your machine See Setting Whether to Print Information on Received Documents in the Reference Guide The sender information includes...

Page 21: ......

Page 22: ...2 1 2 Sending a Fax Sending a Fax This chapter describes how to send a fax How to Send a Fax 2 2 Sending to a Recipient Not Listed in the Address Book New Recipient 2 7 2 C H A P T E R...

Page 23: ...requested to enter a department ID and password enter the department ID and password See Enter ing the Department ID and Password in the User s Guide If the Copy Job Monitor screen appears press the D...

Page 24: ...nt is stored in a One touch But ton press the One touch Buttons 1 key or the One touch Buttons 2 key then select the desired one touch button See Using One touch Buttons in the User s Guide A maximum...

Page 25: ...ine For fine text and illustration 400 x 400 dpi Ultra Fine For precision illustrations IMPORTANT Documents set at resolutions other than those in the above guidelines are automatically changed Note t...

Page 26: ...ings You can send a fax at a specified time See Specifying a Time to Send a Job in the User s Guide You can create a copy of the fax you are sending See Printing a Job Locally while Sending in the Use...

Page 27: ...ginal of more than one page place the next page and press the key After all originals are scanned press the Done key The documents will then be sent NOTE To cancel sending press the key To cancel a do...

Page 28: ...rmation entered as a new address will be deleted after that job is sent The maximum number of recipients you can enter as new addresses at one time is 16 If character input is required the keyboard ap...

Page 29: ...01 or to place a pause at the end of a phone number You can also set the length of the pause See Setting the Pause Length on p 4 25 Tone Use when entering a touch tone phone number on a dial line This...

Page 30: ...OTE The subaddress and password can have up to 20 digits Press the key to delete the entire entry A subaddress or password may include the digits 0 to 9 as well as and spaces 5 Press the OK key The ad...

Page 31: ......

Page 32: ...as how to cancel a fax job or how to print related reports How to Check or Change a Fax Job 3 2 Canceling a Fax Job 3 5 Canceling a Send Job 3 5 Canceling a Receive Job 3 6 Canceling Fax Sending Recei...

Page 33: ...g the Details key on each of the Status screens 1 Press the System Monitor key 2 Press the Fax key NOTE To change the address on a fax Send job see Changing the Address in the User s Guide The red lam...

Page 34: ...top of the screen to select the fax job you want to check If Send Job Status is selected Shows a list of fax jobs currently being sent or waiting to be sent If Received Job Status is selected Shows a...

Page 35: ...Select the fax job for which you want to view details and press the Details key In this example Send Job Status is selected 5 Check the details then press the Done key NOTE If there are multiple reci...

Page 36: ...ling a Fax Job Canceling a Send Job You can cancel a fax job in progress or while it is waiting in the send queue 1 Press the System Monitor key 2 Press the Fax key 3 Select the fax job you want to ca...

Page 37: ...Canceling a Receive Job You can cancel a receive job If the following procedure does not cancel the job see Canceling Fax Sending Receiving from the Device Screen on p 3 7 1 Press the System Monitor k...

Page 38: ...rom the Device Screen While a fax job is being received or sent there are times when it cannot be canceled from the Sys tem Monitor screen In such cases use the following procedure 4 Press the Cancel...

Page 39: ...Canceling a Fax Job 3 8 3 Checking and Changing a Fax Job 3 Press the Cancel key 4 Press the Yes key The fax job is canceled...

Page 40: ...can be printed from the System Monitor screen can be printed from Additional Functions For details see Report Settings on p 4 4 Printing a Send Job Report From the System Monitor screen you can print...

Page 41: ...the System Monitor screen NOTE Log reports are printed as separate Send Result and Receive Result reports or as one Send Receive Result report according to the Fax Communication Result Report settings...

Page 42: ...Printing a Fax Job 3 11 3 Checking and Changing a Fax Job 2 Press the Fax key 3 Press the Log key 4 Press the Print key...

Page 43: ......

Page 44: ...21 Communications Settings 4 24 Setting ECM Sending ECM TX 4 24 Setting the Pause Length Pause Time 4 25 Setting Automatic Redial Auto Redial 4 25 Setting ECM Receiving ECM RX 4 28 Setting the Unit N...

Page 45: ...end Receive Separate Off P 4 5 System Manager Settings Communication Control Settings Fax Settings Send Start Speed 33600 14400 9600 7200 4800 2400 bps Receive Start Speed 33600 14400 9600 7200 4800 2...

Page 46: ...racters P 4 29 Unit Telephone Up to 20 characters p 4 30 Tel Line Type Tone Pulse P 4 30 TX Terminal ID Telephone Mark FAX TEL P 4 31 TX Terminal ID Time Format MM DD YYYY DD MM YYYY YYYY MM DD P 4 32...

Page 47: ...TX Report You can print a Fax Send Result Report after the completion of every send job You can also select to print a portion of the sent document on the Fax Send Result Report Error Copy Print The...

Page 48: ...rate Off 3 Turn the Error Copy Print function On or Off then press the OK key If On is selected For monochrome sending a portion of the outgoing document will be printed on the Fax TX Report For color...

Page 49: ...e specified time can be set in the range 00 00 to 23 59 Use the key to delete any errors 4 Press the Send Receive Separate key to select whether to separate Send and Receive reports then press the OK...

Page 50: ...r dis able certain settings Setting Up the Fax Functions Fax Settings NOTE The factory settings are Send Start Speed 33600 bps Receive Start Speed 33600 bps Memory Lock Off Receive Password None 1 Cal...

Page 51: ...ting Send Receive Start Speeds This function can change the start speed if poor line conditions delay the start of sending or receiving NOTE If frequent errors are encountered at 33600 bps the send sp...

Page 52: ...ress to correct any errors when entering the password The Backspace key erases one letter in front of the cursor each time it is pressed NOTE ITU T A part of the International Telecommuni cations Unio...

Page 53: ...llows key System Settings 2 Enter the System Manager ID and System Password then press the key After pressing each key use the numeric keys to enter the information NOTE This step is not required if y...

Page 54: ...yboard will appear in the touch panel display Enter the condition name then press the OK key NOTE For instructions on entering characters see Entering Characters Using the Touch Panel Dis play in the...

Page 55: ...select Fax 8 Enter the forwarding conditions Enter the fax number subaddress and password settings in step 9 Messages that meet all of these conditions will be forwarded Fax number Sender s phone num...

Page 56: ...dress and password match the values entered If begins with is selected only when fax number is entered Forwards when fax number begins with the values entered If ends with is selected only when fax nu...

Page 57: ...ter restrictions are as follows Fax number numerals from 0 to 9 space Subaddress numerals from 0 to 9 space Password numerals from 0 to 9 space Once the fax number subaddress and password settings are...

Page 58: ...urn the Processing received document after forwarding function On or Off and press the OK key If On is selected Received documents will be printed as they are forwarded If Off is selected Received doc...

Page 59: ...lows key System Settings 2 Enter the System Manager ID and System Password then press the key After pressing each key use the numeric keys to enter the information NOTE This step is not required if yo...

Page 60: ...o scroll to the desired forwarding setting You can use the Receive Type drop down list box to reduce the number of forwarding settings displayed All Displays all forwarding settings Fax Displays only...

Page 61: ...rding Settings on p 4 10 7 Press the Done key Repeat until the Additional Functions screen closes 1 Call up the desired screen as follows key System Settings 2 Enter the System Manager ID and System P...

Page 62: ...On or Off NOTE Use the and keys to scroll to the desired forwarding setting You can use the Receive Type drop down list box to reduce the number of forwarding settings displayed All Displays all forwa...

Page 63: ...to turn forwarding On or Off Forwarding conditions On Conditions are enabled NOTE When the forwarding conditions are On the icon appears in color Forwarding conditions Off not checked Conditions are...

Page 64: ...llows key System Settings 2 Enter the System Manager ID and System Password then press the key After pressing each key use the numeric keys to enter the information NOTE This step is not required if y...

Page 65: ...and keys to scroll to the desired forwarding setting You can use the Receive Type drop down list box to reduce the number of forwarding settings displayed All Displays all forwarding settings Fax Dis...

Page 66: ...ttings 5 Press the Delete key Select Yes or No If Yes is selected Deletes the selected forwarding setting If No is selected Does not delete the selected forwarding setting 6 Press the Done key Repeat...

Page 67: ...ction Mode ECM transmission requires that both the sending and receiving devices be set for ECM If this setting is not made at both ends this function is not valid Even when the ECM function is set er...

Page 68: ...ot be established for any reason i e a communication error NOTE The factory settings are Auto Redial On Redial Times 2 times Redial Interval 2 minutes Redial after error Error and 1st page 1 Call up t...

Page 69: ...selected Auto redial is not selected Press the OK key and go to step 8 3 Press the Option key 4 Use the and keys to set the number of Redial Times and the Redial Interval then press the OK key The nu...

Page 70: ...e first page and the error page when the document is resent If All pages is selected Resends all pages when the document is resent If Error Page is selected Resends only the error page when the docume...

Page 71: ...t both the sending and receiving devices be set for ECM If this setting is not made at both ends this function is not valid Even when the ECM function is set errors can be caused by telephone line pro...

Page 72: ...information about entering characters see Entering Characters Using the Touch Panel Display in the User s Guide 1 Call up the desired screen as follows key Communications Settings Fax Settings Unit Na...

Page 73: ...up the desired screen as follows key Communications Settings Fax Settings or Unit Telephone 2 Enter the phone number and press the OK key Space Press to leave a space between the exchange and phone nu...

Page 74: ...for this function is FAX 2 Select a line type and press the OK key 3 Press the Done key Repeat until the Additional Functions screen closes 1 Call up the desired screen as follows key Communications...

Page 75: ...until the Additional Functions screen closes 1 Call up the desired screen as follows key Communications Settings Fax Settings or TX Terminal ID Time Format 2 Select a Date Time format then press the O...

Page 76: ...a fax number in the address book and change and delete entries Entering the Recipient s Fax Number in the Address Book Store Edit Address Book 1 Call up the desired screen as follows key Address Book...

Page 77: ...tions on entering characters from the keyboard see Entering Characters Using the Touch Panel Display in the User s Guide 5 From the Address Book drop down list box select one of the address books numb...

Page 78: ...4 25 Tone Press before entering a push button signal on a dial line This enables you to use push button services even when connected to a dial line and Press to move the cursor position Space Press to...

Page 79: ...ssword can have up to 20 digits Press the key to delete the entire entry Input may include the digits 0 to 9 as well as and spaces 9 Select a speed from the Send Start Speed drop down list box Send St...

Page 80: ...transmissions ECM is a function that automatically corrects errors in image transmission See Setting ECM Sending on p 4 24 If On is selected Performs ECM Send If Off is selected Does not perform ECM...

Page 81: ...press the Edit key NOTE You can use the or keys or press the A Z or 0 9 keys to find the recipients you want You can simplify the process by using the Address Book or Type drop down list boxes to sel...

Page 82: ...ettings Deleting a Fax Recipient Store Edit Address Book 4 Press the Done key Repeat until the Additional Functions screen closes 1 Call up the desired screen as follows key Address Book Settings Stor...

Page 83: ...n will become invalid See Entering Fax Forwarding Settings on p 4 10 See Forward ing Settings in the Reference Guide It is not possible to delete multiple recipients at one time You can use the or key...

Page 84: ...is chapter describes what to do if problems occur with the machine s fax functions Error Code Table 5 2 Error Message Display 5 3 When Problems Occur 5 4 Fax Sending Problems 5 4 Fax Receiving Problem...

Page 85: ...Retry the entire procedure Recipient may be using a machine other than a G3 machine Ask recipient to make sure receiving machine is a G3 machine 012 Receiving machine is out of paper Ask recipient to...

Page 86: ...respond Confirm that the recipient is able to receive then try again The receiving machine is not a G3 machine Confirm with the recipient Document is too long You have attempted to feed more than 17...

Page 87: ...machine out of paper Ask recipient to add paper Is the recipient line is busy Use busy line detector Verify Solution Is the resolution set to 200 x 400 dpi or 400 x 400 dpi Is image setting set to Tex...

Page 88: ...ing machine support ITU T standard communication functions Verify with the recipient then try again Are the receiving machine s subaddress and password set correctly Confirm that the receiving machine...

Page 89: ...solution the shorter the sending time However fine print may become more difficult to read Is image setting set to Text Photo Set image setting to Text by pressing the image key Is ECM set to On ECM c...

Page 90: ...x Appendix This chapter presents sample reports and lists the fax function specifications Sample Reports 6 2 Fax TX Report 6 2 Fax Activity Report 6 3 Fax Job List 6 5 Specifications 6 6 Index 6 7 C H...

Page 91: ...r 2 Department ID Shows the department ID if department ID control has been set up 3 Destination Tel Shows the sender s telephone number up to 20 digits that is printed automatically 4 Subaddress Show...

Page 92: ...JOB NO MODE PGS RESULT DEPT ID 9876543 04 19 19 14 04 19 19 17 04 19 19 24 04 19 19 27 04 19 19 34 416 795 1111 2101 1250 2101 1250 516 488 6700 3 1234 5678 Canon Italy Canon U S A Canon U S A Canon U...

Page 93: ...hows the recipient s abbreviated name If longer than 24 characters the first characters are shown 4 Job Number Shows number 4 digits set automatically when the document is received 5 Mode Shows the se...

Page 94: ...mbers longer than 28 digits the last 28 digits are shown 3 Destination ID Shows the recipient s abbreviated name If longer than 24 characters the first characters are shown 4 Job Number Shows the rece...

Page 95: ...per drawer feed 11 x17 LGL LTR Stack bypass 11 x17 LGL LTR Scanline density Scan Send Standard mode 200 x 100 dpi equivalent to 8 pels mm x 3 85 line mm Fine mode 200 x 200 dpi equivalent to 8 pels mm...

Page 96: ...ging a Fax Job 3 2 Fax Recipient Settings 4 38 Forwarding Settings 4 16 Checking a Fax Job 3 2 Clear Key 1 2 Communications Settings 4 24 Control Panel Power Switch 1 2 Counter Key 1 2 Custom Fax Sett...

Page 97: ...sult Report Settings 4 4 Fax Sending Problems 5 4 Fax Settings 4 7 Fax TX Report 4 4 6 2 Forwarding Settings 4 10 Changing 4 16 On and Off 4 18 G Guide Key 1 2 H How to Check or Change a Fax Job 3 2 H...

Page 98: ...in the Address Book 2 7 Setting Automatic Redial 4 25 ECM Receiving 4 28 ECM Sending 4 24 the Fax or Phone Icon for Fax Documents 4 31 the Line Type 4 30 the Pause Length 4 25 the Phone Number 4 30 th...

Page 99: ...it Address Book 4 33 4 38 4 39 System Manager Settings 4 7 T Tel Line Type 1 3 4 30 Touch Panel Display 1 2 Transmission Memory Lamp 1 2 Troubleshooting 5 1 Turning Forwarding On and Off 4 18 TX Termi...

Page 100: ...ON U K LTD Woodhatch Reigate Surrey RH2 8BF United Kingdom CANON DEUTSCHLAND GmbH Europark Fichtenhain A10 47807 Krefeld Germany CANON ITALIA S p A Palazzo L Strada 6 20089 Milanofiori Rozzano MI Ital...

Reviews: