


Chapter 2
2-12
2.7
Pickup/Feeding System
2.7.1
Adjusting the
Horizontal Registration
When Replacing the
Pickup Cassette
0000-5368
Make a test copy of the A3 Test Chart, and check to
be sure that the margin on the front side of the image
is correct (L2 = 2.0 ±1.5 mm); otherwise, go through
the following steps to make adjustments, starting with
the 1st side and then the 2nd side:
Adjusting the Horizontal Registration on the 1st Side
1) Slide out the manual feed unit and the cassette 1/2;
then, open the pickup vertical path cover.
2) Remove the 2 screws [1], and detach the front right
cover [2].
F-2-24
- Adjusting the Cassette 1 Side
3) Insert a screwdriver through the hole in the front
right stay, and loosen the screw [1] to adjust the
position of the adjusting plate [2].
F-2-25
F-2-26
- Adjusting the Cassette 2 Side
3) Remove the grip [1] from the front right.
F-2-27
4) Insert a screwdriver through the hole in the front
right stay, and loosen the screw [1] to adjust the
position of the adjusting plate [2].
Image
L2
will decrease the margin on
the front side of the paper.
Moving the adjusting
plate to the right
Summary of Contents for iR C3200 Series
Page 1: ...Dec 3 2004 Portable Manual iR C3200 Series iR C3220N PRT ...
Page 2: ......
Page 6: ......
Page 10: ......
Page 11: ...Chapter 1 Maintenance and Inspection ...
Page 12: ......
Page 14: ......
Page 22: ...Chapter 1 1 8 ...
Page 23: ...Chapter 2 Standards and Adjustments ...
Page 24: ......
Page 26: ......
Page 40: ...Chapter 2 2 14 ...
Page 41: ...Chapter 3 Error Code ...
Page 42: ......
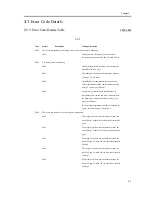
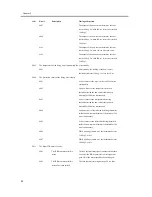
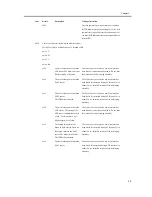
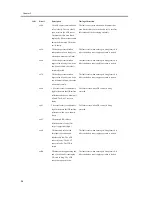
Page 43: ...Contents Contents 3 1 Error Code Details 3 1 3 1 1 Error Code Details Table 3 1 ...
Page 44: ......
Page 63: ...Chapter 4 User Mode Items ...
Page 64: ......
Page 66: ......
Page 79: ...Chapter 5 Service Mode ...
Page 80: ......
Page 82: ......
Page 121: ...Chapter 6 Outline of Components ...
Page 122: ......
Page 124: ......
Page 134: ...Chapter 6 6 10 F 6 6 PLG1 ELCB1 SP1 H4 H3 H2 H1 H1 H2 LA1 ...
Page 138: ...Chapter 6 6 14 ...
Page 139: ...Chapter 7 System Construction ...
Page 140: ......
Page 142: ......
Page 157: ...Chapter 8 Upgrading ...
Page 158: ......
Page 160: ......
Page 168: ...Chapter 8 8 8 ...
Page 169: ...Dec 3 2004 ...
Page 170: ......


