background image

Setting Up the Machine Using the Control Panel

3-9

Set

tin

g Up th

e Mach

ine f

o

Y

our

 Ne

tw

or

k En

viro

nme

n

t

3

Startup Time Settings

When you connect the machine to a switching hub, the machine may not be able to 
connect to the network even if your network settings are set correctly. 

This occurs because the spanning tree process performed between switching hubs 
prevents them from communicating with each other immediately after the machine 
connects to the hub.

In this case, use the following procedure to delay the start of communication.

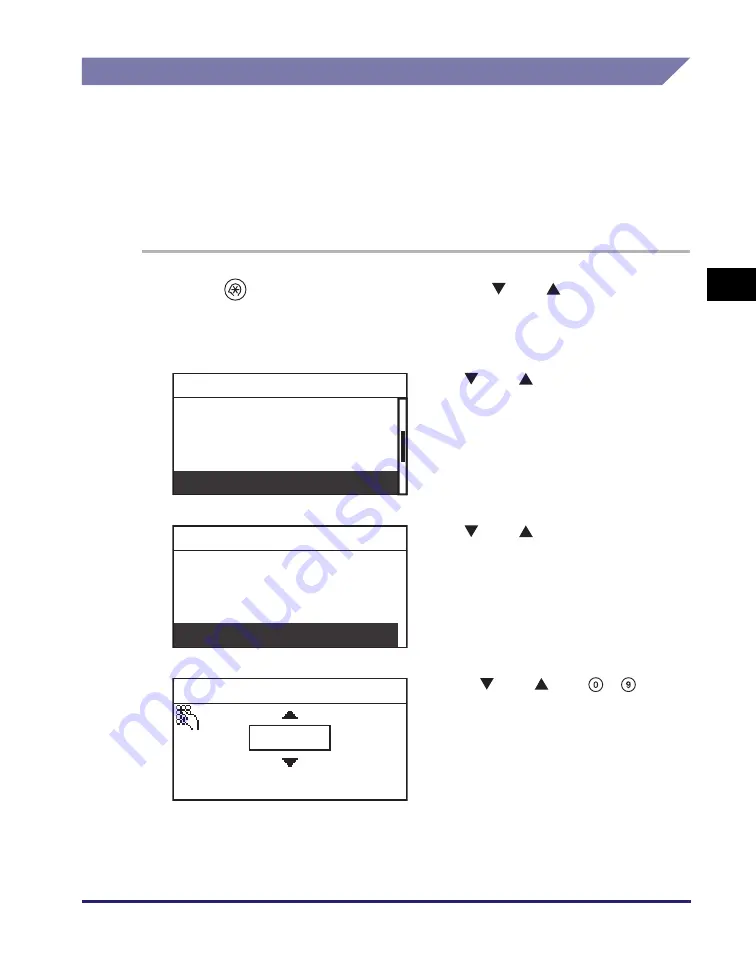
1

Press 

 (Additional Functions) 

 use [

] or [

] to select 

<System Settings> 

 press [OK].

For help, see the screen shots in steps 1 and 2 in “Protocol Settings,” on p. 3-2.

2

Use [

] or [

] to select 

<Network Settings> 

 press [OK].

3

Use [

] or [

] to select 

<Startup Time Set.> 

 press [OK].

4

Using [

] or [

], or 

 - 


(numeric keys), set the time 
period required for the machine to 
delay the startup of network 
communications 

 press [OK].

The value for <Startup Time Set.> can be set 
from 0 to 300 Sec.

 Device Info Settings

 Dept. ID Management

 User ID Management

 Network Settings

System Settings

 TCP/IP Settings

 SNMP Settings

 Ethernet Driver

 Startup Time Set.

Network Settings

 
            60 sec
 
       (0-300)

Startup Time Settings

Summary of Contents for IR 2420

Page 1: ...ENG Network Guide Network Guide Please read this guide before operating this product After you finish reading this guide store it in a safe place for future reference ...

Page 2: ...imageRUNNER 2422 2420 Network Guide ...

Page 3: ...sic Operations Troubleshooting Reference Guide CD ROM Copying Instructions Copying Guide CD ROM Remote User Interface Instructions Remote UI Guide CD ROM Network Connectivity and Setup Instructions Network Guide This Document CD ROM Color Network ScanGear Instructions for Windows only Network ScanGear Guide CD ROM UFRII LT Printer Instructions UFR II Printer Guide CD ROM UFRII LT Printer Driver In...

Page 4: ...omputer for Printing Troubleshooting Appendix Includes the network settings specifications glossary and index Chapter 1 Chapter 2 Chapter 3 Chapter 4 Chapter 5 Chapter 6 Considerable effort has been made to ensure that this manual is free of inaccuracies and omissions However as we are constantly improving our products if you need an exact specification please contact Canon ...

Page 5: ...ine System Requirements 1 2 Checking Your Network Environment 1 3 TCP IP Network Setup Operating Procedures 1 4 Chapter 2 Connecting the Machine to a TCP IP Network Interface Settings 2 2 Ethernet Driver 2 2 Communication Environment Setup 2 6 SNMP Settings 2 6 Specifying IP Addresses 2 12 Setting IPv4 Address 2 12 Setting IPv6 Address 2 16 DNS Settings 2 23 Checking the Network Connection 2 33 Ch...

Page 6: ...9 Using Remote UI Web Browser 3 19 Using NetSpot Device Installer 3 19 Chapter 4 Setting up a Computer for Printing Setting up a Computer for Printing 4 2 Printer Connection Method LPD Raw 4 3 Installing a New Driver 4 3 Changing the Port after Installing the Driver 4 3 Chapter 5 Troubleshooting Printing Problems and Remedies 5 2 Chapter 6 Appendix Network Settings Table 6 2 Software Available for...

Page 7: ... Indicates operational requirements and restrictions Be sure to read these items carefully to operate the machine correctly and avoid damage to the machine or property NOTE Indicates a clarification of an operation or contains additional explanations for a procedure Reading these notes is highly recommended Keys and Buttons Used in This Manual The following symbols and key button names are a few e...

Page 8: ...y see depending on the model or options you have installed The IP addresses shown in the screen shots and text in this manual are for illustrative purposes only The buttons and other objects that are related to operations during the procedure are marked with a as shown in the example below 1 Click OK Click this button for operation ...

Page 9: ...oft Windows 2000 Professional operating system Windows 2000 Professional Microsoft Windows XP Home Edition operating system Windows XP Home Edition Microsoft Windows XP Professional Edition operating system Windows XP Professional Edition Microsoft Windows XP operating system Windows XP Microsoft Windows Vista operating system Windows Vista Microsoft Windows 7 operating system Windows 7 Microsoft ...

Page 10: ...gistered in the U S and other countries Microsoft Windows Windows Vista Windows Server and Internet Explorer are either registered trademarks or trademarks of Microsoft Corporation in the United States and or other countries Other product and company names herein may be the trademarks of their respective owners ...

Page 11: ...f Canon Inc Disclaimers The information in this document is subject to change without notice CANON INC MAKES NO WARRANTY OF ANY KIND WITH REGARD TO THIS MATERIAL EITHER EXPRESS OR IMPLIED EXCEPT AS PROVIDED HEREIN INCLUDING WITHOUT LIMITATION THEREOF WARRANTIES AS TO MARKETABILITY MERCHANTABILITY FITNESS FOR A PARTICULAR PURPOSE OR USE OR NON INFRINGEMENT CANON INC SHALL NOT BE LIABLE FOR ANY DIRE...

Page 12: ... need to know before you start using the machine including the network environments with which the machine is compatible and how to check the network environment you are using System Requirements 1 2 Checking Your Network Environment 1 3 TCP IP Network Setup Operating Procedures 1 4 ...

Page 13: ...t Windows Vista Enterprise Microsoft Windows 7 Starter Edition Microsoft Windows 7 Home Basic Microsoft Windows 7 Home Premium Microsoft Windows 7 Professional Microsoft Windows 7 Enterprise Microsoft Windows 7 Ultimate Microsoft Windows 2000 Server Microsoft Windows Server 2003 Microsoft Windows Server 2008 Mac OS X 10 3 or later Compatible Computers Any computer that runs the above systems IMPOR...

Page 14: ...e In addition to IPv4 Internet Protocol Version 4 the machine also supports IPv6 Internet Protocol Version 6 and has a dual stack configuration that enables it to communicate with both IPv4 and IPv6 networks The functions of IPv4 are always enabled and you can select whether to use the functions of IPv6 For details see Chapter 2 Connecting the Machine to a TCP IP Network Windows 2000 Windows XP Pr...

Page 15: ...e settings use The machine s control panel 3 Communication Environment Setup See Communication Environment Setup on p 2 6 Set up a configuration for communication between the machine and computers on your network To specify the settings use The machine s control panel 4 STCP IP Network Connection See Chapter 2 Connecting the Machine to a TCP IP Network Specify the machine s network address and est...

Page 16: ...uring the protocol settings for the first time After configuring the protocol settings you can change the content by using the Remote UI 5 Protocol Settings See Chapter 3 Setting Up the Machine for Your Network Environment Specify the machine s protocol settings Use any of the following software to specify the settings on the computer The Machine s control panel Additional Functions menu The Remot...

Page 17: ...TCP IP Network Setup Operating Procedures 1 6 Before You Start Using This Machine 1 ...

Page 18: ...ork Interface Settings 2 2 Ethernet Driver 2 2 Communication Environment Setup 2 6 SNMP Settings 2 6 Specifying IP Addresses 2 12 Setting IPv4 Address 2 12 Setting IPv6 Address 2 16 DNS Settings 2 23 Checking the Network Connection 2 33 Checking the Current Network Settings 2 36 Access Control 2 38 Setting the IP Address Range 2 38 Setting the MAC Address Filter 2 46 ...

Page 19: ...st time use the control panel of this machine After configuring the protocol settings you can change them using the Remote UI Settings that have been changed from the control panel become effective after the machine is restarted NOTE For instructions on how to make settings using the Remote UI see Chapter 3 Customizing Settings in the Remote UI Guide For instructions on how to enter characters see...

Page 20: ...0 Base T 100 Base TX 3 Use or to select Network Settings press OK 4 Use or to select Ethernet Driver press OK 5 Press OK to select Auto Detect Use or to select On press OK Proceed to step 7 Device Info Settings Dept ID Management User ID Management Network Settings System Settings TCP IP Settings SNMP Settings Ethernet Driver Startup Time Set Network Settings MAC Address 00 00 00 00 00 00 Auto Det...

Page 21: ... correctly if you reconnect the network cable for example to a different Ethernet hub with the power ON NOTE The default setting is On Use the Off setting when you want to specify a particular Ethernet setting Use or to select Off press OK Press OK to select Auto Detect Use or to select Settings press OK Use or to select Communication Mode press OK Off On Settings Auto Detect MAC Address 00 00 00 ...

Page 22: ...g This Machine in the Reference Guide The Ethernet driver settings are complete Use or to select Full Duplex or Half Duplex press OK Select Full Duplex to set the machine to simultaneously send and receive data Select Half Duplex to set the machine to alternately send and receive data Use or to select Ethernet Type press OK Use or to select 10 Base T or 100 Base TX press OK Full Duplex Half Duplex...

Page 23: ...P community name You can specify up to two community names for the machine Writable SNMP 1 2 You can set the machine to enable the computers on the network to access the machine and modify its settings This item can be specified separately for each community Print Manage Info You can set the machine to automatically enable the SNMP port monitoring function to obtain printer management information ...

Page 24: ...whether to enable or disable SNMP If you want to set or browse the machine s settings from a computer 2 Use or to select Network Settings press OK 3 Use or to select SNMP Settings press OK Use or to select On press OK Proceed to step 5 Device Info Settings Dept ID Management User ID Management Network Settings System Settings TCP IP Settings SNMP Settings Ethernet Driver Startup Time Set Network S...

Page 25: ... press OK 6 Use or to select Settings press OK 7 If you want to change Community Name 1 from the default public to another use or to select Community Name 1 press OK If you do not need to make changes proceed to step 9 Off On Settings SNMP Settings TCP IP Settings SNMP Settings Ethernet Driver Startup Time Set Network Settings Off On Settings SNMP Settings Community Name 1 Community Name 2 Writabl...

Page 26: ...2 Number For more information see Chapter 2 Basic Operations in the Reference Guide 8 Enter the desired community name using numeric keys press OK 9 If you want to specify Community Name 2 use or to select Community Name 2 press OK Otherwise proceed to step 11 10 Enter the desired community name using numeric keys press OK 11 Use or to select Writable SNMP 1 press OK public Set Entry Mode Aa Commu...

Page 27: ... Writable SNMP 2 press OK Otherwise proceed to step 15 14 Use or to select Off or On press OK 15 Use or to select Print Manage Info press OK Off On Writable SNMP 1 Community Name 1 Community Name 2 Writable SNMP 1 Writable SNMP 2 SNMP Settings Off On Writable SNMP 2 Community Name 2 Writable SNMP 1 Writable SNMP 2 Print Manage Info SNMP Settings ...

Page 28: ...OFF see Chapter 1 Before You Start Using This Machine in the Reference Guide The communication environment setup is complete 16 Use or to select Off or On press OK Select On if you are using Windows Vista 7 and set Standard TCP IP port for the printer driver port and want to enable automatically the SNMP port monitoring function to obtain printer management information such as information on print...

Page 29: ...te UI on computers whose IP addresses are not allowed a utility on the computers cannot be used to set or browse detailed information concerning the machine Once you set the range of IP addresses of computers from which data print job can be sent to the machine the machine rejects data sent from computers whose IP addresses are not allowed For instructions on how to specify the IP address range se...

Page 30: ... 3 Use or to select TCP IP Settings press OK 4 Use or to select IPv4 Settings press OK 5 Use or to select IP Address Settings press OK Device Info Settings Dept ID Management User ID Management Network Settings System Settings TCP IP Settings SNMP Settings Ethernet Driver Startup Time Set Network Settings IPv4 Settings IPv6 Settings WINS Configuration LPD Print Settings TCP IP Settings IP Address ...

Page 31: ...e and domain name have been previously set they will be overwritten by the setting values obtained from DHCP BOOTP or RARP If you use DHCP without the DNS dynamic update function it is recommended that an identical IP address be assigned to the machine at all times If the IP address is not identical the host name for the machine will not correspond to the IP address It takes about two minutes to c...

Page 32: ...ess OK 7 Use or to select Subnet Mask press OK 8 Enter the desired subnet mask using numeric keys press OK 9 Use or to select Gateway Address press OK IP Address Auto IP Address Subnet Mask Gateway Address IP Address Settings 000 000 000 000 IP Address IP Address Auto IP Address Subnet Mask Gateway Address IP Address Settings 000 000 000 000 Subnet Mask IP Address Auto IP Address Subnet Mask Gatew...

Page 33: ... the same time The machine can use up to seven of the following IPv6 addresses Link local address 1 An address that is only valid within the same link A link local address is automatically set using a specific prefix fe80 and an interface identifier generated from the MAC address of the machine When the machine is using the functions of IPv6 one link local address is always registered Manual addre...

Page 34: ... Press Additional Functions use or to select System Settings press OK For help see the screen shots in steps 1 and 2 in Ethernet Driver on p 2 2 2 Use or to select Network Settings press OK 3 Use or to select TCP IP Settings press OK 4 Use or to select IPv6 Settings press OK Device Info Settings Dept ID Management User ID Management Network Settings System Settings TCP IP Settings SNMP Settings Et...

Page 35: ...to select Use IPv6 press OK Use or to select On press OK NOTE When you select On for Use IPv6 a link local address is automatically obtained Use or to select Off press OK Proceed to step 15 7 Use or to select Stateless Address press OK Use IPv6 Stateless Address Manual Address Set Use DHCPv6 IPv6 Settings Off On Use IPv6 Off On Use IPv6 Use IPv6 Stateless Address Manual Address Set Use DHCPv6 IPv6...

Page 36: ...s started Use or to select On press OK NOTE The stateless address is discarded when the machine is restarted with the machine s main power switch Use or to select Off press OK 9 Use or to select Manual Address Set press OK 10 Use or to select Use Manual Address press OK Off On Use Stateless Address Off On Use Stateless Address Use IPv6 Stateless Address Manual Address Set Use DHCPv6 IPv6 Settings ...

Page 37: ...r more information see Chapter 2 Basic Operations in the Reference Guide Use or to select On press OK Use or to select Manual Address press OK Enter the desired IPv6 address using numeric keys use or to select Set press OK Use or to select Prefix Length press OK Off On Use Manual Address Use Manual Address Manual Address Prefix Length Default Router Addr Manual Address Set 0000 0000 0000 0000 Set ...

Page 38: ...en 0 and 128 Use or to select Default Router Addr press OK Enter the default router address using numeric keys use or to select Set press OK Use or to select Off press OK 13 Use or to select Use DHCPv6 press OK 64 0 128 Prefix Length Use Manual Address Manual Address Prefix Length Default Router Addr Manual Address Set 0000 0000 0000 0000 Set Entry Mode Aa Default Router Addr Off On Use Manual Add...

Page 39: ... stateful address from a DHCP server 15 Press Reset to return to the Standby display 16 Restart the machine Turn OFF the machine wait at least 10 seconds and then turn it ON NOTE For instructions on how to turn the machine ON and OFF see Chapter 1 Before You Start Using This Machine in the Reference Guide The IPv6 settings are complete Use or to select On press OK Use or to select Off press OK Off...

Page 40: ...e screen shots in steps 1 and 2 in Ethernet Driver on p 2 2 4 Specify the IP address for a DNS server If you want to set up the machine for an IPv4 network 2 Use or to select Network Settings press OK 3 Use or to select TCP IP Settings press OK Use or to select IPv4 Settings press OK Device Info Settings Dept ID Management User ID Management Network Settings System Settings TCP IP Settings SNMP Se...

Page 41: ...ter the IPv4 address using numeric keys press OK If you want to use a secondary DNS server use or to select Secondary DNS Server press OK IP Address Settings PING Command IP Address Range DNS Settings IPv4 Settings DNS Server Settings DNS Host Domain DNS Dynamic Update DNS Settings Primary DNS Server Secondary DNS Server DNS Server Settings 000 000 000 000 Primary DNS Server Primary DNS Server Sec...

Page 42: ...Settings press OK Use or to select DNS Settings press OK The DNS Settings menu appears Use or to select DNS Server Settings press OK Use or to select Primary DNS Server press OK 000 000 000 000 Secondary DNS Server IPv4 Settings IPv6 Settings WINS Configuration LPD Print Settings TCP IP Settings Use DHCPv6 PING Command IP Address Range DNS Settings IPv6 Settings DNS Server Settings DNS Host Domain...

Page 43: ...condary DNS server leave the setting as it is 0000 0000 0000 0000 0000 0000 0000 0000 If you want to change the entry mode press Tone or use or to select Entry Mode press OK You can select Aa Alphabet or 12 Number For more information see Chapter 2 Basic Operations in the Reference Guide Enter the IPv6 address using numeric keys use or to select Set press OK If you want to use a secondary DNS serv...

Page 44: ...not to use the same host name and domain name used with IPv4 communication for IPv6 communication If you want to use the same host name and domain name as in the IPv4 network environment 6 Use or to select DNS Host Domain press OK Use or to select Host Name press OK The DNS Host Domain menu appears Proceed to step 8 Use or to select On press OK Proceed to step 14 DNS Server Settings DNS Host Domai...

Page 45: ...or to select DNS Host Domain press OK Use or to select Settings press OK Use or to select Host Name press OK 8 Enter the host name using numeric keys use or to select Set press OK Off On Settings Use IPv4 Host Domain DNS Server Settings DNS Host Domain DNS Dynamic Update DNS Settings Off On Settings Use IPv4 Host Domain Host Name Domain Name Use IPv4 Host Domain Canon000000 Set Entry Mode Aa Host ...

Page 46: ...ode press OK You can select Aa Alphabet or 12 Number For more information see Chapter 2 Basic Operations in the Reference Guide 11 Press Back to return to the DNS Settings menu 9 Use or to select Domain Name press OK 10 Enter the domain name using numeric keys use or to select Set press OK IMPORTANT If you set Use DHCPv6 to On the manually set domain name will be overwritten 12 Use or to select DN...

Page 47: ...S record configure the following settings in the DHCP server Under the DHCP server right click the Scope icon click Properties In the DNS sheet of the displayed dialog box select Automatically update DHCP client information in DNS Update DNS only if DHCP client requests If you have a DHCP server running Windows Server 2003 or Windows Server 2008 that uses the DHCP service and want to register the ...

Page 48: ... Server 2003 do not support DHCPv6 servers To use the DNS dynamic update function enter the IP address of a DNS server the host name and domain name of this machine Use or to select On press OK If you do not want to use the DNS Dynamic Update function select Off proceed to step 14 Use or to select DNS Dynamic Update press OK Use or to select Settings press OK Use or to select Reg Manual Address pr...

Page 49: ...ne in the Reference Guide The DNS settings are complete If you want to register a manual address in the DNS server using dynamic DNS updating use or to select On press OK Otherwise select Off press OK proceed to step 14 Use or to select Register Stateful press OK If you want to register a stateful address in the DNS server using dynamic DNS updating use or to select On press OK Otherwise select Of...

Page 50: ...tartup time of the machine s network function execute the PING command after the time set as the startup time passes See Startup Time Settings on p 3 9 1 Press Additional Functions use or to select System Settings press OK For help see the screen shots in steps 1 and 2 in Ethernet Driver on p 2 2 2 Use or to select Network Settings press OK 3 Use or to select TCP IP Settings press OK 4 Use or to s...

Page 51: ...displayed on the LCD display If the connection fails check the settings described in Interface Settings on p 2 2 and Setting IPv4 Address on p 2 12 Use or to select IPv6 Address press OK Enter an existing IPv6 address on the network using numeric keys use or to select Set press OK The result of the PING command is displayed on the LCD display If the connection fails check the settings described in...

Page 52: ...ge the entry mode press Tone or use or to select Entry Mode press OK You can select Aa Alphabet or 12 Number For more information see Chapter 2 Basic Operations in the Reference Guide 7 Press Reset to return to the Standby display Use or to select Host Name press OK Enter the host name using numeric keys use or to select Set press OK The result of the PING command is displayed on the LCD display I...

Page 53: ...3 Check the network information according to your network environment If you want to check the IPv4 network settings 2 Use or to select Network Information press OK Use or to select IPv4 press OK The IPv4 menu is displayed Use or to select IP Address Subnet Mask Gateway Address Host Name or Domain Name for the setting you want to check press OK The selected network setting is displayed To return t...

Page 54: ...ess OK If you have selected Default Router Addr Host Name or Domain Name the selected network setting is displayed To return to the IPv6 menu press OK or Back If you have selected Link Local Address Stateless Address 1 Stateless Address 2 Stateless Address 3 Stateless Address 4 Stateless Address 5 Stateless Address 6 or Stateful Address use or to select IP Address or Prefix Length press OK The sel...

Page 55: ... Settings in the Reference Guide Setting the IP Address Range You can control the access to the machine by specifying a range of IP addresses The machine can be set to filter the access by either accepting or rejecting the set range of IP addresses 1 Press Additional Functions use or to select System Settings press OK For help see the screen shots in steps 1 and 2 in Ethernet Driver on p 2 2 2 Use...

Page 56: ...bs from computers by specifying an IP address or a range of IP addresses 4 Use or to select IPv4 Settings or IPv6 Settings press OK 5 Use or to select IP Address Range press OK Use or to select On press OK Proceed to step 7 Use or to select Off press OK Proceed to step 12 IPv4 Settings IPv6 Settings WINS Configuration LPD Print Settings TCP IP Settings IP Address Settings PING Command IP Address R...

Page 57: ...ge press OK 8 Use or to select Settings press OK Use or to select Register press OK Use or to select Single Address or Multiple Dest press OK Select Single Address to specify a single IP address Select Multiple Dest to specify a range of IP addresses Proceed to step 11 IP Address Settings PING Command IP Address Range DNS Settings IPv4 Settings Off On Settings IP Address Range Register Edit Confir...

Page 58: ... settings you want to change or erase press OK Proceed to step 10 Use or to select Permit Reject press OK Use or to select Permit or Reject press OK IMPORTANT If the usage of a protocol or print application is not permitted on your device it cannot be used even if its IP address is permitted on the machine Configure the settings of the device to permit the protocol or print application NOTE The de...

Page 59: ...11 Use or to select Erase press OK To erase the settings use or to select Yes press OK To quit select No IMPORTANT You cannot restore the settings after they are erased Proceed to step 12 Enter the desired IPv4 address using numeric keys press OK To enter another IP address or change the settings of the registered IP addresses repeat steps 9 to 11 IMPORTANT A total of four ranges of IPv4 addresses...

Page 60: ...elect Entry Mode press OK You can select Aa Alphabet or 12 Number For more information see Chapter 2 Basic Operations in the Reference Guide Enter the first IP address at which the range begins using numeric keys press OK Enter the last IP address at which the range ends using numeric keys press OK To enter another IP address or change the settings of the registered IP addresses repeat steps 9 to ...

Page 61: ...entry mode press Tone or use or to select Entry Mode press OK You can select Aa Alphabet or 12 Number For more information see Chapter 2 Basic Operations in the Reference Guide Enter the desired prefix address using numeric keys use or to select Set press OK Enter the prefix length using or or numeric keys press OK The prefix length can be set between 0 and 128 To enter another IP address or chang...

Page 62: ...First Address is less than the number entered in Last Address Enter the last IP address at which the range ends using numeric keys use or to select Set press OK Use or to select Prefix Address press OK Enter the desired prefix address using numeric keys use or to select Set press OK Enter the prefix length using or or numeric keys press OK The prefix length can be set between 0 and 128 To enter an...

Page 63: ...ress Range settings are complete Setting the MAC Address Filter If the machine is connected to an IPv4 network you can use the MAC Address Filter function to protect the machine from unauthorized access IMPORTANT In the following operations in this section the machine s MAC address is necessary To check the MAC address from the machine s control panel print a User s Data List See Chapter 3 Useful ...

Page 64: ...chine can be accessed only from MAC addresses that will be specified in step 10 Be sure to have the correct MAC addresses with you before specifying them on the machine If an incorrect MAC address is entered you will be unable to access the machine via the network Proceed to step 6 Use or to select Off press OK Proceed to step 11 TCP IP Settings SNMP Settings Ethernet Driver Startup Time Set Netwo...

Page 65: ... previously registered MAC address 6 Use or to select RX MAC Address Set press OK 7 Use or to select Settings press OK Use or to select Register press OK Proceed to step 10 Use or to select Edit Confirm press OK RAW Print Settings Use HTTP Port Number Settings RX MAC Address Set TCP IP Settings Off On Settings RX MAC Address Set Register Edit Confirm RX MAC Address Set Register Edit Confirm RX MAC...

Page 66: ...ings you want to change or erase press OK Proceed to step 9 Use or to select Edit press OK Proceed to step 10 Use or to select Erase press OK To erase the settings use or to select Yes press OK To quit select No IMPORTANT You cannot restore the settings after they are erased Proceed to step 11 01 01 01 01 01 01 02 02 02 02 02 02 03 03 03 03 03 03 04 04 04 04 04 04 Edit Edit Erase 01 01 01 01 01 01...

Page 67: ...pter 2 Basic Operations in the Reference Guide 11 Press Reset to return to the Standby display 12 Restart the machine Turn OFF the machine wait at least 10 seconds and then turn it ON NOTE For instructions on how to turn the machine ON and OFF see Chapter 1 Before You Start Using This Machine in the Reference Guide 10 Enter the desired MAC address using numeric keys use or to select Set press OK T...

Page 68: ... network environment using the Control Panel and the Remote User Interface Setting Up the Machine Using the Control Panel 3 2 Protocol Settings 3 2 Startup Time Settings 3 9 Setting Up the Machine Using a Web Browser Remote UI 3 11 Machine Management 3 19 Using Remote UI Web Browser 3 19 Using NetSpot Device Installer 3 19 ...

Page 69: ...ote UI the change is not reflected in the setting display To verify on the machine access Network Information using System Monitor see Checking the Current Network Settings on p 2 36 or print a User s Data List see Chapter 3 Useful Functions and Settings in the Reference Guide Protocol Settings Follow the procedure below to enable protocols required for your network IMPORTANT Be sure to restart th...

Page 70: ... press OK 5 Use or to select WINS Configuration press OK Use or to select On press OK Enter the IPv4 address of the WINS server using numeric keys press OK Device Info Settings Dept ID Management User ID Management Network Settings System Settings TCP IP Settings SNMP Settings Ethernet Driver Startup Time Set Network Settings IPv4 Settings IPv6 Settings WINS Configuration LPD Print Settings TCP IP...

Page 71: ...ion If you want to use LPD as the print application If you do not want to use LPD as the print application Use or to select Off press OK 7 Use or to select LPD Print Settings press OK Use or to select On press OK Use or to select Off press OK Off On WINS Configuration IPv4 Settings IPv6 Settings WINS Configuration LPD Print Settings TCP IP Settings Off On LPD Print Settings Off On LPD Print Settin...

Page 72: ... to use RAW as the print application 9 Use or to select RAW Print Settings press OK Use or to select On press OK If you want to establish bidirectional communication using Port 9100 use or to select On press OK Otherwise select Off press OK Use or to select Off press OK IPv6 Settings WINS Configuration LPD Print Settings RAW Print Settings TCP IP Settings Off On RAW Print Settings Off On Use Bidir...

Page 73: ...UI 11 Use or to select Use HTTP press OK Use or to select On press OK Use or to select Off press OK 13 If you want to change the standard port number settings use or to select Port Number Settings press OK Otherwise proceed to step 15 WINS Configuration LPD Print Settings RAW Print Settings Use HTTP TCP IP Settings Off On Use HTTP Off On Use HTTP LPD Print Settings RAW Print Settings Use HTTP Port...

Page 74: ...o set the port number for LPD If you want to set the port number for RAW Use or to select LPD press OK Enter the port number using or or numeric keys press OK Use or to select RAW press OK Enter the port number using or or numeric keys press OK LPD RAW HTTP SNMP Port Number Settings 515 0 65535 LPD LPD RAW HTTP SNMP Port Number Settings 9100 0 65535 RAW ...

Page 75: ...uctions on how to turn the machine ON and OFF see Chapter 1 Before You Start Using This Machine in the Reference Guide Use or to select HTTP press OK Enter the port number using or or numeric keys press OK NOTE If the port number is changed from the default 80 you must specify the changed port number when entering the URL to access the Remote UI Use or to select SNMP press OK Enter the port number...

Page 76: ...wing procedure to delay the start of communication 1 Press Additional Functions use or to select System Settings press OK For help see the screen shots in steps 1 and 2 in Protocol Settings on p 3 2 2 Use or to select Network Settings press OK 3 Use or to select Startup Time Set press OK 4 Using or or numeric keys set the time period required for the machine to delay the startup of network communi...

Page 77: ...3 5 Press Reset to return to the Standby display 6 Restart the machine Turn OFF the machine wait at least 10 seconds and then turn it ON NOTE For instructions on how to turn the machine ON and OFF see Chapter 1 Before You Start Using This Machine in the Reference Guide The startup time setting is complete ...

Page 78: ...ocol Settings on p 3 2 1 Start the web browser enter the URL below in Location or Address press Enter http machine host name or IP address Example http 172 20 88 125 IMPORTANT For details about supported web browsers see Chapter 1 Using the Remote UI in the Remote UI Guide If you are configuring your web browser to use the proxy server add the IP address of the machine to Exception the address not...

Page 79: ...anager Mode click OK The Remote UI starts NOTE If a password has been set for the machine enter the password click OK If no password has been set it is not necessary to enter a password For instructions on logging in to the Remote UI when the Department ID Management or User ID Management is activated refer to the Remote UI Guide ...

Page 80: ... Using a Web Browser Remote UI 3 13 Setting Up the Machine for Your Network Environment 3 3 On the left side of the screen click Add Func on the list that appears under Add Func click Settings The Settings page is displayed ...

Page 81: ...Setting Up the Machine Using a Web Browser Remote UI 3 14 Setting Up the Machine for Your Network Environment 3 4 Select TCP IP Settings from the list The TCP IP Settings page is displayed ...

Page 82: ...s If neither DHCP BOOTP nor RARP can be used the IP address specified in IP Address will be allocated IMPORTANT For this machine in addition to direct allocation of the IP address to the machine you can use DHCP BOOTP or RARP to specify the IP address When the machine is started or reset it checks whether DHCP BOOTP or RARP is being used and then allocates the IP address using the first available ...

Page 83: ...v6 Address on p 2 16 6 Specify the DNS Settings If you specify the DNS Settings for an IPv4 network Enter the IP address of the primary DNS server and the secondary DNS server in Primary DNS Server Address and Secondary DNS Server Address Specify the Host Name and Domain Name settings In Host Name enter the host name of the machine Example sales_printer In Domain Name enter the domain name of the ...

Page 84: ... WINS Configuration specify whether to display the settings of WINS Resolution for IPv4 To use the WINS server place a check for WINS Resolution and enter the IP address of the WINS server in WINS Server Address 8 Under LPD Print Settings specify whether to display the current print setting by using an LPD application To use LPD print place a check for Use LPD Print 9 Under RAW Print Settings spec...

Page 85: ...egistered IP address or IP address range select one from the list click Edit Select the IP address or IP address range you want to permit or reject from the list click Permit Reject to change the setting NOTE For details about each setting see Setting the IP Address Range on p 2 38 13 Under Allowed Receiving MAC Address Settings specify whether to use RX MAC Address Settings If you want to activat...

Page 86: ...alled in the machine to manage it on a web browser For more information on the Remote UI see the Remote UI Guide Using NetSpot Device Installer NetSpot Device Installer is utility software for specifying the initial settings of Canon devices connected to a network Available on the CD ROM provided NetSpot Device Installer can be accessed directly without installation enabling network users to quick...

Page 87: ...Machine Management 3 20 Setting Up the Machine for Your Network Environment 3 ...

Page 88: ...CHAPTER 4 1 4 Setting up a Computer for Printing This chapter provides instructions on how to set up a computer for printing Setting up a Computer for Printing 4 2 Printer Connection Method LPD Raw 4 3 ...

Page 89: ...to determine the print application you are using and then perform the necessary operations LPD LPD is the print application generally used with TCP IP See Printer Connection Method LPD Raw on p 4 3 Raw Raw is a print application used with Windows 2000 XP Vista 7 Server 2003 Server 2008 It can print at higher speeds than LPD See Printer Connection Method LPD Raw on p 4 3 IMPORTANT To print from a c...

Page 90: ...be Raw if the driver has been installed according to the Printer Driver Installation Guide If you wish to use LPD as the print application change the settings after the driver is installed For details see Changing the Port after Installing the Driver on p 4 3 Changing the Port after Installing the Driver NOTE For Macintosh change the network configurations of your printer in the Print Fax setting ...

Page 91: ...on the Start menu Control Panel Printers Windows 7 Click on the Start menu Devices and Printers 2 Right click the icon of the printer you installed click Printer Properties or Properties 3 Click the Ports tab to display the Ports sheet 4 Click Add Port to open the Printer Ports dialog box For Windows 7 ...

Page 92: ...the printer IP address or printer host name click Next After the computer has confirmed that there is a printer to which the entered IP address is assigned the Completing the Add Standard TCP IP Printer Port Wizard window appears click Finish If the dialog box displays Additional Port Information Required follow the instructions on the screen to search again or click Standard click Canon Network P...

Page 93: ...o use Raw Proceed to step 10 9 If you want to use LPD change the port configuration information In the printer properties dialog box click Configure Port Click LPR under Protocol enter a print queue name in Queue Name under LPR Settings click OK The machine prints according to its spool settings 10 Click OK Installation of the driver and the port settings are complete For Windows 7 ...

Page 94: ...CHAPTER 5 1 5 Troubleshooting This chapter describes how to resolve printing problems Printing Problems and Remedies 5 2 ...

Page 95: ...ter driver see the Printer Driver Installation Guide or Mac UFR II Printer Driver Installation Guide Confirm that the correct printer is set as the output destination for the computer that is printing Check the output destination in Control Panel Windows or System Preferences Macintosh For more information see the Windows Printer Driver Guide or Mac Printer Driver Guide Cause 4 The name of the fil...

Page 96: ...ess of a computer you cannot browse the machine s information from the computer using the Remote UI See Setting the IP Address Range on p 2 38 Cause 2 HTTP is disabled Remedy Set Use HTTP to On and make sure that the same port number as set in the machine is used on the browser See Protocol Settings on p 3 2 Cause 3 The Remote UI is disabled Remedy Set Remote UI On Off to On See Chapter 4 System M...

Page 97: ...Printing Problems and Remedies 5 4 Troubleshooting 5 ...

Page 98: ...CHAPTER 6 1 6 Appendix This chapter describes network settings the glossary and the index Network Settings Table 6 2 Software Available for Network Settings 6 7 Glossary 6 8 Index 6 14 ...

Page 99: ...evice Installer TCP IP Settings Item Setting Description Default Setting Can be set in NetSpot Device Installer Can be set in Remote UI IPv4 Settings IP Address Settings IP Address Auto DHCP On Off Off BOOTP On Off Off RARP On Off Off IP Address IP address 0 0 0 0 Subnet Mask IP address 0 0 0 0 Gateway Address IP address 0 0 0 0 IPv4 Settings PING Command IP address 0 0 0 0 N A N A IPv4 Settings I...

Page 100: ...7 Characters maximum NULL N A DNS Dynamic Update On Off Off N A IPv6 Settings Use IPv6 On Off Off N A Stateless Address On Off On N A IPv6 Settings Manual Address Set Use Manual Address On Off Off N A Manual Address 39 Characters maximum 0 0 0 0 0 0 0 0 N A Prefix Length 0 to 128 64 N A Default Router Addr 39 Characters maximum 0 0 0 0 0 0 0 0 N A IPv6 Settings Use DHCPv6 On Off Off N A Item Setti...

Page 101: ...Settings DNS Server Settings Primary DNS Server IP address 0 0 0 0 0 0 0 0 N A Secondary DNS Server IP address 0 0 0 0 0 0 0 0 N A DNS Host Domain On Off On N A Use IPv4 Host Domain On Off Off N A Host Name 47 Characters maximum Canon the last six digits of the machine s MAC address N A Domain Name 47 Characters maximum NULL N A DNS Dynamic Update On Off Off N A Reg Manual Address On Off Off N A R...

Page 102: ...A Use Bidirectional On Off Off N A Use HTTP Use HTTP On Off On N A Port Number Settings LPD Port Number 515 N A RAW Port Number 9100 N A HTTP Port Number 80 N A SNMP Port Number 161 N A RX MAC Address Set RX MAC Address Set On Off MAC addresses A maximum of five addresses can be registered Off N A Item Setting Description Default Setting Can be set in NetSpot Device Installer Can be set in Remote ...

Page 103: ...ame NULL N A Writable SNMP 1 On Off On N A Writable SNMP 2 On Off Off N A Print Manage Info On Off On N A Item Setting Description Default Setting Can be set in NetSpot Device Installer Can be set in Remote UI Auto Detect On Off On N A Communication Mode Full Duplex Half Duplex Full Duplex N A Ethernet Type 10 Base T 100 Base TX 100 Base TX N A Item Setting Description Default Setting Can be set i...

Page 104: ...machine using the following software Available Partially Available Only some of the items can be set See Network Settings Table on p 6 2 Types of Settings Web Browser Remote UI Control Panel Interface Settings Ethernet Driver See p 2 2 Communication Environment Setup SNMP See p 2 6 IP Address Settings See p 2 12 Protocol Settings See p 3 2 ...

Page 105: ...enables a client to automatically locate such information as the host name domain name and IP address so that it is not necessary to enter these items manually bps Stands for bits per second The measure of transmission speed used in relationship to networks and communication lines C Community Name An identification keyword for SNMP Simple Network Management Protocol Cookie A file left on a user s ...

Page 106: ...in Name System The system that associates the IP address assigned to a computer with the domain name DNS server Domain Name System server A server which maintains a database that translates the domain names of Internet servers such as www w3 org into Internet Protocol IP addresses such as 18 176 0 26 This enables clients to connect to a server with a host name rather than a numeric IP address Doma...

Page 107: ...ess Internet Protocol address A network address used by IP Internet Protocol to specify a computer or device on the Internet Currently two versions of IP are in use IPv4 and IPv6 IPv4 Internet Protocol version 4 An IPv4 address is a 32 bit numeric address usually written as four numbers delimited by periods For example 128 121 4 5 IPv6 Internet Protocol version 6 An IPv6 address is 128 bit long an...

Page 108: ... PDF Portable Document Format The page description language used in Adobe Systems Acrobat document exchange system which is restricted neither by device nor resolution PDF displays documents in a way that is independent of the original application software hardware and operating system used to create those documents A PDF document can contain any combination of text graphics and images PING PING i...

Page 109: ...hat enables you to perform operations which are usually performed on the machine s control panel using a Web browser such as Microsoft Internet Explorer or Safari over a network S SNMP Simple Network Management Protocol The network management protocol of TCP IP In SNMP agents which can be hardware as well as software monitor the activity of the various devices on the network and report to the netw...

Page 110: ...nts it provides greater efficiency T TCP IP Transmission Control Protocol Internet Protocol The protocol used to connect to the Internet and wide area networks U UFRII Ultra Fast Rendering II A printing algorithm for realizing high speed monochrome rendering UFR II enables processing tasks to be executed and divided appropriately between the host PC and the printer to greatly reduce overall printi...

Page 111: ...DNS server 6 9 DNS Settings 2 23 IPv4 6 3 IPv6 6 4 Domain 6 9 E Ethernet 6 9 Ethernet Driver 2 2 6 6 G Gateway Address 6 10 H Host Name 6 4 HTTP 6 10 I Internet Protocol IP 6 10 IP Address 6 10 IPv4 2 12 6 10 IPv6 2 16 6 10 IP Address Auto 6 2 IP Address Range IPv4 6 2 IPv6 6 4 IPv4 Settings 2 13 IPv6 Settings 2 17 L Link Local Address 2 16 Log on 6 10 LPD 4 2 6 11 LPD Print Settings 6 5 ...

Page 112: ...ber Settings 6 5 Protocol 6 11 Protocol Settings 3 2 Proxy Server 6 12 R RARP 6 12 Raw 4 2 6 12 RAW Print Settings 6 5 Remote UI 6 12 RX MAC Address Set 2 47 6 5 S Setting Up Computer for Printing 4 2 SNMP 6 12 SNMP Settings 2 6 6 6 Spool 6 12 Startup Time Settings 3 9 6 6 Stateful Address 2 16 Stateless Address 2 16 6 3 Subnet 6 12 Subnet Mask 2 15 6 13 Switching Hub 6 13 T TCP IP 6 13 TCP IP Set...

Page 113: ...details on your regional dealer CANON LATIN AMERICA INC 703 Waterford Way Suite 400 Miami Florida 33126 U S A CANON AUSTRALIA PTY LTD 1 Thomas Holt Drive North Ryde Sydney N S W 2113 Australia CANON CHINA CO LTD 15F Jinbao Building No 89 Jinbao Street Dongcheng District Beijing 100005 China CANON SINGAPORE PTE LTD 1 HarbourFront Avenue 04 01 Keppel Bay Tower Singapore 098632 CANON HONGKONG CO LTD ...

Reviews: