Canon imageRUNNER C1030 Starter Manual Download Page 51

49

Do not plug or unplug the power plug with wet hands, as this can result 
in electrical shock.
Do not plug the power cord into a multiplug power strip, as this can 
result in a fire or electrical shock.
Do not bundle up or tie up the power cord in a knot, as this can result in a 
fire or electrical shock.
Insert the power plug completely into the AC power outlet. Failure to do 
so can result in a fire or electrical shock.
If excessive stress is applied to the connection part of the power cord, it 
may damage the power cord or the wires inside the machine may 
disconnect. This could result in a fire. Avoid the following situations:

Connecting and disconnecting the power connector frequently
Tripping over the power cord
The power cord is bent near the connection part, and continuous stress 
is being applied to the power outlet or the connection part.
Applying a shock to the power connector

Do not use power cords other than the one provided, as this can result in 
a fire or electrical shock.
As a general rule, do not use extension cords. Using an extension cord 
may result in a fire or electrical shock.
Remove the power plug from the AC power outlet and refrain from using 
the machine while it thunders. Lightening can result in a fire, electrical 
shock or malfunction.

Do not use a power supply voltage other than that listed herein, as this 
may result in a fire or electrical shock.
Always grasp the power plug when unplugging the power plug. Do not 
pull on the power cord, as this may expose the core wire of the power 
cord or damage the cord insulation, causing electricity to leak, resulting 
in a fire or electrical shock.
Leave sufficient space around the power plug so that it can be 
unplugged easily. If objects are placed around the power plug, you may 
be unable to unplug it in an emergency.

Handling

Do not disassemble or modify the machine. There are high-temperature 
and high-voltage components inside the machine which may result in a 
fire or electrical shock.
Electrical equipment can be hazardous if not used properly. Do not allow 
children to touch the power cord, cables, internal gears, or electrical parts.
If the machine makes an unusual noise or emits smoke, heat, or an 
unusual smell, immediately turn off the power switches of the machine 
and computer and disconnect the interface cable if it is connected. Then, 
unplug the power plug from the AC power outlet and contact your local 
authorized Canon dealer. Continued use can result in a fire or electrical 
shock.
Do not use flammable sprays near the machine. If flammable substances 
come into contact with electrical parts inside the machine, this may 
result in a fire or electrical shock.
Always turn off the power switches of the machine and computer, and 
then unplug the power plug and interface cables before moving the 
machine. Failure to do so can damage the cables or cords, resulting in a 
fire or electrical shock.
Confirm that the power plug or power connecter is inserted completely 
after moving the machine. Failure to do so can result in an overheating 
and fire.
Do not drop paper clips, staples, or other metal objects inside the 
machine. Also, do not spill water, liquids, or other flammable substances 
(alcohol, benzene, paint thinner, etc.) inside the machine. If these items 
come into contact with a high-voltage area inside the machine, this may 
result in a fire or electrical shock. If these items are dropped or spilled 
inside the machine, immediately turn off the power switches of the 
machine and computer and disconnect the interface cable if it is 
connected. Then, unplug the power plug from the AC power outlet and 
contact your local authorized Canon dealer.

When plugging or unplugging a USB cable when the power plug is 
plugged into an AC power outlet, do not touch the metal part of the 
connector, as this can result in electrical shock.

Do not place heavy objects on the machine. The object or the machine 
may fall, resulting in personal injury.
Turn off the power switch when the machine will not be used for a long 
period of time, such as overnight. Turn off the machine and unplug the 
power plug if the machine will not be used for an extended period of 
time, such as for several days.
Open or close covers and install or remove cassettes gently and carefully. 
Be careful not to hurt your fingers.
Keep your hands and clothing away from the roller in the output area. 
Even if the machine is not printing, the roller may suddenly rotate and 
catch your hands or clothing, resulting in personal injury.
The output slot is hot during and immediately after printing. Do not 
touch the area surrounding the output slot, as this may result in burns.
Printed paper may be hot immediately after being output. Be careful 
when removing the paper and aligning the removed paper, especially 
after continuous printing. Failure to do so may result in burns.
When performing copy with a thick book placed on the platen glass, do 
not press the feeder forcefully. This may damage the platen glass and 
cause personal injury.
Be careful not to drop a heavy object, such as a dictionary, on the platen 
glass. This may damage the platen glass and cause personal injury.
Close the feeder gently so as not to catch your hand. This may result in 
personal injury.
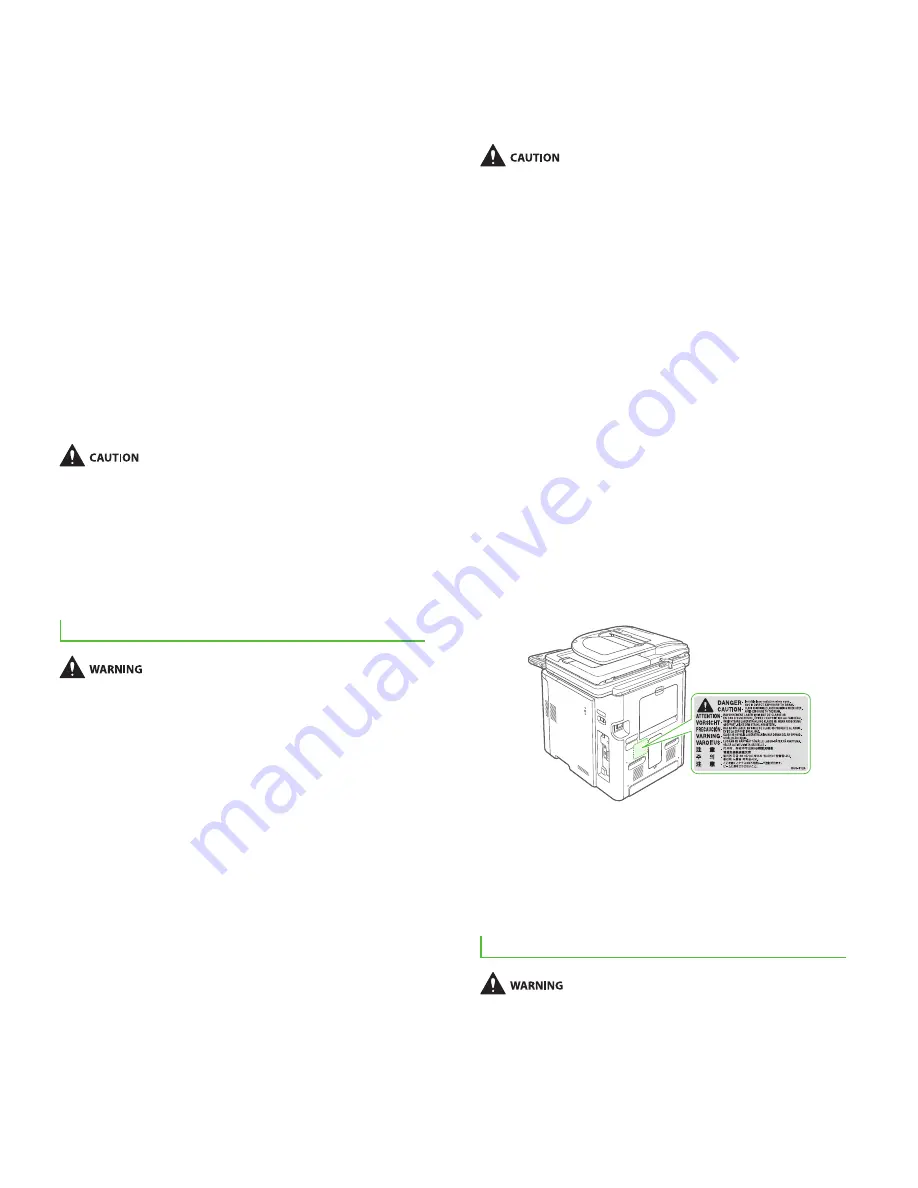
The laser beam can be harmful to human bodies. The laser beam is 
confined in the laser scanner unit by a cover, so there is no danger of the 
laser beam escaping during normal machine operation. Read the 
following remarks and instructions for safety.

Never open covers other than those indicated in this manual.
Do not remove the caution label attached to the cover of the laser 
scanner unit.

If the laser beam should escape and enter your eyes, exposure may 
cause damage to your eyes.

If you operate this machine in manners other than the control, 
adjustment, and operating procedures prescribed in this manual, this 
may result in hazardous radiation exposure.
This machine is confirmed as the class 1 laser product in  
IEC 60825-1:2007.

Maintenance and Inspections

When cleaning the machine, turn off the machine and computer, and 
unplug the interface cables and power plug. Failure to do so can result in 
a fire or electrical shock.
Unplug the power plug from the AC power outlet periodically and clean 
the area around the base of the power plug’s metal pins and the AC 
power outlet with a dry cloth to remove all dust and grime. In damp, 
dusty, or smoky locations, dust can build up around the power plug and 
become damp, which can cause a short circuit, resulting in a fire. 

Summary of Contents for imageRUNNER C1030

Page 1: ...Necessary to Use the Machines Functions Set Up the Machine Set Up Computers and Software Appendix Please read this guide before operating this product After you finish reading this guide store it in a safe place for future reference Read this guide first ...

Page 2: ...IP Address Settings 19 Set IP Address Automatically 21 Check IP Address Setting 22 3 Set Up Computers and Software 24 Types of Connection between Computers and the Machine 24 About User Software CD ROM 25 Network Connection 28 Installation Procedure 28 Check Installation 37 Setting the ScanGear Tool 37 USB Connection 39 Installation Procedure 39 Check Installation 45 4 Appendix 46 User Manual CD R...

Page 3: ...atures The uniFLOW Integration Guide in PDF format is also included in this manual Manuals for the Machine Unless otherwise mentioned illustrations and screens used in this manual are those taken when no optional equipment is attached to the Color imageRUNNER C1030 C1030iF If there is any difference between the Color imageRUNNER C1030 and C1030iF it is clearly indicated in the text for instance Co...

Page 4: ...opy Fax Direct Print Scan to Media PC Print PC Fax Scan E Mail I Fax Remote UI Scan to File Server of the machine you need to make the settings in the flowchart below For example if you intend to use the copy function you need to make the settings in Machine Settings ...

Page 5: ...f the Machine in the e Manual 1 Press the I side of the main power switch A to ON Do not connect the machine and the computer with a USB cable at this time Connect the machine and the computer with a USB cable only during the software installation procedure A USB cable is not used when the machine is used via a network connection Apply the power switch label to the space above the main power switc...

Page 6: ...starts automatically Make sure that the country region is set correctly for your country region If the country region is not set or set incorrectly you may have problems in sending receiving faxes 4 The main screen appears on the display as shown below Direct Print is displayed only if Direct Print in Memory Media Settings is set to On See Security in the e Manual ...

Page 7: ...creen Press Clear to delete the entire entry The display returns to the Standby mode The machine may enter the Standby mode Auto Clear function while you are setting it up Make the setting again from the main menu The default setting is 2 minutes To change the settings see Introduction of the Machine in the e Manual The display turned OFF The machine may enter the Sleep mode while you are performi...

Page 8: ...ing four digits including zeros Enter all four digits of the year and the time in 24 hour notation as four digits including zeros without a space Examples May 6 0506 9 05 a m 0905 4 18 p m 1618 If you make a mistake when entering values press Clear then enter the values again starting with the month If you want to set the time zone go to step 7 If you want to set Daylight Saving Time without setti...

Page 9: ... Mountain time US Canada GMT 7 00 Pacific time US Canada GMT 8 00 If you want to set the Daylight Saving Time go to step 9 9 Use or Scroll Wheel to select Daylight Saving Time Set then press OK In some countries time is advanced throughout the summer season The period in which this is applied is called Daylight Saving Time If you set Daylight Saving Time the machine automatically sets the standard...

Page 10: ... Use or Scroll Wheel to select the week then press OK 15 Use or Scroll Wheel to select Day of the Week then press OK 16 Use or Scroll Wheel to select the day of the week then press OK 17 Press the right Any key to select Set 18 Use or Scroll Wheel to select Month then press OK ...

Page 11: ...Scroll Wheel to select Week then press OK 21 Use or Scroll Wheel to select the week then press OK 22 Use or Scroll Wheel to select Day of the Week then press OK 23 Use or Scroll Wheel to select the day of the week then press OK 24 Press the right Any key to select Set 25 Press Main Menu to return to the Main Menu screen ...

Page 12: ... registering the user telephone number and unit name Refer to the Information About the Keys below Use the keys shown below to enter information in the machine You can enter the following characters in each input mode Press numeric keys to enter numbers Press the Left Right Any key to select the alternative key at the bottom of the display Press to move the cursor position Use Scroll Wheel to move...

Page 13: ... key to select Additional Func 3 Use or Scroll Wheel to select Communications Settings then press OK 4 Use or Scroll Wheel to select Fax Settings then press OK 5 Use or Scroll Wheel to select User Settings then press OK The display returns to the Standby mode The machine may enter the Standby mode Auto Clear function while you are setting it up Make the setting again from the main menu The default...

Page 14: ...ll Wheel to select register then press OK For information on how to enter characters see p 10 The following keys are available to select with or Scroll Wheel Space Inserts a space Inserts a plus sign Backspace Deletes the last number entered To delete all of the entered number press Clear 8 Press the right Any key to select Done 9 Press the right Any key to select Done 10 Use or Scroll Wheel to se...

Page 15: ...t Set For information on how to enter characters see p 10 You can register only one unit name To delete the last character press the left Any key to select Backspace To delete all of the entered characters press Clear 14 Press Main Menu to return to the Main Menu screen Before sending documents you MUST register your fax number unit name and the current date and time in the machine The sender info...

Page 16: ...automatically and routes voice calls to the telephone with built in answering machine When Receiving FAX The telephone with built in answering machine rings and the machine receives faxes automatically When Receiving VOICE CALL The telephone with built in answering machine rings and records voice messages Manual RX Rings for every call whether it is a fax call or a voice call For a fax call you ha...

Page 17: ...depending on the type of the external telephone connected to the machine By default Auto RX is selected in Reception Mode Selection If an external telephone is connected to the machine and receives a fax or voice call the external telephone rings You can answer voice calls while the external telephone is ringing To disable the incoming ring press Main Menu to select Additional Func Communications ...

Page 18: ...ttings then press OK 5 Use or Scroll Wheel to select RX Settings then press OK 6 Use or Scroll Wheel to select Reception Mode Selection then press OK 7 Use or Scroll Wheel to select a reception mode then press OK 8 Press Main Menu to return to the Main Menu screen ...

Page 19: ...s Main Menu 2 Press the right Any key to select Additional Func 3 Use or Scroll Wheel to select Communications Settings then press OK 4 Use or Scroll Wheel to select Fax Settings then press OK 5 Use or Scroll Wheel to select User Settings then press OK 6 Use or Scroll Wheel to select Tel Line Type Selection then press OK 7 Use or Scroll Wheel to select Manual then press OK 8 Use or Scroll Wheel to...

Page 20: ...ware E Mail Send the scanned documents attached to an e mail message through a network Scan to File Server Send a scanned document to a file server from the computer I Fax Send a document to a machine that is compatible with I fax PC Print Print documents on a computer PC Fax Fax a document on a computer Scan with Color Network ScanGear application on the UFRII LT FAX User Software CD ROM Save sca...

Page 21: ...ll Wheel to select System Management Set then press OK If the screen appears prompting you to enter the System Manager ID and System Password enter the System Manager ID and System Password using numeric keys then press Log In Out For details see Security in the e Manual 4 Use or Scroll Wheel to select Network Settings then press OK The display returns to the Standby mode The machine may enter the...

Page 22: ...se or Scroll Wheel to select TCP IP Settings then press OK 7 Use or Scroll Wheel to select IPv4 Settings then press OK For instructions on the settings for IPv6 see Network Settings in the e Manual 8 Use or Scroll Wheel to select IP Address Settings then press OK 9 Use or Scroll Wheel to select Manual Settings then press OK 10 Use numeric keys to enter the IP address then press OK ...

Page 23: ...ss automatically you can specify the IP address subnet mask and gateway address If you do not know them skip each entry by pressing OK Press Main Menu Additional Func System Management Set Network Settings Done TCP IP Settings IPv4 Settings IP Address Settings Obtain Automatically DHCP Enter the IP address Enter the subnet mask Enter the gateway address Done Main Menu Turn off the main power Resta...

Page 24: ...agement Set then press OK If the screen appears prompting you to enter the System Manager ID and System Password enter the System Manager ID and System Password using numeric keys then press Log In Out For details see Security in the e Manual 4 Use or Scroll Wheel to select Network Settings then press OK 5 Press the right Any key to select Done Change to the IP address subnet mask and gateway addr...

Page 25: ...ess Settings then press OK 9 Press the left Any key to select Confirm Set 10 Press the right Any key to select Done If the machine is communicating with the network properly the IP address subnet mask and gateway address are displayed If not 000 000 000 000 is displayed If the machine dose not obtain the IP address 3 minutes after you connected the LAN cable check the IP address settings and the n...

Page 26: ...lowing PC Print Print in the e Manual Remote UI Settings from a PC in the e Manual PC Fax Fax in the e Manual Scan Scan in the e Manual E Mail I Fax E mail Fax in the e Manual Scan to File Server Scan in the e Manual USB Connection For details about the set up see p 39 The following functions are available with USB Connection PC Print PC Fax For more information on how to use each function with US...

Page 27: ...g a significant increase in speed through optimization FAX Driver The FAX Driver is conceptually akin to a printer driver A user selects Print from any Windows application software selects the Canon fax driver as the printer and specifies its destination s and options The FAX Driver then converts this into an image that conforms to standard fax protocols to be printed or stored on the recipient fa...

Page 28: ...nd Color imageRUNNER C1030 with the optional PCL Printer Kit installed Manuals Printer Driver Installation Guide The Printer Driver Installation Guide describes UFR II printer driver installation updating shared printer information uninstallation configuration and printing Canon Products Supported by UFR II Driver The Canon Products Supported by UFR II Driver describes compatible Canon products th...

Page 29: ...ver describes compatible Canon products that are compatible with the PCL printer driver To use the PCL Printer Driver with the Color imageRUNNER C1030 the optional PCL Printer Kit is required Printer Driver Installation Guide The Printer Driver Installation Guide describes PS printer driver installation updating shared printer information uninstallation configuration and printing Canon Products Su...

Page 30: ...PS Printer Kit is attached proceed to step 56 For more information refer to the Printer Driver Installation Guide located on the PS User Software CD ROM 3 If the CD ROM Setup screen is not displayed click start on the Windows task bar My Computer Windows 2000 double click My Computer on the Windows desktop Windows Vista 7 Server 2003 Server 2008 click Start on the Windows task bar Computer Open th...

Page 31: ...ervice in the server computer to set up the printer configuration automatically or use Department ID Management If the Canon Driver Information Assist Service is already installed on your computer this screen is not displayed If you are using an operating system equipped with Windows Firewall the following message box may appear If you want to use Canon Driver Information Assist Service click Yes ...

Page 32: ...the printer configuration automatically or use Department ID Management If the Canon Driver Information Assist Service is already installed on your computer this screen is not displayed If you are using an operating system equipped with Windows Firewall the following message box may appear If you want to use Canon Driver Information Assist Service click Yes If you select No you cannot use Canon Dr...

Page 33: ... of Color Network ScanGear will begin 25 Select the same language as your operating system 26 27 28 29 30 31 The Readme file opens After reading through the information provided proceed to the next step 32 Installation of Color Network ScanGear is completed and the installation of the manuals will begin 33 ...

Page 34: ...Gear Tool After making sure that the drivers are correctly installed proceed to Setting the ScanGear Tool on p 37 ScanGear Tool is installed together with the Color Network ScanGear driver 37 Insert the PCL User Software CD ROM 38 If the CD ROM Setup screen is not displayed click start on the Windows task bar My Computer Windows 2000 double click My Computer on the Windows desktop Windows Vista 7 ...

Page 35: ...ter in the Print Server Point and Print environment it is necessary to install the Canon Driver Information Assist Service in the server computer to set up the printer configuration automatically or use Department ID Management If the Canon Driver Information Assist Service is already installed on your computer this screen is not displayed If you are using an operating system equipped with Windows...

Page 36: ...PS Printer Kit is attached go to the next step 56 Insert the PS User Software CD ROM 57 If the CD ROM Setup screen is not displayed click start on the Windows task bar My Computer Windows 2000 double click My Computer on the Windows desktop Windows Vista 7 Server 2003 Server 2008 click Start on the Windows task bar Computer Open the CD ROM icon then double click MInst MInst exe If a language selec...

Page 37: ...t Service is already installed on your computer this screen is not displayed If you are using an operating system equipped with Windows Firewall the following message box may appear If you want to use Canon Driver Information Assist Service click Yes If you select No you cannot use Canon Driver Information Assist Service 64 Select the machine Product Name iR C1030 using the information displayed i...

Page 38: ...Set Up Computers and Software 71 The Printer Driver Installation Guide is installed on your computer and a shortcut is created on the desktop 72 73 Remove the PS User Software CD ROM Installation is complete ...

Page 39: ... and Printers Verify that the printer driver icons are displayed 2 Set your machine as the default printer Select the printer icon for this machine Click Set as Default Printer from the File menu 3 Verify that the Color Network ScanGear appears in the program list Windows 2000 From the Windows task bar click Start Programs Windows XP Server 2003 From the Windows task bar click start or Start selec...

Page 40: ...ly scanners on the same subnet network with the same network ID as your computer are displayed in the list After selecting the scanner you can click Test Connection to check that the selected scanner can be used You can also specify the machine for scanning by clicking Address For details see Scanning Documents from a Networked Computer in the e Manual 4 Click Exit The ScanGear Tool is closed ...

Page 41: ...r Kit is attached proceed to step 28 For more information refer to the Printer Driver Installation Guide located on the PS User Software CD ROM If you want to install the PCL PS driver by connecting the USB cable plug and play it is necessary to change the settings of the machine Press Main Menu Additional Func System Management Set PDL Selection PnP Done PCL5c PCL6 PS3 depending on the desired dr...

Page 42: ...UFR II Printer Driver in this step then proceed to the next step For more information refer to the Printer Driver Installation Guide located on the UFRII LT FAX User Software CD ROM If you want to install only the fax driver select only the FAX Driver in this step then proceed to step 13 For more information refer to the Fax Driver Installation Guide located on the UFRII LT FAX User Software CD RO...

Page 43: ...ervice in the server computer to set up the printer configuration automatically or use Department ID Management If the Canon Driver Information Assist Service is already installed on your computer this screen is not displayed If you are using an operating system equipped with Windows Firewall the following message box may appear If you want to use Canon Driver Information Assist Service click Yes ...

Page 44: ...er and shortcuts are created on the desktop 26 27 Remove the UFRII LT FAX User Software CD ROM If you want to install the PCL Driver Color imageRUNNER C1030iF or C1030 with the optional PCL Printer Kit attached or PS Driver when the optional PS Printer Kit is attached go to the next step 28 Insert the PCL User Software CD ROM or PS User Software CD ROM The screen shots shown below may differ from ...

Page 45: ...using a shared printer in the Print Server Point and Print environment it is necessary to install the Canon Driver Information Assist Service in the server computer to set up the printer configuration automatically or use Department ID Management If the Canon Driver Information Assist Service is already installed on your computer this screen is not displayed If you are using an operating system eq...

Page 46: ...ect the printer port that you want to add 39 40 45 The Printer Driver Installation Guide is installed on your computer and a shortcut is created on the desktop 46 47 Remove the PCL User Software CD ROM or PS User Software CD ROM Installation is complete 41 42 43 Installation of the printer driver is completed and the installation of the manuals will begin 44 ...

Page 47: ...ntrol Panel double click Printers Windows XP Server 2003 From the Windows task bar click start or Start select Printers and Faxes Windows Vista From the Windows task bar click Start select Control Panel Hardware and Sound double click Printers Windows Server 2008 From the Windows task bar click Start select Control Panel double click Printers Windows 7 Server 2008 R2 From the Windows task bar clic...

Page 48: ...ing the e Manual with Windows follow the steps below 1 Insert the User Manual CD ROM on your computer 2 Select the language 3 Click Install or Display manual 4 When you click Install the e Manual is installed on your computer and the short cut is created on the desktop 5 When you click Display manual the e Manual is displayed 6 To display the e Manual that you installed on your computer double cli...

Page 49: ...ction Categories Select a function category to display a list of image icons for the topics corresponding to that function Click an image icon or Display Function List to display the topic pages for the function category G Print Click to print all categories or a single category H Appendix Categories Select an appendix category to display the topic pages not related to functions such as the mainte...

Page 50: ...en installing and removing the optional accessories be sure to turn the machine off unplug the power plug and then disconnect all the interface cables and power cord from the machine Otherwise the power cord or interface cables may be damaged resulting in a fire or electrical shock Do not install the machine in unstable locations such as on unsteady platforms or inclined floors or in locations sub...

Page 51: ...r liquids or other flammable substances alcohol benzene paint thinner etc inside the machine If these items come into contact with a high voltage area inside the machine this may result in a fire or electrical shock If these items are dropped or spilled inside the machine immediately turn off the power switches of the machine and computer and disconnect the interface cable if it is connected Then ...

Page 52: ... clothing as this will dirty your hands or clothing If toner gets on your hands or clothing wash them immediately with cold water Washing with warm water sets the toner making it impossible to remove the toner stains When removing jammed paper be careful not to allow the toner on the paper to scatter The toner may get into your eyes or mouth If toner gets into your eyes or mouth wash them immediat...

Page 53: ... C1030 1030iF Less than 1300 W 1350 W with optional equipment Electrical noise or a dramatic drop in mains voltage may cause the machine or computer to operate incorrectly or lose data Installation Requirements A location with sufficient space A location with good ventilation A location with a flat even surface A location able to fully support the weight of the machine Do not install the machine i...

Page 54: ...d in this machine has obtained the IPv6 Ready Logo Phase 1 established by the IPv6 Forum Laser Safety Information Laser radiation could be hazardous to the human body For this reason laser radiation emitted inside this equipment is hermetically sealed within the protective housing and external cover No radiation can leak from the machine in the normal operation of the product by the user This mach...

Page 55: ...d by law and may result in criminal and or civil liability A non exhaustive list of these documents is set forth below This list is intended to be a guide only If you are uncertain about the legality of using your product to scan print or otherwise reproduce any particular document and or of the use of the images scanned printed or otherwise reproduced you should consult in advance with your legal...

Page 56: ...oblem is completely resolved Users should contact Canon Authorized Service Facilities for servicing of equipment Information regarding Authorized Service Facility locations can be obtained by calling Canon Customer Care Center 1 800 OK CANON Rights of the Telephone Company If this equipment Color imageRUNNER C1030 C1030iF causes harm to the telephone network the telephone company may temporarily d...

Page 57: ...es industrielles à savoir ligne téléphonique 2 500 pour appareil à clavier ou 500 pour appareil à cadran impulsions Il est également possible de raccorder ce télécopieur à un système téléphonique à poussoirs car la plupart de ces systèmes émettent des signaux d appel non normalisés ou des codes spéciaux qui risquent de perturber le fonctionnement du télécopieur C Condition d alimentation Raccordez...

Page 58: ... V Bovenkerkerweg 59 61 1185 XB Amstelveen The Netherlands CANON CHINA CO LTD 15F Jinbao Building No 89 Jinbao Street Dongcheng District Beijing 100005 PRC CANON SINGAPORE PTE LTD 1 HarbourFront Avenue 04 01 Keppel Bay Tower Singapore 098632 CANON AUSTRALIA PTY LTD 1 Thomas Holt Drive North Ryde Sydney NSW 2113 Australia CANON GLOBAL WORLDWIDE SITES http www canon com FT5 3349 000 CANON INC 2010 P...

Reviews: