• If the print head alignment sheet was not printed correctly, press the
Stop
button, and redo this
•
procedure from the beginning.
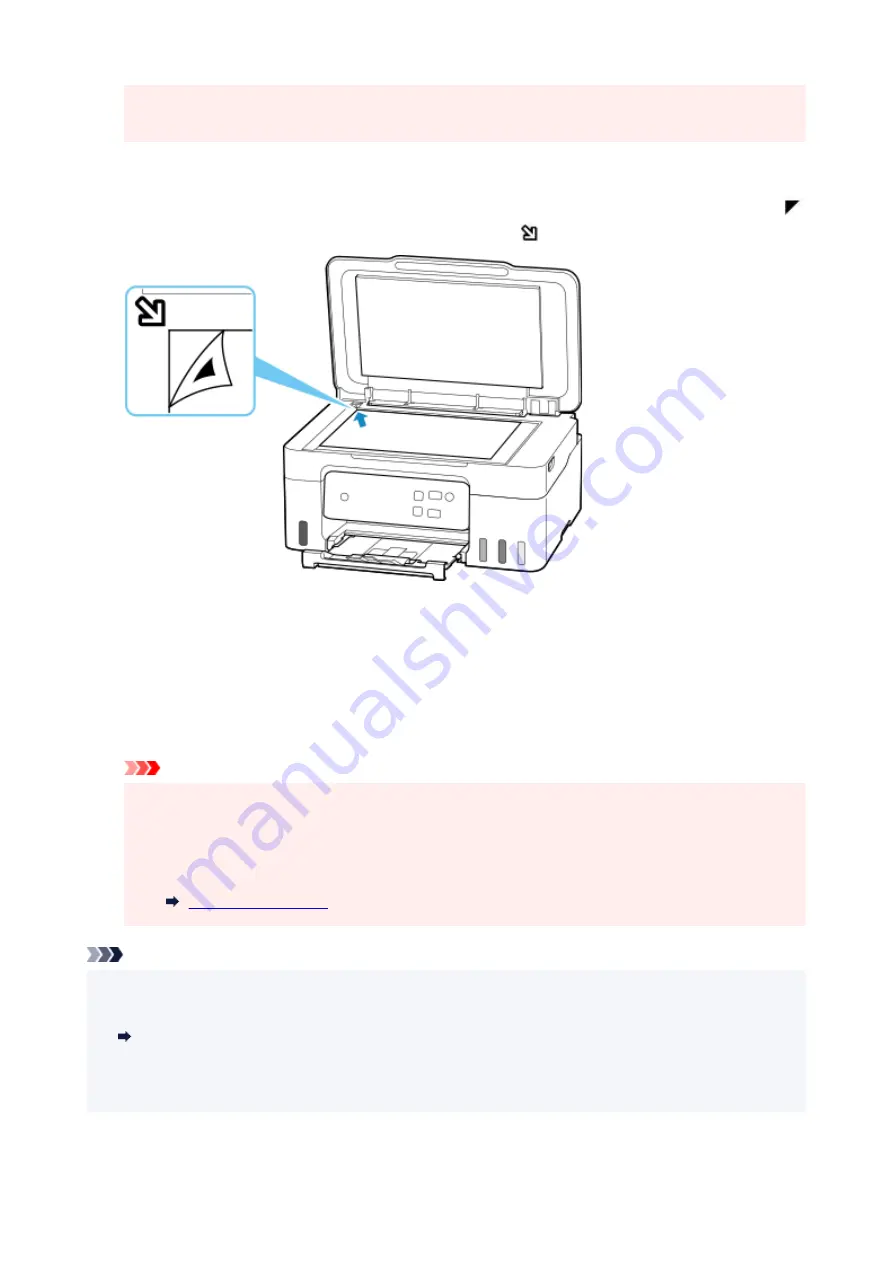
5.
Place print head alignment sheet on platen.
5.
Place the print head alignment sheet WITH THE PRINTED SIDE FACING DOWN and align the mark
on the upper left corner of the sheet with the alignment mark
.
6.
Close the document cover gently, then press the
Black
button or the
Color
button.
6.
The printer starts scanning the print head alignment sheet, and the print head position will be adjusted
automatically.
The print head position adjustment will be complete when the
ON
lamp lights after flashing.
Remove the print head alignment sheet on the platen.
Important
• Do not open the document cover or move the print head alignment sheet on the platen until
•
adjusting the print head position is complete.
• If adjusting the print head position has failed, the
Alarm
lamp lights up. Press the
OK
button to
•
release the error, then take appropriate action.
Note
• For Windows, when the print results are still not satisfactory after adjusting the print head position as
•
described above, adjust the print head position manually from the computer.
Adjusting Print Head Position Manually
• To print and check the current head position adjustment values, press and hold the
Stop
button and
•
release it when the
Alarm
lamp flashes 6 times, then press the
Black
button or the
Color
button.
112
Summary of Contents for G3030 Series
Page 1: ...G3030 series Online Manual English ...
Page 9: ...2901 433 3252 434 4103 435 5100 436 5200 437 6000 438 ...
Page 12: ...Trademarks and Licenses Trademarks Licenses 12 ...
Page 36: ...Restrictions Notices when printing using web service Notice for Web Service Printing 36 ...
Page 42: ... For macOS Refer to Setup Guide and redo setup 42 ...
Page 64: ... TR9530 series TS3300 series E3300 series 64 ...
Page 70: ...Handling Paper Originals Ink Tanks etc Loading Paper Loading Originals Refilling Ink Tanks 70 ...
Page 71: ...Loading Paper Loading Plain Paper Photo Paper Loading Envelopes 71 ...
Page 89: ...89 ...
Page 90: ...Refilling Ink Tanks Refilling Ink Tanks Checking Ink Level Ink Tips 90 ...
Page 115: ...If the problem is not resolved after cleaning contact Canon to request a repair 115 ...
Page 122: ...Safety Safety Precautions Regulatory Information WEEE 122 ...
Page 145: ...Main Components and Their Use Main Components Power Supply 145 ...
Page 146: ...Main Components Front View Rear View Inside View Operation Panel 146 ...
Page 148: ...G Document Cover Open to load an original on the platen H Platen Load an original here 148 ...
Page 252: ...Printing Using Canon Application Software Easy PhotoPrint Editor Guide 252 ...
Page 256: ...Copying Making Copies on Plain Paper Basics Copying on Photo Paper 256 ...
Page 259: ...Scanning Scanning in Windows Scanning in macOS 259 ...
Page 263: ...Note To set the applications to integrate with see Settings Dialog Box 263 ...
Page 277: ...ScanGear Scanner Driver Screens Basic Mode Tab Advanced Mode Tab Preferences Dialog Box 277 ...
Page 306: ...Note To set the applications to integrate with see Settings Dialog 306 ...
Page 309: ...Scanning Tips Positioning Originals Scanning from Computer 309 ...
Page 382: ...Scanning Problems Windows Scanning Problems 382 ...
Page 383: ...Scanning Problems Scanner Does Not Work ScanGear Scanner Driver Does Not Start 383 ...
Page 386: ...Scanning Problems macOS Scanning Problems 386 ...
Page 387: ...Scanning Problems Scanner Does Not Work Scanner Driver Does Not Start 387 ...
Page 395: ... For macOS Refer to Setup Guide and redo setup 395 ...


