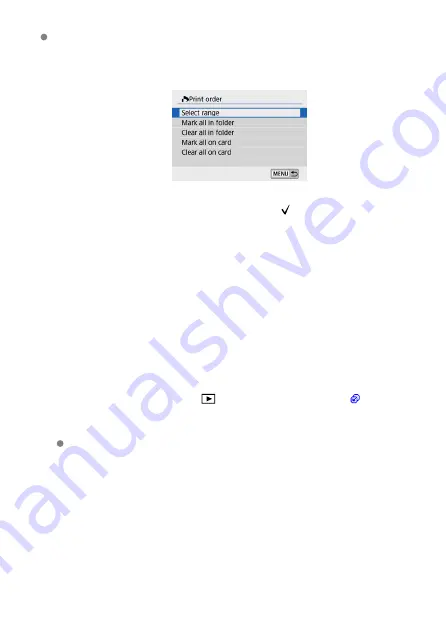
Multiple
•
Select range
Select [
Select range
] in [
Multiple
]. Selecting the first and last images of the range
marks all the images in the range with a checkmark [ ], and one copy of each
image will be specified for printing.
•
All images in a folder
Select [
Mark all in folder
] and select the folder. A print order for one copy of all the
images in the folder will be specified.
If you select [
Clear all in folder
] and select the folder, the print order for all the
images in the folder will be canceled.
•
All images on a card
If you select [
Mark all on card
], one copy of all the images on the card will be
specified for printing.
If you select [
Clear all on card
], the print order will be cleared for all the images on
the card.
If the search conditions are set with [
:
Set image search conditions
] (
) and you
select [
Multiple
], the display will change to [
Mark all found images
] and [
Clear all
found images
].
All found images
If you select [
Mark all found images
], one copy of all the images filtered by the
search conditions will be specified for printing.
If you select [
Clear all found images
], all the print order of the filtered images will
be cleared.
416
Summary of Contents for EOS M50 Mark II
Page 1: ...Advanced User Guide E CT2 D101 A CANON INC 2020 ...
Page 24: ...Part Names 24 ...
Page 26: ...26 ...
Page 84: ...Dragging Sample screen Menu screen Slide your finger while touching the screen 84 ...
Page 139: ...Note Without using the menu you can also switch focus modes by pressing the key 139 ...
Page 178: ...2 Select an option 178 ...
Page 257: ...Dust Delete Data Acquisition 1 Select Dust Delete Data 257 ...
Page 284: ...Clearing Settings 1 Select Shooting info disp 2 Select Reset 3 Select OK 284 ...
Page 286: ...Viewfinder Display Format 1 Select VF display format 2 Select an option 286 ...
Page 350: ...Other Menu Functions 1 2 3 5 6 7 8 9 350 ...
Page 360: ... AF Point Display HDMI HDR Output 360 ...
Page 363: ...Playback 5 1 Playback information display 2 AF point disp 3 HDMI HDR output 363 ...
Page 368: ...368 ...
Page 395: ...4 Erase the images 395 ...
Page 397: ...4 Erase the images Select OK 397 ...
Page 430: ...Caution Some images may not be corrected accurately 430 ...
Page 456: ... Wireless Communication Status 456 ...
Page 482: ...4 Set Size to send 5 Take the picture 482 ...
Page 485: ... 2 Sending multiple selected images 1 Press 2 Select Send selected 485 ...
Page 490: ... 4 Sending all images on the card 1 Press 2 Select Send all card 490 ...
Page 507: ...Steps on the camera 3 10 Establish a Wi Fi connection Select OK 507 ...
Page 531: ...Steps on the camera 2 9 Add image canon as a destination Select image canon is now added 531 ...
Page 538: ...Sending all images on the card 1 Press 2 Select Send all card 538 ...
Page 544: ...Steps on the camera 2 Select A Live streaming icon is added 544 ...
Page 562: ...4 Select OK 562 ...
Page 567: ...Wi Fi Settings 1 Select Wi Fi settings 567 ...
Page 601: ...3 Select OK 601 ...
Page 618: ...Note Auto power off time may be extended while the Date Time Zone screen is displayed 618 ...
Page 619: ...Language 1 Select Language 2 Set the desired language 619 ...


