


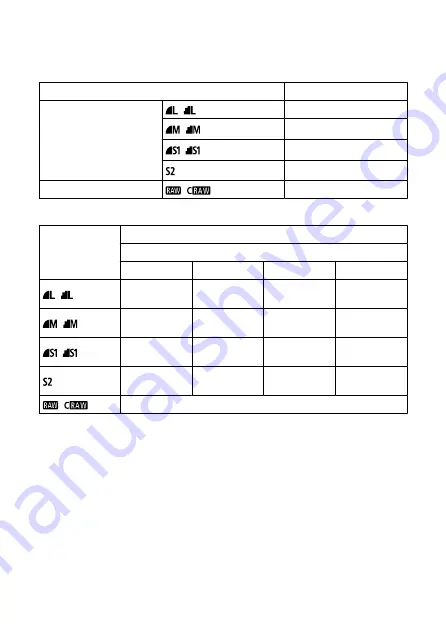
Still photo recording
Image type in still photo recording
Image quality
Resolution (pixels)
JPEG
/
24.0 megapixels (6000 × 4000)
/
Approx. 10.6 megapixels (3984 ×
2656)
/
Approx. 5.9 megapixels (2976 ×
1984)
Approx. 3.8 megapixels (2400 ×
1600)
RAW/C-RAW
/
24.0 megapixels (6000 × 4000)
Still photo pixel count
Image quality
Recorded pixels
Aspect ratio
3:2
4:3
16:9
1:1
/
24.0 megapixels
(6000 × 4000)
Approx. 21.3
megapixels*
(5328 × 4000)
Approx. 20.2
megapixels*
(6000 × 3368)
16.0 megapixels
(4000 × 4000)
/
Approx. 10.6
megapixels
(3984 × 2656)
Approx. 9.5
megapixels
(3552 × 2664)
Approx. 8.9
megapixels*
(3984 × 2240)
Approx. 7.1
megapixels
(2656 × 2656)
/
Approx. 5.9
megapixels
(2976 × 1984)
Approx. 5.3
megapixels
(2656 × 1992)
Approx. 5.0
megapixels*
(2976 × 1680)
Approx. 3.9
megapixels
(1984 × 1984)
Approx. 3.8
megapixels
(2400 × 1600)
Approx. 3.4
megapixels*
(2112 × 1600)
Approx. 3.2
megapixels*
(2400 × 1344)
Approx. 2.6
megapixels
(1600 × 1600)
/
24.0 megapixels (6000 × 4000)
* Values for recorded pixels are rounded off to the nearest 100,000th.
* JPEG images are generated in the set aspect ratio.
* RAW/C-RAW images are generated in [
3:2
], and the set aspect ratio is appended.
* Aspect ratios are slightly different than indicated for image sizes marked with an asterisk.
* These aspect ratios and pixel counts also apply to resizing.
695
Summary of Contents for EOS M50 Mark II
Page 1: ...Advanced User Guide E CT2 D101 A CANON INC 2020 ...
Page 24: ...Part Names 24 ...
Page 26: ...26 ...
Page 84: ...Dragging Sample screen Menu screen Slide your finger while touching the screen 84 ...
Page 139: ...Note Without using the menu you can also switch focus modes by pressing the key 139 ...
Page 178: ...2 Select an option 178 ...
Page 257: ...Dust Delete Data Acquisition 1 Select Dust Delete Data 257 ...
Page 284: ...Clearing Settings 1 Select Shooting info disp 2 Select Reset 3 Select OK 284 ...
Page 286: ...Viewfinder Display Format 1 Select VF display format 2 Select an option 286 ...
Page 350: ...Other Menu Functions 1 2 3 5 6 7 8 9 350 ...
Page 360: ... AF Point Display HDMI HDR Output 360 ...
Page 363: ...Playback 5 1 Playback information display 2 AF point disp 3 HDMI HDR output 363 ...
Page 368: ...368 ...
Page 395: ...4 Erase the images 395 ...
Page 397: ...4 Erase the images Select OK 397 ...
Page 430: ...Caution Some images may not be corrected accurately 430 ...
Page 456: ... Wireless Communication Status 456 ...
Page 482: ...4 Set Size to send 5 Take the picture 482 ...
Page 485: ... 2 Sending multiple selected images 1 Press 2 Select Send selected 485 ...
Page 490: ... 4 Sending all images on the card 1 Press 2 Select Send all card 490 ...
Page 507: ...Steps on the camera 3 10 Establish a Wi Fi connection Select OK 507 ...
Page 531: ...Steps on the camera 2 9 Add image canon as a destination Select image canon is now added 531 ...
Page 538: ...Sending all images on the card 1 Press 2 Select Send all card 538 ...
Page 544: ...Steps on the camera 2 Select A Live streaming icon is added 544 ...
Page 562: ...4 Select OK 562 ...
Page 567: ...Wi Fi Settings 1 Select Wi Fi settings 567 ...
Page 601: ...3 Select OK 601 ...
Page 618: ...Note Auto power off time may be extended while the Date Time Zone screen is displayed 618 ...
Page 619: ...Language 1 Select Language 2 Set the desired language 619 ...