


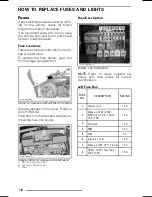


HOW TO REPLACE FUSES AND LIGHTS
rmo2015-008-762_a
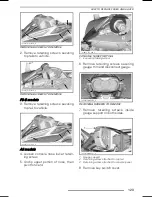
1. Bulb retaining spring
2. Bulb housing
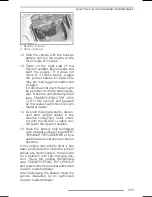
14. Install the new bulb in place and se-
cure with retaining spring.
NOTICE
Never touch glass portion
of a halogen bulb with bare fingers,
it shortens its operating life. If glass
is touched, clean it with isopropyl al-
cohol and a clean cloth.
15. Reinstall housing cap.
16. Install the connector onto light
bulb.
17. Properly reinstall the parts in the
reverse order of their removal.
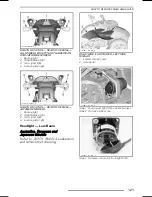
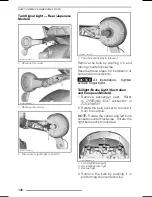
Turn Signal Light — Front
1. Remove the lens.
rmo2008-001-103_a
TYPICAL
1. Front turn signal lens screw
2. Turn the connector counterclock-
wise as indicated below and remove
lens.
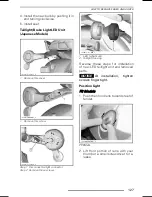
rmo2008-001-104_a
TYPICAL
1. Front turn signal light connector
3. Remove the bulb by pushing it in
and turning counterclockwise.
4. Install the new bulb by pushing it in
and turning clockwise.
5. Properly reinstall the parts in the re-
verse order of their removal.
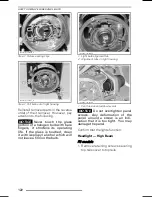
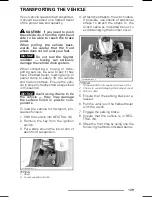
Turn Signal Light — Rear (Australian
and European Models)
1. Remove the lens
rmr2015-133-026_a
1. Rear turn signal lens screw
2. Remove the bulb by pushing in and
turning counterclockwise.
3. Install the new bulb by pushing and
turning it clockwise.
4. Reinstall the lens.
NOTICE
At
installation,
tighten
screws finger tight.
______________
125
Summary of Contents for SPYDER F3TM 2016
Page 10: ...GENERAL PRECAUTIONS This page is intentionally blank 8 _______________ ...
Page 11: ...VEHICLE INFORMATION _______________ 9 ...
Page 39: ...SAFE OPERATING INSTRUCTIONS ______ SAFE OPERATING INSTRUCTIONS ______ 37 ...
Page 87: ...PRE RIDE INSPECTION _______________ 85 ...
Page 90: ...PRE RIDE CHECKLIST This page is intentionally blank 88 ______________ ...
Page 91: ...MAINTENANCE _______________ 89 ...
Page 113: ...ROAD SIDE REPAIRS ______________ 111 ...
Page 133: ...TECHNICAL INFORMATION ______________ 131 ...
Page 144: ...SPECIFICATIONS This page is intentionally blank 142 ______________ ...
Page 145: ...WARRANTY ______________ 143 ...
Page 160: ...This page is intentionally blank 158 ______________ ...
Page 161: ...CUSTOMER INFORMATION ______________ 159 ...
Page 164: ...CHANGE OF ADDRESS OWNERSHIP This page is intentionally blank 162 ______________ ...
Page 165: ...CHANGE OF ADDRESS OWNERSHIP ______________ 163 ...
Page 166: ...CHANGE OF ADDRESS OWNERSHIP This page is intentionally blank 164 ______________ ...
Page 167: ...CHANGE OF ADDRESS OWNERSHIP ______________ 165 ...
Page 168: ...CHANGE OF ADDRESS OWNERSHIP This page is intentionally blank 166 ______________ ...
Page 169: ...CHANGE OF ADDRESS OWNERSHIP NOTES ______________ 167 ...
Page 170: ...CHANGE OF ADDRESS OWNERSHIP NOTES 168 ______________ ...


