


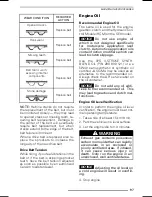


MAINTENANCE PROCEDURES
Clutch Fluid (SM6 Model)
Clutch Fluid Level Verification
Check the clutch fluid level when the
clutch does not operate normally or
when it is difficult to shift gears with
the gearshift lever.
The clutch fluid reservoir is near the re-
verse button on the left handlebar.
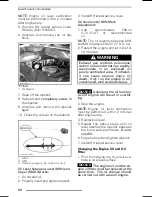
Check the clutch fluid level as follows:
1. Park the vehicle on a firm, level sur-
face.
2. Set the handlebar straight in order to
position the top of clutch fluid reser-
voir horizontally.
3. Wipe clean the cap area.
4. Unscrew cap retaining screws.
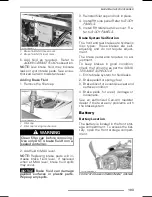
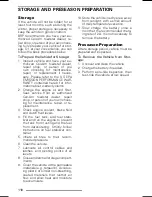
rmo2015-008-008_a
TYPICAL
1. Clutch fluid reservoir cap
2. Retaining screws to remove
5. Carefully remove cap. Pay attention
not to drop the cap seal.
6. Look inside the reservoir to see the
fluid level.
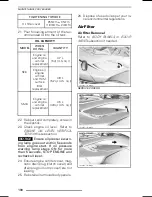
Check clutch fluid level inside the
reservoir:
– The fluid must be flush to the fill
level line (protuberance on the
reservoir wall).
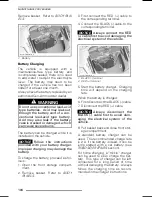
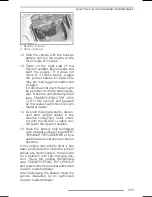
rmo2013-003-040_a
FLUID REMOVED FOR CLARITY PURPOSE
1. Minimum
2. Maximum
Adding Clutch Fluid
1. If the fluid level is lower than spec-
ified, add fluid to the reservoir up
to the fill level line. Use only DOT 4
brake fluid.
2. Add fluid as required.
Do not over-
fill.
NOTICE
Immediately wipe up any
spills.
3. Push back the seal located inside
the cap.
4. Reinstall the cap to the reservoir.
5. Tighten cap screws.
TIGHTENING TORQUE
Cap screws
1.35 N•m ± 0.15 N•m
(12 lbf•
in
± 1 lbf•
in
)
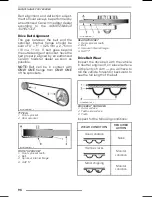
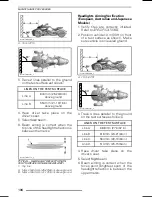
Headlights
Headlights Aiming Verification
(North American Models)
1. Verify tires are correctly inflated.
Refer to
SPECIFICATIONS
.
2. Position vehicle 10 m (33 ft) in front
of a test surface as shown. Make
sure vehicle is on leveled ground.
______________
105
Summary of Contents for SPYDER F3TM 2016
Page 10: ...GENERAL PRECAUTIONS This page is intentionally blank 8 _______________ ...
Page 11: ...VEHICLE INFORMATION _______________ 9 ...
Page 39: ...SAFE OPERATING INSTRUCTIONS ______ SAFE OPERATING INSTRUCTIONS ______ 37 ...
Page 87: ...PRE RIDE INSPECTION _______________ 85 ...
Page 90: ...PRE RIDE CHECKLIST This page is intentionally blank 88 ______________ ...
Page 91: ...MAINTENANCE _______________ 89 ...
Page 113: ...ROAD SIDE REPAIRS ______________ 111 ...
Page 133: ...TECHNICAL INFORMATION ______________ 131 ...
Page 144: ...SPECIFICATIONS This page is intentionally blank 142 ______________ ...
Page 145: ...WARRANTY ______________ 143 ...
Page 160: ...This page is intentionally blank 158 ______________ ...
Page 161: ...CUSTOMER INFORMATION ______________ 159 ...
Page 164: ...CHANGE OF ADDRESS OWNERSHIP This page is intentionally blank 162 ______________ ...
Page 165: ...CHANGE OF ADDRESS OWNERSHIP ______________ 163 ...
Page 166: ...CHANGE OF ADDRESS OWNERSHIP This page is intentionally blank 164 ______________ ...
Page 167: ...CHANGE OF ADDRESS OWNERSHIP ______________ 165 ...
Page 168: ...CHANGE OF ADDRESS OWNERSHIP This page is intentionally blank 166 ______________ ...
Page 169: ...CHANGE OF ADDRESS OWNERSHIP NOTES ______________ 167 ...
Page 170: ...CHANGE OF ADDRESS OWNERSHIP NOTES 168 ______________ ...


