

83
VENUS - GIOIA
EN
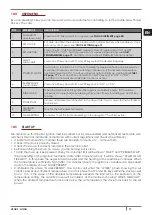
11.9
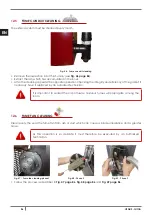
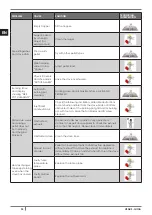
”FAILURE DEPRESS” ALARM
To the boiler is connected a pressostat which control the depression and in some stove models on the fire
door id installed a microswitch which registers the opening.
“ACTIVE ALARM” “AL 8 - FAILURE DEPRESS”: the pressostat and/or fire door which is not correctly closed
stops the power supply to the auger.
• Reset the error with P4 key. The stove carries out the phase “FINAL CLEANING” and then is in “OFF”.
• Check the type of glitch as
ALARMS page 90
.
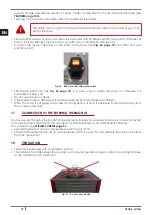
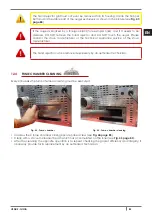
• Unscrew the black cap, press the button and screw the cap again.
• Clean the burning pot and start the stove up again with P4 key.
11.10
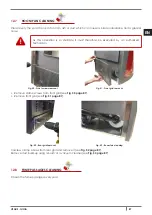
”OPEN DOOR” ALARM
On the lower part of the fire door is installed a microswitch which detects the opening.
“ACTIVE ALARM” “AL 9 - OPEN DOOR”: it means that the fire door is not correctly closed.
• Reset the error pressing P4 key. The stove carries out a “FINAL CLEANING” and “OFF” appears.
• Check the type of failure as shown on
ALARMS page 90
.
• Clean the burning pot and start the stove up again pressing P4 key.
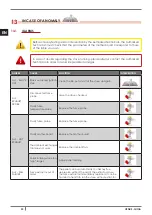
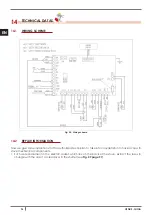
12
MAINTEINANCE
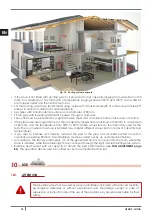
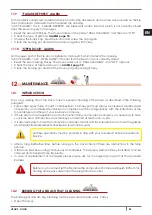
12.1
INTRODUCTION
For a long working life of the stove, have a periodic cleaning of the stove as described in the following
paragrafs.
•
Fume outlet pipes (fume c chimney flue + chimney pot) must always be cleaned, scrubbed and
checked by an authorized technician in compliance with local regulations, with the instructions of the
manufacturer and those of your insurance company.
• If there are no local regulations and no instruction from your insurance company, it is necessary to have
your fume pipe, chimney flue and chimney pot cleaned at least once a year.
• It is also necessary to have the combustion chamber, motors and fans cleaned and to have the gaskets
and the electronical elements checked at least once a year.
All these operations must be planned in time with your Autorized Technical Assistance
Service.
• After a long ineffective time, before turning on the stove check if there are obstructions in the fume
exhaust.
• If the stove had been using continuously and intensely, the whole system (chimney included), must be
cleaned and checked more frequently.
• In case of replacement of damaged pieces please ask for the original spare part at the Autorized
Retailer.
Before any movement let the fire inside the combustion chamber extinguish till the total
cooling and always disconnect the plug from the socket.
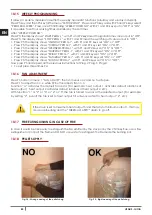
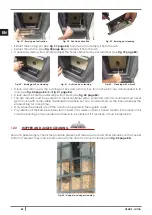
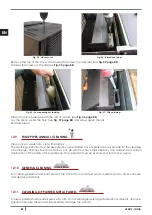
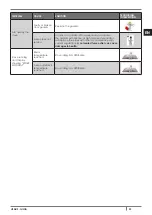
12.2
BURNING POT AND ASH TRAY CLEANING
The burning pot and ash tray cleaning must be executed at least every 2 days.
• Open the door.
Summary of Contents for VENUS
Page 2: ......
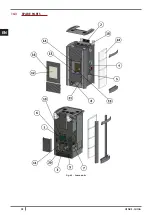
Page 49: ...49 VENUS GIOIA IT 14 3 RICAMBI Fig 60 Ricambi...
Page 52: ...52 VENUS GIOIA IT 14 4 DICHIARAZIONE DI CONFORMIT Fig 61 Dichiarazione di Conformit...
Page 98: ...98 VENUS GIOIA EN 14 3 SPARE PARTS Fig 60 Spare parts...
Page 101: ...101 VENUS GIOIA EN 14 5 DECLARATION OF CONFORMITY Fig 61 Declaration of Conformity...
Page 148: ...148 VENUS GIOIA FR 14 3 PI CES D TACH ES Fig 60 Pi ces d tach es...
Page 151: ...151 VENUS GIOIA FR 14 5 D CLARATION DE CONFORMIT Fig 61 D claration de Conformit...
Page 197: ...197 VENUS GIOIA ES 14 3 REPUESTOS Fig 60 Repuestos...
Page 200: ...200 VENUS GIOIA ES 14 5 DECLARACI N DE CONFORMEDAD Fig 61 Declaraci n de conformedad...
Page 247: ...247 VENUS GIOIA NL 14 3 RESERVEONDERDELEN Fig 60 Reserveinderdelen...
Page 250: ...250 VENUS GIOIA NL 14 5 CONFORMITEITSVERKLARING Fig 61 Conformiteitsverklaring...
Page 297: ...297 VENUS GIOIA PT 14 3 PE AS SOBRESSALENTES Fig 60 Pe as sobressalentes...
Page 300: ...300 VENUS GIOIA PT 14 5 DECLARA O DE CONFORMIDADE Fig 61 Declara o de conformidade...
Page 302: ...302 VENUS GIOIA EL 1 MANUAL...
Page 305: ...305 VENUS GIOIA EL 7 2 Fig 2 LEGEND Fig 2 305 1 2 3 4 5 3 5 mt Fig 2 305 1 2 3 u 4...
Page 307: ...307 VENUS GIOIA EL Fig 4 7 4 350 3 5 meters 7 5 7 6 Fig 5 Fig 5 307 Fig 3 306...
Page 308: ...308 VENUS GIOIA EL 7 7 Fig 6 LEGEND Fig 6 308 1 2 3 4 5 6 7 8 9 10...
Page 312: ...312 VENUS GIOIA EL 7 11 Fig 10 1 LEGEND Fig 10 312 1 2 100 80 mm 3 4 0 5 mt 120 mm Fig 11 2...
Page 319: ...319 VENUS GIOIA EL Fig 23 Fig 24 2 Fig 23 319 Fig 24 319 Fig 25 Fig 25 319 9 6 350...
Page 323: ...323 VENUS GIOIA EL 10 10 1 10 2 1 2 pellet 1 5...
Page 333: ...333 VENUS GIOIA EL 12 12 1 12 2 2 Fig 37 Fig 38 Fig 39 Fig 37 333 Fig 38 333 Fig 39 333...
Page 335: ...335 VENUS GIOIA EL 12 4 4 8 Fig 44 Fig 45 2 Fig 44 335 Fig 45 335 12 5 Fig 46...
Page 339: ...339 VENUS GIOIA EL 12 13 12 14 700 C...
Page 341: ...341 VENUS GIOIA EL AL 5 NO IGNITION Pellet pellets AL 6 NO PELLET AL 7 THERMAL SAFETY...
Page 342: ...342 VENUS GIOIA EL AL 8 FAILURE DEPRESS pellets 304 AL 9 OPEN DOOR...
Page 343: ...343 VENUS GIOIA EL 13 2 4A 250V pellet ACTIVE ALARM...
Page 345: ...345 VENUS GIOIA EL WORK MODULATI...
Page 346: ...346 VENUS GIOIA EL 14 14 1 WIRING SCHEME Fig 58 Wiring scheme 14 2 Fig 59 347...
Page 347: ...347 VENUS GIOIA EL Fig 59 Fig 60 348 3 5 8 7 10 9 6 1 4 3 3 2...
Page 348: ...348 VENUS GIOIA EL 14 3 Fig 60...
Page 351: ...351 VENUS GIOIA EL 14 5 Fig 61...