

66
VENUS - GIOIA
EN
• Check with local authorities if there are any restrictive regulations which regard the combustible air inlet,
room ventilation, fume exhaust system together with chimney flue and chimney pot.
• The manufacturer declines any responsibility in case of installation which are not in compliance with
current regulations, in case of a wrong room ventilation system, in case of an electric connection which
is not in compliance with regulations and in case of a wrong use of the appliance.
• The installation must be executed by an authorized technician, who must release to the user a declaration
of conformity of the system and will assume the whole responsibility on the final installation and on the
resulting good running of the product.
• As equipment with the stove there is a testing and maintenance manual which must be periodically
executed by the installer.
• Check if there is the combustible air inlet.
• Check the probable presence of other stoves or appliances which could depress the room (see
EXTERNAL AIR INLET page 61
).
• Check at switched on stove if there is the presence of CO in the room.
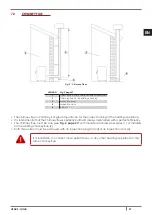
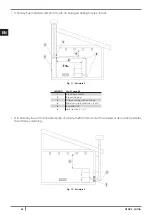
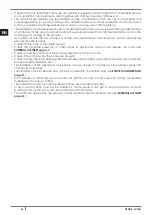
• Check if the chimney has the necessary draught.
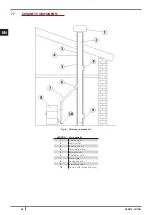
• Check if during the fume passage all has been executed in safety (probable fume losses and distances
from flammable materials, etc.…).
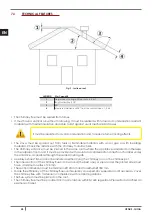
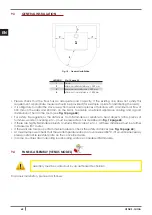
• The installation of the appliance must enable an easy access for appliance, fume exhaust pipes and
chimney flue cleaning.
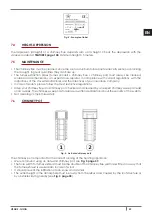
• The installation must enable en easy access to the electric connection plug (see
ELECTRIC CONNECTION
page 71
).
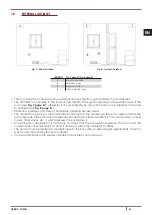
• It is forbidden to install the stove in bedrooms, bathrooms and in rooms used for storing combustible
materials and in one-room flats.
•
The installation in one-room flats is allowed if they are in sealed chamber.
• In any case the stove must not be installed in rooms where it can get in touch with water or water
splashes because this can cause burn hazards and short-circuit.
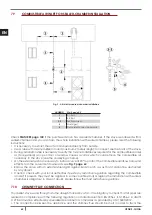
• To install more appliances, the external air inlet must be correctly dimensioned (see
EXTERNAL AIR INLET
page 61
).
Summary of Contents for VENUS
Page 2: ......
Page 49: ...49 VENUS GIOIA IT 14 3 RICAMBI Fig 60 Ricambi...
Page 52: ...52 VENUS GIOIA IT 14 4 DICHIARAZIONE DI CONFORMIT Fig 61 Dichiarazione di Conformit...
Page 98: ...98 VENUS GIOIA EN 14 3 SPARE PARTS Fig 60 Spare parts...
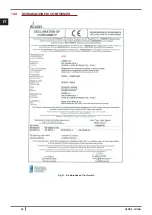
Page 101: ...101 VENUS GIOIA EN 14 5 DECLARATION OF CONFORMITY Fig 61 Declaration of Conformity...
Page 148: ...148 VENUS GIOIA FR 14 3 PI CES D TACH ES Fig 60 Pi ces d tach es...
Page 151: ...151 VENUS GIOIA FR 14 5 D CLARATION DE CONFORMIT Fig 61 D claration de Conformit...
Page 197: ...197 VENUS GIOIA ES 14 3 REPUESTOS Fig 60 Repuestos...
Page 200: ...200 VENUS GIOIA ES 14 5 DECLARACI N DE CONFORMEDAD Fig 61 Declaraci n de conformedad...
Page 247: ...247 VENUS GIOIA NL 14 3 RESERVEONDERDELEN Fig 60 Reserveinderdelen...
Page 250: ...250 VENUS GIOIA NL 14 5 CONFORMITEITSVERKLARING Fig 61 Conformiteitsverklaring...
Page 297: ...297 VENUS GIOIA PT 14 3 PE AS SOBRESSALENTES Fig 60 Pe as sobressalentes...
Page 300: ...300 VENUS GIOIA PT 14 5 DECLARA O DE CONFORMIDADE Fig 61 Declara o de conformidade...
Page 302: ...302 VENUS GIOIA EL 1 MANUAL...
Page 305: ...305 VENUS GIOIA EL 7 2 Fig 2 LEGEND Fig 2 305 1 2 3 4 5 3 5 mt Fig 2 305 1 2 3 u 4...
Page 307: ...307 VENUS GIOIA EL Fig 4 7 4 350 3 5 meters 7 5 7 6 Fig 5 Fig 5 307 Fig 3 306...
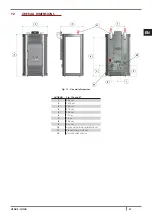
Page 308: ...308 VENUS GIOIA EL 7 7 Fig 6 LEGEND Fig 6 308 1 2 3 4 5 6 7 8 9 10...
Page 312: ...312 VENUS GIOIA EL 7 11 Fig 10 1 LEGEND Fig 10 312 1 2 100 80 mm 3 4 0 5 mt 120 mm Fig 11 2...
Page 319: ...319 VENUS GIOIA EL Fig 23 Fig 24 2 Fig 23 319 Fig 24 319 Fig 25 Fig 25 319 9 6 350...
Page 323: ...323 VENUS GIOIA EL 10 10 1 10 2 1 2 pellet 1 5...
Page 333: ...333 VENUS GIOIA EL 12 12 1 12 2 2 Fig 37 Fig 38 Fig 39 Fig 37 333 Fig 38 333 Fig 39 333...
Page 335: ...335 VENUS GIOIA EL 12 4 4 8 Fig 44 Fig 45 2 Fig 44 335 Fig 45 335 12 5 Fig 46...
Page 339: ...339 VENUS GIOIA EL 12 13 12 14 700 C...
Page 341: ...341 VENUS GIOIA EL AL 5 NO IGNITION Pellet pellets AL 6 NO PELLET AL 7 THERMAL SAFETY...
Page 342: ...342 VENUS GIOIA EL AL 8 FAILURE DEPRESS pellets 304 AL 9 OPEN DOOR...
Page 343: ...343 VENUS GIOIA EL 13 2 4A 250V pellet ACTIVE ALARM...
Page 345: ...345 VENUS GIOIA EL WORK MODULATI...
Page 346: ...346 VENUS GIOIA EL 14 14 1 WIRING SCHEME Fig 58 Wiring scheme 14 2 Fig 59 347...
Page 347: ...347 VENUS GIOIA EL Fig 59 Fig 60 348 3 5 8 7 10 9 6 1 4 3 3 2...
Page 348: ...348 VENUS GIOIA EL 14 3 Fig 60...
Page 351: ...351 VENUS GIOIA EL 14 5 Fig 61...


