
62
VENUS - GIOIA
EN
7.9
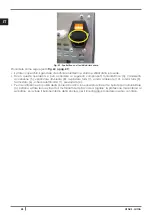
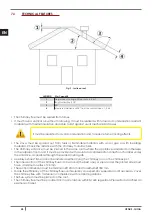
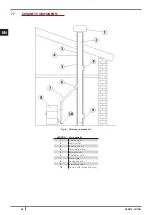
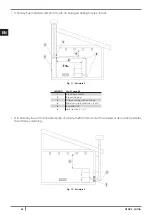
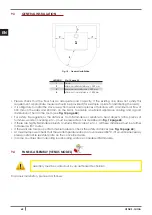
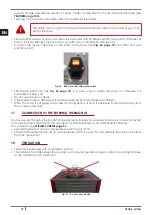
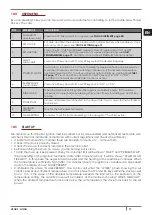
COMBUSTIBLE AIR INLET FOR SEALED-CHAMBER INSTALLATION
Fig. 9 -
Air inlet for sealed-chamber installation
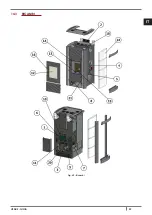
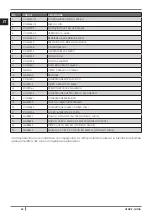
LEGEND
Fig. 9 page 62
1
≥ 1,5 mt
2
≥ 0,3 mt
3-3
Sectional view
4
Shield grid
5
Curve inlet to turn downwards
Check
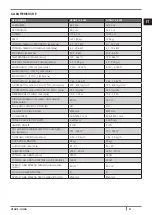
FEATURES page 100
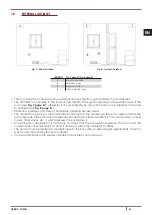
if the purchased stove has a sealed-chamber. If the stove is endowed with a
sealed-chamber and you want also the whole installation with sealed chamber, please read the following
instructions:
• It is necessary to extract the air for combustion directly from outside.
• Use a tube with minimum Ø60 mm and maximum 2 meters lenght; to connect see the back of the stove.
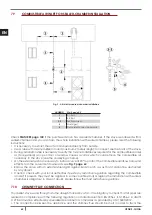
• During installation step is necessary to verify the minimum distances required for the combustible air inlet
as (for example) an open door or window causes a vortex which could remove the combustible air
necessary to the stove (see the underlying scheme).
•
On the external wall it is necessary to install a curve at 90° to protect the combustible air inflow from wind
effects: turn the curve inlet downwards, see
Fig. 9 page 62
.
• Endow the curve with an external shield grid against birds in such a way that it cannot be obstructed
by any object.
• Caution: check with your local authorities if exists any restrictive regulation regarding the combustible
air inlet: if present, they must be applied. In some countries and/or regions the installation with sealed-
chamber is obligatory: in case of doubt, please follow the most restrictive regulations.
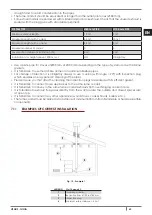
7.10
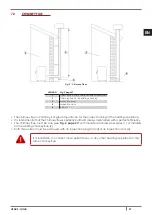
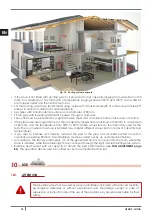
CHIMNEY FLUE CONNECTION
Your pellet stove works through a fume draught forced by a fan. It is obligatory to check that all pipes are
realized in compliance with the following regulation on material selection: EN 1856-1, EN 1856-2 e UNI/TS
11278. All must be effected by specialized personnel or companies as provided by UNI 10683:2012.
•
The connection between the appliance and the chimney flue should be short in order to favor the
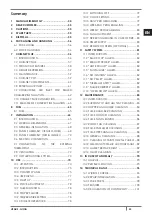
Summary of Contents for VENUS
Page 2: ......
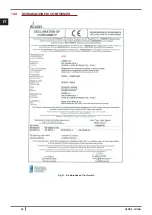
Page 49: ...49 VENUS GIOIA IT 14 3 RICAMBI Fig 60 Ricambi...
Page 52: ...52 VENUS GIOIA IT 14 4 DICHIARAZIONE DI CONFORMIT Fig 61 Dichiarazione di Conformit...
Page 98: ...98 VENUS GIOIA EN 14 3 SPARE PARTS Fig 60 Spare parts...
Page 101: ...101 VENUS GIOIA EN 14 5 DECLARATION OF CONFORMITY Fig 61 Declaration of Conformity...
Page 148: ...148 VENUS GIOIA FR 14 3 PI CES D TACH ES Fig 60 Pi ces d tach es...
Page 151: ...151 VENUS GIOIA FR 14 5 D CLARATION DE CONFORMIT Fig 61 D claration de Conformit...
Page 197: ...197 VENUS GIOIA ES 14 3 REPUESTOS Fig 60 Repuestos...
Page 200: ...200 VENUS GIOIA ES 14 5 DECLARACI N DE CONFORMEDAD Fig 61 Declaraci n de conformedad...
Page 247: ...247 VENUS GIOIA NL 14 3 RESERVEONDERDELEN Fig 60 Reserveinderdelen...
Page 250: ...250 VENUS GIOIA NL 14 5 CONFORMITEITSVERKLARING Fig 61 Conformiteitsverklaring...
Page 297: ...297 VENUS GIOIA PT 14 3 PE AS SOBRESSALENTES Fig 60 Pe as sobressalentes...
Page 300: ...300 VENUS GIOIA PT 14 5 DECLARA O DE CONFORMIDADE Fig 61 Declara o de conformidade...
Page 302: ...302 VENUS GIOIA EL 1 MANUAL...
Page 305: ...305 VENUS GIOIA EL 7 2 Fig 2 LEGEND Fig 2 305 1 2 3 4 5 3 5 mt Fig 2 305 1 2 3 u 4...
Page 307: ...307 VENUS GIOIA EL Fig 4 7 4 350 3 5 meters 7 5 7 6 Fig 5 Fig 5 307 Fig 3 306...
Page 308: ...308 VENUS GIOIA EL 7 7 Fig 6 LEGEND Fig 6 308 1 2 3 4 5 6 7 8 9 10...
Page 312: ...312 VENUS GIOIA EL 7 11 Fig 10 1 LEGEND Fig 10 312 1 2 100 80 mm 3 4 0 5 mt 120 mm Fig 11 2...
Page 319: ...319 VENUS GIOIA EL Fig 23 Fig 24 2 Fig 23 319 Fig 24 319 Fig 25 Fig 25 319 9 6 350...
Page 323: ...323 VENUS GIOIA EL 10 10 1 10 2 1 2 pellet 1 5...
Page 333: ...333 VENUS GIOIA EL 12 12 1 12 2 2 Fig 37 Fig 38 Fig 39 Fig 37 333 Fig 38 333 Fig 39 333...
Page 335: ...335 VENUS GIOIA EL 12 4 4 8 Fig 44 Fig 45 2 Fig 44 335 Fig 45 335 12 5 Fig 46...
Page 339: ...339 VENUS GIOIA EL 12 13 12 14 700 C...
Page 341: ...341 VENUS GIOIA EL AL 5 NO IGNITION Pellet pellets AL 6 NO PELLET AL 7 THERMAL SAFETY...
Page 342: ...342 VENUS GIOIA EL AL 8 FAILURE DEPRESS pellets 304 AL 9 OPEN DOOR...
Page 343: ...343 VENUS GIOIA EL 13 2 4A 250V pellet ACTIVE ALARM...
Page 345: ...345 VENUS GIOIA EL WORK MODULATI...
Page 346: ...346 VENUS GIOIA EL 14 14 1 WIRING SCHEME Fig 58 Wiring scheme 14 2 Fig 59 347...
Page 347: ...347 VENUS GIOIA EL Fig 59 Fig 60 348 3 5 8 7 10 9 6 1 4 3 3 2...
Page 348: ...348 VENUS GIOIA EL 14 3 Fig 60...
Page 351: ...351 VENUS GIOIA EL 14 5 Fig 61...